


소개
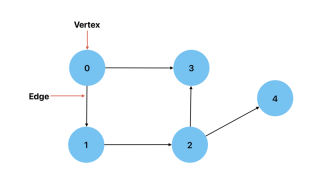
그래프는 다수의 꼭짓점(노드)과 그 사이에 있는 모서리(연결)로 이루어진 데이터 구조입니다.
트리는 그래프의 예입니다. 모든 트리는 그래프이지만 모든 그래프가 트리는 아닙니다. 예를 들어 주기가 있는 그래프는 트리가 아닙니다. 트리에는 두 노드 사이에 하나의 루트와 하나의 고유 경로가 있는 반면, 그래프에는 정점 사이에 많은 루트와 여러 경로가 있을 수 있습니다.
기본 용어
정점: 그래프의 노드입니다.
Edge: 두 정점 사이의 연결입니다.
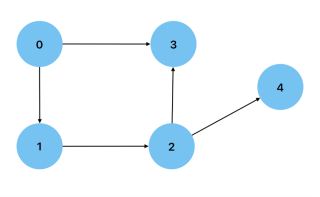
방향: 두 정점 사이의 연결에 방향이 있는 경우. 이는 한 꼭지점에서 다른 꼭지점으로 이동하는 방법이 한 가지뿐임을 의미합니다. 도시(정점)와 도시 사이의 경로(가장자리)를 보여주는 그래프를 예로 들 수 있습니다.
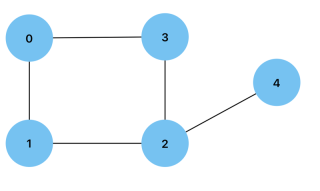
무방향: 그래프의 두 꼭지점 사이의 연결이 양방향으로 가는 경우. 우정으로 연결된 사람(정점)을 보여주는 그래프를 예로 들 수 있습니다.
차수: 정점에 연결된 가장자리의 수입니다. 유향 그래프의 정점은 내각 또는 외차를 가질 수 있습니다. 이는 각각 정점을 향하는 모서리와 정점에서 멀어지는 모서리의 수입니다.
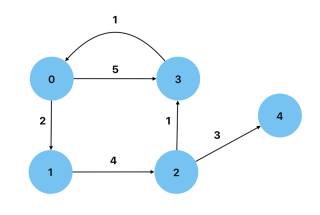
가중치: 간선에 가중치 값이 있는 그래프입니다. 노드 간 거리가 가중치로 표시되는 로드맵을 예로 들 수 있습니다.
순환: 하나 이상의 꼭지점에서 자신에게로 돌아가는 경로가 있는 그래프.
비순환: 주기가 없는 그래프, 즉 어떤 노드도 자신에게 돌아갈 경로가 없습니다. 방향성 비순환 그래프는 데이터 처리 흐름을 표시하는 데 사용할 수 있는 그래프 유형입니다.
밀도: 그래프의 가장자리 수가 최대 가능한 가장자리 수에 가까울 때
희소: 그래프에 가능한 최소 모서리 수에 가까운 경우.
자체 루프: 가장자리에 자신과 연결된 정점이 하나 있는 경우.
다중 간선: 그래프의 두 꼭짓점 사이에 여러 간선이 있는 경우.
단순: 그래프에 자체 루프나 다중 간선이 없는 경우
간단한 유향 그래프에서 최대 간선 수를 얻으려면: n*(n-1) 여기서 n은 노드 수입니다.
간단한 무방향 그래프에서 최대 간선 수를 얻으려면: n*(n-1)/2 여기서 n은 노드 수입니다.
JavaScript로 그래프 구현
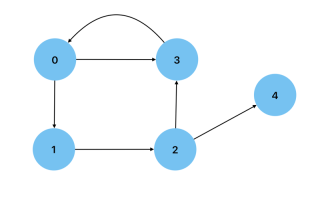
그래프를 구현하려면 그래프의 정점과 가장자리를 지정하는 것부터 시작할 수 있습니다. 아래는 다음 그래프에서 이를 수행하는 방법에 대한 예입니다.
const vertices = ["A", "B", "C", "D", "E"];

const edges = [
  ["A", "B"],
  ["A", "D"],
  ["B", "D"],
  ["B", "E"],
  ["C", "D"],
  ["D", "E"],
];
그런 다음 주어진 꼭짓점에 인접한 것을 찾는 함수를 만들 수 있습니다.
const findAdjacentNodes = function (node) {
  const adjacentNodes = [];
  for (let edge of edges) {
    const nodeIndex = edge.indexOf(node);
    if (nodeIndex > -1) {
      let adjacentNode = nodeIndex === 0 ? edge[1] : edge[0];
      adjacentNodes.push(adjacentNode);
    }
  }
  return adjacentNodes;
};
그리고 두 정점이 연결되어 있는지 확인하는 또 다른 기능:
const isConnected = function (node1, node2) {
  const adjacentNodes = new Set(findAdjacentNodes(node1));
  return adjacentNodes.has(node2);
};
인접 목록
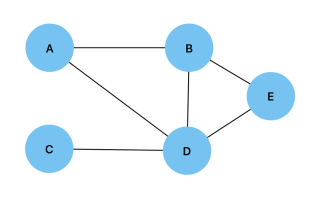
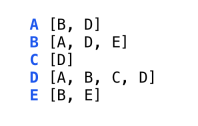
인접 리스트는 노드에 연결된 모든 꼭지점을 리스트로 저장한 그래프를 표현한 것입니다. 아래는 해당 인접 목록의 그래프와 시각적 표현입니다.
인접 목록은 Node 클래스와 Graph 클래스라는 두 개의 클래스를 생성하여 JavaScript로 구현할 수 있습니다. Node 클래스는 생성자와 두 정점을 결합하는 connect() 메서드로 구성됩니다. 또한 위에 표시된 것과 정확히 동일한 방식으로 작동하는 isConnected() 및 getAdjacentNodes() 메서드도 있습니다.
class Node {
  constructor(value) {
    this.value = value;
    this.edgesList = [];
  }
  connect(node) {
    this.edgesList.push(node);
    node.edgesList.push(this);
  }
  getAdjNodes() {
    return this.edgesList.map((edge) => edge.value);
  }
  isConnected(node) {
    return this.edgesList.map((edge) =>
    edge.value).indexOf(node.value) > -1;
  }
}
그래프 클래스는 생성자와 그래프에 새 정점을 추가하는 addToGraph() 메서드로 구성됩니다.
class Graph {
  constructor(nodes) {
    this.nodes = [...nodes];
  }
  addToGraph(node) {
    this.nodes.push(node);
  }
}
Adjacency Matrix
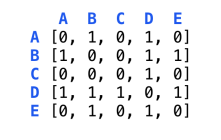
A 2-D array where each array represents a vertex and each index represents a possible connection between vertices. An adjacency matrix is filled with 0s and 1s, with 1 representing a connection. The value at adjacencyMatrix[node1][node2] will show whether or not there is a connection between the two specified vertices. Below is is a graph and its visual representation as an adjacency matrix.
To implement this adjacency matrix in JavaScript, we start by creating two classes, the first being the Node class:
class Node {
  constructor(value) {
    this.value = value;
  }
}
We then create the Graph class which will contain the constructor for creating the 2-D array initialized with zeros.
class Graph {
  constructor(nodes) {
    this.nodes = [...nodes];
    this.adjacencyMatrix = Array.from({ length: nodes.length },
    () => Array(nodes.length).fill(0));
   }
}
We will then add the addNode() method which will be used to add new vertices to the graph.
  addNode(node) {
    this.nodes.push(node);
    this.adjacencyMatrix.forEach((row) => row.push(0));
    this.adjacencyMatrix.push(new Array(this.nodes.length).fill(0));
  }
Next is the connect() method which will add an edge between two vertices.
  connect(node1, node2) {
    const index1 = this.nodes.indexOf(node1);
    const index2 = this.nodes.indexOf(node2);

    if (index1 > -1 && index2 > -1) {
      this.adjacencyMatrix[index1][index2] = 1;
      this.adjacencyMatrix[index2][index1] = 1;
    }
  }
We will also create the isConnected() method which can be used to check if two vertices are connected.
  isConnected(node1, node2) {
    const index1 = this.nodes.indexOf(node1);
    const index2 = this.nodes.indexOf(node2);

    if (index1 > -1 && index2 > -1) {
      return this.adjacencyMatrix[index1][index2] === 1;
    }
    return false;
  }
Lastly we will add the printAdjacencyMatrix() method to the Graph class.
  printAdjacencyMatrix() {
    console.log(this.adjacencyMatrix);
  }
Breadth First Search
Similar to a Breadth First Search in a tree, the vertices adjacent to the current vertex are visited before visiting any subsequent children. A queue is the data structure of choice when performing a Breadth First Search on a graph.
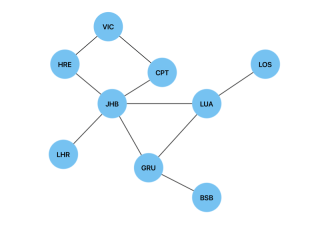
Below is a graph of international airports and their connections and we will use a Breadth First Search to find the shortest route(path) between two airports(vertices).
In order to implement this search algorithm in JavaScript, we will use the same Node and Graph classes we implemented the adjacency list above. We will create a breadthFirstTraversal() method and add it to the Graph class in order to traverse between two given vertices. This method will have the visitedNodes object, which will be used to store the visited vertices and their predecessors. It is initiated as null to show that the first vertex in our search has no predecessors.
breathFirstTraversal(start, end) {
    const queue = [start];
    const visitedNodes = {};
    visitedNodes[start.value] = null;

    while (queue.length > 0) {
      const node = queue.shift();

      if (node.value === end.value) {
        return this.reconstructedPath(visitedNodes, end);
      }
      for (const adjacency of node.edgesList) {
        if (!visitedNodes.hasOwnProperty(adjacency.value)) {
          visitedNodes[adjacency.value] = node;
          queue.push(adjacency);
        }
      }
    }
  }
Once the end vertex is found, we will use the reconstructedPath() method in the Graph class in order to return the shortest path between two vertices. Each vertex is added iteratively to the shortestPath array, which in turn must be reversed in order to come up with the correct order for the shortest path.
reconstructedPath(visitedNodes, endNode) {
    let currNode = endNode;

    const shortestPath = [];

    while (currNode !== null) {
      shortestPath.push(currNode.value);
      currNode = visitedNodes[currNode.value];
    }
    return shortestPath.reverse();
  }
In the case of the graph of international airports, breathFirstTraversal(JHB, LOS) will return JHB -> LUA -> LOS as the shortest path. In the case of a weighted graph, we would use Dijkstra's algorithm to find the shortest path.
Depth First Search
Similar to a depth first search in a tree, this algorithm will fully explore every descendant of a vertex, before backtracking to the root. A stack is the data structure of choice for depth first traversals in a graph.
A depth first search can be used to detect a cycle in a graph. We will use the same graph of international airports to illustrate this in JavaScript.
Similar to the Breadth First Search algorithm above, this implementation of a Depth First Search algorithm in JavaScript will use the previously created Node and Graph classes. We will create a helper function called depthFirstTraversal() and add it to the Graph class.
  depthFirstTraversal(start, visitedNodes = {}, parent = null) {
    visitedNodes[start.value] = true;

    for (const adjacency of start.edgesList) {
      if (!visitedNodes[adjacency.value]) {
        if (this.depthFirstTraversal(adjacency, visitedNodes, start)) {
          return true;
        }
      } else if (adjacency !== parent) {
        return true;
      }
    }

    return false;
  }
This will perform the Depth First Traversal of the graph, using the parent parameter to keep track of the previous vertex and prevent the detection of a cycle when revisiting the parent vertex. Visited vertices will be marked as true in the visitedNodes object. This method will then use recursion to visit previously unvisited vertices. If the vertex has already been visited, we check it against the parent parameter. A cycle has been found if the vertex has already been visited and it is not the parent.
We will also create the wrapper function hasCycle() in the Graph class. This function is used to detect a cycle in a disconnected graph. It will initialize the visitedNodes object and loop through all of the vertices in the graph.
hasCycle() {
    const visitedNodes = {};

    for (const node of this.nodes) {
      if (!visitedNodes[node.value]) {
        if (this.depthFirstTraversal(node, visitedNodes)) {
          return true;
        }
      }
    }
    return false;
  }
In the case of the graph of international airports, the code will return true.
Depth First Traversal of a graph is also useful for pathfinding(not necessarily shortest path) and for solving mazes.
Kesimpulan
Pemahaman yang kukuh tentang graf sebagai struktur data dan algoritma yang berkaitan dengannya amat diperlukan apabila melanjutkan kajian tentang struktur dan algoritma data. Walaupun tidak mesra pemula seperti siaran sebelumnya dalam siri ini, panduan ini sepatutnya berguna untuk memperdalam pemahaman anda tentang struktur data dan algoritma.
위 내용은 데이터 구조 및 알고리즘: 그래프의 상세 내용입니다. 자세한 내용은 PHP 중국어 웹사이트의 기타 관련 기사를 참조하세요!

 JavaScript 데이터 유형 : 브라우저와 Nodejs 사이에 차이가 있습니까?May 14, 2025 am 12:15 AM
JavaScript 코어 데이터 유형은 브라우저 및 Node.js에서 일관되지만 추가 유형과 다르게 처리됩니다. 1) 글로벌 객체는 브라우저의 창이고 node.js의 글로벌입니다. 2) 이진 데이터를 처리하는 데 사용되는 Node.js의 고유 버퍼 객체. 3) 성능 및 시간 처리에는 차이가 있으며 환경에 따라 코드를 조정해야합니다.
 JavaScript 댓글 : / / * * /사용 안내서May 13, 2025 pm 03:49 PM
javaScriptUSTWOTYPESOFSOFCOMMENTS : 단일 라인 (//) 및 multi-line (//)
 Python vs. JavaScript : 개발자를위한 비교 분석May 09, 2025 am 12:22 AM
Python과 JavaScript의 주요 차이점은 유형 시스템 및 응용 프로그램 시나리오입니다. 1. Python은 과학 컴퓨팅 및 데이터 분석에 적합한 동적 유형을 사용합니다. 2. JavaScript는 약한 유형을 채택하며 프론트 엔드 및 풀 스택 개발에 널리 사용됩니다. 두 사람은 비동기 프로그래밍 및 성능 최적화에서 고유 한 장점을 가지고 있으며 선택할 때 프로젝트 요구 사항에 따라 결정해야합니다.
 Python vs. JavaScript : 작업에 적합한 도구 선택May 08, 2025 am 12:10 AM
Python 또는 JavaScript를 선택할지 여부는 프로젝트 유형에 따라 다릅니다. 1) 데이터 과학 및 자동화 작업을 위해 Python을 선택하십시오. 2) 프론트 엔드 및 풀 스택 개발을 위해 JavaScript를 선택하십시오. Python은 데이터 처리 및 자동화 분야에서 강력한 라이브러리에 선호되는 반면 JavaScript는 웹 상호 작용 및 전체 스택 개발의 장점에 없어서는 안될 필수입니다.
 파이썬 및 자바 스크립트 : 각각의 강점을 이해합니다May 06, 2025 am 12:15 AM
파이썬과 자바 스크립트는 각각 고유 한 장점이 있으며 선택은 프로젝트 요구와 개인 선호도에 따라 다릅니다. 1. Python은 간결한 구문으로 데이터 과학 및 백엔드 개발에 적합하지만 실행 속도가 느립니다. 2. JavaScript는 프론트 엔드 개발의 모든 곳에 있으며 강력한 비동기 프로그래밍 기능을 가지고 있습니다. node.js는 풀 스택 개발에 적합하지만 구문은 복잡하고 오류가 발생할 수 있습니다.
 JavaScript의 핵심 : C 또는 C에 구축 되었습니까?May 05, 2025 am 12:07 AM
javaScriptisNotBuiltoncorc; it'SangretedLanguageThatrunsonOngineStenWrittenInc .1) javaScriptWasDesignEdasAlightweight, 해석 hanguageforwebbrowsers.2) Endinesevolvedfromsimpleplemporectreterstoccilpilers, 전기적으로 개선된다.
 JavaScript 응용 프로그램 : 프론트 엔드에서 백엔드까지May 04, 2025 am 12:12 AM
JavaScript는 프론트 엔드 및 백엔드 개발에 사용할 수 있습니다. 프론트 엔드는 DOM 작업을 통해 사용자 경험을 향상시키고 백엔드는 Node.js를 통해 서버 작업을 처리합니다. 1. 프론트 엔드 예 : 웹 페이지 텍스트의 내용을 변경하십시오. 2. 백엔드 예제 : node.js 서버를 만듭니다.
 Python vs. JavaScript : 어떤 언어를 배워야합니까?May 03, 2025 am 12:10 AM
Python 또는 JavaScript는 경력 개발, 학습 곡선 및 생태계를 기반으로해야합니다. 1) 경력 개발 : Python은 데이터 과학 및 백엔드 개발에 적합한 반면 JavaScript는 프론트 엔드 및 풀 스택 개발에 적합합니다. 2) 학습 곡선 : Python 구문은 간결하며 초보자에게 적합합니다. JavaScript Syntax는 유연합니다. 3) 생태계 : Python에는 풍부한 과학 컴퓨팅 라이브러리가 있으며 JavaScript는 강력한 프론트 엔드 프레임 워크를 가지고 있습니다.


핫 AI 도구

Undresser.AI Undress
사실적인 누드 사진을 만들기 위한 AI 기반 앱

AI Clothes Remover
사진에서 옷을 제거하는 온라인 AI 도구입니다.

Undress AI Tool
무료로 이미지를 벗다

Clothoff.io
AI 옷 제거제

Video Face Swap
완전히 무료인 AI 얼굴 교환 도구를 사용하여 모든 비디오의 얼굴을 쉽게 바꾸세요!

인기 기사
뜨거운 도구

SublimeText3 영어 버전
권장 사항: Win 버전, 코드 프롬프트 지원!

에디트플러스 중국어 크랙 버전
작은 크기, 구문 강조, 코드 프롬프트 기능을 지원하지 않음

VSCode Windows 64비트 다운로드
Microsoft에서 출시한 강력한 무료 IDE 편집기

Dreamweaver Mac版
시각적 웹 개발 도구

Atom Editor Mac 버전 다운로드
가장 인기 있는 오픈 소스 편집기

