Windows 11 및 10에서 업데이트 캐시를 지우는 방법
- PHPz원래의
- 2024-06-19 07:06:391362검색
Windows 11과 Windows 10 모두 Windows 업데이트 캐시를 매우 쉽게 지울 수 있습니다. 그래픽 방법이나 명령줄 옵션을 사용하여 저장된 업데이트 파일을 삭제할 수 있습니다. 사용 가능한 옵션을 보여드리겠습니다.
Windows 업데이트 캐시를 지워야 하는 이유는 무엇입니까?
Windows 업데이트 캐시를 지우고 싶은 데는 여러 가지 이유가 있습니다.
업데이트를 찾거나 설치하는 데 문제가 있을 수 있으며 캐시를 지우면 문제가 해결되는 경우가 많습니다. 캐시를 지우면 Windows에서 필요한 모든 파일을 다시 다운로드하도록 하여 Windows 업데이트 관련 문제를 해결합니다.
또 다른 이유는 저장 공간을 확보하기 위해서입니다. 업데이트 캐시 파일은 스토리지의 상당 부분을 사용하는 경우가 많으므로 캐시된 파일을 삭제하여 이를 회수할 수 있습니다. (Windows는 업데이트를 설치한 후 일부 업데이트 파일을 삭제하지만 전부는 삭제하지 않습니다.)
파일 탐색기를 사용하여 Windows 업데이트 캐시 지우기
업데이트 캐시를 삭제하는 쉬운 그래픽 방법은 파일 탐색기를 사용하는 것입니다. 이 방법은 모든 업데이트 캐시 파일을 삭제합니다.
이 방법을 사용하려면 Windows+R을 눌러 실행 대화 상자를 엽니다. 상자에 다음을 입력하고 Enter 키를 누릅니다.
services.msc
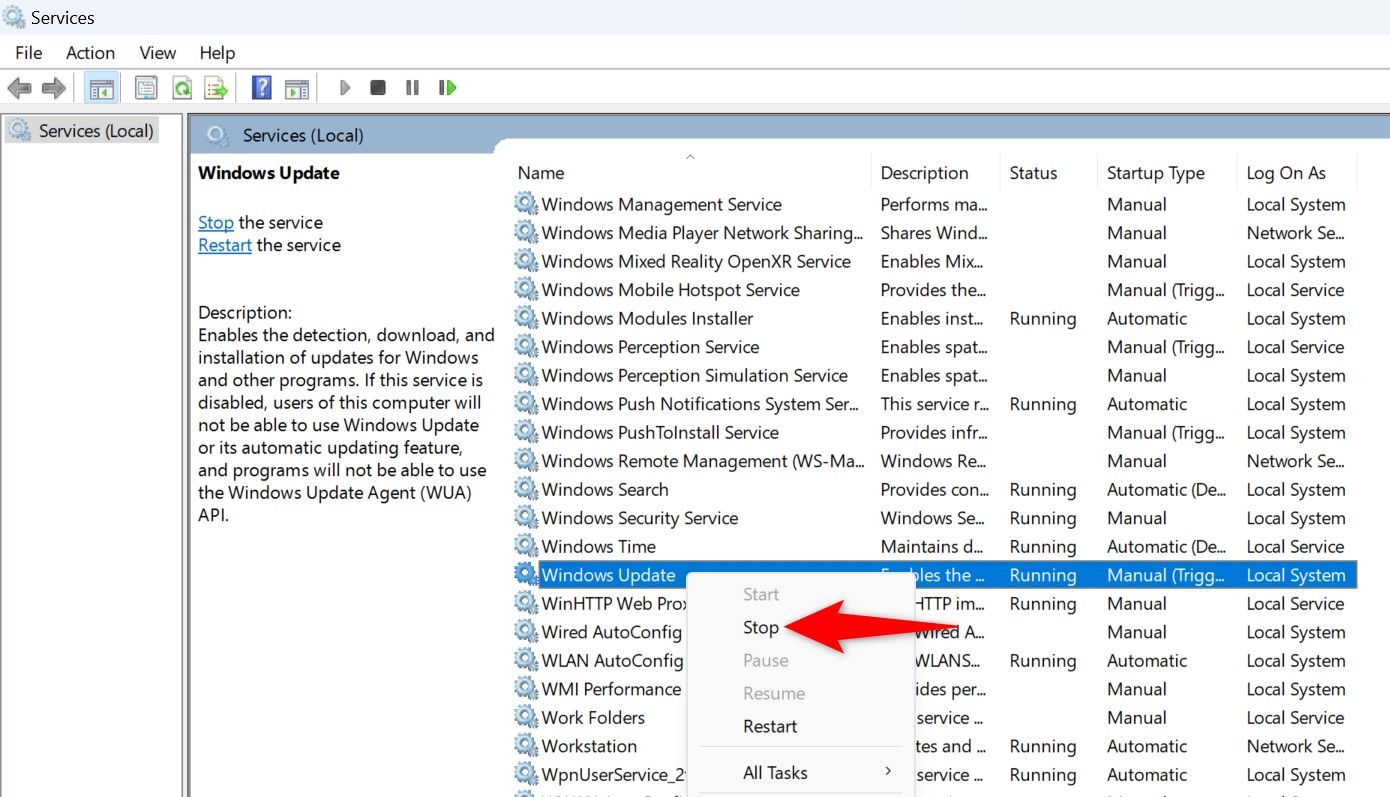
서비스 창에서 Windows 업데이트 서비스를 찾습니다. 마우스 오른쪽 버튼을 클릭하고 "중지"를 선택하십시오. 나중에 여기로 돌아올 것이므로 이 창을 열어 두세요.
Windows+R을 사용하여 다시 실행을 시작하고 상자에 아래 경로를 입력한 후 Enter를 누르세요. 다음은 Windows Update 캐시 폴더 경로입니다. C: 드라이브에 Windows가 설치되어 있다고 가정합니다. 하지만 그렇지 않은 경우에는 경로의 드라이브 문자를 변경하면 됩니다.
C:WindowsSoftwareDistribution
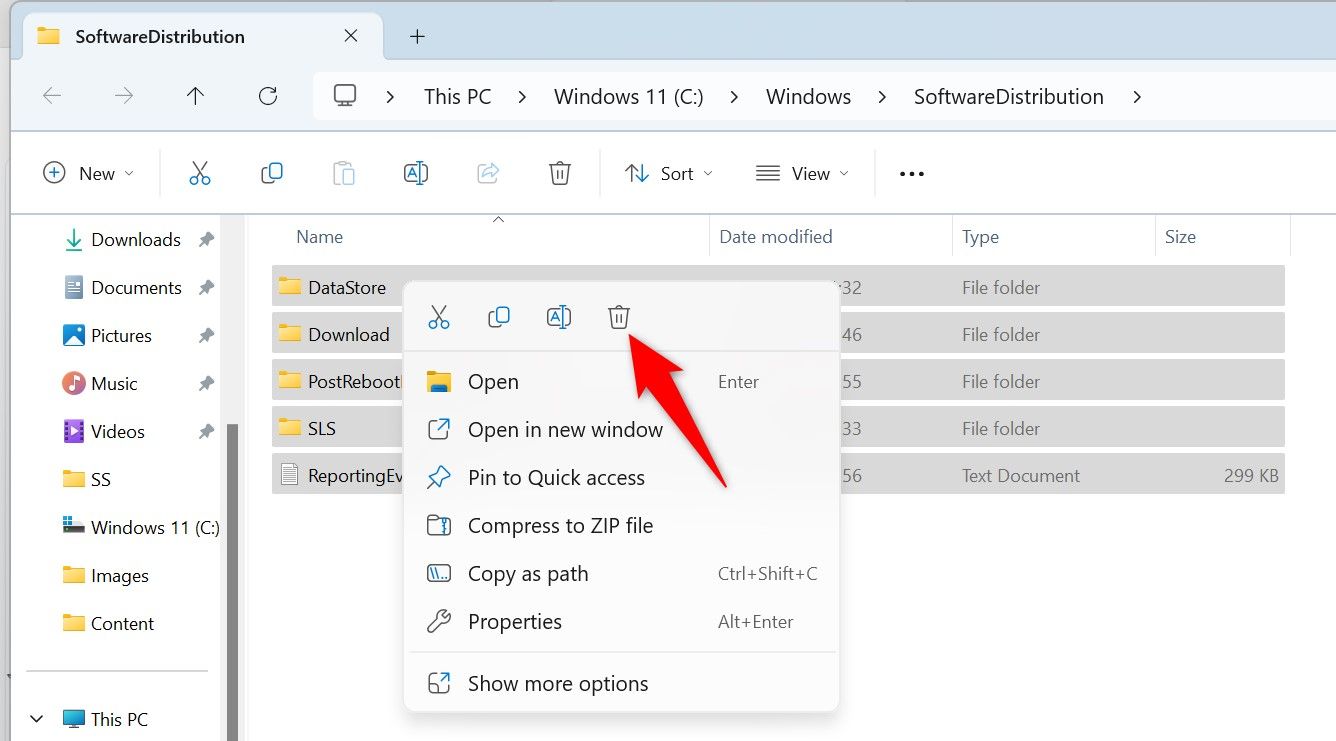
열려 있는 폴더의 모든 파일을 선택하려면 Ctrl+A를 누르세요. 선택한 파일을 마우스 오른쪽 버튼으로 클릭하고 휴지통 아이콘(Windows 11) 또는 "삭제"(Windows 10)를 선택합니다.
파일 탐색기를 닫고 휴지통을 비우세요.
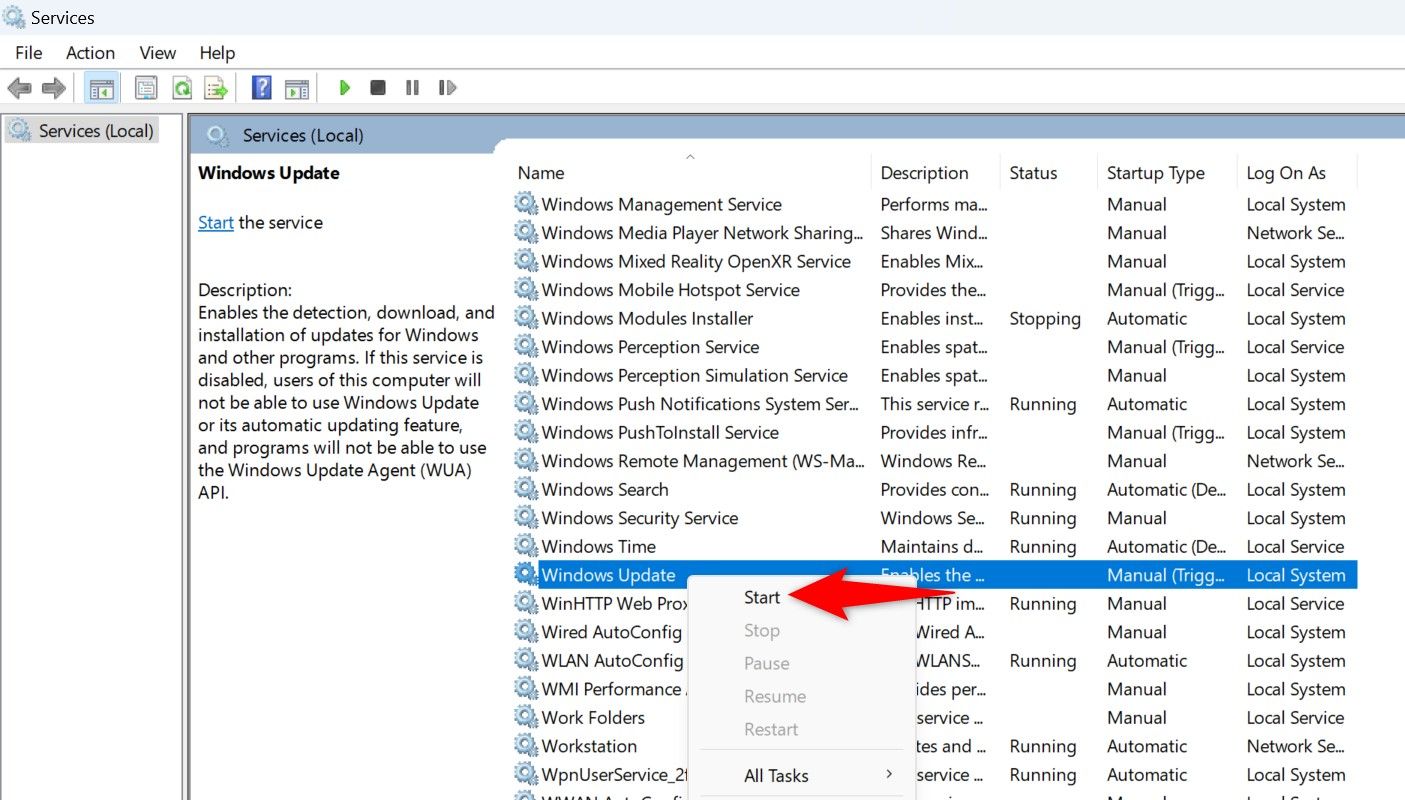
그런 다음 "서비스" 창으로 돌아가서 "Windows 업데이트"를 마우스 오른쪽 버튼으로 클릭하고 "시작"을 선택하세요.
이렇게 하면 PC가 계속해서 최신 업데이트를 찾을 수 있습니다.
디스크 정리를 사용하여 Windows 업데이트 캐시 지우기
Windows에 내장된 디스크 정리 유틸리티는 일부 Windows 업데이트 캐시 파일을 삭제하는 데 도움이 됩니다.
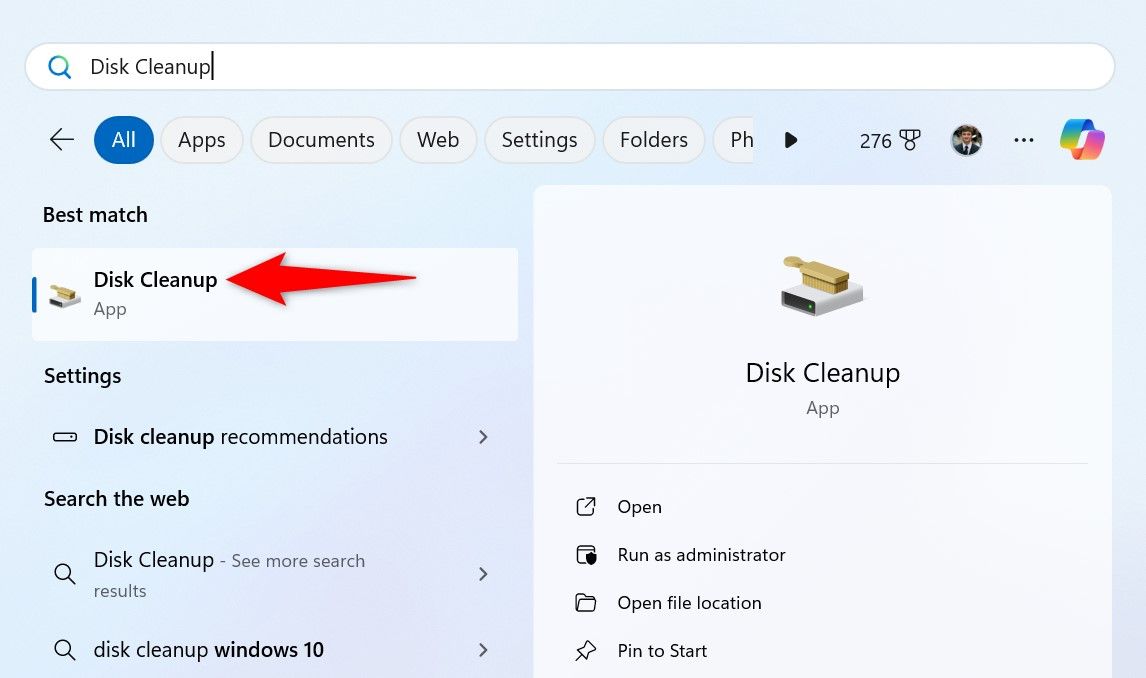
사용하려면 시작 메뉴를 열고 디스크 정리를 검색한 후 유틸리티를 실행하세요.
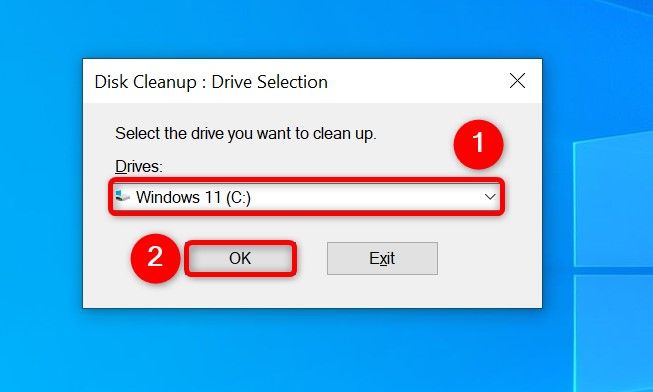
Windows 설치 드라이브를 선택하고 "확인"을 선택하세요.
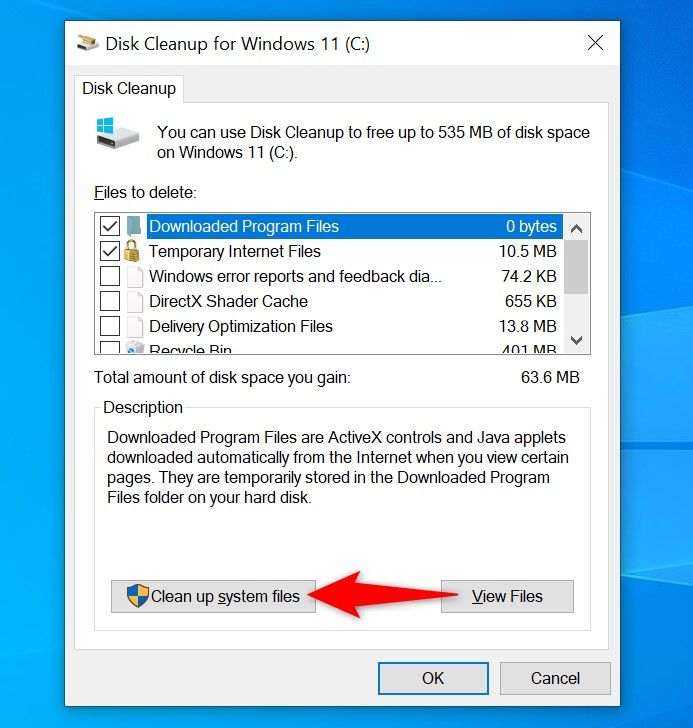
"시스템 파일 정리"를 선택하세요.
Windows 설치 드라이브를 다시 선택하고 "확인"을 선택하세요.
디스크 정리에서 "Windows 업데이트 정리" 옵션을 활성화하세요. 해당 파일도 삭제하려면 다른 옵션을 자유롭게 활성화하세요. 그런 다음 하단에서 '확인'을 클릭하세요.
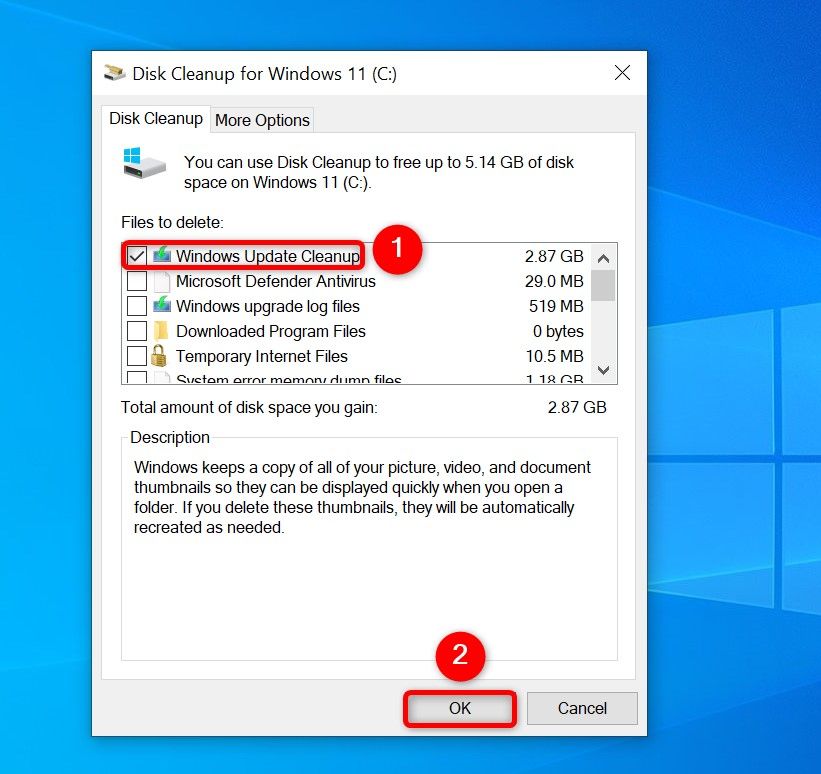
도구가 업데이트 캐시 파일 정리를 시작합니다.
명령 프롬프트를 사용하여 Windows 업데이트 캐시 지우기
그래픽 방식보다 명령줄 방법을 선호하는 경우 명령 프롬프트(또는 PowerShell)에서 몇 가지 명령을 사용하여 업데이트 캐시를 제거하세요.
시작 메뉴를 열고 명령 프롬프트를 검색한 후 "관리자 권한으로 실행"을 선택하여 시작하세요.
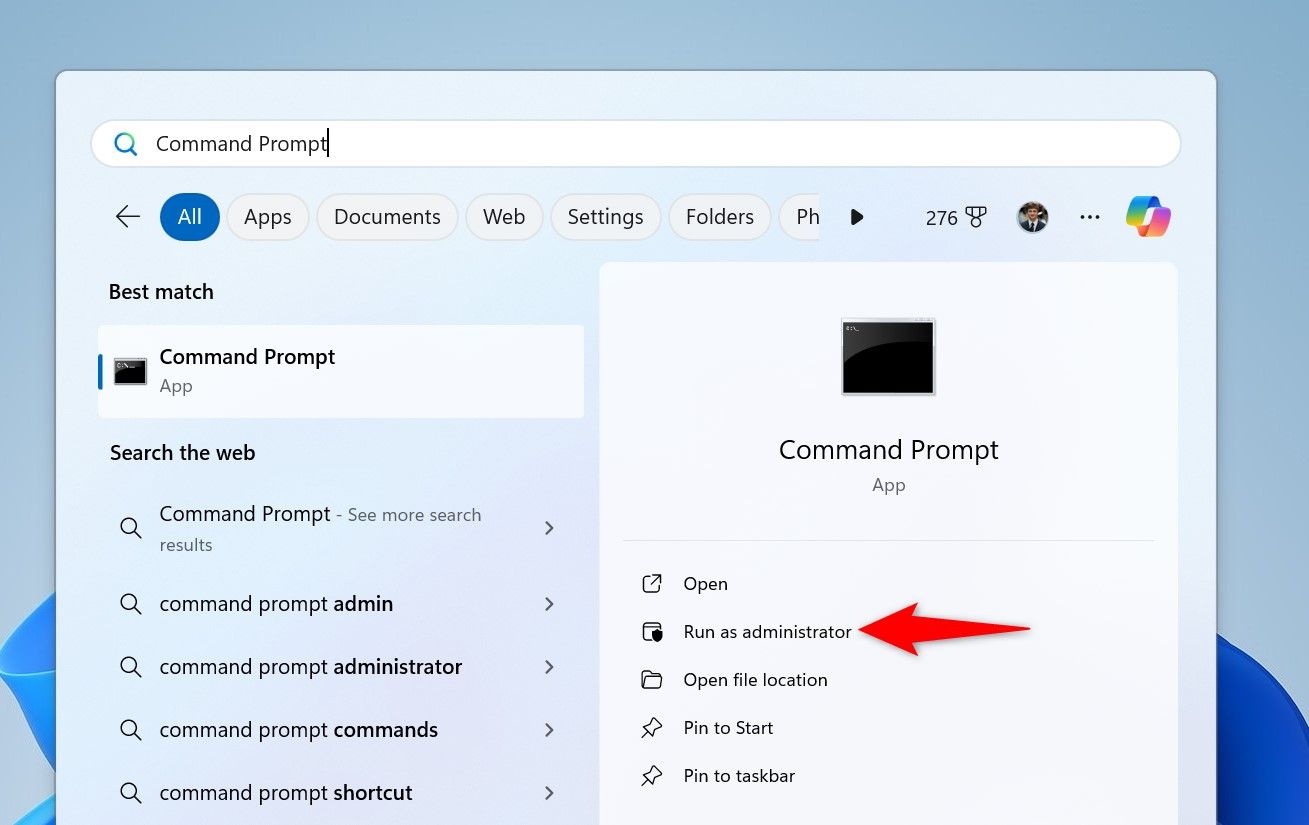
"사용자 계정 컨트롤"(UAC) 프롬프트에서 "예"를 선택하세요.
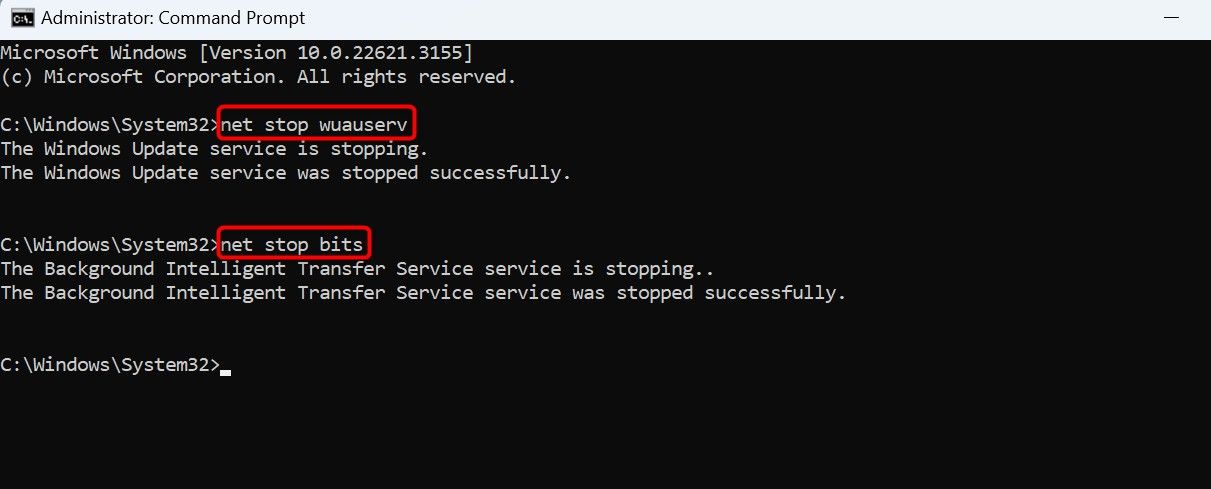
명령 프롬프트에 다음 줄을 입력하고 각 줄 끝에서 Enter 키를 누릅니다. 첫 번째 명령은 Windows 업데이트 서비스를 비활성화하고 두 번째 명령은 Background Intelligent Transfer Service 서비스를 해제합니다.
<code class="hljs sql">net stop wuauservnet stop bits</code>
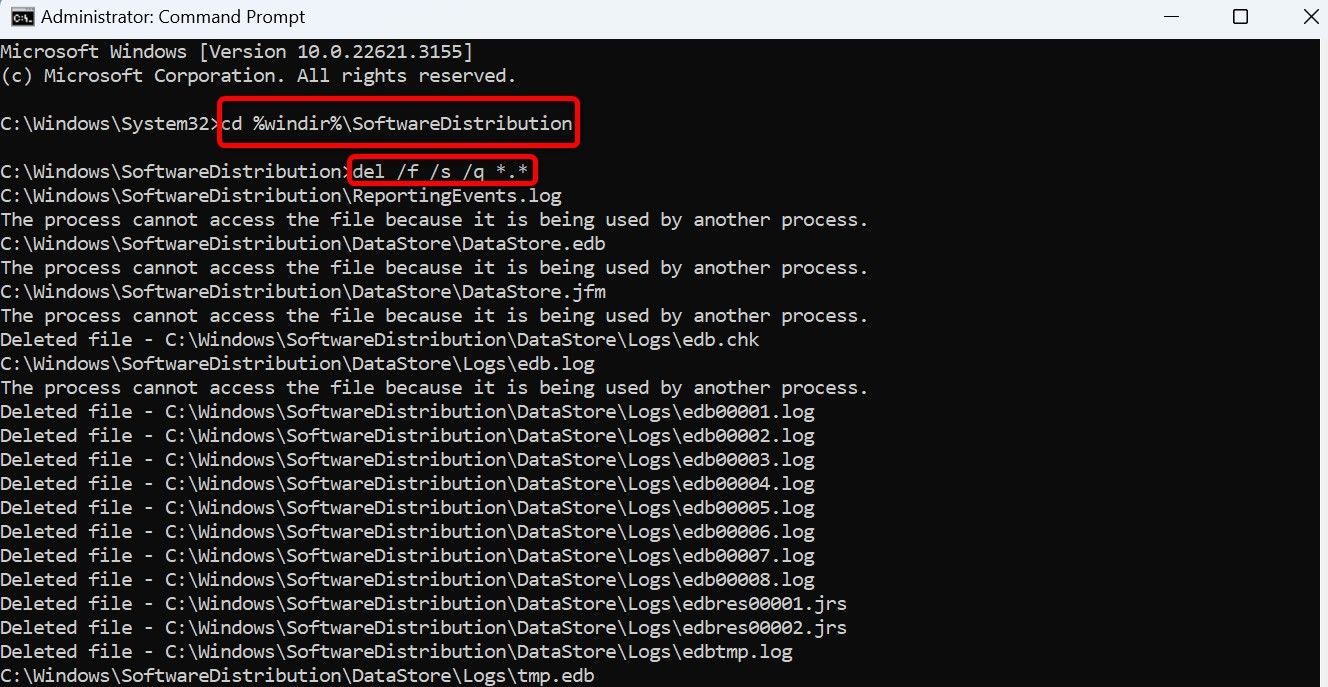
Next up, run the following command to make the Windows Update cache folder the current working directory.
cd %windir%SoftwareDistribution
Type the following command and press Enter to delete the update cache.
del /f /s /q *.*
After clearing the cache, restart the services you stopped above. Do that by typing the following commands and pressing Enter after each line.
<code class="hljs sql">net start wuauservnet start bits</code>
You’re done.
Use a Script to Clear Update Cache in a Single-Click
You can make a batch file out of the commands above to clear your Windows Update cache in just a single click. This is a convenient method if you delete your update cache files often.
To make that script, open the Start Menu, search for Notepad, and launch the app. Copy the code below and paste it in your Notepad document.
<code class="hljs xml">net stop wuauservnet stop bitscd %windir%SoftwareDistributiondel /f /s /q *.*net start wuauservnet start bits</code>
Save the file by choosing File > Save from the menu bar.
In the "Save As" window, select the folder where you want to save the script. Click the "Save as Type" drop-down menu and choose "All Files." Select the "File Name" field and enter a name of your choice. Then, append .bat at the end of the file name. This ensures Notepad saves the file as a batch script.
Then, click "Save."
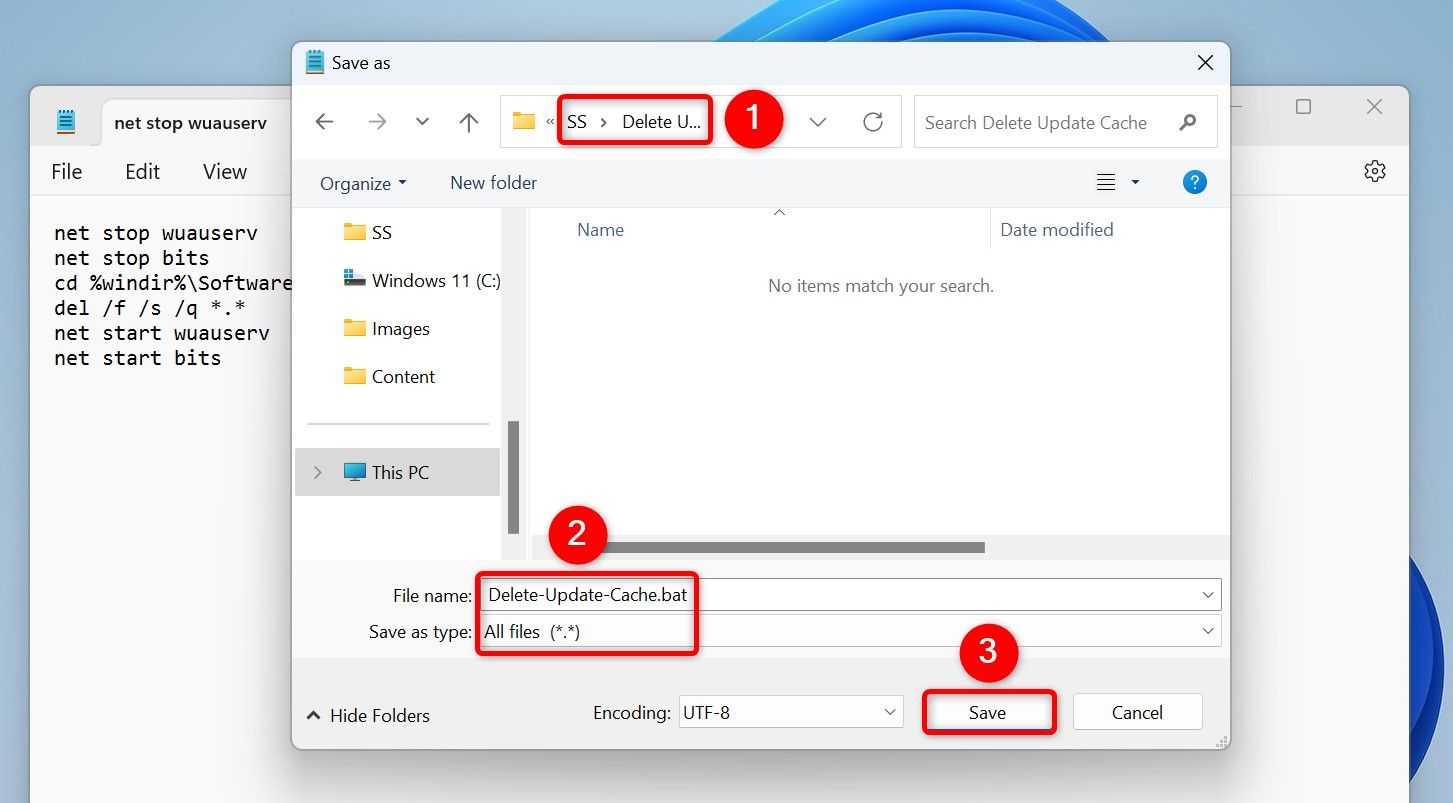
In the future, to clear your Windows Update cache using the script, right-click the script file and select "Run as Administrator." In the User Account Control prompt, choose "Yes." The script will stop certain services, deletes the update cache files, and restarts the stopped services.
And that’s how you get rid of the update cache files using various ways on your Windows 11 or Windows 10 computer. We hope you find the methods useful.
위 내용은 Windows 11 및 10에서 업데이트 캐시를 지우는 방법의 상세 내용입니다. 자세한 내용은 PHP 중국어 웹사이트의 기타 관련 기사를 참조하세요!

