Development strategy_Server-side
Reading Prerequisites
This development strategy is based on the authorization verification process of using Authorization Code to obtain Access Token. It is suitable for applications that need to be accessed from the web server, such as Web/wap websites. .
Before reading this development guide, please read [QQ Login] Using Authorization Code to Obtain Access Token to understand the authentication process.
1. Experience it
Note:
This experience is based on the serverless mode, but the experience effect is the same as that of The server side mode is the same.
1. Browser access: http://qzs.qq.com/qzone/openapi/client.html.
2. Click the "Login" button on the page: 
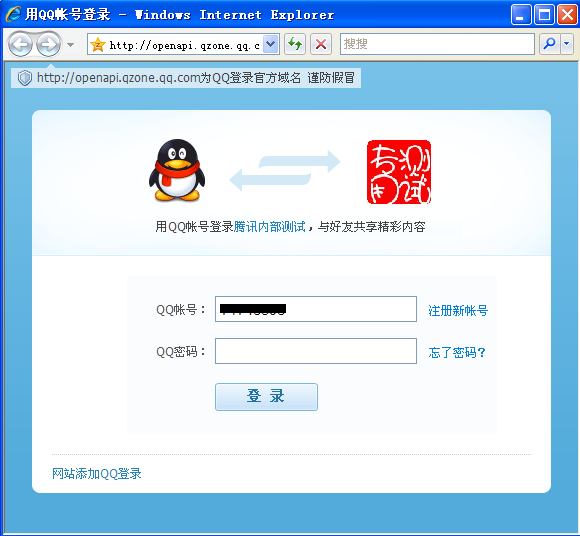
3. Enter the QQ account number and password in the pop-up login box: 
4. Log in successfully After that, jump to the specified callback address, with Access Token in the URL: 
2. Get started quickly
Preparation
1. Please ensure that your website has submitted an application for QQ login and successfully obtained the appid and appkey. Apply for access
2. Please ping openapi.qzone.qq.com on your server to ensure that the connection between the website and Qzone is smooth.
Step1: Place the QQ login button
The website needs to download the "QQ login" button image and place the button appropriately on the page in accordance with the UI specifications s position.
Button Icon Download Button Placement Specification
Step2: Obtain Authorization Code
1. Open the browser and visit the following address (please enter Replace client_id, redirect_uri, scope and other parameter values with your own):
https://graph.qq.com/oauth2.0/authorize?response_type=code&client_id=[YOUR_APPID] &redirect_uri=[YOUR_REDIRECT_URI]&scope=[THE_SCOPE]
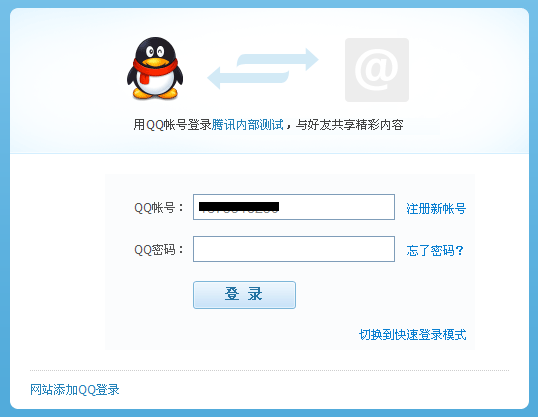
2. If the user is already logged in, a confirmation page will pop up. If you have not logged in, the login page will pop up, as shown below: 
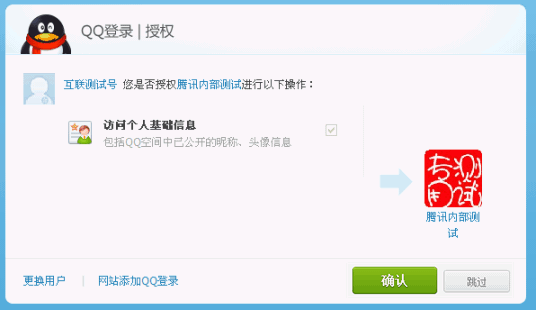
3. After successful login, the authorization box will pop up to guide the user to authorize (only for the first successful login, and the first visit An authorization page will appear when an unauthorized OpenAPI is used), as shown below: 
Note:
If the user clicks "Skip", it will jump to Callback address, returns the default avatar, nickname and gender.
It is recommended that third-party applications control authorization items, that is, only the OpenAPI name that must be used is passed in the parameter scope. Because the more authorization items there are, the more likely the user is to deny authorization.
4. If the user clicks "Confirm" authorization, it will successfully jump to the specified redirect_uri and follow the Authorization Code (Note that this code will expire within 10 minutes).
For example, the callback address is: www.qq.com/my.php, it will jump to:
http://www.qq.com/my.php? code=520DD95263C1CFEA0870FBB66E******
Note:
It is recommended that the callback address be set to the homepage of the website or the user center of the website.
Step3: Obtain Access Token through Authorization Code
1. Send a request to the following address (please replace the parameter value with your Your own, see here for parameter explanation):
https://graph.qq.com/oauth2.0/token?grant_type=authorization_code&client_id=[YOUR_APP_ID]&client_secret=[YOUR_APP_Key] &code=[The_AUTHORIZATION_CODE]&state=[The_CLIENT_STATE]&redirect_uri=[YOUR_REDIRECT_URI]
2. You can get the Access Token:
access_token= YOUR_ACCESS_TOKEN&expires_in=3600
can accept the request in the program corresponding to the callback URL (see the sample code below) and complete the work of obtaining the Access Token.
Special reminder:
The access token obtained has a validity period of 3 months and will be automatically refreshed when the user logs in again.
Third-party websites can store access token information for subsequent use when calling OpenAPI to access and modify user information.
Step4: Use Access Token to obtain the user’s OpenID
1. Send a request to the following address (please replace access_token and other parameter values with your own ):
https://graph.qq.com/oauth2.0/me?access_token=YOUR_ACCESS_TOKEN
2. Get the user OpenID, the returned package is as follows:
callback( {"client_id":"YOUR_APPID","openid":"YOUR_OPENID"} );Step5: Use Access Token and OpenID to access and modify user data
1. It is recommended that the website call the get_user_info interface after the user logs in to obtain the user's avatar and nickname and display them on the website to make the user experience unified.
2. Call other OpenAPI to access and modify user data. For all OpenAPI details, please refer to the [QQ Login] API document.
Take calling the get_user_info interface as an example:
(1) Send a request to the URL of get_user_info (please replace access_token, appid and other parameter values with your own):
https://graph.qq.com/user/get_user_info?access_token=YOUR_ACCESS_TOKEN&oauth_consumer_key=YOUR_APP_ID&openid=YOUR_OPENID
##(2) After successful return, you can obtain it User data:
   "ret":0,
   "msg":"",
   "nickname":"YOUR_NICK_NAME",
   ...
}
3. Sample code
//The APPID of the application
$app_id = "YOUR_APP_ID";
//The APPKEY of the application
$app_secret = "YOUR_APP_KEY";
//The callback address after successful authorization
$my_url = "YOUR_REDIRECT_URL";
//Step1: Get Authorization Code
session_start();
$code = $_REQUEST["code"];
if(empty ($code))
{
//The state parameter is used to prevent CSRF attacks. It will be brought back unchanged during the callback after successful authorization.
$_SESSION['state'] = md5(uniqid(rand(), TRUE));
//Splicing URL
$dialog_url = "https://graph.qq.com/oauth2.0/authorize?response_type=code&client_id="
. $app_id . "&redirect_uri=" . urlencode($my_url) . "&state="
. . $_SESSION['state'];
echo("<script> top.location.href='" . $dialog_url . "'</ script>");
}
if($_REQUEST['state'] == $_SESSION['state'])
{
//拼接URL
$token_url = "https://graph.qq.com/oauth2.0/token?grant_type=authorization_code&"
. "client_id=" . $app_id . "&redirect_uri=" . urlencode($my_url)
. "&client_secret=" . $app_secret . "&code=" . $code;
$response = file_get_contents($token_url);
if (strpos($response, "callback") !== false)
{
$lpos = strpos($response, "(");
$rpos = strrpos($response, ")");
$response = substr($response, $lpos 1, $rpos - $lpos -1);
$msg = json_decode($response);
if (isset($msg->error))
{
echo "<h3>error:</h3>" . $msg->error;
echo "<h3>msg :</h3>" . $msg->error_description;
exit;
}
}
$params = array();
parse_str($response, $params);
$graph_url = "https://graph.qq.com/oauth2.0/me?access_token="
$params['access_token'];
$str = file_get_contents($graph_url);
if (strpos($str, "callback") !== false)
{
$lpos = strpos($str, "(");
$rpos = strrpos($str, ")");
$str = substr($str, $lpos 1, $rpos - $lpos -1);
}
$user = json_decode($str);
if (isset($user->error))
{
echo "<h3>error:</h3>" . $user->error;
echo "<h3>msg :</h3>" . $user->error_description;
exit;
}
echo("Hello " . $user->openid);
}
else
{
echo("The state does not match. You may be a victim of CSRF.");
}
?>


