ホームページ >テクノロジー周辺機器 >AI >カスタム データセットへの OpenAI CLIP の実装
カスタム データセットへの OpenAI CLIP の実装
- WBOYWBOYWBOYWBOYWBOYWBOYWBOYWBOYWBOYWBOYWBOYWBOYWB転載
- 2023-09-14 11:57:04973ブラウズ
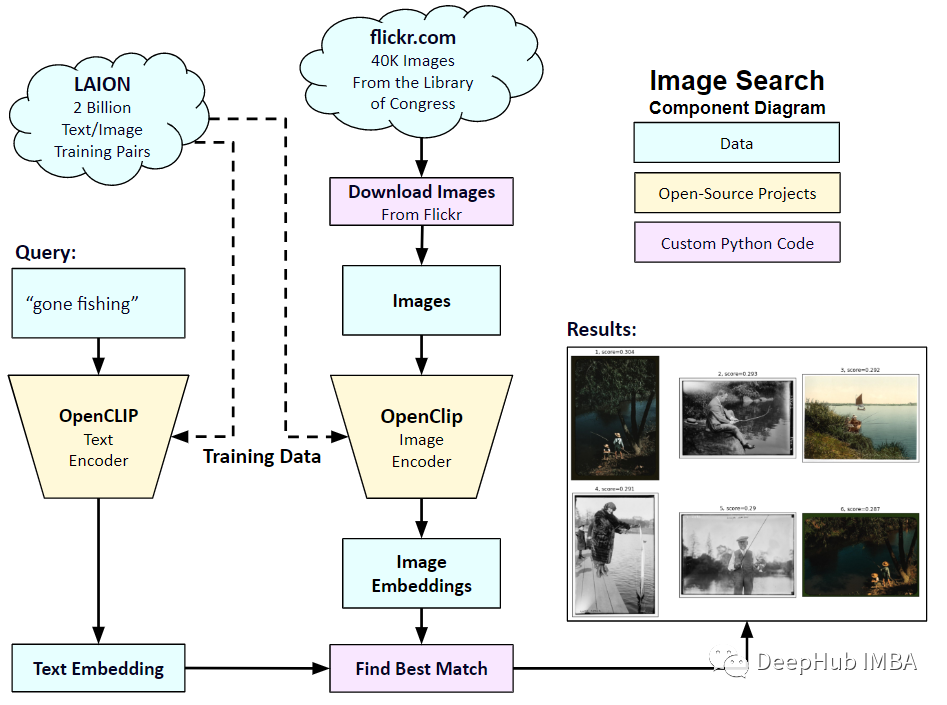
2021 年 1 月、OpenAI は DALL-E と CLIP という 2 つの新しいモデルを発表しました。どちらのモデルも、テキストと画像を何らかの方法で接続するマルチモーダル モデルです。 CLIP の正式名は Contrastive Language-Image Pre-training で、対照的なテキストと画像のペアに基づく事前トレーニング方法です。なぜCLIPを導入するのか?なぜなら、現在人気のStable Diffusionは単一のモデルではなく、複数のモデルで構成されているからです。重要なコンポーネントの 1 つはテキスト エンコーダで、ユーザーのテキスト入力をエンコードするために使用されます。このテキスト エンコーダは、トレーニング中の CLIP モデル
CLIP モデルのテキスト エンコーダです。入力文を与えて、それに一致する最も関連性の高い画像を抽出できます。 CLIP は、完全な文とそれが説明する画像との関係を学習します。つまり、「車」や「犬」などの個別のカテゴリではなく、完全な文に基づいてトレーニングされます。これはアプリケーションにとって非常に重要です。完全なフレーズでトレーニングすると、モデルはさらに学習し、写真とテキストの間のパターンを認識できるようになります。彼らはまた、写真と対応する文章の大きなデータセットでトレーニングされた場合、モデルが分類器として機能することを実証しました。 CLIPがリリースされた当初は、微調整なし(ゼロショット)でImageNetデータセット上での分類性能がResNets-50を上回り、非常に有用でした。

そこで、この記事では、PyTorch を使用して CLIP モデルを最初から実装し、CLIP をより深く理解できるようにします
ここでは 2 つのライブラリ (timm とtransformers) を使用する必要があります。最初にコードをインポートします。
import os import cv2 import gc import numpy as np import pandas as pd import itertools from tqdm.autonotebook import tqdm import albumentations as A import matplotlib.pyplot as plt import torch from torch import nn import torch.nn.functional as F import timm from transformers import DistilBertModel, DistilBertConfig, DistilBertTokenizer
次のステップは、データと一般的な構成設定を前処理することです。 。 config はハイパーパラメータをすべて記述した通常の Python ファイルで、Jupyter Notebook を使用する場合は Notebook の最初に定義されるクラスです。
class CFG:debug = Falseimage_path = "../input/flickr-image-dataset/flickr30k_images/flickr30k_images"captions_path = "."batch_size = 32num_workers = 4head_lr = 1e-3image_encoder_lr = 1e-4text_encoder_lr = 1e-5weight_decay = 1e-3patience = 1factor = 0.8epochs = 2device = torch.device("cuda" if torch.cuda.is_available() else "cpu") model_name = 'resnet50'image_embedding = 2048text_encoder_model = "distilbert-base-uncased"text_embedding = 768text_tokenizer = "distilbert-base-uncased"max_length = 200 pretrained = True # for both image encoder and text encodertrainable = True # for both image encoder and text encodertemperature = 1.0 # image sizesize = 224 # for projection head; used for both image and text encodersnum_projection_layers = 1projection_dim = 256 dropout = 0.1
カスタム インジケーター用のヘルパー クラスもいくつかあります
class AvgMeter:def __init__(self, name="Metric"):self.name = nameself.reset() def reset(self):self.avg, self.sum, self.count = [0] * 3 def update(self, val, count=1):self.count += countself.sum += val * countself.avg = self.sum / self.count def __repr__(self):text = f"{self.name}: {self.avg:.4f}"return text def get_lr(optimizer):for param_group in optimizer.param_groups:return param_group["lr"]
私たちの目標は、画像と文章を記述することです。したがって、データセットは文と画像の両方を返す必要があります。したがって、DistilBERT タガーを使用して文 (タイトル) にタグを付け、タグ ID (input_ids) とアテンション マスクを DistilBERT に提供する必要があります。 DistilBERT は BERT モデルよりも小さいですが、モデルの結果は類似しているため、これを使用することを選択します。
次のステップは、HuggingFace トークナイザーを使用してトークン化することです。 __init__ で取得されたトークナイザー オブジェクトは、モデルの実行時にロードされます。タイトルはあらかじめ設定された最大長まで埋め込まれ、切り詰められます。関連画像をロードする前に、エンコードされたタイトルを __getitem__ にロードします。これは、キー input_ids とattention_mask を含む辞書であり、変換と展開を実行します (どれでも)。次に、それをテンソルに変換し、「image」をキーとして辞書に保存します。最後に、タイトルの原文をキーワード「タイトル」とともに辞書に登録します。
class CLIPDataset(torch.utils.data.Dataset):def __init__(self, image_filenames, captions, tokenizer, transforms):"""image_filenames and cpations must have the same length; so, if there aremultiple captions for each image, the image_filenames must have repetitivefile names """ self.image_filenames = image_filenamesself.captions = list(captions)self.encoded_captions = tokenizer(list(captions), padding=True, truncatinotallow=True, max_length=CFG.max_length)self.transforms = transforms def __getitem__(self, idx):item = {key: torch.tensor(values[idx])for key, values in self.encoded_captions.items()} image = cv2.imread(f"{CFG.image_path}/{self.image_filenames[idx]}")image = cv2.cvtColor(image, cv2.COLOR_BGR2RGB)image = self.transforms(image=image)['image']item['image'] = torch.tensor(image).permute(2, 0, 1).float()item['caption'] = self.captions[idx] return item def __len__(self):return len(self.captions) def get_transforms(mode="train"):if mode == "train":return A.Compose([A.Resize(CFG.size, CFG.size, always_apply=True),A.Normalize(max_pixel_value=255.0, always_apply=True),])else:return A.Compose([A.Resize(CFG.size, CFG.size, always_apply=True),A.Normalize(max_pixel_value=255.0, always_apply=True),])
画像とテキストのエンコーダー: 画像エンコーダーとして ResNet50 を使用します。
class ImageEncoder(nn.Module):"""Encode images to a fixed size vector""" def __init__(self, model_name=CFG.model_name, pretrained=CFG.pretrained, trainable=CFG.trainable):super().__init__()self.model = timm.create_model(model_name, pretrained, num_classes=0, global_pool="avg")for p in self.model.parameters():p.requires_grad = trainable def forward(self, x):return self.model(x)
DistilBERT をテキスト エンコーダとして使用します。 CLS トークンの最終表現を使用して、文の表現全体を取得します。
class TextEncoder(nn.Module):def __init__(self, model_name=CFG.text_encoder_model, pretrained=CFG.pretrained, trainable=CFG.trainable):super().__init__()if pretrained:self.model = DistilBertModel.from_pretrained(model_name)else:self.model = DistilBertModel(cnotallow=DistilBertConfig()) for p in self.model.parameters():p.requires_grad = trainable # we are using the CLS token hidden representation as the sentence's embeddingself.target_token_idx = 0 def forward(self, input_ids, attention_mask):output = self.model(input_ids=input_ids, attention_mask=attention_mask)last_hidden_state = output.last_hidden_statereturn last_hidden_state[:, self.target_token_idx, :]
上記のコードは、画像とテキストを固定サイズのベクトル (画像 2048、テキスト 768) にエンコードしました。画像とテキストを比較するには、画像とテキストの寸法が類似している必要があります。 , そこで、2048 次元と 768 次元のベクトルを 256 次元 (projection_dim) に投影し、次元が同じ場合にのみ比較できます。
class ProjectionHead(nn.Module):def __init__(self,embedding_dim,projection_dim=CFG.projection_dim,dropout=CFG.dropout):super().__init__()self.projection = nn.Linear(embedding_dim, projection_dim)self.gelu = nn.GELU()self.fc = nn.Linear(projection_dim, projection_dim)self.dropout = nn.Dropout(dropout)self.layer_norm = nn.LayerNorm(projection_dim) def forward(self, x):projected = self.projection(x)x = self.gelu(projected)x = self.fc(x)x = self.dropout(x)x = x + projectedx = self.layer_norm(x)return x
最終的な CLIP モデルは次のようになります:
class CLIPModel(nn.Module):def __init__(self,temperature=CFG.temperature,image_embedding=CFG.image_embedding,text_embedding=CFG.text_embedding,):super().__init__()self.image_encoder = ImageEncoder()self.text_encoder = TextEncoder()self.image_projection = ProjectionHead(embedding_dim=image_embedding)self.text_projection = ProjectionHead(embedding_dim=text_embedding)self.temperature = temperature def forward(self, batch):# Getting Image and Text Featuresimage_features = self.image_encoder(batch["image"])text_features = self.text_encoder(input_ids=batch["input_ids"], attention_mask=batch["attention_mask"])# Getting Image and Text Embeddings (with same dimension)image_embeddings = self.image_projection(image_features)text_embeddings = self.text_projection(text_features) # Calculating the Losslogits = (text_embeddings @ image_embeddings.T) / self.temperatureimages_similarity = image_embeddings @ image_embeddings.Ttexts_similarity = text_embeddings @ text_embeddings.Ttargets = F.softmax((images_similarity + texts_similarity) / 2 * self.temperature, dim=-1)texts_loss = cross_entropy(logits, targets, reductinotallow='none')images_loss = cross_entropy(logits.T, targets.T, reductinotallow='none')loss = (images_loss + texts_loss) / 2.0 # shape: (batch_size)return loss.mean() #这里还加了一个交叉熵函数 def cross_entropy(preds, targets, reductinotallow='none'):log_softmax = nn.LogSoftmax(dim=-1)loss = (-targets * log_softmax(preds)).sum(1)if reduction == "none":return losselif reduction == "mean":return loss.mean()
CLIP が損失として対称クロス エントロピーを使用することをここで説明する必要があります。ノイズの影響を軽減し、モデルの堅牢性を向上させるために、ここでは簡単にするためにクロス エントロピーを使用します。
テストできます:
# A simple Example batch_size = 4 dim = 256 embeddings = torch.randn(batch_size, dim) out = embeddings @ embeddings.T print(F.softmax(out, dim=-1))
次のステップはトレーニングです。トレーニングと検証のデータローダーをロードするのに役立つ関数がいくつかあります
def make_train_valid_dfs():dataframe = pd.read_csv(f"{CFG.captions_path}/captions.csv")max_id = dataframe["id"].max() + 1 if not CFG.debug else 100image_ids = np.arange(0, max_id)np.random.seed(42)valid_ids = np.random.choice(image_ids, size=int(0.2 * len(image_ids)), replace=False)train_ids = [id_ for id_ in image_ids if id_ not in valid_ids]train_dataframe = dataframe[dataframe["id"].isin(train_ids)].reset_index(drop=True)valid_dataframe = dataframe[dataframe["id"].isin(valid_ids)].reset_index(drop=True)return train_dataframe, valid_dataframe def build_loaders(dataframe, tokenizer, mode):transforms = get_transforms(mode=mode)dataset = CLIPDataset(dataframe["image"].values,dataframe["caption"].values,tokenizer=tokenizer,transforms=transforms,)dataloader = torch.utils.data.DataLoader(dataset,batch_size=CFG.batch_size,num_workers=CFG.num_workers,shuffle=True if mode == "train" else False,)return dataloader
次に、トレーニングと評価が続きます
def train_epoch(model, train_loader, optimizer, lr_scheduler, step):loss_meter = AvgMeter()tqdm_object = tqdm(train_loader, total=len(train_loader))for batch in tqdm_object:batch = {k: v.to(CFG.device) for k, v in batch.items() if k != "caption"}loss = model(batch)optimizer.zero_grad()loss.backward()optimizer.step()if step == "batch":lr_scheduler.step() count = batch["image"].size(0)loss_meter.update(loss.item(), count) tqdm_object.set_postfix(train_loss=loss_meter.avg, lr=get_lr(optimizer))return loss_meter def valid_epoch(model, valid_loader):loss_meter = AvgMeter() tqdm_object = tqdm(valid_loader, total=len(valid_loader))for batch in tqdm_object:batch = {k: v.to(CFG.device) for k, v in batch.items() if k != "caption"}loss = model(batch) count = batch["image"].size(0)loss_meter.update(loss.item(), count) tqdm_object.set_postfix(valid_loss=loss_meter.avg)return loss_meter
最後に、プロセス全体が統合されます
def main():train_df, valid_df = make_train_valid_dfs()tokenizer = DistilBertTokenizer.from_pretrained(CFG.text_tokenizer)train_loader = build_loaders(train_df, tokenizer, mode="train")valid_loader = build_loaders(valid_df, tokenizer, mode="valid") model = CLIPModel().to(CFG.device)params = [{"params": model.image_encoder.parameters(), "lr": CFG.image_encoder_lr},{"params": model.text_encoder.parameters(), "lr": CFG.text_encoder_lr},{"params": itertools.chain(model.image_projection.parameters(), model.text_projection.parameters()), "lr": CFG.head_lr, "weight_decay": CFG.weight_decay}]optimizer = torch.optim.AdamW(params, weight_decay=0.)lr_scheduler = torch.optim.lr_scheduler.ReduceLROnPlateau(optimizer, mode="min", patience=CFG.patience, factor=CFG.factor)step = "epoch" best_loss = float('inf')for epoch in range(CFG.epochs):print(f"Epoch: {epoch + 1}")model.train()train_loss = train_epoch(model, train_loader, optimizer, lr_scheduler, step)model.eval()with torch.no_grad():valid_loss = valid_epoch(model, valid_loader) if valid_loss.avg <p><span>アプリケーション: 画像の埋め込みを取得し、一致するものを見つけます。 </span></p><p><span>トレーニングを完了した後、それを実際にどのように適用すればよいでしょうか?トレーニングされたモデルをロードし、検証セットからの画像を提供し、モデル自体の形状 (valid_set_size、256) と image_embeddings を返す関数を作成する必要があります。 </span></p><pre class="brush:php;toolbar:false">def get_image_embeddings(valid_df, model_path):tokenizer = DistilBertTokenizer.from_pretrained(CFG.text_tokenizer)valid_loader = build_loaders(valid_df, tokenizer, mode="valid") model = CLIPModel().to(CFG.device)model.load_state_dict(torch.load(model_path, map_locatinotallow=CFG.device))model.eval() valid_image_embeddings = []with torch.no_grad():for batch in tqdm(valid_loader):image_features = model.image_encoder(batch["image"].to(CFG.device))image_embeddings = model.image_projection(image_features)valid_image_embeddings.append(image_embeddings)return model, torch.cat(valid_image_embeddings) _, valid_df = make_train_valid_dfs() model, image_embeddings = get_image_embeddings(valid_df, "best.pt") def find_matches(model, image_embeddings, query, image_filenames, n=9):tokenizer = DistilBertTokenizer.from_pretrained(CFG.text_tokenizer)encoded_query = tokenizer([query])batch = {key: torch.tensor(values).to(CFG.device)for key, values in encoded_query.items()}with torch.no_grad():text_features = model.text_encoder(input_ids=batch["input_ids"], attention_mask=batch["attention_mask"])text_embeddings = model.text_projection(text_features) image_embeddings_n = F.normalize(image_embeddings, p=2, dim=-1)text_embeddings_n = F.normalize(text_embeddings, p=2, dim=-1)dot_similarity = text_embeddings_n @ image_embeddings_n.T values, indices = torch.topk(dot_similarity.squeeze(0), n * 5)matches = [image_filenames[idx] for idx in indices[::5]] _, axes = plt.subplots(3, 3, figsize=(10, 10))for match, ax in zip(matches, axes.flatten()):image = cv2.imread(f"{CFG.image_path}/{match}")image = cv2.cvtColor(image, cv2.COLOR_BGR2RGB)ax.imshow(image)ax.axis("off") plt.show()呼び出しメソッドは次のとおりです:
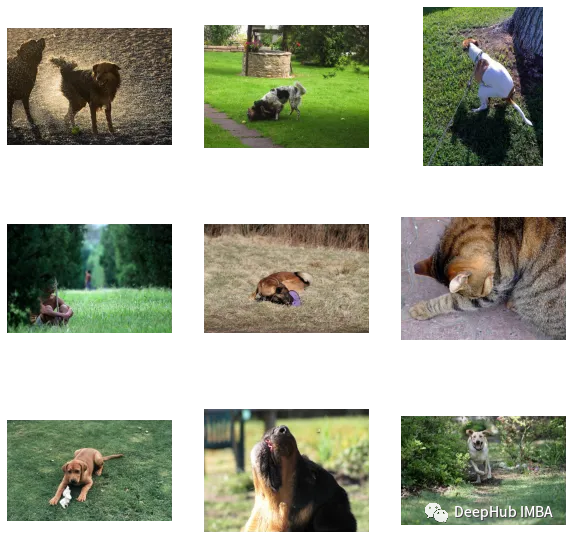
find_matches(model, image_embeddings,query="one dog sitting on the grass",image_filenames=valid_df['image'].values,n=9)

カスタマイズされた効果が次のとおりであることがわかります。まだ悪くないです(でも猫が写っています(笑))。言い換えれば、CLIP メソッドは小規模なデータ セットでのカスタマイズも可能です。
この記事のコードとデータ セットは次のとおりです:
https ://www.kaggle.com/code/jyotidabas/simple-openai-clip-implementation
以上がカスタム データセットへの OpenAI CLIP の実装の詳細内容です。詳細については、PHP 中国語 Web サイトの他の関連記事を参照してください。

