ホームページ >バックエンド開発 >Python チュートリアル >Python+OpenCVで仮想四角形をドラッグした効果を実現する方法
Python+OpenCVで仮想四角形をドラッグした効果を実現する方法
- WBOYWBOYWBOYWBOYWBOYWBOYWBOYWBOYWBOYWBOYWBOYWBOYWB転載
- 2023-05-15 19:22:121135ブラウズ
1. プロジェクトの効果
2. コア プロセス
1. OpenCV はビデオ ストリームを読み取り、画像の各フレームに四角形を描画します。
2. mediapipe を使用して指のキー ポイントの座標を取得します。
3. 指の座標位置と長方形の座標位置に基づいて、指の先端が長方形上にあるかどうかを判断し、長方形上にある場合には、長方形は指の動きに追従します。
3. コード処理
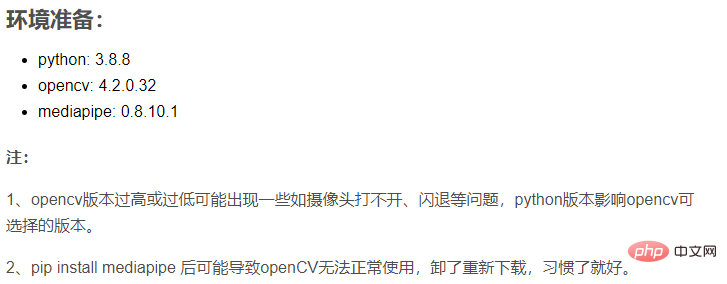
環境準備:
python: 3.8.8
opencv: 4.2.0.32
mediapipe: 0.8 .10.1
注:
1. opencv のバージョンが高すぎたり低すぎたりすると、カメラが開かない、クラッシュするなどの問題が発生する可能性があります。 version は、opencv の選択可能なバージョンに影響します。
2. pip install mediapipe を実行すると OpenCV が正常に使えなくなる場合がありますので、アンインストールして再度ダウンロードしてください。
1. カメラのビデオを読み取り、四角形を描画します
import cv2
import time
import numpy as np


# 调用摄像头 0 默认摄像头
cap = cv2.VideoCapture(0)

# 初始方块数据
x = 100
y = 100
w = 100
h = 100

# 读取一帧帧照片
while True:
    # 返回frame图片
    rec,frame = cap.read()

    # 镜像
    frame = cv2.flip(frame,1)

    # 画矩形
    cv2.rectangle(frame, (x, y), (x + w, y + h), (255, 0, 255), -1)

    # 显示画面
    cv2.imshow('frame',frame)

    # 退出条件
    if cv2.waitKey(1) & 0xFF == ord('q'):
        break

cap.release()
cv2.destroyAllWindows()
これは非常に基本的な手順ですが、この時点でこのコードを実行してカメラがオンになると、驚くでしょう。私たちのハンサムな顔を見てください。顔を見ると、左上隅に 100*100 の紫色の長方形があります。
2. 指の座標を処理するためにメディアパイプをインポートします
pip install mediapipe
この時点で、突然 openCV が利用できなくなるなどの問題が発生する可能性がありますが、問題ありませんので、アンインストールして再度ダウンロードしてください。
mediapipe の詳細: Hands - mediapipe (google.github.io)

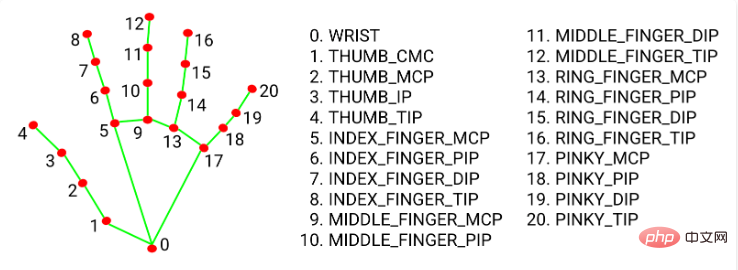
つまり、21 個の指のキー ポイントの座標が返されます。ビデオ画面内の指の位置比率 (0 ~ 1) に、対応する画面の幅と高さを乗算して、指に対応する座標を取得します。
今回は人差し指と中指の先、8番と12番を使いました。
2.1 いくつかの基本情報を構成します
import cv2
import time
import numpy as np
import mediapipe as mp


mp_drawing = mp.solutions.drawing_utils
mp_drawing_styles = mp.solutions.drawing_styles
mp_hands = mp.solutions.hands

hands =  mp_hands.Hands(
    static_image_mode=True,
    max_num_hands=2,
    min_detection_confidence=0.5)
2.2 画像の各フレームを処理するときに、
    frame.flags.writeable = False
    frame = cv2.cvtColor(frame, cv2.COLOR_BGR2RGB)
    # 返回结果
    results = hands.process(frame)

    frame.flags.writeable = True
    frame = cv2.cvtColor(frame, cv2.COLOR_RGB2BGR)
を追加します。ビデオストリーム内の画像の各フレームを読み込むと、BGR から RGB に変換され、メディアパイプによって生成された読み取り用オブジェクトに供給され、この画像内の指のキーポイントの情報が返されます。画像のすべてのフレームに描画を続けます。
    # 如果结果不为空
    if results.multi_hand_landmarks:

        # 遍历双手(根据读取顺序,一只只手遍历、画画)
        for hand_landmarks in results.multi_hand_landmarks:
            mp_drawing.draw_landmarks(
                frame,
                hand_landmarks,
                mp_hands.HAND_CONNECTIONS,
                mp_drawing_styles.get_default_hand_landmarks_style(),
                mp_drawing_styles.get_default_hand_connections_style())
2.3 このステップの完全なコード
import cv2
import time
import numpy as np
import mediapipe as mp


mp_drawing = mp.solutions.drawing_utils
mp_drawing_styles = mp.solutions.drawing_styles
mp_hands = mp.solutions.hands

hands =  mp_hands.Hands(
    static_image_mode=True,
    max_num_hands=2,
    min_detection_confidence=0.5)


# 调用摄像头 0 默认摄像头
cap = cv2.VideoCapture(0)

# 方块初始数组
x = 100
y = 100
w = 100
h = 100


# 读取一帧帧照片
while True:
    # 返回frame图片
    rec,frame = cap.read()

    # 镜像
    frame = cv2.flip(frame,1)


    frame.flags.writeable = False
    frame = cv2.cvtColor(frame, cv2.COLOR_BGR2RGB)
    # 返回结果
    results = hands.process(frame)

    frame.flags.writeable = True
    frame = cv2.cvtColor(frame, cv2.COLOR_RGB2BGR)


    # 如果结果不为空
    if results.multi_hand_landmarks:

        # 遍历双手(根据读取顺序,一只只手遍历、画画)
        # results.multi_hand_landmarks n双手
        # hand_landmarks 每只手上21个点信息
        for hand_landmarks in results.multi_hand_landmarks:
            mp_drawing.draw_landmarks(
                frame,
                hand_landmarks,
                mp_hands.HAND_CONNECTIONS,
                mp_drawing_styles.get_default_hand_landmarks_style(),
                mp_drawing_styles.get_default_hand_connections_style())


    # 画矩形
    cv2.rectangle(frame, (x, y), (x + w, y + h), (255, 0, 255), -1)

    # 显示画面
    cv2.imshow('frame',frame)

    # 退出条件
    if cv2.waitKey(1) & 0xFF == ord('q'):
        break

cap.release()
cv2.destroyAllWindows()
3. 位置計算
この実験では正方形をドラッグする必要があるため、時間をドラッグしないでください。前の手順に従って人差し指 (8) と中指 (12) の先端の位置を取得します。それらが近い場合は、位置に応じてブロックの座標を変更します。指がブロックと一致するとき。

完全なコード

import cv2
import time
import math
import numpy as np
import mediapipe as mp
# mediapipe配置
mp_drawing = mp.solutions.drawing_utils
mp_drawing_styles = mp.solutions.drawing_styles
mp_hands = mp.solutions.hands
hands = mp_hands.Hands(
static_image_mode=True,
max_num_hands=2,
min_detection_confidence=0.5)
# 调用摄像头 0 默认摄像头
cap = cv2.VideoCapture(0)
# cv2.namedWindow("frame", 0)
# cv2.resizeWindow("frame", 960, 640)
# 获取画面宽度、高度
width = int(cap.get(cv2.CAP_PROP_FRAME_WIDTH))
height = int(cap.get(cv2.CAP_PROP_FRAME_HEIGHT))
# 方块初始数组
x = 100
y = 100
w = 100
h = 100
L1 = 0
L2 = 0
on_square = False
square_color = (0, 255, 0)
# 读取一帧帧照片
while True:
# 返回frame图片
rec,frame = cap.read()
# 镜像
frame = cv2.flip(frame,1)
frame.flags.writeable = False
frame = cv2.cvtColor(frame, cv2.COLOR_BGR2RGB)
# 返回结果
results = hands.process(frame)
frame.flags.writeable = True
frame = cv2.cvtColor(frame, cv2.COLOR_RGB2BGR)
# 如果结果不为空
if results.multi_hand_landmarks:
# 遍历双手(根据读取顺序,一只只手遍历、画画)
# results.multi_hand_landmarks n双手
# hand_landmarks 每只手上21个点信息
for hand_landmarks in results.multi_hand_landmarks:
mp_drawing.draw_landmarks(
frame,
hand_landmarks,
mp_hands.HAND_CONNECTIONS,
mp_drawing_styles.get_default_hand_landmarks_style(),
mp_drawing_styles.get_default_hand_connections_style())
# 记录手指每个点的x y 坐标
x_list = []
y_list = []
for landmark in hand_landmarks.landmark:
x_list.append(landmark.x)
y_list.append(landmark.y)
# 获取食指指尖
index_finger_x, index_finger_y = int(x_list[8] * width),int(y_list[8] * height)
# 获取中指
middle_finger_x,middle_finger_y = int(x_list[12] * width), int(y_list[12] * height)
# 计算两指尖距离
finger_distance = math.hypot((middle_finger_x - index_finger_x), (middle_finger_y - index_finger_y))
# 如果双指合并(两之间距离近)
if finger_distance < 60:
# X坐标范围 Y坐标范围
if (index_finger_x > x and index_finger_x < (x + w)) and (
index_finger_y > y and index_finger_y < (y + h)):
if on_square == False:
L1 = index_finger_x - x
L2 = index_finger_y - y
square_color = (255, 0, 255)
on_square = True
else:
# 双指不合并/分开
on_square = False
square_color = (0, 255, 0)
# 更新坐标
if on_square:
x = index_finger_x - L1
y = index_finger_y - L2
# 图像融合 使方块不遮挡视频图片
overlay = frame.copy()
cv2.rectangle(frame, (x, y), (x + w, y + h), square_color, -1)
frame = cv2.addWeighted(overlay, 0.5, frame, 1 - 0.5, 0)
# 显示画面
cv2.imshow('frame',frame)
# 退出条件
if cv2.waitKey(1) & 0xFF == ord('q'):
break
cap.release()
cv2.destroyAllWindows()以上がPython+OpenCVで仮想四角形をドラッグした効果を実現する方法の詳細内容です。詳細については、PHP 中国語 Web サイトの他の関連記事を参照してください。

