
ホームページ >ウェブフロントエンド >Vue.js >vue3テーブルコンポーネントの使い方
vue3テーブルコンポーネントの使い方

- 王林転載
- 2023-05-12 21:40:121279ブラウズ
基本的なテーブル
テーブル コンポーネントを開発する前に、どのような API を使用するかを考えます。作成者は制作作業で要素を使用するため、最初のいくつかのコンポーネントのスタイルは要素と似ていますが、今回は要素スタイルを使用する予定はなく、要素スタイルを変更して直接表示する予定です:
ユーザーには次のように使用してほしい:
<script setup>
const dataList = [
{
id: 1,
name: '《JavaEE企业应用实战》',
author: 'dev1ce',
price: '10.22',
desc: '书中最后讲解的项目案例,涵盖从前期设计到最终实施的整个过程,对全书知识点进行串联和巩固,使读者融会贯通,掌握Java Web开发的精髓。'
},
{
id: 2,
name: '《代码整洁之道》',
author: 'R0bert',
price: '10.22',
desc: '整洁代码并非遵循一组规则编写的。不可能因为学习一套金规玉律就成为软件大师。专业精神和手工艺来自于推动规则形成的价值。'
},
{
id: 3,
name: '《ECMAScript 6 入门教程》',
author: 'y1feng',
price: '10.22',
desc: '本书是一本开源的 JavaScript 语言教程,全面介绍 ECMAScript 6 新引入的语法特性。'
},
]
const columnsList = [
{
title: '书名',
key: 'name'
},
{
title: '作者',
key: 'author'
},
{
title: '价格',
key: 'price'
},
{
title: '简介',
key: 'desc'
}
]
</script>
<template>
<sanorin-table :columns="columnsList" :data="dataList"/>
</template>これに従って次のコードを記述します
<script setup>
import { ref, computed } from 'vue'
import { useProp, useNeumorphism } from '../mixin/neumorphism'
const props = defineProps({
...useProp,
...{
data: { // dataList
type: Array,
default: () => [],
},
columns: { // columnsList
type: Array,
default: () => [],
},
}
})
const { baseStyleObject } = useNeumorphism(props)
let styleObject = computed(() => ({
// '--font-size': `${props.size-26}px`, '--line-height': `${props.size-20}px`, '--limit-size': `${props.size-28}px`
}))
</script>
<template>
<div :>
<table >
<thead>
<tr class="neumorphism">
<!-- 表头循环 -->
<th v-for="col in columns" :key="col.key">{{col.title}}</th>
</tr>
</thead>
<tbody>
<!-- 表体循环 -->
<tr class="neumorphism" v-for="row in data" :key="row.id">
<td v-for="col in columns" :key="col.key">
<span>
{{row[col.key]}}
</span>
</td>
</tr>
</tbody>
</table>
</div>
</template>
<script>
export default {
name: 'sanorin-table',
}
</script>
<style scoped>
@import "../../style/index.css";
@import "../../style/neumorphism.css";
table {
width: 100%;
/* border-collapse: collapse; */
empty-cells: show;
border-collapse:separate;
border-spacing:0px 10px;
}
table td,
table th {
color: var(--text-color);
padding: 8px 16px 8px 16px;
text-align: left;
}
table th {
color: var(--text-back-color) !important;
font-weight: 600;
white-space: nowrap;
}
table tr{
margin-top: 20px;
}
</style>最後のものが出てきます 効果は次のとおりです:
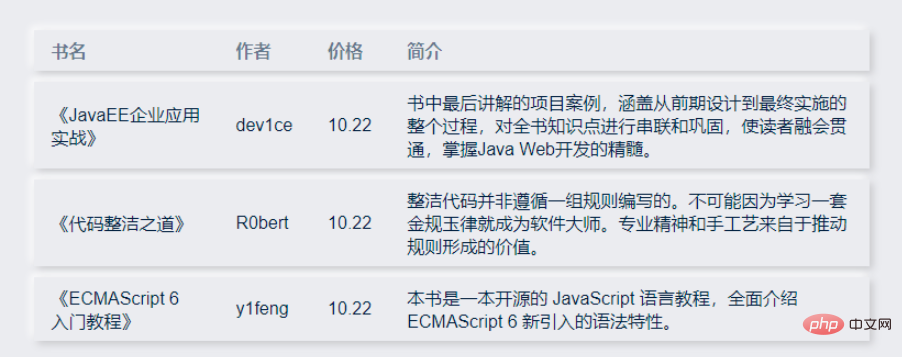
# そして、これに気づいた後、ヘッダーの修正から始めて次の作業を開始します。
固定ヘッダー
ここでは前者の方法で進めますが、今後ニーズに応えられない場合は後者の方法に変更します。
エフェクトとコードは次のとおりです:
<script setup>
import { ref, computed } from 'vue'
import { useProp, useNeumorphism } from '../mixin/neumorphism'
const props = defineProps({
...useProp,
...{
data: { // dataList
type: Array,
default: () => [],
},
columns: { // columnsList
type: Array,
default: () => [],
},
}
})
const { baseStyleObject } = useNeumorphism(props)
let styleObject = computed(() => ({
}))
</script>
<template>
<div class="san-table scrollbar" :>
<table>
<thead>
<tr class="neumorphism">
<!-- 表头循环 -->
<th v-for="col in columns" :key="col.key">{{col.title}}</th>
</tr>
</thead>
<tbody>
<!-- 表体循环 -->
<tr class="neumorphism" v-for="row in data" :key="row.id">
<td v-for="col in columns" :key="col.key">
<span>
{{row[col.key]}}
</span>
</td>
</tr>
</tbody>
</table>
</div>
</template>
<script>
export default {
name: 'sanorin-table',
}
</script>
<style scoped>
@import "../../style/index.css";
@import "../../style/neumorphism.css";
.san-table{
padding: 0px 20px 20px 20px;
height: 200px;
position: relative;
width: 700px;
overflow: auto;
}
table {
width: 100%;
table-layout: fixed;
empty-cells: show;
border-collapse:separate;
border-spacing:0px 10px;
}
thead {
position: sticky;
top: 10px;
}
thead:before{
position: absolute;
content: '';
width: calc(100% + var(--shadow-blur) * 2);
transform: translate(calc(var(--shadow-blur) * -1) , -10px);
height: 20px;
background-color: var(--main-color);
z-index: -1;
}
table td,
table th {
color: var(--text-color);
padding: 8px 16px 8px 16px;
text-align: left;
}
table th {
color: var(--text-back-color) !important;
font-weight: 600;
white-space: nowrap;
}
</style>高さ/流体の高さ
テーブルの高さを設定できます。 (高さ)
データ量が動的に変化する場合、テーブルの最大高さを設定できます。 (maxHeight) max-height プロパティを設定することで、テーブルの最大の高さを指定します。このとき、必要な表の高さが最大高さより大きい場合は、スクロールバーが表示されます。
sanorin-table 要素に height または maxHeight 属性が定義されていれば、追加コードなしで固定ヘッダーを持つテーブルを実装できます。
コードは次のとおりです:
<script setup>
import { ref, computed, reactive } from 'vue'
import { useProp, useNeumorphism } from '../mixin/neumorphism'
const props = defineProps({
...useProp,
...{
data: { // dataList
type: Array,
default: () => [],
},
columns: { // columnsList
type: Array,
default: () => [],
},
height: {
type: Number,
},
maxHeight: {
type: Number,
}
}
})
// 高度设置
let tableHeightStyleObj = computed(() => {
let styleObj = ((e) => {
if (e.maxHeight) return { maxHeight: e.maxHeight + 'px' }
if (e.height) return { height: e.height + 'px' }
return {}
})({...props})
return styleObj
})
const { baseStyleObject } = useNeumorphism(props)
let styleObject = computed(() => ({
...tableHeightStyleObj.value
}))
</script>
<template>
<div class="san-table scrollbar" :>
<table>
<colgroup>
<col v-for="(col, index) in columns" :key="index">
</colgroup>
<thead>
<tr class="neumorphism">
<th v-for="col in columns" :key="col.key"> {{col.title}} </th>
</tr>
</thead>
<tbody>
<tr class="neumorphism" v-for="row in data" :key="row.id">
<td v-for="col in columns" :key="col.key"> {{row[col.key]}} </td>
</tr>
</tbody>
</table>
</div>
</template>
<script>
export default {
name: 'sanorin-table',
}
</script>
<style scoped>
@import "../../style/index.css";
@import "../../style/neumorphism.css";
.san-table{
padding: 0px 20px 20px 20px;
position: relative;
width: 700px;
overflow: auto;
}
table {
width: 100%;
table-layout: fixed;
empty-cells: show;
border-collapse:separate;
border-spacing:0px 10px;
}
thead {
position: sticky;
top: 10px;
}
thead:before{
position: absolute;
content: '';
width: calc(100% + var(--shadow-blur) * 2);
transform: translate(calc(var(--shadow-blur) * -1) , -10px);
height: 20px;
background-color: var(--main-color);
z-index: -1;
}
table td,
table th {
color: var(--text-color);
padding: 8px 16px 8px 16px;
text-align: left;
}
table th {
color: var(--text-back-color) !important;
font-weight: 600;
white-space: nowrap;
}
</style>カスタム列幅
次に、幅コントロールを追加して、列で渡される配列オブジェクトに幅を追加します。例は次のとおりです:
const columnsList = [
  {
    title: '书名',
    key: 'name',
    width: 100,
  },
  {
    title: '作者',
    key: 'author',
    width: 100,
  },
  {
    title: '价格',
    key: 'price',
    width: 100,
  },
  {
    title: '简介',
    key: 'desc',
    minWidth: 350,
  }
]
次の効果が得られることを願っています
1. width を含む列の幅は固定されており、ブラウザの幅によって変化しません。
2. minWidth を含む列は、残りの幅を自動的に埋めます。設定値より大きい場合はテーブルを表示します。設定値より小さい場合は、値を設定するときに幅を固定します##3。width と minWidth を含まない列はテーブルの残りの幅を自動的に埋めます。
ニーズに応じて、各列の幅表示を個別に制御する必要があり、ブラウザの幅が変更されたときにその場で列を再計算して再レンダリングします。
まず、現在の状況で各列の必要な幅を計算するメソッドを定義し、それを必要な dom にバインドします。これにより、テーブルが変更される/ブラウザの幅が変更されるたびに、テーブルの幅をリアルタイムに変更できます。
  const initColumns = () => {
    // 计算每一列在当前情况下所要的宽度
  }
  watch(() => props.columns, () => { initColumns() });
  onMounted(() => {
    nextTick(() => {
      initColumns();
      on(window, 'resize', throttle(() => initColumns(), 400));
    });
  });
  onBeforeUnmount(() => off(window, 'resize', () => initColumns()));
すべてのコード: <script setup>
import { ref, computed, watch, onMounted, onBeforeUnmount, nextTick } from 'vue'
import { on, off } from '../../utils/listener'
import { throttle } from "../../utils/debounce&throttle"
import { useProp, useNeumorphism } from '../mixin/neumorphism'
const table = ref() // 与html中ref=""对应,定位dom元素
const props = defineProps({
...useProp,
...{
data: { // dataList
type: Array,
default: () => [],
},
columns: { // columnsList
type: Array,
default: () => [],
},
height: { // height
type: Number,
},
maxHeight: { // 流体高度
type: Number,
},
minUnsetWidth: { // 未设置宽度时最小宽度
type: Number,
default: 80
}
}
})
// 高度设置
let tableHeightStyleObj = computed(() => {
let styleObj = ((e) => {
if (e.maxHeight) return { maxHeight: e.maxHeight + 'px' }
if (e.height) return { height: e.height + 'px' }
return {}
})({...props})
return styleObj
})
// 列宽设置
let col = ref([])
const { columns, minUnsetWidth } = props
const _min_column_width = minUnsetWidth // 未设置宽度时最小宽度
const initColumns = () => {
col.value = (() => {
let _total_width = table.value.offsetWidth // 表格dom元素总宽度
let _needed_minWidth = columns.reduce((t, v) => { // 需要的最小宽度
t += v.width || v.minWidth || _min_column_width
return t
}, 0)
// 需要的最小宽度比总宽度大,则取minWidth即可
if (_needed_minWidth >= _total_width) return columns.reduce((t, v) => {
let n = v.width || v.minWidth || _min_column_width
t = [...t, n]
return t
}, [])
// 需要的最小宽度比总宽度大,则要把minWidth加权,权重为(未分配的宽度 / minWidth之和)
let _unassigned_width = columns.reduce((t, v) => {
t += v.minWidth || 0
return t
}, 0)
let _assigned_width = _needed_minWidth - _unassigned_width
let _width_power = (_total_width - _assigned_width) / _unassigned_width
return columns.reduce((t, v) => {
let n = v.width || (v.minWidth ? (_width_power * v.minWidth).toFixed(2) : _min_column_width)
t = [...t, n]
return t
}, [])
})()
}
watch(() => props.columns, () => { initColumns() })
const throttleInitColumns = () => throttle(() => initColumns(), 400)
onMounted(() => {
nextTick(() => {
initColumns()
on(window, 'resize', throttleInitColumns)
})
})
onBeforeUnmount(() => off(window, 'resize', throttleInitColumns))
const { baseStyleObject } = useNeumorphism(props)
let styleObject = computed(() => ({
...tableHeightStyleObj.value
}))
</script>
<template>
<div class="san-table scrollbar" :>
<table ref="table">
<colgroup>
<col v-for="(item, index) in col" :key="index" :width="`${item}px`">
</colgroup>
<thead>
<tr class="neumorphism">
<th v-for="col in columns" :key="col.key"> {{col.title}} </th>
</tr>
</thead>
<tbody>
<tr class="neumorphism" v-for="row in data" :key="row.id">
<td v-for="col in columns" :key="col.key"> {{row[col.key]}} </td>
</tr>
</tbody>
</table>
</div>
</template>
<script>
export default {
name: 'sanorin-table',
}
</script>
<style scoped>
@import "../../style/index.css";
@import "../../style/neumorphism.css";
.san-table{
padding: 0px 20px 20px 20px;
position: relative;
overflow: auto;
}
table {
width: 100%;
table-layout: fixed;
empty-cells: show;
border-collapse:separate;
border-spacing:0px 10px;
}
thead {
position: sticky;
top: 10px;
}
thead:before{
position: absolute;
content: '';
width: calc(100% + var(--shadow-blur) * 2);
transform: translate(calc(var(--shadow-blur) * -1) , -10px);
height: 20px;
background-color: var(--main-color);
z-index: -1;
}
table td,
table th {
color: var(--text-color);
padding: 8px 16px 8px 16px;
text-align: left;
word-break:break-all;
}
table th {
color: var(--text-back-color) !important;
font-weight: 600;
white-space: nowrap;
}
</style>使用される 2 つの JS、手ぶれ補正スロットリングと登録モニタリングもここに記載されています/* 防抖节流函数 */
let timeout = null // 创建一个标记用来存放定时器的返回值
let count = 0;
export function debounce(fn, wait = 1000, immediate = false) {
return function () {
const args = arguments;
if (immediate) {
if (count == 0) {
fn.apply(this, arguments)
count++;
} else {
if (timeout) {
clearTimeout(timeout) // 每当用户输入的时候把前一个 setTimeout clear 掉
}
timeout = setTimeout(() => {
fn.apply(this, arguments)
}, wait)
}
} else {
if (timeout) {
clearTimeout(timeout) // 每当用户输入的时候把前一个 setTimeout clear 掉
}
timeout = setTimeout(() => {
fn.apply(this, arguments)
}, wait)
}
}()
}
let canRun = true;
let count1 = 0;
export function throttle(fn, wait = 1000, immediate = true) {
return function () {
if (immediate) {
if (count1 == 0) {
fn.apply(this, arguments);
count1++;
} else {
if (canRun) {
canRun = false
setTimeout(function () {
fn.apply(this, arguments)
canRun = true
}, wait);
}
}
} else {
if (!canRun) return
canRun = false
setTimeout(function () {
fn.apply(this, arguments)
canRun = true
}, wait);
}
}()
}/**
* 绑定事件 on(element, event, handler)
*/
export const on = (element, event, handler) => {
if (document.addEventListener) {
if (element && event && handler) {
element.addEventListener(event, handler, false)
}
}
}
/**
* 解绑事件 off(element, event, handler)
*/
export const off = (element, event, handler) => {
if (document.removeEventListener) {
if (element && event) {
element.removeEventListener(event, handler, false)
}
}
}以上がvue3テーブルコンポーネントの使い方の詳細内容です。詳細については、PHP 中国語 Web サイトの他の関連記事を参照してください。