ホームページ >バックエンド開発 >Python チュートリアル >Pytorch を使用して自己教師あり事前トレーニング用の対照学習 SimCLR を実装する
Pytorch を使用して自己教師あり事前トレーニング用の対照学習 SimCLR を実装する
- WBOYWBOYWBOYWBOYWBOYWBOYWBOYWBOYWBOYWBOYWBOYWBOYWB転載
- 2023-04-10 14:11:032203ブラウズ
SimCLR (Simple Framework for Contrastive Learning of Representations) は、画像表現を学習するための自己教師ありテクノロジです。従来の教師あり学習手法とは異なり、SimCLR はラベル付きデータに依存して有用な表現を学習しません。対照的な学習フレームワークを利用して、ラベルのない画像から高レベルの意味情報をキャプチャできる一連の便利な機能を学習します。
SimCLR は、さまざまな画像分類ベンチマークにおいて、最先端の教師なし学習手法よりも優れたパフォーマンスを発揮することが証明されています。また、学習した表現は、小さなラベル付きデータセットに対する最小限の微調整で、オブジェクト検出、セマンティック セグメンテーション、少数ショット学習などの下流タスクに簡単に転送できます。

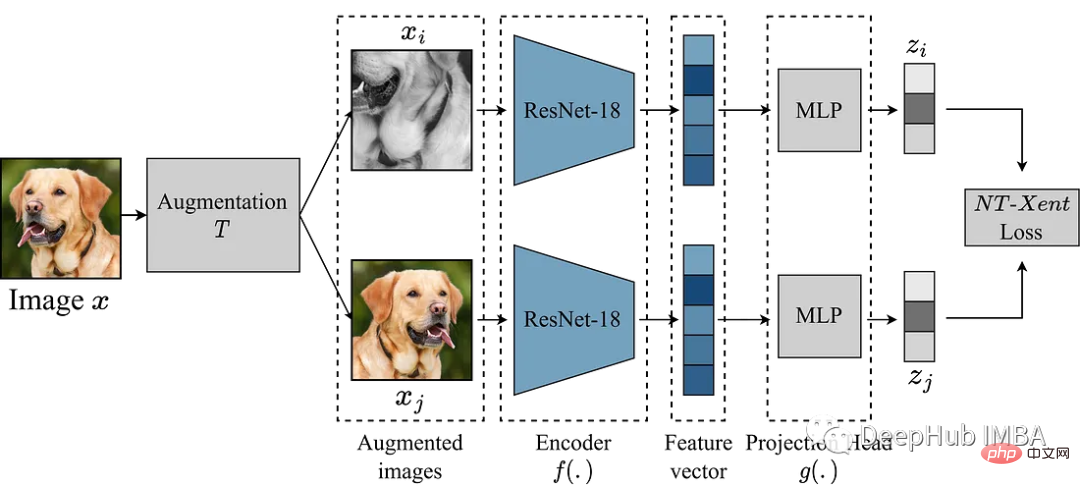
#SimCLR の主なアイデアは、拡張モジュール T を通じて同じ画像の他の拡張バージョンと比較することで、画像の適切な表現を学習することです。これは、エンコーダ ネットワーク f(.) を介して画像をマッピングし、それを投影することによって行われます。 head g(.) は、学習された特徴を低次元空間にマッピングします。次に、同じ画像の 2 つの強化バージョンの表現間でコントラスト損失が計算され、同じ画像の類似した表現と、異なる画像の異なる表現が促進されます。
この記事では、SimCLR フレームワークを詳しく掘り下げ、データ拡張、対比損失関数、エンコーダーとプロジェクションのヘッド アーキテクチャなど、アルゴリズムの主要なコンポーネントについて説明します。
Kaggle のガベージ分類データセットを使用して実験を行います
拡張モジュール
SimCLR で最も重要なのは、画像を変換するための拡張モジュールです。 SimCLR 論文の著者らは、強力なデータ拡張が教師なし学習に役立つことを示唆しています。したがって、この論文で推奨されているアプローチに従います。
- サイズ変更のためのランダムなトリミング
- 50% の確率でランダムな水平反転
- ランダムな色の歪み (カラー ディザリングの確率 80%、カラー ドロップの確率 20%) )
- 50% の確率はランダムなガウスぼかしです
def get_complete_transform(output_shape, kernel_size, s=1.0):
 """
Color distortion transform

Args:
s: Strength parameter

Returns:
A color distortion transform
"""
 rnd_crop = RandomResizedCrop(output_shape)
 rnd_flip = RandomHorizontalFlip(p=0.5)

 color_jitter = ColorJitter(0.8*s, 0.8*s, 0.8*s, 0.2*s)
 rnd_color_jitter = RandomApply([color_jitter], p=0.8)

 rnd_gray = RandomGrayscale(p=0.2)
 gaussian_blur = GaussianBlur(kernel_size=kernel_size)
 rnd_gaussian_blur = RandomApply([gaussian_blur], p=0.5)
 to_tensor = ToTensor()
 image_transform = Compose([
 to_tensor,
 rnd_crop,
 rnd_flip,
 rnd_color_jitter,
 rnd_gray,
 rnd_gaussian_blur,
])
 return image_transform

 class ContrastiveLearningViewGenerator(object):
 """
Take 2 random crops of 1 image as the query and key.
"""
 def __init__(self, base_transform, n_views=2):
 self.base_transform = base_transform
 self.n_views = n_views

 def __call__(self, x):
 views = [self.base_transform(x) for i in range(self.n_views)]
 return views
次のステップは、PyTorch データセットを定義することです。
class CustomDataset(Dataset):
 def __init__(self, list_images, transform=None):
 """
Args:
list_images (list): List of all the images
transform (callable, optional): Optional transform to be applied on a sample.
"""
 self.list_images = list_images
 self.transform = transform

 def __len__(self):
 return len(self.list_images)

 def __getitem__(self, idx):
 if torch.is_tensor(idx):
 idx = idx.tolist()

 img_name = self.list_images[idx]
 image = io.imread(img_name)
 if self.transform:
 image = self.transform(image)

 return image
例として、バックボーンとして小さいモデル ResNet18 を使用するため、その入力は 224x224 画像です。必要に応じていくつかのパラメーターを設定し、データローダーを生成します
out_shape = [224, 224]
 kernel_size = [21, 21] # 10% of out_shape

 # Custom transform
 base_transforms = get_complete_transform(output_shape=out_shape, kernel_size=kernel_size, s=1.0)
 custom_transform = ContrastiveLearningViewGenerator(base_transform=base_transforms)

 garbage_ds = CustomDataset(
 list_images=glob.glob("/kaggle/input/garbage-classification/garbage_classification/*/*.jpg"),
 transform=custom_transform
 )

 BATCH_SZ = 128

 # Build DataLoader
 train_dl = torch.utils.data.DataLoader(
 garbage_ds,
 batch_size=BATCH_SZ,
 shuffle=True,
 drop_last=True,
 pin_memory=True)
SimCLR
データを準備し、モデルの再現を開始しました。上記の拡張モジュールは、画像の 2 つの拡張ビューを提供し、これらはエンコーダを通過して対応する表現を取得します。 SimCLR の目標は、モデルが 2 つの異なる拡張ビューからオブジェクトの一般的な表現を学習することを奨励することで、これらの異なる学習された表現間の類似性を最大化することです。
エンコーダ ネットワークの選択には制限がなく、どのようなアーキテクチャでも選択できます。前述したように、簡単なデモンストレーションには ResNet18 を使用します。エンコーダー モデルによって学習された表現によって類似性係数が決定され、これらの表現の品質を向上させるために、SimCLR は投影ヘッドを使用してエンコード ベクトルをより豊かな潜在空間に投影します。ここでは ResNet18 の 512 次元の特徴を 256 次元の空間に投影しています。非常に複雑に見えますが、実際には relu で mlp を追加しているだけです。
class Identity(nn.Module):
 def __init__(self):
 super(Identity, self).__init__()
 def forward(self, x):
 return x

 class SimCLR(nn.Module):
 def __init__(self, linear_eval=False):
 super().__init__()
 self.linear_eval = linear_eval
 resnet18 = models.resnet18(pretrained=False)
 resnet18.fc = Identity()
 self.encoder = resnet18
 self.projection = nn.Sequential(
 nn.Linear(512, 512),
 nn.ReLU(),
 nn.Linear(512, 256)
)
 def forward(self, x):
 if not self.linear_eval:
 x = torch.cat(x, dim=0)
 encoding = self.encoder(x)
 projection = self.projection(encoding)
 return projection
コントラスト損失
正規化温度スケールクロスエントロピー損失 (NT-Xent) としても知られるコントラスト損失関数は、 SimCLR の重要なコンポーネントです。これにより、モデルは同じ画像については同様の表現を学習し、異なる画像については異なる表現を学習するようになります。

NT-Xent 損失は、エンコーダ ネットワークを通過した画像の拡張ビューのペアを使用して計算され、対応する表現が取得されます。コントラスト損失の目的は、同じ画像の 2 つの拡張ビューの表現が類似するように促し、同時に異なる画像の表現を強制的に非類似にすることです。
NT-Xent は、ソフトマックス関数を適用して、ビュー表現のペアごとの類似性を強化します。ソフトマックス関数は、ミニバッチ内のすべての表現ペアに適用され、各画像の類似確率分布が取得されます。温度パラメーターは、softmax 関数を適用する前にペアごとの類似性をスケールするために使用され、最適化中により良い勾配を取得するのに役立ちます。
類似性の確率分布を取得した後、同じ画像の一致する表現の対数尤度を最大化し、異なる画像の不一致表現の対数尤度を最小化することによって NT-Xent 損失が計算されます。
LABELS = torch.cat([torch.arange(BATCH_SZ) for i in range(2)], dim=0)
 LABELS = (LABELS.unsqueeze(0) == LABELS.unsqueeze(1)).float() #one-hot representations
 LABELS = LABELS.to(DEVICE)

 def ntxent_loss(features, temp):
 """
NT-Xent Loss.

Args:
z1: The learned representations from first branch of projection head
z2: The learned representations from second branch of projection head
Returns:
Loss
"""
 similarity_matrix = torch.matmul(features, features.T)
 mask = torch.eye(LABELS.shape[0], dtype=torch.bool).to(DEVICE)
 labels = LABELS[~mask].view(LABELS.shape[0], -1)
 similarity_matrix = similarity_matrix[~mask].view(similarity_matrix.shape[0], -1)

 positives = similarity_matrix[labels.bool()].view(labels.shape[0], -1)

 negatives = similarity_matrix[~labels.bool()].view(similarity_matrix.shape[0], -1)

 logits = torch.cat([positives, negatives], dim=1)
 labels = torch.zeros(logits.shape[0], dtype=torch.long).to(DEVICE)

 logits = logits / temp
 return logits, labels
すべての準備が完了しました。SimCLR をトレーニングして効果を確認してみましょう。
simclr_model = SimCLR().to(DEVICE)
 criterion = nn.CrossEntropyLoss().to(DEVICE)
 optimizer = torch.optim.Adam(simclr_model.parameters())

 epochs = 10
 with tqdm(total=epochs) as pbar:
 for epoch in range(epochs):
 t0 = time.time()
 running_loss = 0.0
 for i, views in enumerate(train_dl):
 projections = simclr_model([view.to(DEVICE) for view in views])
 logits, labels = ntxent_loss(projections, temp=2)
 loss = criterion(logits, labels)
 optimizer.zero_grad()
 loss.backward()
 optimizer.step()

 # print stats
 running_loss += loss.item()
 if i%10 == 9: # print every 10 mini-batches
 print(f"Epoch: {epoch+1} Batch: {i+1} Loss: {(running_loss/100):.4f}")
 running_loss = 0.0
 pbar.update(1)
 print(f"Time taken: {((time.time()-t0)/60):.3f} mins")
上記のコードは 10 ラウンドでトレーニングされています。事前トレーニング プロセスが完了していると仮定すると、必要なダウンストリーム タスクに事前トレーニングされたエンコーダーを使用できます。これは以下のコードで実行できます。
from torchvision.transforms import Resize, CenterCrop
 resize = Resize(255)
 ccrop = CenterCrop(224)
 ttensor = ToTensor()

 custom_transform = Compose([
 resize,
 ccrop,
 ttensor,
 ])

 garbage_ds = ImageFolder(
 root="/kaggle/input/garbage-classification/garbage_classification/",
 transform=custom_transform
 )

 classes = len(garbage_ds.classes)

 BATCH_SZ = 128

 train_dl = torch.utils.data.DataLoader(
 garbage_ds,
 batch_size=BATCH_SZ,
 shuffle=True,
 drop_last=True,
 pin_memory=True,
 )

 class Identity(nn.Module):
 def __init__(self):
 super(Identity, self).__init__()
 def forward(self, x):
 return x

 class LinearEvaluation(nn.Module):
 def __init__(self, model, classes):
 super().__init__()
 simclr = model
 simclr.linear_eval=True
 simclr.projection = Identity()
 self.simclr = simclr
 for param in self.simclr.parameters():
 param.requires_grad = False
 self.linear = nn.Linear(512, classes)
 def forward(self, x):
 encoding = self.simclr(x)
 pred = self.linear(encoding)
 return pred

 eval_model = LinearEvaluation(simclr_model, classes).to(DEVICE)
 criterion = nn.CrossEntropyLoss().to(DEVICE)
 optimizer = torch.optim.Adam(eval_model.parameters())

 preds, labels = [], []
 correct, total = 0, 0

 with torch.no_grad():
 t0 = time.time()
 for img, gt in tqdm(train_dl):
 image = img.to(DEVICE)
 label = gt.to(DEVICE)
 pred = eval_model(image)
 _, pred = torch.max(pred.data, 1)
 total += label.size(0)
 correct += (pred == label).float().sum().item()

 print(f"Time taken: {((time.time()-t0)/60):.3f} mins")

 print(
 "Accuracy of the network on the {} Train images: {} %".format(
 total, 100 * correct / total
)
)
上記のコードの最も重要な部分は、トレーニングしたばかりの simclr モデルを読み取り、すべての重みをフリーズしてから、下流の分類タスクを実行するために分類ヘッド self.linear を作成することです。
概要
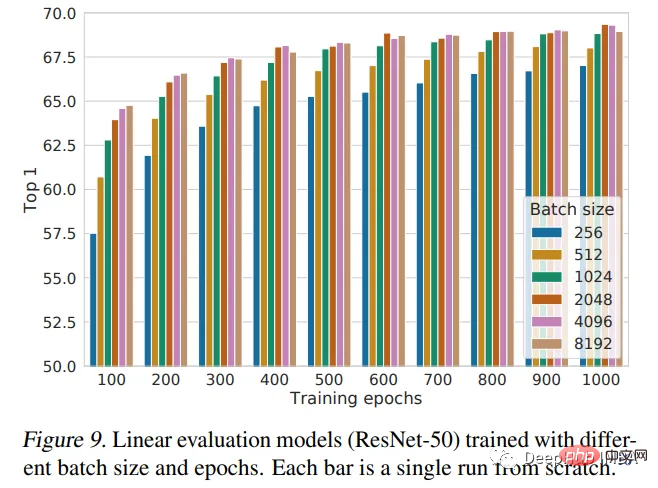
この記事では、SimCLR フレームワークを紹介し、それを使用してランダムに初期化された重みで ResNet18 を事前トレーニングします。事前トレーニングは、大規模なデータセットでモデルをトレーニングし、他のタスクに転送できる便利な機能を学習するためにディープ ラーニングで使用される強力な手法です。 SimCLR の論文では、バッチ サイズが大きいほどパフォーマンスが向上すると考えられています。私たちの実装ではバッチ サイズ 128 のみを使用し、トレーニングは 10 エポックのみです。したがって、これはモデルの最高のパフォーマンスではないため、パフォーマンスの比較が必要な場合は、さらなるトレーニングが必要です。
次の図は、論文の著者によって与えられたパフォーマンスの結論です:

以上がPytorch を使用して自己教師あり事前トレーニング用の対照学習 SimCLR を実装するの詳細内容です。詳細については、PHP 中国語 Web サイトの他の関連記事を参照してください。

