


翻訳者 | Zhu Xianzhong
改訂 | Sun Shujuan
はじめに
ML モデルのライフサイクルの各段階における基本的なアクティビティの 1 つ開発 1 つはコラボレーションです。 ML モデルの構想から展開まで、モデルの構築に関与するさまざまなアクター間の参加と対話が必要です。さらに、ML モデル開発の性質上、実験、アーティファクトとメトリクスの追跡、モデルのバージョン管理などが含まれます。これらすべてに、ML モデルのライフサイクルを適切に維持するための効果的な組織が必要です。
幸いなことに、モデルのライフサイクルを開発および維持するための MLflow に似たツールが登場しました。この記事では、MLflow の主要コンポーネントと機能の分析を含め、MLflow を詳細に分析します。さらに、MLflow が実際にどのように機能するかを示す例も提供します。
MLflow とは何ですか?
MLflow は、ML モデルのライフサイクルのあらゆる段階での開発、メンテナンス、コラボレーションのためのオープンソース ツールです。さらに、MLflow はフレームワークに依存しないツールであるため、ML/DL (機械学習/深層学習) フレームワークは、MLflow が提案するエコシステムにすぐに適応できます。
MLflow は、メトリクス、アーティファクト、メタデータなどを追跡するための一連のツールを提供するプラットフォームとして表示されます。さらに、モデルとプロジェクトをパッケージ化、配布、デプロイするための標準形式のサポートも提供します。
MLflow は、モデルのバージョンを管理するためのツールも提供します。これらのツールは、次の 4 つの主要コンポーネントにカプセル化されています。
- MLflow Tracking
- MLflow モデル
- MLflow プロジェクト
- MLflow レジストリ (レジストリ)
MLflow Tracking
MLflow Tracking は、メトリクス、パラメーター、モデル バージョン、コード バージョン、ドキュメントを記録するための API ベースのツールです。 MLflow トレースは、アーティファクト、モデル、ファイルなどを視覚化して管理するための UI と統合されています。
その中で、各 MLflow 追跡セッションは、実行という概念に基づいて編成および管理されます。実行とはコードの実行を指しますが、このうちアーティファクトログ部分は明示的に実行されます。
MLflow トラッキングを使用すると、Python、R、Java などの言語と、MLflow が提供する REST API を介して実行を生成できます。デフォルトでは、実行はコード セッションが実行されるディレクトリに保存されます。ただし、MLflow では、アーティファクトをローカルまたはリモート サーバーに保存することもできます。
MLflow モデル
MLflow モデルを使用すると、機械学習モデルを標準形式にパッケージ化し、REST API、Microsoft Azure ML、Amazon SageMaker、Apache Spark などのさまざまなサービスを通じて直接利用できます。 MLflow モデル コントラクトの利点の 1 つは、ラッパーが複数言語または複数フレーバーをサポートしていることです。
[翻訳者注] MLflow では「フレーバー」という言葉がよく出てきますが、これは主に複数の言語、複数のタイプのコンポーネントおよびライブラリの広範なサポートを指します。これは、以下に示す構成ファイルから簡単に確認できます。この時点で。ここでは、この記事では一律に「風味」と直訳します。
パッケージ化に関しては、MLflow は 2 つのファイルを含むディレクトリを生成します。1 つはモデルで、もう 1 つはモデルのパッケージ化と読み込みの詳細を指定するファイルです。たとえば、次のコード スニペットは、フレーバー ローダーを指定する MLmodel ファイルと環境を定義する "conda.yaml" ファイルの内容を示しています。
<span style="color: rgb(89, 89, 89); margin: 0px; padding: 0px; background: none 0% 0% / auto repeat scroll padding-box border-box rgba(0, 0, 0, 0);">artifact_path</span>: <span style="color: rgb(89, 89, 89); margin: 0px; padding: 0px; background: none 0% 0% / auto repeat scroll padding-box border-box rgba(0, 0, 0, 0);">model</span><br><span style="color: rgb(89, 89, 89); margin: 0px; padding: 0px; background: none 0% 0% / auto repeat scroll padding-box border-box rgba(0, 0, 0, 0);">flavors</span>:<br><span style="color: rgb(89, 89, 89); margin: 0px; padding: 0px; background: none 0% 0% / auto repeat scroll padding-box border-box rgba(0, 0, 0, 0);">python_function</span>:<br><span style="color: rgb(89, 89, 89); margin: 0px; padding: 0px; background: none 0% 0% / auto repeat scroll padding-box border-box rgba(0, 0, 0, 0);">env</span>: <span style="color: rgb(89, 89, 89); margin: 0px; padding: 0px; background: none 0% 0% / auto repeat scroll padding-box border-box rgba(0, 0, 0, 0);">conda</span>.<span style="color: rgb(0, 92, 197); margin: 0px; padding: 0px; background: none 0% 0% / auto repeat scroll padding-box border-box rgba(0, 0, 0, 0);">yaml</span><br><span style="color: rgb(89, 89, 89); margin: 0px; padding: 0px; background: none 0% 0% / auto repeat scroll padding-box border-box rgba(0, 0, 0, 0);">loader_module</span>: <span style="color: rgb(89, 89, 89); margin: 0px; padding: 0px; background: none 0% 0% / auto repeat scroll padding-box border-box rgba(0, 0, 0, 0);">MLflow</span>.<span style="color: rgb(0, 92, 197); margin: 0px; padding: 0px; background: none 0% 0% / auto repeat scroll padding-box border-box rgba(0, 0, 0, 0);">sklearn</span><br><span style="color: rgb(89, 89, 89); margin: 0px; padding: 0px; background: none 0% 0% / auto repeat scroll padding-box border-box rgba(0, 0, 0, 0);">model_path</span>: <span style="color: rgb(89, 89, 89); margin: 0px; padding: 0px; background: none 0% 0% / auto repeat scroll padding-box border-box rgba(0, 0, 0, 0);">model</span>.<span style="color: rgb(0, 92, 197); margin: 0px; padding: 0px; background: none 0% 0% / auto repeat scroll padding-box border-box rgba(0, 0, 0, 0);">pkl</span><br><span style="color: rgb(89, 89, 89); margin: 0px; padding: 0px; background: none 0% 0% / auto repeat scroll padding-box border-box rgba(0, 0, 0, 0);">python_version</span>: <span style="color: rgb(0, 92, 197); margin: 0px; padding: 0px; background: none 0% 0% / auto repeat scroll padding-box border-box rgba(0, 0, 0, 0);">3.8</span><span style="color: rgb(0, 92, 197); margin: 0px; padding: 0px; background: none 0% 0% / auto repeat scroll padding-box border-box rgba(0, 0, 0, 0);">.2</span><br><span style="color: rgb(89, 89, 89); margin: 0px; padding: 0px; background: none 0% 0% / auto repeat scroll padding-box border-box rgba(0, 0, 0, 0);">sklearn</span>:<br><span style="color: rgb(89, 89, 89); margin: 0px; padding: 0px; background: none 0% 0% / auto repeat scroll padding-box border-box rgba(0, 0, 0, 0);">pickled_model</span>: <span style="color: rgb(89, 89, 89); margin: 0px; padding: 0px; background: none 0% 0% / auto repeat scroll padding-box border-box rgba(0, 0, 0, 0);">model</span>.<span style="color: rgb(0, 92, 197); margin: 0px; padding: 0px; background: none 0% 0% / auto repeat scroll padding-box border-box rgba(0, 0, 0, 0);">pkl</span><br><span style="color: rgb(89, 89, 89); margin: 0px; padding: 0px; background: none 0% 0% / auto repeat scroll padding-box border-box rgba(0, 0, 0, 0);">serialization_format</span>: <span style="color: rgb(89, 89, 89); margin: 0px; padding: 0px; background: none 0% 0% / auto repeat scroll padding-box border-box rgba(0, 0, 0, 0);">cloudpickle</span><br><span style="color: rgb(89, 89, 89); margin: 0px; padding: 0px; background: none 0% 0% / auto repeat scroll padding-box border-box rgba(0, 0, 0, 0);">sklearn_version</span>: <span style="color: rgb(0, 92, 197); margin: 0px; padding: 0px; background: none 0% 0% / auto repeat scroll padding-box border-box rgba(0, 0, 0, 0);">0.24</span><span style="color: rgb(0, 92, 197); margin: 0px; padding: 0px; background: none 0% 0% / auto repeat scroll padding-box border-box rgba(0, 0, 0, 0);">.2</span><br><span style="color: rgb(89, 89, 89); margin: 0px; padding: 0px; background: none 0% 0% / auto repeat scroll padding-box border-box rgba(0, 0, 0, 0);">run_id</span>: <span style="color: rgb(0, 92, 197); margin: 0px; padding: 0px; background: none 0% 0% / auto repeat scroll padding-box border-box rgba(0, 0, 0, 0);">39</span><span style="color: rgb(89, 89, 89); margin: 0px; padding: 0px; background: none 0% 0% / auto repeat scroll padding-box border-box rgba(0, 0, 0, 0);">c46969dc7b4154b8408a8f5d0a97e9</span><br><span style="color: rgb(89, 89, 89); margin: 0px; padding: 0px; background: none 0% 0% / auto repeat scroll padding-box border-box rgba(0, 0, 0, 0);">utc_time_created</span>: <span style="color: rgb(102, 153, 0); margin: 0px; padding: 0px; background: none 0% 0% / auto repeat scroll padding-box border-box rgba(0, 0, 0, 0);">'2021-05-29 23:24:21.753565'</span>
MLflow プロジェクト
MLflow プロジェクトは、機械学習プロジェクトをパッケージ化、共有、再利用するための標準形式を提供します。各プロジェクトはリモート リポジトリまたはローカル ディレクトリにすることができます。 MLflow モデルとは異なり、MLflow プロジェクトは機械学習プロジェクトの移植性と配布を可能にすることを目的としています。
MLflow プロジェクトは、「MLProject」という名前の YAML 宣言ファイルによって定義され、対応するプロジェクトの一連の仕様コンテンツを公開します。
モデル実装の主要な機能は MLProject ファイルで指定されます。これらの機能には次のものが含まれます:
- モデルが受け取る入力パラメータ
- モデルのデータ型パラメータ
- モデルの実行に使用されるコマンド、および ##プロジェクトが実行される環境
- ##以下のコード スニペットは、MLProject ファイルの例を示しています。ここで、実装されるモデルはツリーです。決定木の形式では、その唯一のパラメーターはツリーの深さに対応し、デフォルト値は 2 です。
<span style="color: rgb(89, 89, 89); margin: 0px; padding: 0px; background: none 0% 0% / auto repeat scroll padding-box border-box rgba(0, 0, 0, 0);">name</span>: <span style="color: rgb(89, 89, 89); margin: 0px; padding: 0px; background: none 0% 0% / auto repeat scroll padding-box border-box rgba(0, 0, 0, 0);">example</span><span style="color: rgb(215, 58, 73); margin: 0px; padding: 0px; background: none 0% 0% / auto repeat scroll padding-box border-box rgba(0, 0, 0, 0);">-</span><span style="color: rgb(89, 89, 89); margin: 0px; padding: 0px; background: none 0% 0% / auto repeat scroll padding-box border-box rgba(0, 0, 0, 0);">decision</span><span style="color: rgb(215, 58, 73); margin: 0px; padding: 0px; background: none 0% 0% / auto repeat scroll padding-box border-box rgba(0, 0, 0, 0);">-</span><span style="color: rgb(89, 89, 89); margin: 0px; padding: 0px; background: none 0% 0% / auto repeat scroll padding-box border-box rgba(0, 0, 0, 0);">tree</span><br><span style="color: rgb(89, 89, 89); margin: 0px; padding: 0px; background: none 0% 0% / auto repeat scroll padding-box border-box rgba(0, 0, 0, 0);">conda_env</span>: <span style="color: rgb(89, 89, 89); margin: 0px; padding: 0px; background: none 0% 0% / auto repeat scroll padding-box border-box rgba(0, 0, 0, 0);">conda</span>.<span style="color: rgb(0, 92, 197); margin: 0px; padding: 0px; background: none 0% 0% / auto repeat scroll padding-box border-box rgba(0, 0, 0, 0);">yaml</span><br><span style="color: rgb(89, 89, 89); margin: 0px; padding: 0px; background: none 0% 0% / auto repeat scroll padding-box border-box rgba(0, 0, 0, 0);">entry_points</span>:<br><span style="color: rgb(89, 89, 89); margin: 0px; padding: 0px; background: none 0% 0% / auto repeat scroll padding-box border-box rgba(0, 0, 0, 0);">main</span>:<br><span style="color: rgb(89, 89, 89); margin: 0px; padding: 0px; background: none 0% 0% / auto repeat scroll padding-box border-box rgba(0, 0, 0, 0);">parameters</span>:<br><span style="color: rgb(89, 89, 89); margin: 0px; padding: 0px; background: none 0% 0% / auto repeat scroll padding-box border-box rgba(0, 0, 0, 0);">tree_depth</span>: {<span style="color: rgb(89, 89, 89); margin: 0px; padding: 0px; background: none 0% 0% / auto repeat scroll padding-box border-box rgba(0, 0, 0, 0);">type</span>: <span style="color: rgb(89, 89, 89); margin: 0px; padding: 0px; background: none 0% 0% / auto repeat scroll padding-box border-box rgba(0, 0, 0, 0);">int</span>, <span style="color: rgb(215, 58, 73); margin: 0px; padding: 0px; background: none 0% 0% / auto repeat scroll padding-box border-box rgba(0, 0, 0, 0);">default</span>: <span style="color: rgb(0, 92, 197); margin: 0px; padding: 0px; background: none 0% 0% / auto repeat scroll padding-box border-box rgba(0, 0, 0, 0);">2</span>}<br><span style="color: rgb(89, 89, 89); margin: 0px; padding: 0px; background: none 0% 0% / auto repeat scroll padding-box border-box rgba(0, 0, 0, 0);">command</span>: <span style="color: rgb(102, 153, 0); margin: 0px; padding: 0px; background: none 0% 0% / auto repeat scroll padding-box border-box rgba(0, 0, 0, 0);">"python main.py {tree_depth}"</span>
同様に、MLflow は、ローカル サーバーまたはリモート リポジトリにあるプロジェクトを実行するための CLI (コマンド ライン インターフェイス、コマンド ライン インターフェイス) を提供します。次のコード スニペットは、ローカル サーバーまたはリモート リポジトリからプロジェクトを実行する方法の例を示しています。
<span style="color: rgb(89, 89, 89); margin: 0px; padding: 0px; background: none 0% 0% / auto repeat scroll padding-box border-box rgba(0, 0, 0, 0);">$</span> <span style="color: rgb(89, 89, 89); margin: 0px; padding: 0px; background: none 0% 0% / auto repeat scroll padding-box border-box rgba(0, 0, 0, 0);">mlflow</span> <span style="color: rgb(89, 89, 89); margin: 0px; padding: 0px; background: none 0% 0% / auto repeat scroll padding-box border-box rgba(0, 0, 0, 0);">run</span> <span style="color: rgb(89, 89, 89); margin: 0px; padding: 0px; background: none 0% 0% / auto repeat scroll padding-box border-box rgba(0, 0, 0, 0);">model</span><span style="color: rgb(215, 58, 73); margin: 0px; padding: 0px; background: none 0% 0% / auto repeat scroll padding-box border-box rgba(0, 0, 0, 0);">/</span><span style="color: rgb(89, 89, 89); margin: 0px; padding: 0px; background: none 0% 0% / auto repeat scroll padding-box border-box rgba(0, 0, 0, 0);">example</span><span style="color: rgb(215, 58, 73); margin: 0px; padding: 0px; background: none 0% 0% / auto repeat scroll padding-box border-box rgba(0, 0, 0, 0);">-</span><span style="color: rgb(89, 89, 89); margin: 0px; padding: 0px; background: none 0% 0% / auto repeat scroll padding-box border-box rgba(0, 0, 0, 0);">decision</span><span style="color: rgb(215, 58, 73); margin: 0px; padding: 0px; background: none 0% 0% / auto repeat scroll padding-box border-box rgba(0, 0, 0, 0);">-</span><span style="color: rgb(89, 89, 89); margin: 0px; padding: 0px; background: none 0% 0% / auto repeat scroll padding-box border-box rgba(0, 0, 0, 0);">tree</span> <span style="color: rgb(215, 58, 73); margin: 0px; padding: 0px; background: none 0% 0% / auto repeat scroll padding-box border-box rgba(0, 0, 0, 0);">-</span><span style="color: rgb(89, 89, 89); margin: 0px; padding: 0px; background: none 0% 0% / auto repeat scroll padding-box border-box rgba(0, 0, 0, 0);">P</span> <span style="color: rgb(89, 89, 89); margin: 0px; padding: 0px; background: none 0% 0% / auto repeat scroll padding-box border-box rgba(0, 0, 0, 0);">tree_depth</span><span style="color: rgb(215, 58, 73); margin: 0px; padding: 0px; background: none 0% 0% / auto repeat scroll padding-box border-box rgba(0, 0, 0, 0);">=</span><span style="color: rgb(0, 92, 197); margin: 0px; padding: 0px; background: none 0% 0% / auto repeat scroll padding-box border-box rgba(0, 0, 0, 0);">3</span><br><span style="color: rgb(89, 89, 89); margin: 0px; padding: 0px; background: none 0% 0% / auto repeat scroll padding-box border-box rgba(0, 0, 0, 0);">$</span> <span style="color: rgb(89, 89, 89); margin: 0px; padding: 0px; background: none 0% 0% / auto repeat scroll padding-box border-box rgba(0, 0, 0, 0);">mlflow</span> <span style="color: rgb(89, 89, 89); margin: 0px; padding: 0px; background: none 0% 0% / auto repeat scroll padding-box border-box rgba(0, 0, 0, 0);">run</span> <span style="color: rgb(89, 89, 89); margin: 0px; padding: 0px; background: none 0% 0% / auto repeat scroll padding-box border-box rgba(0, 0, 0, 0);">git</span><span style="color: rgb(215, 58, 73); margin: 0px; padding: 0px; background: none 0% 0% / auto repeat scroll padding-box border-box rgba(0, 0, 0, 0);">@</span><span style="color: rgb(89, 89, 89); margin: 0px; padding: 0px; background: none 0% 0% / auto repeat scroll padding-box border-box rgba(0, 0, 0, 0);">github</span>.<span style="color: rgb(0, 92, 197); margin: 0px; padding: 0px; background: none 0% 0% / auto repeat scroll padding-box border-box rgba(0, 0, 0, 0);">com</span>:<span style="color: rgb(89, 89, 89); margin: 0px; padding: 0px; background: none 0% 0% / auto repeat scroll padding-box border-box rgba(0, 0, 0, 0);">FernandoLpz</span><span style="color: rgb(215, 58, 73); margin: 0px; padding: 0px; background: none 0% 0% / auto repeat scroll padding-box border-box rgba(0, 0, 0, 0);">/</span><span style="color: rgb(89, 89, 89); margin: 0px; padding: 0px; background: none 0% 0% / auto repeat scroll padding-box border-box rgba(0, 0, 0, 0);">MLflow</span><span style="color: rgb(215, 58, 73); margin: 0px; padding: 0px; background: none 0% 0% / auto repeat scroll padding-box border-box rgba(0, 0, 0, 0);">-</span><span style="color: rgb(89, 89, 89); margin: 0px; padding: 0px; background: none 0% 0% / auto repeat scroll padding-box border-box rgba(0, 0, 0, 0);">example</span>.<span style="color: rgb(0, 92, 197); margin: 0px; padding: 0px; background: none 0% 0% / auto repeat scroll padding-box border-box rgba(0, 0, 0, 0);">git</span> <span style="color: rgb(215, 58, 73); margin: 0px; padding: 0px; background: none 0% 0% / auto repeat scroll padding-box border-box rgba(0, 0, 0, 0);">-</span><span style="color: rgb(89, 89, 89); margin: 0px; padding: 0px; background: none 0% 0% / auto repeat scroll padding-box border-box rgba(0, 0, 0, 0);">P</span> <span style="color: rgb(89, 89, 89); margin: 0px; padding: 0px; background: none 0% 0% / auto repeat scroll padding-box border-box rgba(0, 0, 0, 0);">tree_depth</span><span style="color: rgb(215, 58, 73); margin: 0px; padding: 0px; background: none 0% 0% / auto repeat scroll padding-box border-box rgba(0, 0, 0, 0);">=</span><span style="color: rgb(0, 92, 197); margin: 0px; padding: 0px; background: none 0% 0% / auto repeat scroll padding-box border-box rgba(0, 0, 0, 0);">3</span>
どちらの例でも、環境は MLProject ファイル仕様に基づいて生成されます。モデルをトリガーするコマンドは、コマンド ラインで渡された引数を使用して実行されます。モデルでは入力パラメーターが許可されているため、これらのパラメーターは `-P' フラグを介して指定できます。どちらの例でも、モデル パラメーターはデシジョン ツリーの最大の深さを参照します。
デフォルトでは、例に示すように実行すると、アーティファクトが「.mlruns」という名前のディレクトリに保存されます。
MLflow サーバーにアーティファクトを保存するにはどうすればよいですか?
MLflow を実装する際の最も一般的な使用例の 1 つは、MLflow サーバーを使用してメトリクスとアーティファクトを記録することです。 MLflow サーバーは、MLflow クライアントによって生成されたアーティファクトとファイルを管理します。これらのアーティファクトは、ファイル ディレクトリからリモート データベースに至るまで、さまざまなストレージ スキームに保存できます。たとえば、MLflow サーバーをローカルで実行するには、次のコマンドを入力します:
<span style="color: rgb(89, 89, 89); margin: 0px; padding: 0px; background: none 0% 0% / auto repeat scroll padding-box border-box rgba(0, 0, 0, 0);">$</span> <span style="color: rgb(89, 89, 89); margin: 0px; padding: 0px; background: none 0% 0% / auto repeat scroll padding-box border-box rgba(0, 0, 0, 0);">mlflow</span> <span style="color: rgb(89, 89, 89); margin: 0px; padding: 0px; background: none 0% 0% / auto repeat scroll padding-box border-box rgba(0, 0, 0, 0);">server</span>
上述命令将通过IP地址http://127.0.0.1:5000/启动MLflow服务。为了存储工件和指标,在客户端会话中定义服务器的跟踪URI。
在下面的代码片段中,我们将看到MLflow服务器中工件存储的基本实现:
<span style="color: rgb(215, 58, 73); margin: 0px; padding: 0px; background: none 0% 0% / auto repeat scroll padding-box border-box rgba(0, 0, 0, 0);">import</span> <span style="color: rgb(0, 92, 197); margin: 0px; padding: 0px; background: none 0% 0% / auto repeat scroll padding-box border-box rgba(0, 0, 0, 0);">MLflow</span> <br><span style="color: rgb(89, 89, 89); margin: 0px; padding: 0px; background: none 0% 0% / auto repeat scroll padding-box border-box rgba(0, 0, 0, 0);">remote_server_uri</span> <span style="color: rgb(215, 58, 73); margin: 0px; padding: 0px; background: none 0% 0% / auto repeat scroll padding-box border-box rgba(0, 0, 0, 0);">=</span> <span style="color: rgb(102, 153, 0); margin: 0px; padding: 0px; background: none 0% 0% / auto repeat scroll padding-box border-box rgba(0, 0, 0, 0);">"http://127.0.0.1:5000"</span><br><span style="color: rgb(89, 89, 89); margin: 0px; padding: 0px; background: none 0% 0% / auto repeat scroll padding-box border-box rgba(0, 0, 0, 0);">MLflow</span>.<span style="color: rgb(0, 92, 197); margin: 0px; padding: 0px; background: none 0% 0% / auto repeat scroll padding-box border-box rgba(0, 0, 0, 0);">set_tracking_uri</span>(<span style="color: rgb(89, 89, 89); margin: 0px; padding: 0px; background: none 0% 0% / auto repeat scroll padding-box border-box rgba(0, 0, 0, 0);">remote_server_uri</span>)<br><span style="color: rgb(215, 58, 73); margin: 0px; padding: 0px; background: none 0% 0% / auto repeat scroll padding-box border-box rgba(0, 0, 0, 0);">with</span> <span style="color: rgb(89, 89, 89); margin: 0px; padding: 0px; background: none 0% 0% / auto repeat scroll padding-box border-box rgba(0, 0, 0, 0);">MLflow</span>.<span style="color: rgb(0, 92, 197); margin: 0px; padding: 0px; background: none 0% 0% / auto repeat scroll padding-box border-box rgba(0, 0, 0, 0);">start_run</span>():<br> <span style="color: rgb(89, 89, 89); margin: 0px; padding: 0px; background: none 0% 0% / auto repeat scroll padding-box border-box rgba(0, 0, 0, 0);">MLflow</span>.<span style="color: rgb(0, 92, 197); margin: 0px; padding: 0px; background: none 0% 0% / auto repeat scroll padding-box border-box rgba(0, 0, 0, 0);">log_param</span>(<span style="color: rgb(102, 153, 0); margin: 0px; padding: 0px; background: none 0% 0% / auto repeat scroll padding-box border-box rgba(0, 0, 0, 0);">"test-param"</span>, <span style="color: rgb(0, 92, 197); margin: 0px; padding: 0px; background: none 0% 0% / auto repeat scroll padding-box border-box rgba(0, 0, 0, 0);">1</span>)<br> <span style="color: rgb(89, 89, 89); margin: 0px; padding: 0px; background: none 0% 0% / auto repeat scroll padding-box border-box rgba(0, 0, 0, 0);">MLflow</span>.<span style="color: rgb(0, 92, 197); margin: 0px; padding: 0px; background: none 0% 0% / auto repeat scroll padding-box border-box rgba(0, 0, 0, 0);">log_metric</span>(<span style="color: rgb(102, 153, 0); margin: 0px; padding: 0px; background: none 0% 0% / auto repeat scroll padding-box border-box rgba(0, 0, 0, 0);">"test-metric"</span>, <span style="color: rgb(0, 92, 197); margin: 0px; padding: 0px; background: none 0% 0% / auto repeat scroll padding-box border-box rgba(0, 0, 0, 0);">2</span>)
其中,命令“MLflow.set_tracking_uri()”负责设置服务器的位置。
如何在MLflow服务器中执行身份验证?
在没有身份验证的情况下暴露服务器可能会有风险。因此,添加身份验证非常必要,当然也非常方便。身份验证将取决于您将在其中部署服务器的生态系统:
- 在本地服务器上,添加基于用户和密码的基本身份验证就足够了
- 在远程服务器上,必须与相应的代理一起调整凭据数据
为了说明这些,让我们看一个使用基本身份验证(用户名和密码)部署的MLflow服务器的示例。此外,我们还将看到如何通过配置客户端方式来使用此服务器。
示例:MLflow服务器身份验证
在本例中,我们通过Nginx反向代理将基本用户和密码身份验证应用于MLflow服务器。
让我们从Nginx的安装开始,我们可以通过以下方式完成:
# <span style="color: rgb(89, 89, 89); margin: 0px; padding: 0px; background: none 0% 0% / auto repeat scroll padding-box border-box rgba(0, 0, 0, 0);">For</span> <span style="color: rgb(89, 89, 89); margin: 0px; padding: 0px; background: none 0% 0% / auto repeat scroll padding-box border-box rgba(0, 0, 0, 0);">darwin</span> <span style="color: rgb(89, 89, 89); margin: 0px; padding: 0px; background: none 0% 0% / auto repeat scroll padding-box border-box rgba(0, 0, 0, 0);">based</span> <span style="color: rgb(89, 89, 89); margin: 0px; padding: 0px; background: none 0% 0% / auto repeat scroll padding-box border-box rgba(0, 0, 0, 0);">OS</span><br><span style="color: rgb(89, 89, 89); margin: 0px; padding: 0px; background: none 0% 0% / auto repeat scroll padding-box border-box rgba(0, 0, 0, 0);">$</span> <span style="color: rgb(89, 89, 89); margin: 0px; padding: 0px; background: none 0% 0% / auto repeat scroll padding-box border-box rgba(0, 0, 0, 0);">brew</span> <span style="color: rgb(89, 89, 89); margin: 0px; padding: 0px; background: none 0% 0% / auto repeat scroll padding-box border-box rgba(0, 0, 0, 0);">install</span> <span style="color: rgb(89, 89, 89); margin: 0px; padding: 0px; background: none 0% 0% / auto repeat scroll padding-box border-box rgba(0, 0, 0, 0);">nginx</span><br><br># <span style="color: rgb(89, 89, 89); margin: 0px; padding: 0px; background: none 0% 0% / auto repeat scroll padding-box border-box rgba(0, 0, 0, 0);">For</span> <span style="color: rgb(89, 89, 89); margin: 0px; padding: 0px; background: none 0% 0% / auto repeat scroll padding-box border-box rgba(0, 0, 0, 0);">debian</span> <span style="color: rgb(89, 89, 89); margin: 0px; padding: 0px; background: none 0% 0% / auto repeat scroll padding-box border-box rgba(0, 0, 0, 0);">based</span> <span style="color: rgb(89, 89, 89); margin: 0px; padding: 0px; background: none 0% 0% / auto repeat scroll padding-box border-box rgba(0, 0, 0, 0);">OS</span><br><span style="color: rgb(89, 89, 89); margin: 0px; padding: 0px; background: none 0% 0% / auto repeat scroll padding-box border-box rgba(0, 0, 0, 0);">$</span> <span style="color: rgb(89, 89, 89); margin: 0px; padding: 0px; background: none 0% 0% / auto repeat scroll padding-box border-box rgba(0, 0, 0, 0);">apt</span><span style="color: rgb(215, 58, 73); margin: 0px; padding: 0px; background: none 0% 0% / auto repeat scroll padding-box border-box rgba(0, 0, 0, 0);">-</span><span style="color: rgb(89, 89, 89); margin: 0px; padding: 0px; background: none 0% 0% / auto repeat scroll padding-box border-box rgba(0, 0, 0, 0);">get</span> <span style="color: rgb(89, 89, 89); margin: 0px; padding: 0px; background: none 0% 0% / auto repeat scroll padding-box border-box rgba(0, 0, 0, 0);">install</span> <span style="color: rgb(89, 89, 89); margin: 0px; padding: 0px; background: none 0% 0% / auto repeat scroll padding-box border-box rgba(0, 0, 0, 0);">nginx</span><br><br># <span style="color: rgb(89, 89, 89); margin: 0px; padding: 0px; background: none 0% 0% / auto repeat scroll padding-box border-box rgba(0, 0, 0, 0);">For</span> <span style="color: rgb(89, 89, 89); margin: 0px; padding: 0px; background: none 0% 0% / auto repeat scroll padding-box border-box rgba(0, 0, 0, 0);">redhat</span> <span style="color: rgb(89, 89, 89); margin: 0px; padding: 0px; background: none 0% 0% / auto repeat scroll padding-box border-box rgba(0, 0, 0, 0);">based</span> <span style="color: rgb(89, 89, 89); margin: 0px; padding: 0px; background: none 0% 0% / auto repeat scroll padding-box border-box rgba(0, 0, 0, 0);">OS</span><br><span style="color: rgb(89, 89, 89); margin: 0px; padding: 0px; background: none 0% 0% / auto repeat scroll padding-box border-box rgba(0, 0, 0, 0);">$</span> <span style="color: rgb(89, 89, 89); margin: 0px; padding: 0px; background: none 0% 0% / auto repeat scroll padding-box border-box rgba(0, 0, 0, 0);">yum</span> <span style="color: rgb(89, 89, 89); margin: 0px; padding: 0px; background: none 0% 0% / auto repeat scroll padding-box border-box rgba(0, 0, 0, 0);">install</span> <span style="color: rgb(89, 89, 89); margin: 0px; padding: 0px; background: none 0% 0% / auto repeat scroll padding-box border-box rgba(0, 0, 0, 0);">nginx</span>
对于Windows操作系统,您必须使用本机Win32 API。您可以按照链接(https://nginx.org/en/docs/windows.html)处的详细说明进行这些操作,在此省略有关介绍。
安装结束后,我们将继续使用“htpasswd”命令生成具有相应密码的用户,如下所示:
<span style="color: rgb(89, 89, 89); margin: 0px; padding: 0px; background: none 0% 0% / auto repeat scroll padding-box border-box rgba(0, 0, 0, 0);">sudo</span> <span style="color: rgb(89, 89, 89); margin: 0px; padding: 0px; background: none 0% 0% / auto repeat scroll padding-box border-box rgba(0, 0, 0, 0);">htpasswd</span> <span style="color: rgb(215, 58, 73); margin: 0px; padding: 0px; background: none 0% 0% / auto repeat scroll padding-box border-box rgba(0, 0, 0, 0);">-</span><span style="color: rgb(89, 89, 89); margin: 0px; padding: 0px; background: none 0% 0% / auto repeat scroll padding-box border-box rgba(0, 0, 0, 0);">c</span> <span style="color: rgb(215, 58, 73); margin: 0px; padding: 0px; background: none 0% 0% / auto repeat scroll padding-box border-box rgba(0, 0, 0, 0);">/</span><span style="color: rgb(89, 89, 89); margin: 0px; padding: 0px; background: none 0% 0% / auto repeat scroll padding-box border-box rgba(0, 0, 0, 0);">usr</span><span style="color: rgb(215, 58, 73); margin: 0px; padding: 0px; background: none 0% 0% / auto repeat scroll padding-box border-box rgba(0, 0, 0, 0);">/</span><span style="color: rgb(89, 89, 89); margin: 0px; padding: 0px; background: none 0% 0% / auto repeat scroll padding-box border-box rgba(0, 0, 0, 0);">local</span><span style="color: rgb(215, 58, 73); margin: 0px; padding: 0px; background: none 0% 0% / auto repeat scroll padding-box border-box rgba(0, 0, 0, 0);">/</span><span style="color: rgb(89, 89, 89); margin: 0px; padding: 0px; background: none 0% 0% / auto repeat scroll padding-box border-box rgba(0, 0, 0, 0);">etc</span><span style="color: rgb(215, 58, 73); margin: 0px; padding: 0px; background: none 0% 0% / auto repeat scroll padding-box border-box rgba(0, 0, 0, 0);">/</span><span style="color: rgb(89, 89, 89); margin: 0px; padding: 0px; background: none 0% 0% / auto repeat scroll padding-box border-box rgba(0, 0, 0, 0);">nginx</span><span style="color: rgb(215, 58, 73); margin: 0px; padding: 0px; background: none 0% 0% / auto repeat scroll padding-box border-box rgba(0, 0, 0, 0);">/</span>.<span style="color: rgb(89, 89, 89); margin: 0px; padding: 0px; background: none 0% 0% / auto repeat scroll padding-box border-box rgba(0, 0, 0, 0);">htpasswdMLflow</span><span style="color: rgb(215, 58, 73); margin: 0px; padding: 0px; background: none 0% 0% / auto repeat scroll padding-box border-box rgba(0, 0, 0, 0);">-</span><span style="color: rgb(89, 89, 89); margin: 0px; padding: 0px; background: none 0% 0% / auto repeat scroll padding-box border-box rgba(0, 0, 0, 0);">user</span>
上述命令为nginx服务的“.htpasswd”文件中指定的名字为“mlflow-user”的用户生成凭据。稍后,要在创建的用户凭据下定义代理,请使用配置文件“/usr/local/etc/nginx/nginx.conf”进行定义,默认情况下具有以下内容:
<span style="color: rgb(89, 89, 89); margin: 0px; padding: 0px; background: none 0% 0% / auto repeat scroll padding-box border-box rgba(0, 0, 0, 0);">server</span> {<br> <span style="color: rgb(89, 89, 89); margin: 0px; padding: 0px; background: none 0% 0% / auto repeat scroll padding-box border-box rgba(0, 0, 0, 0);">listen</span> <span style="color: rgb(0, 92, 197); margin: 0px; padding: 0px; background: none 0% 0% / auto repeat scroll padding-box border-box rgba(0, 0, 0, 0);">8080</span>;<br> <span style="color: rgb(89, 89, 89); margin: 0px; padding: 0px; background: none 0% 0% / auto repeat scroll padding-box border-box rgba(0, 0, 0, 0);">server_name</span><span style="color: rgb(89, 89, 89); margin: 0px; padding: 0px; background: none 0% 0% / auto repeat scroll padding-box border-box rgba(0, 0, 0, 0);">localhost</span>;<br> # <span style="color: rgb(89, 89, 89); margin: 0px; padding: 0px; background: none 0% 0% / auto repeat scroll padding-box border-box rgba(0, 0, 0, 0);">charset</span> <span style="color: rgb(89, 89, 89); margin: 0px; padding: 0px; background: none 0% 0% / auto repeat scroll padding-box border-box rgba(0, 0, 0, 0);">koi8</span><span style="color: rgb(215, 58, 73); margin: 0px; padding: 0px; background: none 0% 0% / auto repeat scroll padding-box border-box rgba(0, 0, 0, 0);">-</span><span style="color: rgb(89, 89, 89); margin: 0px; padding: 0px; background: none 0% 0% / auto repeat scroll padding-box border-box rgba(0, 0, 0, 0);">r</span>;<br> # <span style="color: rgb(89, 89, 89); margin: 0px; padding: 0px; background: none 0% 0% / auto repeat scroll padding-box border-box rgba(0, 0, 0, 0);">access_log</span><span style="color: rgb(89, 89, 89); margin: 0px; padding: 0px; background: none 0% 0% / auto repeat scroll padding-box border-box rgba(0, 0, 0, 0);">logs</span><span style="color: rgb(215, 58, 73); margin: 0px; padding: 0px; background: none 0% 0% / auto repeat scroll padding-box border-box rgba(0, 0, 0, 0);">/</span><span style="color: rgb(89, 89, 89); margin: 0px; padding: 0px; background: none 0% 0% / auto repeat scroll padding-box border-box rgba(0, 0, 0, 0);">host</span>.<span style="color: rgb(0, 92, 197); margin: 0px; padding: 0px; background: none 0% 0% / auto repeat scroll padding-box border-box rgba(0, 0, 0, 0);">access</span>.<span style="color: rgb(0, 92, 197); margin: 0px; padding: 0px; background: none 0% 0% / auto repeat scroll padding-box border-box rgba(0, 0, 0, 0);">log</span><span style="color: rgb(89, 89, 89); margin: 0px; padding: 0px; background: none 0% 0% / auto repeat scroll padding-box border-box rgba(0, 0, 0, 0);">main</span>;<br> <span style="color: rgb(89, 89, 89); margin: 0px; padding: 0px; background: none 0% 0% / auto repeat scroll padding-box border-box rgba(0, 0, 0, 0);">location</span> <span style="color: rgb(215, 58, 73); margin: 0px; padding: 0px; background: none 0% 0% / auto repeat scroll padding-box border-box rgba(0, 0, 0, 0);">/</span> {<br> <span style="color: rgb(0, 92, 197); margin: 0px; padding: 0px; background: none 0% 0% / auto repeat scroll padding-box border-box rgba(0, 0, 0, 0);">root</span> <span style="color: rgb(89, 89, 89); margin: 0px; padding: 0px; background: none 0% 0% / auto repeat scroll padding-box border-box rgba(0, 0, 0, 0);">html</span>;<br> <span style="color: rgb(89, 89, 89); margin: 0px; padding: 0px; background: none 0% 0% / auto repeat scroll padding-box border-box rgba(0, 0, 0, 0);">index</span><span style="color: rgb(89, 89, 89); margin: 0px; padding: 0px; background: none 0% 0% / auto repeat scroll padding-box border-box rgba(0, 0, 0, 0);">index</span>.<span style="color: rgb(89, 89, 89); margin: 0px; padding: 0px; background: none 0% 0% / auto repeat scroll padding-box border-box rgba(0, 0, 0, 0);">html</span> <span style="color: rgb(89, 89, 89); margin: 0px; padding: 0px; background: none 0% 0% / auto repeat scroll padding-box border-box rgba(0, 0, 0, 0);">index</span>.<span style="color: rgb(89, 89, 89); margin: 0px; padding: 0px; background: none 0% 0% / auto repeat scroll padding-box border-box rgba(0, 0, 0, 0);">htm</span>;<br> }
它必须看起来像这样:
<span style="color: rgb(89, 89, 89); margin: 0px; padding: 0px; background: none 0% 0% / auto repeat scroll padding-box border-box rgba(0, 0, 0, 0);">server</span> {<br> # <span style="color: rgb(89, 89, 89); margin: 0px; padding: 0px; background: none 0% 0% / auto repeat scroll padding-box border-box rgba(0, 0, 0, 0);">listen</span> <span style="color: rgb(0, 92, 197); margin: 0px; padding: 0px; background: none 0% 0% / auto repeat scroll padding-box border-box rgba(0, 0, 0, 0);">8080</span>;<br> # <span style="color: rgb(89, 89, 89); margin: 0px; padding: 0px; background: none 0% 0% / auto repeat scroll padding-box border-box rgba(0, 0, 0, 0);">server_name</span><span style="color: rgb(89, 89, 89); margin: 0px; padding: 0px; background: none 0% 0% / auto repeat scroll padding-box border-box rgba(0, 0, 0, 0);">localhost</span>;<br><br> # <span style="color: rgb(89, 89, 89); margin: 0px; padding: 0px; background: none 0% 0% / auto repeat scroll padding-box border-box rgba(0, 0, 0, 0);">charset</span> <span style="color: rgb(89, 89, 89); margin: 0px; padding: 0px; background: none 0% 0% / auto repeat scroll padding-box border-box rgba(0, 0, 0, 0);">koi8</span><span style="color: rgb(215, 58, 73); margin: 0px; padding: 0px; background: none 0% 0% / auto repeat scroll padding-box border-box rgba(0, 0, 0, 0);">-</span><span style="color: rgb(89, 89, 89); margin: 0px; padding: 0px; background: none 0% 0% / auto repeat scroll padding-box border-box rgba(0, 0, 0, 0);">r</span>;<br><br> # <span style="color: rgb(89, 89, 89); margin: 0px; padding: 0px; background: none 0% 0% / auto repeat scroll padding-box border-box rgba(0, 0, 0, 0);">access_log</span><span style="color: rgb(89, 89, 89); margin: 0px; padding: 0px; background: none 0% 0% / auto repeat scroll padding-box border-box rgba(0, 0, 0, 0);">logs</span><span style="color: rgb(215, 58, 73); margin: 0px; padding: 0px; background: none 0% 0% / auto repeat scroll padding-box border-box rgba(0, 0, 0, 0);">/</span><span style="color: rgb(89, 89, 89); margin: 0px; padding: 0px; background: none 0% 0% / auto repeat scroll padding-box border-box rgba(0, 0, 0, 0);">host</span>.<span style="color: rgb(0, 92, 197); margin: 0px; padding: 0px; background: none 0% 0% / auto repeat scroll padding-box border-box rgba(0, 0, 0, 0);">access</span>.<span style="color: rgb(0, 92, 197); margin: 0px; padding: 0px; background: none 0% 0% / auto repeat scroll padding-box border-box rgba(0, 0, 0, 0);">log</span><span style="color: rgb(89, 89, 89); margin: 0px; padding: 0px; background: none 0% 0% / auto repeat scroll padding-box border-box rgba(0, 0, 0, 0);">main</span>;<br><br> <span style="color: rgb(89, 89, 89); margin: 0px; padding: 0px; background: none 0% 0% / auto repeat scroll padding-box border-box rgba(0, 0, 0, 0);">location</span> <span style="color: rgb(215, 58, 73); margin: 0px; padding: 0px; background: none 0% 0% / auto repeat scroll padding-box border-box rgba(0, 0, 0, 0);">/</span> {<br> <span style="color: rgb(0, 92, 197); margin: 0px; padding: 0px; background: none 0% 0% / auto repeat scroll padding-box border-box rgba(0, 0, 0, 0);">proxy_pass</span> <span style="color: rgb(89, 89, 89); margin: 0px; padding: 0px; background: none 0% 0% / auto repeat scroll padding-box border-box rgba(0, 0, 0, 0);">http</span>:<span style="color: rgb(106, 115, 125); margin: 0px; padding: 0px; background: none 0% 0% / auto repeat scroll padding-box border-box rgba(0, 0, 0, 0);">//localhost:5000;</span><br> <span style="color: rgb(89, 89, 89); margin: 0px; padding: 0px; background: none 0% 0% / auto repeat scroll padding-box border-box rgba(0, 0, 0, 0);">auth_basic</span> <span style="color: rgb(102, 153, 0); margin: 0px; padding: 0px; background: none 0% 0% / auto repeat scroll padding-box border-box rgba(0, 0, 0, 0);">"Restricted Content"</span>;<br> <span style="color: rgb(89, 89, 89); margin: 0px; padding: 0px; background: none 0% 0% / auto repeat scroll padding-box border-box rgba(0, 0, 0, 0);">auth_basic_user_file</span> <span style="color: rgb(215, 58, 73); margin: 0px; padding: 0px; background: none 0% 0% / auto repeat scroll padding-box border-box rgba(0, 0, 0, 0);">/</span><span style="color: rgb(89, 89, 89); margin: 0px; padding: 0px; background: none 0% 0% / auto repeat scroll padding-box border-box rgba(0, 0, 0, 0);">usr</span><span style="color: rgb(215, 58, 73); margin: 0px; padding: 0px; background: none 0% 0% / auto repeat scroll padding-box border-box rgba(0, 0, 0, 0);">/</span><span style="color: rgb(89, 89, 89); margin: 0px; padding: 0px; background: none 0% 0% / auto repeat scroll padding-box border-box rgba(0, 0, 0, 0);">local</span><span style="color: rgb(215, 58, 73); margin: 0px; padding: 0px; background: none 0% 0% / auto repeat scroll padding-box border-box rgba(0, 0, 0, 0);">/</span><span style="color: rgb(89, 89, 89); margin: 0px; padding: 0px; background: none 0% 0% / auto repeat scroll padding-box border-box rgba(0, 0, 0, 0);">etc</span><span style="color: rgb(215, 58, 73); margin: 0px; padding: 0px; background: none 0% 0% / auto repeat scroll padding-box border-box rgba(0, 0, 0, 0);">/</span><span style="color: rgb(89, 89, 89); margin: 0px; padding: 0px; background: none 0% 0% / auto repeat scroll padding-box border-box rgba(0, 0, 0, 0);">nginx</span><span style="color: rgb(215, 58, 73); margin: 0px; padding: 0px; background: none 0% 0% / auto repeat scroll padding-box border-box rgba(0, 0, 0, 0);">/</span>.<span style="color: rgb(89, 89, 89); margin: 0px; padding: 0px; background: none 0% 0% / auto repeat scroll padding-box border-box rgba(0, 0, 0, 0);">htpasswd</span>;<br> }<br>
在这里,我们通过端口5000为本地主机定义身份验证代理。这是默认情况下部署MLflow服务器的IP地址和端口号。请注意,在使用云端类型的提供程序时,您必须配置实现所需的凭据和代理。接下来,开始初始化MLflow服务器,如以下代码段所示:
<span style="color: rgb(89, 89, 89); margin: 0px; padding: 0px; background: none 0% 0% / auto repeat scroll padding-box border-box rgba(0, 0, 0, 0);">$</span> <span style="color: rgb(89, 89, 89); margin: 0px; padding: 0px; background: none 0% 0% / auto repeat scroll padding-box border-box rgba(0, 0, 0, 0);">MLflow</span> <span style="color: rgb(89, 89, 89); margin: 0px; padding: 0px; background: none 0% 0% / auto repeat scroll padding-box border-box rgba(0, 0, 0, 0);">server</span> <span style="color: rgb(215, 58, 73); margin: 0px; padding: 0px; background: none 0% 0% / auto repeat scroll padding-box border-box rgba(0, 0, 0, 0);">--</span><span style="color: rgb(89, 89, 89); margin: 0px; padding: 0px; background: none 0% 0% / auto repeat scroll padding-box border-box rgba(0, 0, 0, 0);">host</span> <span style="color: rgb(89, 89, 89); margin: 0px; padding: 0px; background: none 0% 0% / auto repeat scroll padding-box border-box rgba(0, 0, 0, 0);">localhost</span>
尝试在浏览器中访问http://localhost时,需要通过创建的用户名和密码请求身份验证。

图1:登录界面
输入凭据后,您将被导航到MLflow服务器用户界面中,如图2所示。

图2:MLflow服务器UI
要从客户端将数据存储在MLflow服务器中,您必须:
- 定义包含访问服务器的凭据的环境变量
- 设置存储工件的URI
对于凭证,我们将导出以下环境变量:
<span style="color: rgb(89, 89, 89); margin: 0px; padding: 0px; background: none 0% 0% / auto repeat scroll padding-box border-box rgba(0, 0, 0, 0);">$</span> <span style="color: rgb(215, 58, 73); margin: 0px; padding: 0px; background: none 0% 0% / auto repeat scroll padding-box border-box rgba(0, 0, 0, 0);">export</span> <span style="color: rgb(89, 89, 89); margin: 0px; padding: 0px; background: none 0% 0% / auto repeat scroll padding-box border-box rgba(0, 0, 0, 0);">MLflow_TRACKING_USERNAME</span><span style="color: rgb(215, 58, 73); margin: 0px; padding: 0px; background: none 0% 0% / auto repeat scroll padding-box border-box rgba(0, 0, 0, 0);">=</span><span style="color: rgb(89, 89, 89); margin: 0px; padding: 0px; background: none 0% 0% / auto repeat scroll padding-box border-box rgba(0, 0, 0, 0);">MLflow</span><span style="color: rgb(215, 58, 73); margin: 0px; padding: 0px; background: none 0% 0% / auto repeat scroll padding-box border-box rgba(0, 0, 0, 0);">-</span><span style="color: rgb(89, 89, 89); margin: 0px; padding: 0px; background: none 0% 0% / auto repeat scroll padding-box border-box rgba(0, 0, 0, 0);">user</span><br><span style="color: rgb(89, 89, 89); margin: 0px; padding: 0px; background: none 0% 0% / auto repeat scroll padding-box border-box rgba(0, 0, 0, 0);">$</span> <span style="color: rgb(215, 58, 73); margin: 0px; padding: 0px; background: none 0% 0% / auto repeat scroll padding-box border-box rgba(0, 0, 0, 0);">export</span> <span style="color: rgb(89, 89, 89); margin: 0px; padding: 0px; background: none 0% 0% / auto repeat scroll padding-box border-box rgba(0, 0, 0, 0);">MLflow_TRACKING_PASSWORD</span><span style="color: rgb(215, 58, 73); margin: 0px; padding: 0px; background: none 0% 0% / auto repeat scroll padding-box border-box rgba(0, 0, 0, 0);">=</span><span style="color: rgb(89, 89, 89); margin: 0px; padding: 0px; background: none 0% 0% / auto repeat scroll padding-box border-box rgba(0, 0, 0, 0);">MLflow</span><span style="color: rgb(215, 58, 73); margin: 0px; padding: 0px; background: none 0% 0% / auto repeat scroll padding-box border-box rgba(0, 0, 0, 0);">-</span><span style="color: rgb(89, 89, 89); margin: 0px; padding: 0px; background: none 0% 0% / auto repeat scroll padding-box border-box rgba(0, 0, 0, 0);">password</span>
一旦定义了环境变量,就只需要为工件存储定义服务器URI。
<span style="color: rgb(215, 58, 73); margin: 0px; padding: 0px; background: none 0% 0% / auto repeat scroll padding-box border-box rgba(0, 0, 0, 0);">import</span> <span style="color: rgb(0, 92, 197); margin: 0px; padding: 0px; background: none 0% 0% / auto repeat scroll padding-box border-box rgba(0, 0, 0, 0);">MLflow</span><br><br># <span style="color: rgb(89, 89, 89); margin: 0px; padding: 0px; background: none 0% 0% / auto repeat scroll padding-box border-box rgba(0, 0, 0, 0);">Define</span> <span style="color: rgb(89, 89, 89); margin: 0px; padding: 0px; background: none 0% 0% / auto repeat scroll padding-box border-box rgba(0, 0, 0, 0);">MLflow</span> <span style="color: rgb(89, 89, 89); margin: 0px; padding: 0px; background: none 0% 0% / auto repeat scroll padding-box border-box rgba(0, 0, 0, 0);">Server</span> <span style="color: rgb(89, 89, 89); margin: 0px; padding: 0px; background: none 0% 0% / auto repeat scroll padding-box border-box rgba(0, 0, 0, 0);">URI</span><br><span style="color: rgb(89, 89, 89); margin: 0px; padding: 0px; background: none 0% 0% / auto repeat scroll padding-box border-box rgba(0, 0, 0, 0);">remote_server_uri</span> <span style="color: rgb(215, 58, 73); margin: 0px; padding: 0px; background: none 0% 0% / auto repeat scroll padding-box border-box rgba(0, 0, 0, 0);">=</span> <span style="color: rgb(102, 153, 0); margin: 0px; padding: 0px; background: none 0% 0% / auto repeat scroll padding-box border-box rgba(0, 0, 0, 0);">"http://localhost"</span><br><span style="color: rgb(89, 89, 89); margin: 0px; padding: 0px; background: none 0% 0% / auto repeat scroll padding-box border-box rgba(0, 0, 0, 0);">MLflow</span>.<span style="color: rgb(0, 92, 197); margin: 0px; padding: 0px; background: none 0% 0% / auto repeat scroll padding-box border-box rgba(0, 0, 0, 0);">set_tracking_uri</span>(<span style="color: rgb(89, 89, 89); margin: 0px; padding: 0px; background: none 0% 0% / auto repeat scroll padding-box border-box rgba(0, 0, 0, 0);">remote_server_uri</span>)<br><br><br><span style="color: rgb(215, 58, 73); margin: 0px; padding: 0px; background: none 0% 0% / auto repeat scroll padding-box border-box rgba(0, 0, 0, 0);">with</span> <span style="color: rgb(89, 89, 89); margin: 0px; padding: 0px; background: none 0% 0% / auto repeat scroll padding-box border-box rgba(0, 0, 0, 0);">MLflow</span>.<span style="color: rgb(0, 92, 197); margin: 0px; padding: 0px; background: none 0% 0% / auto repeat scroll padding-box border-box rgba(0, 0, 0, 0);">start_run</span>():<br> <span style="color: rgb(89, 89, 89); margin: 0px; padding: 0px; background: none 0% 0% / auto repeat scroll padding-box border-box rgba(0, 0, 0, 0);">MLflow</span>.<span style="color: rgb(0, 92, 197); margin: 0px; padding: 0px; background: none 0% 0% / auto repeat scroll padding-box border-box rgba(0, 0, 0, 0);">log_param</span>(<span style="color: rgb(102, 153, 0); margin: 0px; padding: 0px; background: none 0% 0% / auto repeat scroll padding-box border-box rgba(0, 0, 0, 0);">"test-param"</span>, <span style="color: rgb(0, 92, 197); margin: 0px; padding: 0px; background: none 0% 0% / auto repeat scroll padding-box border-box rgba(0, 0, 0, 0);">2332</span>)<br> <span style="color: rgb(89, 89, 89); margin: 0px; padding: 0px; background: none 0% 0% / auto repeat scroll padding-box border-box rgba(0, 0, 0, 0);">MLflow</span>.<span style="color: rgb(0, 92, 197); margin: 0px; padding: 0px; background: none 0% 0% / auto repeat scroll padding-box border-box rgba(0, 0, 0, 0);">log_metric</span>(<span style="color: rgb(102, 153, 0); margin: 0px; padding: 0px; background: none 0% 0% / auto repeat scroll padding-box border-box rgba(0, 0, 0, 0);">"test-metric"</span>, <span style="color: rgb(0, 92, 197); margin: 0px; padding: 0px; background: none 0% 0% / auto repeat scroll padding-box border-box rgba(0, 0, 0, 0);">1144</span>)
当执行上面的代码片段时,我们可以看到测试指标和参数反映在服务器上。

图3:从服务器上具有身份验证的客户端服务存储的指标和参数
如何注册MLflow模型?
开发机器学习模型时的一个日常需求是维护模型版本中的顺序。为此,MLflow提供了MLflow注册表。
MLflow注册表是一个扩展,有助于:
- 管理每个MLModel的版本,以及
- 记录每个模型在三个不同阶段的发展进程:归档(archive)、模拟环境(staging)和生产(production)。它非常类似于Git中的版本系统。
注册模型有四种选择:
- 通过UI
- 作为“MLflow.
.log_model()”的参数方式 - 使用“MLflow.register_model()”方法或
- 使用“create_registered_model()”客户端API。
在以下示例中,使用“MLflow.
<span style="color: rgb(215, 58, 73); margin: 0px; padding: 0px; background: none 0% 0% / auto repeat scroll padding-box border-box rgba(0, 0, 0, 0);">with</span> <span style="color: rgb(89, 89, 89); margin: 0px; padding: 0px; background: none 0% 0% / auto repeat scroll padding-box border-box rgba(0, 0, 0, 0);">MLflow</span>.<span style="color: rgb(0, 92, 197); margin: 0px; padding: 0px; background: none 0% 0% / auto repeat scroll padding-box border-box rgba(0, 0, 0, 0);">start_run</span>():<br><br> <span style="color: rgb(89, 89, 89); margin: 0px; padding: 0px; background: none 0% 0% / auto repeat scroll padding-box border-box rgba(0, 0, 0, 0);">model</span> <span style="color: rgb(215, 58, 73); margin: 0px; padding: 0px; background: none 0% 0% / auto repeat scroll padding-box border-box rgba(0, 0, 0, 0);">=</span> <span style="color: rgb(89, 89, 89); margin: 0px; padding: 0px; background: none 0% 0% / auto repeat scroll padding-box border-box rgba(0, 0, 0, 0);">DecisionTreeModel</span>(<span style="color: rgb(89, 89, 89); margin: 0px; padding: 0px; background: none 0% 0% / auto repeat scroll padding-box border-box rgba(0, 0, 0, 0);">max_depth</span><span style="color: rgb(215, 58, 73); margin: 0px; padding: 0px; background: none 0% 0% / auto repeat scroll padding-box border-box rgba(0, 0, 0, 0);">=</span><span style="color: rgb(89, 89, 89); margin: 0px; padding: 0px; background: none 0% 0% / auto repeat scroll padding-box border-box rgba(0, 0, 0, 0);">max_depth</span>)<br> <span style="color: rgb(89, 89, 89); margin: 0px; padding: 0px; background: none 0% 0% / auto repeat scroll padding-box border-box rgba(0, 0, 0, 0);">model</span>.<span style="color: rgb(0, 92, 197); margin: 0px; padding: 0px; background: none 0% 0% / auto repeat scroll padding-box border-box rgba(0, 0, 0, 0);">load_data</span>()<br> <span style="color: rgb(89, 89, 89); margin: 0px; padding: 0px; background: none 0% 0% / auto repeat scroll padding-box border-box rgba(0, 0, 0, 0);">model</span>.<span style="color: rgb(0, 92, 197); margin: 0px; padding: 0px; background: none 0% 0% / auto repeat scroll padding-box border-box rgba(0, 0, 0, 0);">train</span>()<br> <span style="color: rgb(89, 89, 89); margin: 0px; padding: 0px; background: none 0% 0% / auto repeat scroll padding-box border-box rgba(0, 0, 0, 0);">model</span>.<span style="color: rgb(0, 92, 197); margin: 0px; padding: 0px; background: none 0% 0% / auto repeat scroll padding-box border-box rgba(0, 0, 0, 0);">evaluate</span>()<br><br> <span style="color: rgb(89, 89, 89); margin: 0px; padding: 0px; background: none 0% 0% / auto repeat scroll padding-box border-box rgba(0, 0, 0, 0);">MLflow</span>.<span style="color: rgb(0, 92, 197); margin: 0px; padding: 0px; background: none 0% 0% / auto repeat scroll padding-box border-box rgba(0, 0, 0, 0);">log_param</span>(<span style="color: rgb(102, 153, 0); margin: 0px; padding: 0px; background: none 0% 0% / auto repeat scroll padding-box border-box rgba(0, 0, 0, 0);">"tree_depth"</span>, <span style="color: rgb(89, 89, 89); margin: 0px; padding: 0px; background: none 0% 0% / auto repeat scroll padding-box border-box rgba(0, 0, 0, 0);">max_depth</span>)<br> <span style="color: rgb(89, 89, 89); margin: 0px; padding: 0px; background: none 0% 0% / auto repeat scroll padding-box border-box rgba(0, 0, 0, 0);">MLflow</span>.<span style="color: rgb(0, 92, 197); margin: 0px; padding: 0px; background: none 0% 0% / auto repeat scroll padding-box border-box rgba(0, 0, 0, 0);">log_metric</span>(<span style="color: rgb(102, 153, 0); margin: 0px; padding: 0px; background: none 0% 0% / auto repeat scroll padding-box border-box rgba(0, 0, 0, 0);">"precision"</span>, <span style="color: rgb(89, 89, 89); margin: 0px; padding: 0px; background: none 0% 0% / auto repeat scroll padding-box border-box rgba(0, 0, 0, 0);">model</span>.<span style="color: rgb(0, 92, 197); margin: 0px; padding: 0px; background: none 0% 0% / auto repeat scroll padding-box border-box rgba(0, 0, 0, 0);">precision</span>)<br> <span style="color: rgb(89, 89, 89); margin: 0px; padding: 0px; background: none 0% 0% / auto repeat scroll padding-box border-box rgba(0, 0, 0, 0);">MLflow</span>.<span style="color: rgb(0, 92, 197); margin: 0px; padding: 0px; background: none 0% 0% / auto repeat scroll padding-box border-box rgba(0, 0, 0, 0);">log_metric</span>(<span style="color: rgb(102, 153, 0); margin: 0px; padding: 0px; background: none 0% 0% / auto repeat scroll padding-box border-box rgba(0, 0, 0, 0);">"recall"</span>, <span style="color: rgb(89, 89, 89); margin: 0px; padding: 0px; background: none 0% 0% / auto repeat scroll padding-box border-box rgba(0, 0, 0, 0);">model</span>.<span style="color: rgb(0, 92, 197); margin: 0px; padding: 0px; background: none 0% 0% / auto repeat scroll padding-box border-box rgba(0, 0, 0, 0);">recall</span>)<br> <span style="color: rgb(89, 89, 89); margin: 0px; padding: 0px; background: none 0% 0% / auto repeat scroll padding-box border-box rgba(0, 0, 0, 0);">MLflow</span>.<span style="color: rgb(0, 92, 197); margin: 0px; padding: 0px; background: none 0% 0% / auto repeat scroll padding-box border-box rgba(0, 0, 0, 0);">log_metric</span>(<span style="color: rgb(102, 153, 0); margin: 0px; padding: 0px; background: none 0% 0% / auto repeat scroll padding-box border-box rgba(0, 0, 0, 0);">"accuracy"</span>, <span style="color: rgb(89, 89, 89); margin: 0px; padding: 0px; background: none 0% 0% / auto repeat scroll padding-box border-box rgba(0, 0, 0, 0);">model</span>.<span style="color: rgb(0, 92, 197); margin: 0px; padding: 0px; background: none 0% 0% / auto repeat scroll padding-box border-box rgba(0, 0, 0, 0);">accuracy</span>)<br><br> # <span style="color: rgb(89, 89, 89); margin: 0px; padding: 0px; background: none 0% 0% / auto repeat scroll padding-box border-box rgba(0, 0, 0, 0);">Register</span> <span style="color: rgb(89, 89, 89); margin: 0px; padding: 0px; background: none 0% 0% / auto repeat scroll padding-box border-box rgba(0, 0, 0, 0);">the</span> <span style="color: rgb(89, 89, 89); margin: 0px; padding: 0px; background: none 0% 0% / auto repeat scroll padding-box border-box rgba(0, 0, 0, 0);">model</span><br> <span style="color: rgb(89, 89, 89); margin: 0px; padding: 0px; background: none 0% 0% / auto repeat scroll padding-box border-box rgba(0, 0, 0, 0);">MLflow</span>.<span style="color: rgb(0, 92, 197); margin: 0px; padding: 0px; background: none 0% 0% / auto repeat scroll padding-box border-box rgba(0, 0, 0, 0);">sklearn</span>.<span style="color: rgb(0, 92, 197); margin: 0px; padding: 0px; background: none 0% 0% / auto repeat scroll padding-box border-box rgba(0, 0, 0, 0);">log_model</span>(<span style="color: rgb(89, 89, 89); margin: 0px; padding: 0px; background: none 0% 0% / auto repeat scroll padding-box border-box rgba(0, 0, 0, 0);">model</span>.<span style="color: rgb(0, 92, 197); margin: 0px; padding: 0px; background: none 0% 0% / auto repeat scroll padding-box border-box rgba(0, 0, 0, 0);">tree</span>, <span style="color: rgb(102, 153, 0); margin: 0px; padding: 0px; background: none 0% 0% / auto repeat scroll padding-box border-box rgba(0, 0, 0, 0);">"MyModel-dt"</span>,<span style="color: rgb(89, 89, 89); margin: 0px; padding: 0px; background: none 0% 0% / auto repeat scroll padding-box border-box rgba(0, 0, 0, 0);">registered_model_name</span><span style="color: rgb(215, 58, 73); margin: 0px; padding: 0px; background: none 0% 0% / auto repeat scroll padding-box border-box rgba(0, 0, 0, 0);">=</span><span style="color: rgb(102, 153, 0); margin: 0px; padding: 0px; background: none 0% 0% / auto repeat scroll padding-box border-box rgba(0, 0, 0, 0);">"Decision Tree"</span>)
如果是新模型,MLFlow将其初始化为版本1。如果模型已进行版本控制,则将其初始化成版本2(或后续版本)。
默认情况下,注册模型时,分配的状态为“无”。要将状态分配给已注册模型,我们可以通过以下方式执行:
<span style="color: rgb(89, 89, 89); margin: 0px; padding: 0px; background: none 0% 0% / auto repeat scroll padding-box border-box rgba(0, 0, 0, 0);">client</span> <span style="color: rgb(215, 58, 73); margin: 0px; padding: 0px; background: none 0% 0% / auto repeat scroll padding-box border-box rgba(0, 0, 0, 0);">=</span> <span style="color: rgb(89, 89, 89); margin: 0px; padding: 0px; background: none 0% 0% / auto repeat scroll padding-box border-box rgba(0, 0, 0, 0);">MLflowClient</span>()<br><span style="color: rgb(89, 89, 89); margin: 0px; padding: 0px; background: none 0% 0% / auto repeat scroll padding-box border-box rgba(0, 0, 0, 0);">client</span>.<span style="color: rgb(0, 92, 197); margin: 0px; padding: 0px; background: none 0% 0% / auto repeat scroll padding-box border-box rgba(0, 0, 0, 0);">transition_model_version_stage</span>(<br><span style="color: rgb(89, 89, 89); margin: 0px; padding: 0px; background: none 0% 0% / auto repeat scroll padding-box border-box rgba(0, 0, 0, 0);">name</span><span style="color: rgb(215, 58, 73); margin: 0px; padding: 0px; background: none 0% 0% / auto repeat scroll padding-box border-box rgba(0, 0, 0, 0);">=</span><span style="color: rgb(102, 153, 0); margin: 0px; padding: 0px; background: none 0% 0% / auto repeat scroll padding-box border-box rgba(0, 0, 0, 0);">"Decision Tree"</span>,<br><span style="color: rgb(89, 89, 89); margin: 0px; padding: 0px; background: none 0% 0% / auto repeat scroll padding-box border-box rgba(0, 0, 0, 0);">version</span><span style="color: rgb(215, 58, 73); margin: 0px; padding: 0px; background: none 0% 0% / auto repeat scroll padding-box border-box rgba(0, 0, 0, 0);">=</span><span style="color: rgb(0, 92, 197); margin: 0px; padding: 0px; background: none 0% 0% / auto repeat scroll padding-box border-box rgba(0, 0, 0, 0);">2</span>,<br><span style="color: rgb(89, 89, 89); margin: 0px; padding: 0px; background: none 0% 0% / auto repeat scroll padding-box border-box rgba(0, 0, 0, 0);">stage</span><span style="color: rgb(215, 58, 73); margin: 0px; padding: 0px; background: none 0% 0% / auto repeat scroll padding-box border-box rgba(0, 0, 0, 0);">=</span><span style="color: rgb(102, 153, 0); margin: 0px; padding: 0px; background: none 0% 0% / auto repeat scroll padding-box border-box rgba(0, 0, 0, 0);">"Staging"</span><br>)
在上面的代码片段中,决策树模型的版本2被分配给模拟环境(staging)。在服务器UI中,我们可以看到如图4所示的状态:

图4:注册模型
为了实现模型服务,我们可以使用MLflowCLI。为此,我们只需要服务器URI、模型名称和模型状态这些信息即可,如下所示:
<span style="color: rgb(89, 89, 89); margin: 0px; padding: 0px; background: none 0% 0% / auto repeat scroll padding-box border-box rgba(0, 0, 0, 0);">$</span> <span style="color: rgb(215, 58, 73); margin: 0px; padding: 0px; background: none 0% 0% / auto repeat scroll padding-box border-box rgba(0, 0, 0, 0);">export</span> <span style="color: rgb(89, 89, 89); margin: 0px; padding: 0px; background: none 0% 0% / auto repeat scroll padding-box border-box rgba(0, 0, 0, 0);">MLflow_TRACKING_URI</span><span style="color: rgb(215, 58, 73); margin: 0px; padding: 0px; background: none 0% 0% / auto repeat scroll padding-box border-box rgba(0, 0, 0, 0);">=</span><span style="color: rgb(89, 89, 89); margin: 0px; padding: 0px; background: none 0% 0% / auto repeat scroll padding-box border-box rgba(0, 0, 0, 0);">http</span>:<span style="color: rgb(106, 115, 125); margin: 0px; padding: 0px; background: none 0% 0% / auto repeat scroll padding-box border-box rgba(0, 0, 0, 0);">//localhost</span><br><span style="color: rgb(89, 89, 89); margin: 0px; padding: 0px; background: none 0% 0% / auto repeat scroll padding-box border-box rgba(0, 0, 0, 0);">$</span> <span style="color: rgb(89, 89, 89); margin: 0px; padding: 0px; background: none 0% 0% / auto repeat scroll padding-box border-box rgba(0, 0, 0, 0);">mlflow</span> <span style="color: rgb(89, 89, 89); margin: 0px; padding: 0px; background: none 0% 0% / auto repeat scroll padding-box border-box rgba(0, 0, 0, 0);">models</span> <span style="color: rgb(89, 89, 89); margin: 0px; padding: 0px; background: none 0% 0% / auto repeat scroll padding-box border-box rgba(0, 0, 0, 0);">serve</span> <span style="color: rgb(215, 58, 73); margin: 0px; padding: 0px; background: none 0% 0% / auto repeat scroll padding-box border-box rgba(0, 0, 0, 0);">-</span><span style="color: rgb(89, 89, 89); margin: 0px; padding: 0px; background: none 0% 0% / auto repeat scroll padding-box border-box rgba(0, 0, 0, 0);">m</span> <span style="color: rgb(102, 153, 0); margin: 0px; padding: 0px; background: none 0% 0% / auto repeat scroll padding-box border-box rgba(0, 0, 0, 0);">"models:/MyModel-dt/Production"</span>
模型服务和POST请求
<span style="color: rgb(89, 89, 89); margin: 0px; padding: 0px; background: none 0% 0% / auto repeat scroll padding-box border-box rgba(0, 0, 0, 0);">$</span> <span style="color: rgb(89, 89, 89); margin: 0px; padding: 0px; background: none 0% 0% / auto repeat scroll padding-box border-box rgba(0, 0, 0, 0);">curl</span> <span style="color: rgb(89, 89, 89); margin: 0px; padding: 0px; background: none 0% 0% / auto repeat scroll padding-box border-box rgba(0, 0, 0, 0);">http</span>:<span style="color: rgb(106, 115, 125); margin: 0px; padding: 0px; background: none 0% 0% / auto repeat scroll padding-box border-box rgba(0, 0, 0, 0);">//localhost/invocations -H 'Content-Type: application/json' -d '{"inputs": [[0.39797844703998664, 0.6739875109527594, 0.9455601866618499, 0.8668404460733665, 0.1589125298570211]}'</span><br>[<span style="color: rgb(0, 92, 197); margin: 0px; padding: 0px; background: none 0% 0% / auto repeat scroll padding-box border-box rgba(0, 0, 0, 0);">1</span>]<span style="color: rgb(215, 58, 73); margin: 0px; padding: 0px; background: none 0% 0% / auto repeat scroll padding-box border-box rgba(0, 0, 0, 0);">%</span>
在上面的代码片段中,向模型提供服务的地址发出POST请求。在请求中传递了一个包含五个元素的数组,这是模型期望作为推理的输入数据。在这种情况下,预测结果是1。
需要指出的是,MLFlow允许定义数据结构,以便通过实现签名在“MLmodel”文件中进行推断。同样,通过请求传递的数据可以是不同类型的,可以在链接(https://www.mlflow.org/docs/latest/_modules/mlflow/models/signature.html)处查阅。
前面示例的完整实现可以在下面的链接处找到:
https://github.com/FernandoLpz/MLFlow-example
MLflow插件
由于MLflow的框架不可知性,导致了MLflow插件的出现。该插件的主要功能是以自适应方式将MLflow的功能扩展到不同的框架。
MLflow插件允许为特定平台定制和调整工件的部署和存储。
例如,下面这些是用于平台特定部署的插件:
- MLflow-redisai:它允许从MLflow中创建和管理的模型创建部署到RedisAI(https://oss.redislabs.com/redisai/)
- MLflow-torchserve:使PyTorch模型能够直接部署到torchserve(https://github.com/pytorch/serve)
- MLflow-algorithmia:允许将使用MLflow创建和管理的模型部署到Algorithmia(https://algorithmia.com/)基础设施
- MLflow-ray-serve:支持将MLflow模型部署到Ray(https://docs.ray.io/en/master/serve/)基础设施上
另一方面,为了管理MLflow项目,我们还提供了MLflow-yarn,这是一个在Hadoop/Yarn支持下管理MLProject的插件。对于MLflow跟踪的定制,我们有MLflow-elasticsearchstore,它允许在Elasticsearch环境下管理MLflow追踪扩展。
同样,也提供了特定的插件以支持部署到AWS和Azure等平台,它们是:
- MLflow.sagemaker和
- MLflow.azureml
必须提到的是,MLflow提供了根据需要创建和定制插件的能力。
MLflow与Kubeflow的比较
由于对开发和维护机器学习模型生命周期的工具的需求不断增加,出现了不同的管理方案,例如MLflow和KubeFlow等。
正如我们在本文中已经看到的,MLflow是一种工具,它允许在开发机器学习模型的生命周期中进行协作,主要关注跟踪工件(MLflow跟踪)、协作、维护和项目版本控制。
另一方面,还有一个类似的工具是Kubeflow,它与MLflow一样,是一种开发具有特定差异的机器学习模型的工具。
Kubeflow是一个在Kubernetes集群上工作的平台;也就是说,Kubeflow利用了Kubernetes的集装箱化特性。此外,Kubeflow还提供了Kubeflow管道线等工具,旨在通过SDK扩展生成和自动化管道(DAGs)。
此外,Kubeflow还提供Katib,这是一种大规模优化超参数的工具,并提供Jupyter笔记本的管理和协作服务。
具体而言,MLflow是一个专注于机器学习项目开发的管理和协作工具。另一方面,Kubeflow是一个专注于通过Kubernetes集群和使用容器开发、训练和部署模型的平台。
这两个平台都具有各自显著的优势,都是开发、维护和部署机器学习模型的可选择方案。然而,在开发团队中使用、实现和集成这些技术时,必须考虑相应的技术壁垒。
由于Kubeflow需要连接到Kubernetes集群才能达到实现和集成目的,因此建议由一名专家来管理该技术。同样,开发和配置管道自动化也是一项挑战,需要学习曲线,在特定情况下可能对公司不利。
总之,MLflow和Kubeflow都是专注于机器学习模型生命周期特定阶段的平台。MLflow是一种面向协作的工具,而Kubeflow更倾向于利用Kubernetes集群来生成机器学习任务。然而,Kubeflow需要MLOps部分的经验。您需要了解Kubernetes中的服务部署,这可能是尝试接近Kubeflow时需要考虑的问题。
翻訳者紹介
Zhu Xianzhong 氏、51CTO コミュニティ編集者、51CTO エキスパートブロガー、講師、濰坊の大学のコンピューター教師、フリーランスプログラミング業界のベテラン。初期の頃は、さまざまな Microsoft テクノロジ (ASP.NET AJX および Cocos 2d-X に関連する 3 冊の技術書を編集) に焦点を当てていましたが、過去 10 年間は、オープンソースの世界に専念してきました (人気のある完全なソースに精通しています)。スタックWeb開発技術)を学び、OneNet/AliOS Arduino/ESP32/Raspberry PiなどのIoT開発技術やScala Hadoop Spark Flinkなどのビッグデータ開発技術について学びました。
元のタイトル: MLFlow を使用して機械学習モデルをパッケージ化して配布する方法 、著者: Fernando López
以上が実際の機械学習モデルのMLFlowパッケージ化とデプロイメントの詳細内容です。詳細については、PHP 中国語 Web サイトの他の関連記事を参照してください。

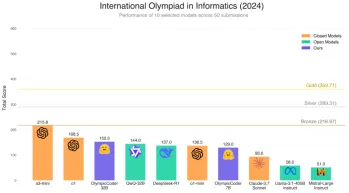 顔を抱きしめます&#039; S 7BモデルオリンピックコダーはClaude 3.7を破っていますか?Apr 23, 2025 am 11:49 AM
FaceのOlympiccoder-7Bを抱き締める:強力なオープンソースコード推論モデル 優れたコードに焦点を当てた言語モデルを開発するための競争は激化しており、顔を抱き締めることは、恐るべき競争相手との競争に参加しました:Olympiccoder-7B、製品
 4つの新しいジェミニ機能は、見逃す余裕がありますApr 23, 2025 am 11:48 AM
AIが質問に答えるだけでなく、AIができることを望んでいる人は何人いますか?私は自分が持っていることを知っています、そして最近、私はそれがどのように変容しているかに驚いています。 aiチャットボットはもうチャットするだけでなく、作成することです。
 Camundaは、エージェントAIオーケストレーションの新しいスコアを作成しますApr 23, 2025 am 11:46 AM
Smart AIは、エンタープライズソフトウェアプラットフォームとアプリケーションのあらゆるレベルのレベルに統合され始めているため(強力なコアツールと信頼性の低いシミュレーションツールの両方があることを強調する必要があります)、これらのエージェントを管理するための新しいインフラストラクチャ機能のセットが必要です。 ドイツのベルリンに拠点を置くプロセスオーケストレーション会社であるCamundaは、Smart AIが適切な役割を果たし、新しいデジタル職場での正確なビジネス目標とルールと一致するのに役立つと考えています。同社は現在、組織がAIエージェントのモデル化、展開、管理を支援するように設計されたインテリジェントオーケストレーション機能を提供しています。 実用的なソフトウェアエンジニアリングの観点から、これはどういう意味ですか? 確実性と非決定的プロセスの統合 同社は、鍵はユーザー(通常はデータサイエンティスト、ソフトウェア)を許可することだと言いました
 キュレーションされたエンタープライズAIエクスペリエンスに価値はありますか?Apr 23, 2025 am 11:45 AM
次の'25年にGoogle Cloudに参加して、GoogleがどのようにAIの製品を区別するかを見たいと思っていました。 エージェントスペース(ここで説明)とカスタマーエクスペリエンススイート(ここで説明)に関する最近の発表は、ビジネス価値を強調し、
 ぼろきれに最適な多言語埋め込みモデルを見つける方法は?Apr 23, 2025 am 11:44 AM
検索拡張生成(RAG)システムのための最適な多言語埋め込みモデルの選択 今日の相互接続された世界では、効果的な多言語AIシステムを構築することが最重要です。 REには、堅牢な多言語埋め込みモデルが重要です
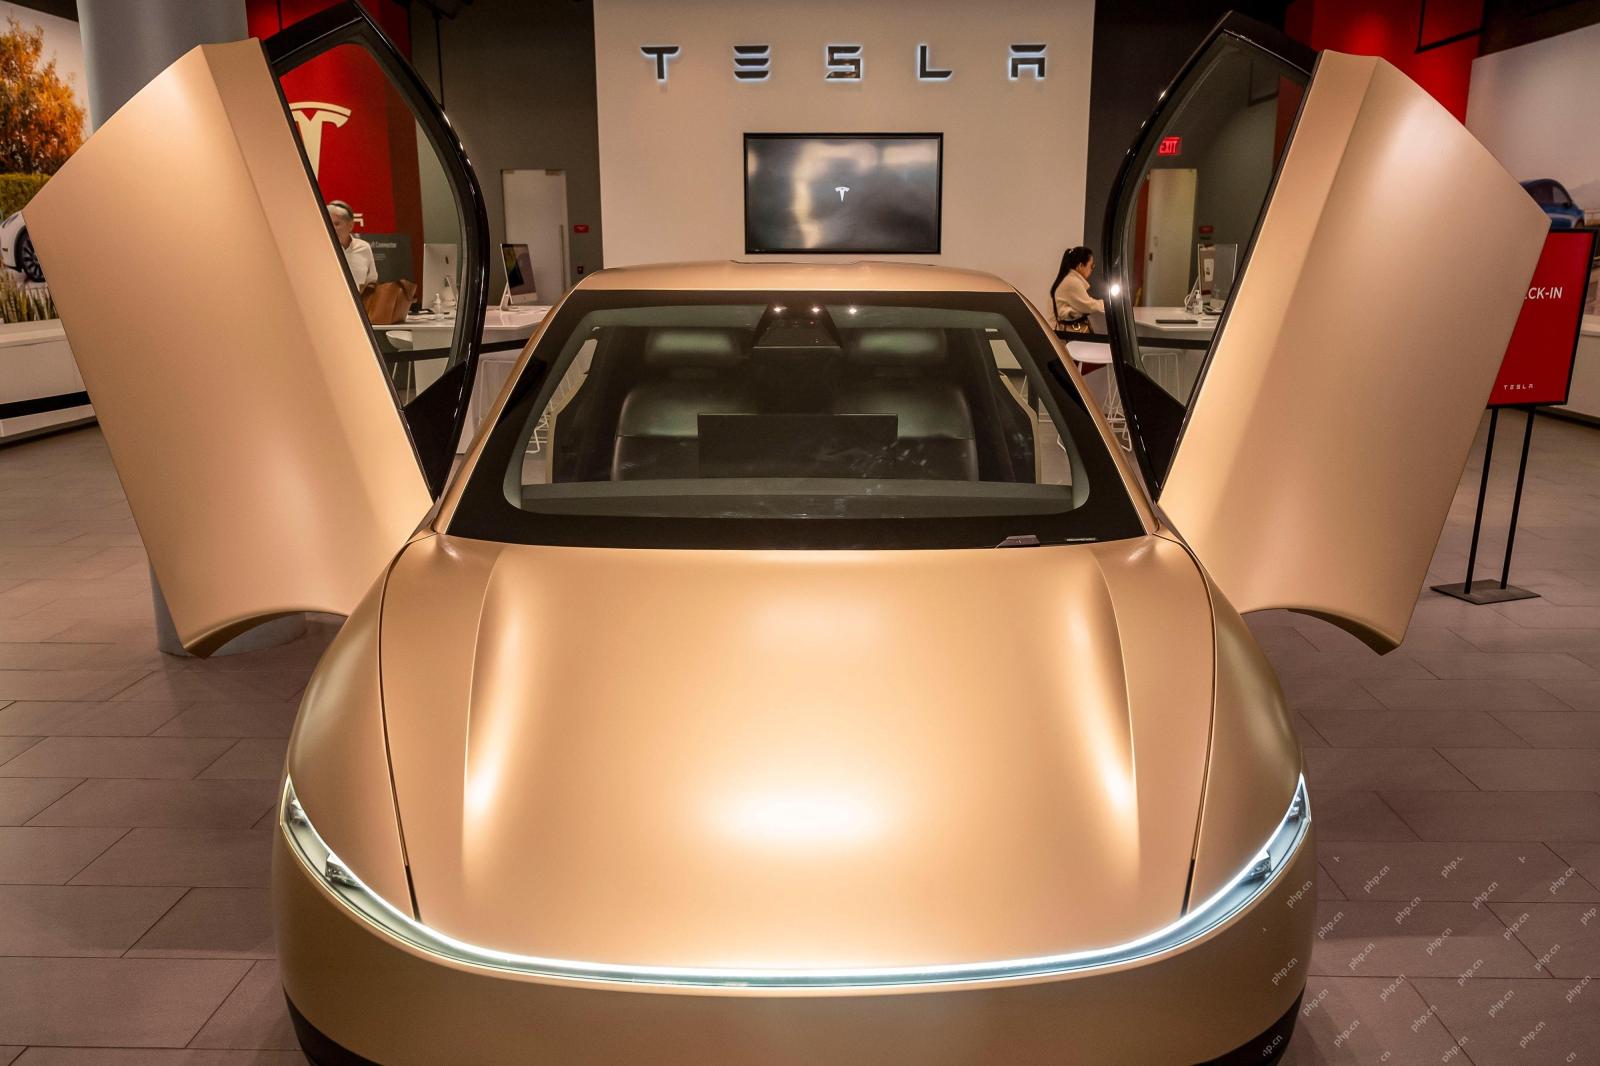 ムスク:オースティンのロボタキシスは、10,000マイルごとに介入が必要ですApr 23, 2025 am 11:42 AM
テスラのオースティンロボタキシローンチ:マスクの主張を詳しく見る Elon Muskは最近、テキサス州オースティンでのテスラの今後のRobotaxi発売を発表しました。当初、安全上の理由で10〜20台の車両の小さな艦隊を展開し、迅速な拡大を計画しました。 h
 AI&#x27;の衝撃的なピボット:作業ツールからデジタルセラピストやライフコーチまでApr 23, 2025 am 11:41 AM
人工知能の適用方法は予期しない場合があります。当初、私たちの多くは、それが主にコードの作成やコンテンツの作成など、創造的で技術的なタスクに使用されていると思うかもしれません。 ただし、Harvard Business Reviewによって報告された最近の調査では、そうではないことが示されています。ほとんどのユーザーは、仕事だけでなく、サポート、組織、さらには友情のために人工知能を求めています! 報告書は、AIアプリケーションの最初のケースは治療と交際であると述べています。これは、その24時間年中無休の可用性と匿名の正直なアドバイスとフィードバックを提供する能力が非常に価値があることを示しています。 一方、マーケティングタスク(ブログの作成、ソーシャルメディアの投稿の作成、広告コピーなど)は、一般的な使用リストではるかに低くランク付けされています。 なぜこれがなぜですか?研究の結果とそれがどのように続くかを見てみましょう
 企業はAIエージェントの採用に向けて競い合っていますApr 23, 2025 am 11:40 AM
AIエージェントの台頭は、ビジネス環境を変えています。 Cloud Revolutionと比較して、AIエージェントの影響は指数関数的に大きく、知識作業に革命をもたらすことを約束していると予測されています。 人間の意思決定-makiをシミュレートする能力


ホットAIツール

Undresser.AI Undress
リアルなヌード写真を作成する AI 搭載アプリ

AI Clothes Remover
写真から衣服を削除するオンライン AI ツール。

Undress AI Tool
脱衣画像を無料で

Clothoff.io
AI衣類リムーバー

Video Face Swap
完全無料の AI 顔交換ツールを使用して、あらゆるビデオの顔を簡単に交換できます。

人気の記事
ホットツール

EditPlus 中国語クラック版
サイズが小さく、構文の強調表示、コード プロンプト機能はサポートされていません

ZendStudio 13.5.1 Mac
強力な PHP 統合開発環境

DVWA
Damn Vulnerable Web App (DVWA) は、非常に脆弱な PHP/MySQL Web アプリケーションです。その主な目的は、セキュリティ専門家が法的環境でスキルとツールをテストするのに役立ち、Web 開発者が Web アプリケーションを保護するプロセスをより深く理解できるようにし、教師/生徒が教室環境で Web アプリケーションを教え/学習できるようにすることです。安全。 DVWA の目標は、シンプルでわかりやすいインターフェイスを通じて、さまざまな難易度で最も一般的な Web 脆弱性のいくつかを実践することです。このソフトウェアは、

MantisBT
Mantis は、製品の欠陥追跡を支援するために設計された、導入が簡単な Web ベースの欠陥追跡ツールです。 PHP、MySQL、Web サーバーが必要です。デモおよびホスティング サービスをチェックしてください。

mPDF
mPDF は、UTF-8 でエンコードされた HTML から PDF ファイルを生成できる PHP ライブラリです。オリジナルの作者である Ian Back は、Web サイトから「オンザフライ」で PDF ファイルを出力し、さまざまな言語を処理するために mPDF を作成しました。 HTML2FPDF などのオリジナルのスクリプトよりも遅く、Unicode フォントを使用すると生成されるファイルが大きくなりますが、CSS スタイルなどをサポートし、多くの機能強化が施されています。 RTL (アラビア語とヘブライ語) や CJK (中国語、日本語、韓国語) を含むほぼすべての言語をサポートします。ネストされたブロックレベル要素 (P、DIV など) をサポートします。

