ホームページ >ウェブフロントエンド >Vue.js >Vue 3を使ったFimgaプラグインの開発過程を記録します。
Vue 3を使ったFimgaプラグインの開発過程を記録します。
- 青灯夜游転載
- 2022-04-11 11:27:114834ブラウズ
Vue 3 を使用して Figma プラグインを開発するにはどうすればよいですか?次の記事では、Figma プラグインの原理を紹介し、Vue 3 を使用して Fimga プラグインを開発するプロセスを記録し、すぐに使用できるコードを添付します。

Vue 3 を使用して Figma プラグインを開発する
Figma は現在人気のデザイン ツールであり、デザイン チームがますます増えています。 Sketch から Figma への切り替えを開始します。 Figma の最大の特徴は、 Web テクノロジー を使用して開発されており、完全に クロスプラットフォームであることです。 Figma プラグインも Web テクノロジーを使用して開発されており、html、js、css を知っていれば、Figma プラグインを作成できます。
Figma プラグインの原理
Figma アーキテクチャの概要
Fimga プラグインを導入する前に-では、まず Fimga の技術アーキテクチャについて学びましょう。
Figma は全体として React を使用して開発されており、コアのキャンバス領域は canvas の一部であり、WebGL を使用してレンダリングされます。また、キャンバス エンジン部分には WebAssembly が使用されており、これが Figma が非常にスムーズに動作できる理由です。デスクトップ Figma アプリは、Web テクノロジーを使用してデスクトップ アプリケーションを開発するためのフレームワークである Electron を使用します。 Electron はブラウザに似ていますが、実際には内部で Web アプリケーションを実行します。
Figma プラグインの原理
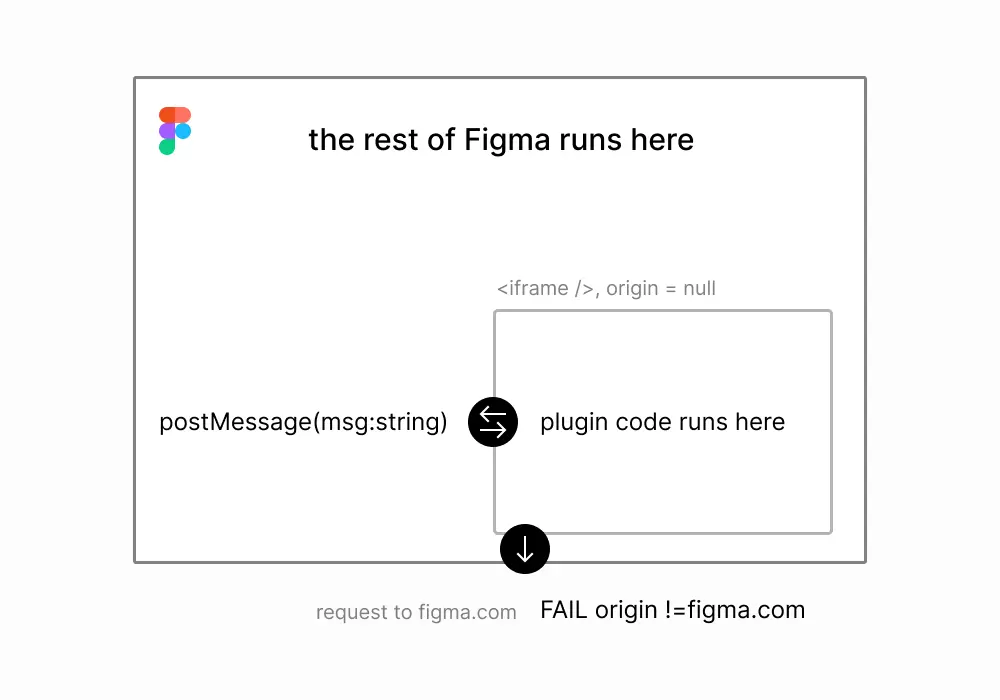
Web 上で安全で信頼性の高いプラグイン システムを開発するには、iframe が間違いなく最も直接的なソリューションです。 。 iframe はブラウザで長年使用されている標準 W3C 仕様です。その特徴は次のとおりです:
セキュリティ、自然なサンドボックス分離環境、iframe 内のページメインフレームの操作;
信頼性が高く、非常に優れた互換性があり、長年にわたって市場でテストされています;
しかし、また、明らかな欠点: メイン フレームワークとの通信は postMessage(STRING) を通じてのみ行うことができ、通信効率が非常に低いです。プラグイン内でキャンバス要素を操作したい場合は、メインフレームから要素のノード情報をiframeにコピーし、完了後にメインフレームにノード情報を更新する必要があります。 iframe での操作。これには大量の通信が必要となり、複雑なデザイン ドラフトのノード情報は非常に膨大になるため、通信制限を超える可能性があります。
キャンバスを操作できるようにするには、メインスレッドに戻る必要があります。メイン スレッドで実行されるプラグインの主な問題はセキュリティです。そのため、Figma 開発者は、Realm API を使用して、メイン スレッドに js サンドボックス環境を実装しました。サンドボックスでは純粋な js コードと Figma が提供する API のみを実行でき、ブラウザ API (ネットワーク、ストレージなど) にはアクセスできないため、セキュリティが確保されます。

興味のある学生は、公式チームが書いた 「Web 上にプラグイン システムを構築し、夜もよく眠る方法」 を読むことをお勧めします。詳細はこちら この記事では Figma プラグイン ソリューションの選定プロセスを紹介しており、とても参考になります。
総合的な検討の結果、Figma はプラグインを 2 つの部分に分割しました。プラグイン UI は iframe で実行され、キャンバスを操作するコードはメインの分離サンドボックスで実行されます。糸。 UI スレッドとメイン スレッドは postMessage を通じて通信します。
プラグイン構成ファイル manifest.json は、メインスレッドにロードされた js ファイルを指す main フィールドでそれぞれ構成されます。 ui フィールド設定は iframe の html ファイルにロードされます。プラグインを開くと、メインスレッドは figma.showUI() メソッドを呼び出して iframe をロードします。
最も単純な Figma プラグインを作成する
プラグインの実行プロセスを理解するために、まず最も単純な Figma を作成します。プラグイン。機能はシンプルです。正方形のカラーブロックを加算または減算できます。
Figma Desktop のインストール
まず、ダウンロードして、Figma Desktop をインストールする必要があります。
プラグイン起動ファイルmanifest.jsonを書き込みます
新しいコードプロジェクトを作成し、ルートに新しいmanifest.jsonファイルを作成します次の内容を含むディレクトリ:
{
  "name": "simple-demo",
  "api": "1.0.0",
  "main": "main.js",
  "ui": "index.html",
  "editorType": [
    "figjam",
    "figma"
  ]
}
UI コードの書き込み
新しいルート ディレクトリの作成index.html,
<!DOCTYPE html>
<html>
<head>
<meta charset="UTF-8">
<meta http-equiv="X-UA-Compatible" content="IE=edge">
<meta name="viewport" content="width=device-width, initial-scale=1.0">
<title>Demo</title>
<style>
h1 {
text-align: center;
}
p {
color: red;
}
.buttons {
margin-top: 20px;
text-align: center;
}
.buttons button {
width: 40px;
}
#block-num {
font-size: 20px;
}
</style>
</head>
<body>
<h1>Figma 插件 Demo</h1>
<p>当前色块数量:<span id="block-num">0</span></p>
<div>
<button id="btn-add" onclick="addBlock()">+</button>
<button id="btn-sub" onclick="subBlock()">-</button>
</div>
<script>
console.log('ui code runs!');
var blockNumEle = document.getElementById('block-num');
function addBlock() {
console.log('add');
var num = +blockNumEle.innerText;
num += 1;
blockNumEle.innerText = num;
}
function subBlock() {
console.log('substract');
var num = +blockNumEle.innerText;
if (num === 0) return;
num -= 1;
blockNumEle.innerText = num;
}
</script>
</body>
</html>メインの JS コードの編集
次の内容を含む新しいルート ディレクトリ main.js を作成します:
console.log('from code 2');
figma.showUI(__html__, {
  width: 400,
  height: 400,
});
プラグインを開始します
Figmaデスクトップ APP で、キャンバス上の任意の場所を右クリックしてメニューを開き、プラグイン -> 開発 -> マニフェストからプラグインをインポート... を選択します。 manifest.json はプラグインを正常にインポートするために以前のファイル パスを作成しました。
次に、Plugins -> Development -> simple-demo (プラグイン名) を右クリックしてプラグインを開きます。

ボタンをテストクリックすると、正常に機能します。カラー ブロックがまだページに表示されていないだけです (心配しないでください)。
デバッグ コンソールは、Plugins -> Development -> Open console から開くことができます。印刷したログを確認できます。
操作キャンバス
前述したように、キャンバス コードはメイン スレッドで実行されます。実行効率を高めるため、プラグインはメイン スレッドでのみ操作できます。キャンバスのコンテンツを操作したいと考えています。それは main.js にあります。最上位オブジェクト figma は、キャンバスの操作に使用される一連の API をカプセル化する main.js で公開されています。詳細については、公式 Web サイトのドキュメント#を参照してください。 ##。 figma.createRectangle() を使用して四角形を作成します。メインスレッドは、応答するために figma.ui.onmessage を通じて UI スレッドからのイベントをリッスンする必要があります。変更された main.js コードは次のとおりです:
console.log('figma plugin code runs!')

figma.showUI(__html__, {
  width: 400,
  height: 400,
});

const nodes = [];

figma.ui.onmessage = (msg) => {=
  if (msg.type === "add-block") {
    const rect = figma.createRectangle();
    rect.x = nodes.length * 150;
    rect.fills = [{ type: "SOLID", color: { r: 1, g: 0.5, b: 0 } }];
    figma.currentPage.appendChild(rect);
    nodes.push(rect);
  } else if (msg.type === "sub-block") {
    const rect = nodes.pop();
    if (rect) {
      rect.remove();
    }
  }
  figma.viewport.scrollAndZoomIntoView(nodes);
}; 同時に、index.html 内のいくつかのコードを変更して に渡す必要があります。 parent.postMessage メイン スレッドは次のイベントを送信します。
function addBlock() {
  console.log('add');
  var num = +blockNumEle.innerText;
  num += 1;
  blockNumEle.innerText = num;
  parent.postMessage({ pluginMessage: { type: 'add-block' } }, '*')
}

function subBlock() {
  console.log('substract');
  var num = +blockNumEle.innerText;
  if (num === 0) return;
  num -= 1;
  blockNumEle.innerText = num;
  parent.postMessage({ pluginMessage: { type: 'sub-block' } }, '*')
}
プラグインを再起動し、再試行すると、カラー ブロックの追加と削除が正常に実行できることがわかります。

Vue 3 を使用した Figma プラグインの開発
前の例を通して、次のようになります。 Figma プラグインの機能はすでに理解しています 動作原理。しかし、この「ネイティブ」js と html を使用してコードを記述するのは非常に非効率です。パッケージ化された製品にメインフレームで実行される js ファイルと iframe# で実行される html ファイルが含まれている限り、最新の Web テクノロジを使用してコードを作成できます。 ## それでおしまい。 Vue 3 を使用してプラグインを開発してみることにしました。 (学習ビデオ共有: vuejs チュートリアル)
についてはあまり詳しく説明しません。知っている人は誰でも理解できます。わかりました、最初にここに行って、勉強して戻ってきてください。ここでの焦点は、どのフレームワークを使用するか (vue 2 に変更、反応プロセスは同様です) ではなく、構築ツールにあります。
Vite 新しいプロジェクトを開始しますVite
は、Vue の作者によって開発された新世代のビルド ツールであり、推奨されるビルド ツールでもありますVue3の場合。
まず、Vue TypeScript テンプレート プロジェクトを構築しましょう。 <pre class="brush:js;toolbar:false;">npm init vite@latest figma-plugin-vue3 --template vue-ts
cd figma-plugin-vue3
npm install
npm run dev</pre>次に、ブラウザで
を開いてページを表示します。
以前のプラグイン デモを Vue 3 に移植します。
src/App.vue コードの変更は次のとおりです。 <pre class="brush:css;toolbar:false;"><script setup>
import { ref } from &#39;vue&#39;;
const num = ref(0);
console.log(&#39;ui code runs!&#39;);
function addBlock() {
console.log(&#39;add&#39;);
num.value += 1;
parent.postMessage({ pluginMessage: { type: &#39;add-block&#39; } }, &#39;*&#39;)
}
function subBlock() {
console.log(&#39;substract&#39;);
if (num .value=== 0) return;
num.value -= 1;
parent.postMessage({ pluginMessage: { type: &#39;sub-block&#39; } }, &#39;*&#39;)
}
</script>
<template>
<h1>Figma 插件 Demo</h1>
<p>当前色块数量:<span id="block-num">{{ num }}</span></p>
<div>
<button id="btn-add" @click="addBlock">+</button>
<button id="btn-sub" @click="subBlock">-</button>
</div>
</template>
<style scoped>
h1 {
text-align: center;
}
p {
color: red;
}
.buttons {
margin-top: 20px;
text-align: center;
}
.buttons button {
width: 40px;
}
#block-num {
font-size: 20px;
}
</style></pre> メイン スレッド サンドボックスで実行される js コードを
ディレクトリに保存します。次の内容を含む新しい src/worker/code.ts を作成します。 <pre class="brush:js;toolbar:false;">console.log(&#39;figma plugin code runs!&#39;)
figma.showUI(__html__, {
width: 400,
height: 400,
});
const nodes: RectangleNode[] = [];
figma.ui.onmessage = (msg) => {
if (msg.type === "add-block") {
const rect = figma.createRectangle();
rect.x = nodes.length * 150;
rect.fills = [{ type: "SOLID", color: { r: 1, g: 0.5, b: 0 } }];
figma.currentPage.appendChild(rect);
nodes.push(rect);
} else if (msg.type === "sub-block") {
const rect = nodes.pop();
if (rect) {
rect.remove();
}
}
figma.viewport.scrollAndZoomIntoView(nodes);
};</pre>
の ts 型宣言が上記のコードにないため、必要があります。インストールします。
を変更し、typeRoots を追加して、tsコードはエラーを報告しません。また、型宣言の競合を解決するには、"skipLibCheck": true を追加します。 <pre class="brush:js;toolbar:false;">{
"compilerOptions": {
// ...
"skipLibCheck": true,
"typeRoots": [
"./node_modules/@types",
"./node_modules/@figma"
]
},
}</pre>
Figma プラグインに必要なビルド製品は次のとおりです:
- #マニフェスト。 json
- プラグイン構成としてのファイル
- UI コードとしてのファイル
- メイン スレッドの js コードとして
#manifest.json ファイルをパブリック ディレクトリに追加します
##public ディレクトリ内のすべてのファイルは、ビルド プロダクトの dist
ディレクトリに移動します。{
"name": "figma-plugin-vue3",
"api": "1.0.0",
"main": "code.js",
"ui": "index.html",
"editorType": [
"figjam",
"figma"
]
}
vite.config.ts 中增加构建入口
默认情况下 vite 会用 index.html 作为构建入口,里面用到的资源会被打包构建。我们还需要一个入口,用来构建主线程 js 代码。
执行 npm i -D @types/node ,安装 Node.js 的类型声明,以便在 ts 中使用 Node.js API。 vite.config.ts 的 build.rollupOptions 中增加 input 。默认情况下输出产物会带上文件 hash ,所以也要修改 output 配置:
import { defineConfig } from 'vite'
import vue from '@vitejs/plugin-vue'
import { resolve } from 'path';

// https://vitejs.dev/config/
export default defineConfig({
  plugins: [vue()],
  build: {
    sourcemap: 'inline',
    rollupOptions: {
      input:{
            main: resolve(__dirname, 'index.html'),
            code: resolve(__dirname, 'src/worker/code.ts'),
          },
      output: {
        entryFileNames: '[name].js',
      },
    },
  },
})
运行构建
执行 npm run build , dist 目录会有构建产物。然后我们按照前面的步骤,将 dist 目录添加为 Figma 插件。 Plugins -> Development -> Import plugin from manifest... ,选择 dist/manifest.json 文件路径。
启动插件......怎么插件里一片空白?好在 Figma 里面有 devtools 调试工具,我们打开瞧一瞧。

可以看到,我们的 index.html 已经成功加载,但是 js 代码没加载所以页面空白。js、css 等资源是通过相对路径引用的,而我们的 iframe 中的 src 是一个 base64 格式内容,在寻找 js 资源的时候因为没有域名,所以找不到资源。
解决办法也很简单,我们给资源加上域名,然后本地起一个静态资源服务器就行了。修改 vite.config.ts ,加上 base: 'http://127.0.0.1:3000'
import { defineConfig } from 'vite'
import vue from '@vitejs/plugin-vue'
import { resolve } from 'path';

// https://vitejs.dev/config/
export default defineConfig({
  plugins: [vue()],
  base: 'http://127.0.0.1:3000',
  build: {
    sourcemap: 'inline',
    rollupOptions: {
      input: {
        main: resolve(__dirname, 'index.html'),
        code: resolve(__dirname, 'src/worker/code.ts'),
      },
      output: {
        entryFileNames: '[name].js',
      },
    },
  },
  preview: {
    port: 3000,
  },
})
重新构建代码 npm run build 。然后启动静态资源服务器 npm run preview 。通过浏览器访问 http://localhost:3000/ 可以看到内容。
然后重新打开 Figma 插件看看。果然,插件已经正常了!

Figma 加载插件只需要
index.html和code.js,其他资源都可以通过网络加载。这意味着我们可以将 js、css 资源放在服务端,实现插件的热更?不知道发布插件的时候会不会有限制,这个我还没试过。
开发模式
我们已经能成功通过 Vue 3 来构建 Figma 插件了,但是我不想每次修改代码都要构建一遍,我们需要能够自动构建代码的开发模式。
vite 自动的 dev 模式是启动了一个服务,没有构建产物(而且没有类似webpack里面的 writeToDisk 配置),所以无法使用。
watch 模式
vite 的 build 命令有watch模式,可以监听文件改动然后自动执行 build 。我们只需要修改 package.json , scripts 里新增 "watch": "vite build --watch" 。
npm run watch

# 同时要在另一个终端里启动静态文件服务
npm run preview
这种方式虽然修改代码后会自动编译,但是每次还是要关闭插件并重新打开才能看到更新。这样写UI还是太低效了,能不能在插件里实现 HMR (模块热重载)功能呢?
dev 模式
vite dev 的问题在于没有构建产物。 code.js 是运行在 Fimga 主线程沙箱中的,这部分是无法热重载的,所以可以利用 vite build --watch 实现来编译。需要热重载的是 index.html 以及相应的 js 、css 资源。
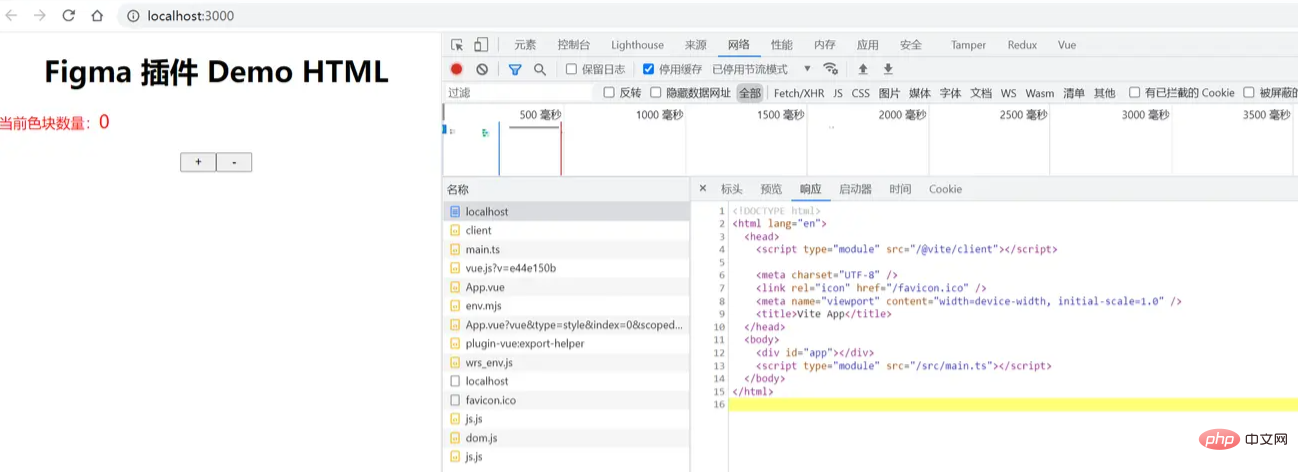
先来看一下 npm run dev 模式下的 html 资源有什么内容:

理论上来说,我们只需要把这个 html 手动写入到 dist 目录就行,热重载的时候 html 文件不需要修改。直接写入的话会遇到资源是相对路径的问题,所以要么把资源路径都加上域名( http://localhost:3000 ),或者使用 <base>标签。
手动生成 html 文件
对比上面的 html 代码和根目录的 index.html 文件,发现只是增加了一个 <script type="module" src="/@vite/client"></script> 。所以我们可以自己解析 index.html ,然后插入相应这个标签,以及一个 <base> 标签。解析 HTML 我们用 jsdom 。
const JSDOM = require('jsdom');
const fs = require('fs');

// 生成 html 文件
function genIndexHtml(sourceHTMLPath, targetHTMLPath) {
  const htmlContent = fs.readFileSync(sourceHTMLPath, 'utf-8');
  const dom = new JSDOM(htmlContent);
  const { document } = dom.window;

  const script = document.createElement('script');
  script.setAttribute('type', 'module');
  script.setAttribute('src', '/@vite/client');
  dom.window.document.head.insertBefore(script, document.head.firstChild);

  const base = document.createElement('base');
  base.setAttribute('href', 'http://127.0.0.1:3000/');
  dom.window.document.head.insertBefore(base, document.head.firstChild);

  const result = dom.serialize();
  fs.writeFileSync(targetHTMLPath, result);
}
同时 vite 提供了 JavaScript API,所以我们可以代码组织起来,写一个 js 脚本来启动开发模式。新建文件 scripts/dev.js ,完整内容如下:
const { JSDOM } = require('jsdom');
const fs = require('fs');
const path = require('path');
const vite = require('vite');

const rootDir = path.resolve(__dirname, '../');

function dev() {
  const htmlPath = path.resolve(rootDir, 'index.html');
  const targetHTMLPath = path.resolve(rootDir, 'dist/index.html');
  genIndexHtml(htmlPath, targetHTMLPath);

  buildMainCode();

  startDevServer();
}

// 生成 html 文件
function genIndexHtml(sourceHTMLPath, targetHTMLPath) {
  const htmlContent = fs.readFileSync(sourceHTMLPath, 'utf-8');
  const dom = new JSDOM(htmlContent);
  const {
    document
  } = dom.window;

  const script = document.createElement('script');
  script.setAttribute('type', 'module');
  script.setAttribute('src', '/@vite/client');
  dom.window.document.head.insertBefore(script, document.head.firstChild);

  const base = document.createElement('base');
  base.setAttribute('href', 'http://127.0.0.1:3000/');
  dom.window.document.head.insertBefore(base, document.head.firstChild);

  const result = dom.serialize();
  fs.writeFileSync(targetHTMLPath, result);
}

// 构建 code.js 入口
async function buildMainCode() {
  const config = vite.defineConfig({
    configFile: false, // 关闭默认使用的配置文件
    build: {
      emptyOutDir: false, // 不要清空 dist 目录
      lib: { // 使用库模式构建
        entry: path.resolve(rootDir, 'src/worker/code.ts'),
        name: 'code',
        formats: ['es'],
        fileName: (format) => `code.js`,
      },
      sourcemap: 'inline',
      watch: {},
    },
  });
  return vite.build(config);
}

// 开启 devServer
async function startDevServer() {
  const config = vite.defineConfig({
    configFile: path.resolve(rootDir, 'vite.config.ts'),
    root: rootDir,
    server: {
      hmr: {
        host: '127.0.0.1', // 必须加上这个,否则 HMR 会报错
      },
      port: 3000,
    },
    build: {
      emptyOutDir: false, // 不要清空 dist 目录
      watch: {}, // 使用 watch 模式
    }
  });
  const server = await vite.createServer(config);
  await server.listen()

  server.printUrls()
}

dev();
执行 node scripts/dev.js ,然后在 Figma 中重启插件。试试修改一下 Vue 代码,发现插件内容自动更新了!
最后在 package.json 中新建一个修改一下dev的内容为 "dev": "node scripts/dev.js" 就可以了。
通过请求来获取 HTML
前面通过自己生产 index.html 的方式有很大的弊端:万一后续 vite 更新后修改了默认 html 的内容,那我们的脚本也要跟着修改。有没有更健壮的方式呢?我想到可以通过请求 devServer 来获取 html 内容,然后写入本地。话不多说,修改后代码如下:
const { JSDOM } = require('jsdom');
const fs = require('fs');
const path = require('path');
const vite = require('vite');
const axios = require('axios');

const rootDir = path.resolve(__dirname, '../');

async function dev() {
  // const htmlPath = path.resolve(rootDir, 'index.html');
  const targetHTMLPath = path.resolve(rootDir, 'dist/index.html');

  await buildMainCode();

  await startDevServer();

  // 必须放到 startDevServer 后面执行
  await genIndexHtml(targetHTMLPath);
}

// 生成 html 文件
async function genIndexHtml(/* sourceHTMLPath,*/ targetHTMLPath) {
  const htmlContent = await getHTMLfromDevServer();
  const dom = new JSDOM(htmlContent);

  // ...

  const result = dom.serialize();
  fs.writeFileSync(targetHTMLPath, result);
}

// ...

// 通过请求 devServer 获取HTML
async function getHTMLfromDevServer () {
  const rsp = await axios.get('http://localhost:3000/index.html');
  return rsp.data;
}

dev();
结语
Figma 基于Web平台的特性使之能成为真正跨平台的设计工具,只要有浏览器就能使用。同时也使得开发插件变得非常简单,非专业人士经过简单的学习也可以上手开发一个插件。而Web社区有数量庞大的开发者,相信 Figma 的插件市场也会越来越繁荣。
本文通过一个例子,详细讲述了使用 Vue 3 开发 Figma 插件的过程,并且完美解决了开发模式下热重载的问题。我将模板代码提交到了 Git 仓库中,需要的同学可以直接下载使用:figma-plugin-vue3。
开发 Figma 插件还会遇到一些其他问题,例如如何进行网络请求、本地存储等,有空再继续分享我的实践心得。
本文转载自:https://juejin.cn/post/7084639146915921956
作者:大料园
(学习视频分享:web前端开发)
以上がVue 3を使ったFimgaプラグインの開発過程を記録します。の詳細内容です。詳細については、PHP 中国語 Web サイトの他の関連記事を参照してください。


