ホームページ >ウェブフロントエンド >uni-app >uni-appにプラグインを導入する方法
uni-appにプラグインを導入する方法
- 藏色散人オリジナル
- 2021-09-15 14:30:2310914ブラウズ
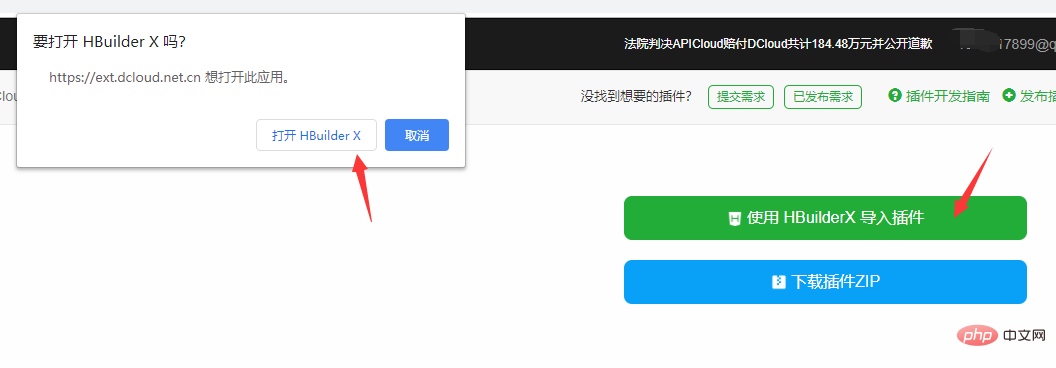
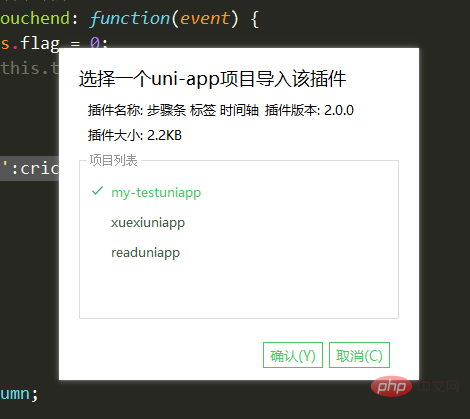
uni-app にプラグインを導入する方法: 1. uni-app の公式 Web サイトで必要なプラグインを見つけます; 2. 右上の [HX を使用してインポート] をクリックします; 3 . インポートするプロジェクトを選択して、クリックするだけです。

この記事の動作環境: Windows 7 システム、ユニアプリ バージョン 2.5.1、DELL G3 コンピューター
方法uni-appにプラグインを導入するには?
在uni-app中快速导入自己需要的插件
在uni-app的官网上;找到自己需要的插件;
然后点击右侧顶部的【使用HX导入】这一步的前提是你必须要用自己的账好登录;
然后选择你要导入哪一个项目 然后就可以了


plugin
<template>
<!-- 获取一个数组,结构为[{date:'时间',info:'内容内容'}] -->
<!-- @click事件返回点击标签元素的索引值 第一项为0 -->
<!--
在uni-app中快速导入自己需要的插件
在uni-app的官网上;找到自己需要的插件;
然后点击右侧顶部的【使用HX导入】这一步的前提是你必须要用自己的账好登录;
然后选择你要导入哪一个项目 然后就可以了
-->
<view class="bg">
<view class="steps">
<view class="steps_item" v-for="(i, index) in infoList">
<view class="s_r">
<view class="line" :style="{backgroundColor:index != 0?backgroundColor:'rgba(0,0,0,0)'}"></view>
<view class="index" :style="{backgroundColor:backgroundColor,color:color}">
{{ index + 1 }}
</view>
<view class="line" :style="{backgroundColor:index != infoList.length-1?backgroundColor:'rgba(0,0,0,0)'}"></view>
</view>
<view class="s_l">
<view class="info_item" @tap="topage(index)">
<text>{{ i.date }}</text>
<view :style="{WebkitLineClamp:lineNum!=0?lineNum:''}">{{ i.info }}</view>
</view>
</view>
</view>
</view>
</view>
</template>
<script>
export default {
name: 'YSteps',
props: {
infoList: {
type: Array,
default: []
},
color: {
type: String,
default: '#fff'
},
backgroundColor: {
type: String,
default: '#ff3838'
},
lineNum: {
type: Number,
default: 0
}
},
data() {
return {};
},
onLoad(e) {
//获取列表
},
methods: {
topage(e) {
this.$emit('click', e);
}
}
};
</script>
<style lang="scss" scoped>
page {
background-color: #f2f2f2;
}
.bg {
margin: 20upx 0;
background-color: #f2f2f2;
display: flex;
}
.steps {
display: flex;
flex-direction: column;
.steps_item {
display: flex;
.s_r {
padding: 0 20rpx;
display: flex;
flex-direction: column;
align-items: center;
.line {
flex: 1;
width: 5rpx;
background-color: #fff;
}
.index {
width: 40rpx;
height: 40rpx;
font-size: 12px;
text-align: center;
line-height: 40rpx;
border-radius: 50rpx;
}
}
.s_l {
display: flex;
flex-direction: column;
padding: 20rpx 0;
.info_item {
background-color: #FFFFFF;
margin-right: 30upx;
border-radius: 10upx;
display: flex;
flex-direction: column;
justify-content: center;
padding: 30upx;
box-shadow: 0 10rpx 30rpx #ddd;
width: 580rpx;
text {
font-size: 18px;
font-weight: 500;
color: rgba(51, 51, 51, 1);
line-height: 25px;
}
view {
font-size: 14px;
font-weight: 400;
color: rgba(102, 102, 102, 1);
line-height: 20px;
overflow: hidden;
text-overflow: ellipsis;
display: -webkit-box;
flex-direction: column;
}
}
.info_item:active {
background-color: #f4f4f4;
}
}
}
}
// .steps {
// display: flex;
// flex-direction: column;
// margin: 0 30upx;
// .steps_item {
// display: flex;
// align-items:center ;
// background-color: #fff;
// margin-top: 10rpx;
// .s_r {
// display: flex;
// flex-direction: column;
// align-items: center;
// height: 100%;
// background-color: #f3f;
// flex: 1;
// view {
// height: 100%;
// display: flex;
// flex: 1;
// height: 100%;
// width: 5upx;
// }
// text {
// display: flex;
// flex-direction: column;
// align-items: center;
// width: 40upx;
// line-height: 40upx;
// height: 40upx;
// border-radius: 50%;
// background-color: #ff3838;
// color: #ffffff;
// font-size: 10px;
// }
// }
// }
// }
// .info_list {
// display: flex;
// flex-direction: column;
// flex: 1;
// .info_item {
// background-color: #fff;
// height: 200upx;
// margin: 20upx 0;
// margin-right: 30upx;
// border-radius: 10upx;
// display: flex;
// flex-direction: column;
// justify-content: center;
// padding: 0 30upx;
// text {
// font-size: 18px;
// font-family: PingFangSC-Medium, PingFang SC;
// font-weight: 500;
// color: rgba(51, 51, 51, 1);
// line-height: 25px;
// }
// view {
// font-size: 14px;
// font-family: PingFangSC-Regular, PingFang SC;
// font-weight: 400;
// color: rgba(102, 102, 102, 1);
// line-height: 20px;
// overflow: hidden;
// text-overflow: ellipsis;
// display: -webkit-box;
// -webkit-line-clamp: 2;
// flex-direction: column;
// }
// }
// .info_item:active {
// opacity: 0.6;
// }
// }
</style>
使用 [推奨学習: uni-app チュートリアル]
rree以上がuni-appにプラグインを導入する方法の詳細内容です。詳細については、PHP 中国語 Web サイトの他の関連記事を参照してください。
声明:
この記事の内容はネチズンが自主的に寄稿したものであり、著作権は原著者に帰属します。このサイトは、それに相当する法的責任を負いません。盗作または侵害の疑いのあるコンテンツを見つけた場合は、admin@php.cn までご連絡ください。
前の記事:uni_app は何に使用できますか?次の記事:uni_app は何に使用できますか?

