ホームページ >ウェブフロントエンド >uni-app >uniapp はプロンプトを追加する機能をどのように実装しますか
uniapp はプロンプトを追加する機能をどのように実装しますか
- 藏色散人オリジナル
- 2020-12-16 17:28:105118ブラウズ
uniapp でプロンプトを追加する実装方法: 最初に入力を判定してフォーカスを取得し、次にインターフェースを介してデータを取得し、フロントエンドのシミュレーション処理を実行し、次に入力ボックスの変更イベントを設定し、最後にクリックイベントを設定し、検索クリックを実装できます。

このチュートリアルの動作環境: Windows 7 システム、uni-app2.5.1 バージョンこの方法は、すべてのブランドのコンピューターに適しています。
#推奨 (無料):uniapp は検索およびプロンプト機能を実装します (パラメーターの受け渡しなどを含む)
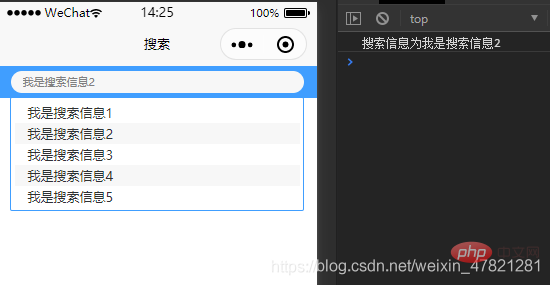
まずコードを見て、コピーして使用してください。v-for ループなどの使用を検討するのに役立ちました。考えられる問題の質問です。 (プラグインをインストールしてscssを使用することを推奨します) 以下のような効果が見られます。
<template>
<view>
<input>
<!-- 判断input获取焦点同时后台给到了数据 -->
<view>
<view>
{{item.title}}
</view>
</view>
</view></template><script>
export default {
data() {
return {
Value: '', //搜索内容
placeholder: '请输入搜索内容', //提示
isValue: false, //文字框是否显示
SearchList: []
}
},
methods: {
ShowValue() {
this.isValue = !this.isValue if (this.isValue) { //如果获取到了焦点
this.getList()
} else {
//失去焦点 清空数据
}
},
getList(value) { //这一步是获取数据 您可以通过接口获取 这里做前端模拟处理
// 需要和后台协商没有数据时候传递默认的几条
// axios.get('/getList?value='+value).then(res=>{ //请求案例
// this.SearchList = res.data.data
// })
if (!value) {
let arr = [{
id: 1,
title: "我是搜索信息1"
},
{
id: 2,
title: "我是搜索信息2"
},
{
id: 3,
title: "我是搜索信息3"
},
{
id: 4,
title: "我是搜索信息4"
},
{
id: 5,
title: "我是搜索信息5"
},
]
this.SearchList = arr } else {
this.getList()
}
},
GetValue(event) { //input框的change事件
console.log('当前输入' + event.detail.value)
// 有值就获取 没有就让他为空
event.detail.value ? this.Value = event.detail.value : this.Value = ''
event.detail.value ? this.getList(this.Value) : this.getList(this.Value)
},
SetValue(value) { //点击事件 搜索点击这一条
console.log('搜索信息为' + value)
this.Value = value this.placeholder = value this.SearchList = []
this.isValue = !this.isValue // 拿到数据 做页面跳转操作比如
// uni.navigateTo({
// url:"../cart/cart"
// })
}
},
onLoad() {}
}</script><style>
$max:100%;
.box {
width: $max;
padding: 10 30rpx; //上下10 左右30
height: 64rpx;
display: flex;
justify-content: center;
align-items: center;
min-height: 32px;
position: relative;
background: #409EFF;
.S-input {
width: 660rpx;
background: #f7f7f7;
padding-left: 30rpx;
border-radius:32rpx;
}
.InputList {
position: absolute;
width: 690rpx;
height: auto;
min-height: 100rpx;
top: 74rpx;
border: 1rpx solid #409EFF;
border-radius: 5rpx;
padding: 10rpx;
.listSon {
height: 50rpx;
line-height: 50rpx;
font-size: 32rpx;
text-indent:1em;
}
.listSon:nth-of-type(even){
background: #f7f7f7;
}
}
}</style>追加の役立つ可能性のある情報がコメントされています以上がuniapp はプロンプトを追加する機能をどのように実装しますかの詳細内容です。詳細については、PHP 中国語 Web サイトの他の関連記事を参照してください。
声明:
この記事の内容はネチズンが自主的に寄稿したものであり、著作権は原著者に帰属します。このサイトは、それに相当する法的責任を負いません。盗作または侵害の疑いのあるコンテンツを見つけた場合は、admin@php.cn までご連絡ください。
前の記事:uniappで現在のページを更新する方法次の記事:uniappで現在のページを更新する方法

