ホームページ >ウェブフロントエンド >jsチュートリアル >Vueでのueditorの使い方
Vueでのueditorの使い方
- 亚连オリジナル
- 2018-06-06 17:18:151968ブラウズ
この記事では主に、Vue での ueditor リッチ テキスト エディターの使用に関する関連情報を紹介します。必要な友人は参照してください。
私は最近、バックエンド管理システムで作業するときにリッチ テキスト エディターを使用する必要性に遭遇しました。最後に、私は ueditor を選択しました。私のプロジェクトでは vue+vue-router+webpack+elementUI ソリューションを使用してフレームワークの構築を完了します
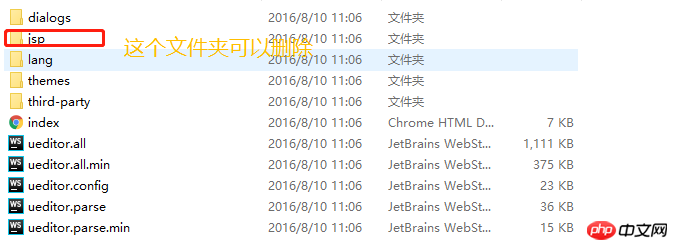
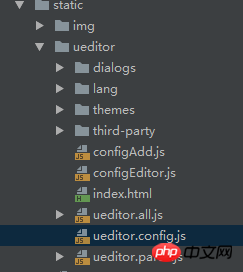
1. UEditor の公式 Web サイトから最新の JSP バージョンのパッケージをダウンロードして解凍します。 2. このフォルダーの名前を ueditor に変更し、プロジェクト内の静的フォルダーに移動し、ueditor.config の内容を変更します。以下に示すように、.js フォルダーを作成します。


3. サブコンポーネント
<template>
<p :id="id" type="text/plain"></p>
</template>
<script>
import '../../../static/ueditor/ueditor.config.js'
import '../../../static/ueditor/ueditor.all.min.js'
import '../../../static/ueditor/lang/zh-cn/zh-cn.js'
import '../../../static/ueditor/ueditor.parse.min.js'
export default {
name: 'UE',
data() {
return {
editor: null
}
},
props: {
defaultMsg: {
type: String,
default: '请输入内容'
},
config: {
type: Object
},
id: {
type: String,
default: `ue${Math.random(0, 100)}`
}
},
mounted() {
this.$nextTick(() => {
this.editor = UE.getEditor(this.id, this.config); // 初始化UE
this.editor.addListener("ready", () => {
this.editor.execCommand('insertHtml', this.defaultMsg);
this.editor.focus() // 确保UE加载完成后,放入内容。
})
})
},
methods: {
getUEContent() { // 获取内容方法
return this.editor.getContent()
},
clearContent() { // 清空编辑器内容
return this.editor.execCommand('cleardoc');
},
},
beforeDestroy() {
// 组件销毁的时候,要销毁 UEditor 实例
if (this.editor !== null && this.editor.destroy) {
this.editor.destroy();
}
}
}
</script>
<style scoped></style> を書き込みます。 4. 親コンポーネントで 
<UE :config="configEditor" :id="ue1" ref="ue" :defaultMsg="val"></UE>
 を使用します。 5. 実行後、画像をアップロードすると、バックエンド構成アイテムの http エラーが表示されます。ファイルをアップロードすると、アップロードミスが発生します。フロントエンドで ueditor を設定した後、バックエンド部分と連携して、ueditor.config.js のserverUrl のプレフィックスを独自のバックエンドのリクエスト パス アドレスに変更する必要があることをここで明確にしておきます。 -end access
serverUrl: "统一请求地址"
上 皆さんの参考になれば幸いです。
関連記事:
highCharts を使用して Vue で 3D 円グラフを描画する方法 vue-lazyload で画像遅延読み込みプラグインを使用するVuejs 単一ファイル コンポーネント (詳細なチュートリアル)以上がVueでのueditorの使い方の詳細内容です。詳細については、PHP 中国語 Web サイトの他の関連記事を参照してください。
声明:
この記事の内容はネチズンが自主的に寄稿したものであり、著作権は原著者に帰属します。このサイトは、それに相当する法的責任を負いません。盗作または侵害の疑いのあるコンテンツを見つけた場合は、admin@php.cn までご連絡ください。

