ホームページ >バックエンド開発 >Python チュートリアル >pytorch + visdom 独自に構築した画像データセットを処理する CNN 方法
pytorch + visdom 独自に構築した画像データセットを処理する CNN 方法
- 不言オリジナル
- 2018-06-04 16:19:004133ブラウズ
この記事では主に、自作の画像データセットを処理するための pytorch + visdom CNN の方法を紹介します。必要な友達はそれを参照できるようにしました
。システム: win10
cpu: i7-6700HQgpu: gtx965mpython: 3.6pytorch: 0.3 データのダウンロードSasank Chilamkurthy のチュートリアルから出典データ: ダウンロードリンク。
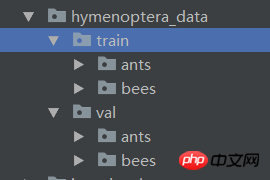
ダウンロードして解凍し、プロジェクトのルート ディレクトリに置きます:
 このデータ セットは、アリとミツバチを分類するために使用されます。各クラスには約 120 個のトレーニング画像と 75 個の検証画像があります。
データインポート
torchvision.datasets.ImageFolder(root,transforms) モジュールを使用して、イメージをテンソルに変換できます。
最初に変換を定義します:
ata_transforms = {
  'train': transforms.Compose([
    # 随机切成224x224 大小图片 统一图片格式
    transforms.RandomResizedCrop(224),
    # 图像翻转
    transforms.RandomHorizontalFlip(),
    # totensor 归一化(0,255) >> (0,1)  normalize  channel=(channel-mean)/std
    transforms.ToTensor(),
    transforms.Normalize(mean=[0.485, 0.456, 0.406], std=[0.229, 0.224, 0.225])
  ]),
  "val" : transforms.Compose([
    # 图片大小缩放 统一图片格式
    transforms.Resize(256),
    # 以中心裁剪
    transforms.CenterCrop(224),
    transforms.ToTensor(),
    transforms.Normalize(mean=[0.485, 0.456, 0.406], std=[0.229, 0.224, 0.225])
  ])
}
データのインポートとロード:
data_dir = './hymenoptera_data'
# trans data
image_datasets = {x: datasets.ImageFolder(os.path.join(data_dir, x), data_transforms[x]) for x in ['train', 'val']}
# load data
data_loaders = {x: DataLoader(image_datasets[x], batch_size=BATCH_SIZE, shuffle=True) for x in ['train', 'val']}

data_sizes = {x: len(image_datasets[x]) for x in ['train', 'val']}
class_names = image_datasets['train'].classes
print(data_sizes, class_names)
{'train': 244, 'val': 153} ['ants', 'bees'] トレーニング セット 244 枚、テスト セット 153 枚。 いくつかの画像を視覚化します。visdom はテンソル入力をサポートしているため、テンソル計算を直接使用できます:
inputs, classes = next(iter(data_loaders['val']))
out = torchvision.utils.make_grid(inputs)
inp = torch.transpose(out, 0, 2)
mean = torch.FloatTensor([0.485, 0.456, 0.406])
std = torch.FloatTensor([0.229, 0.224, 0.225])
inp = std * inp + mean
inp = torch.transpose(inp, 0, 2)
viz.images(inp)
 処理に基づいて CNN
ネットを作成します。前回の記事の cifar10 の仕様を変更しました:
class CNN(nn.Module):
  def __init__(self, in_dim, n_class):
    super(CNN, self).__init__()
    self.cnn = nn.Sequential(
      nn.BatchNorm2d(in_dim),
      nn.ReLU(True),
      nn.Conv2d(in_dim, 16, 7), # 224 >> 218
      nn.BatchNorm2d(16),
      nn.ReLU(inplace=True),
      nn.MaxPool2d(2, 2), # 218 >> 109
      nn.ReLU(True),
      nn.Conv2d(16, 32, 5), # 105
      nn.BatchNorm2d(32),
      nn.ReLU(True),
      nn.Conv2d(32, 64, 5), # 101
      nn.BatchNorm2d(64),
      nn.ReLU(True),
      nn.Conv2d(64, 64, 3, 1, 1),
      nn.BatchNorm2d(64),
      nn.ReLU(True),
      nn.MaxPool2d(2, 2), # 101 >> 50
      nn.Conv2d(64, 128, 3, 1, 1), #
      nn.BatchNorm2d(128),
      nn.ReLU(True),
      nn.MaxPool2d(3), # 50 >> 16
    )
    self.fc = nn.Sequential(
      nn.Linear(128*16*16, 120),
      nn.BatchNorm1d(120),
      nn.ReLU(True),
      nn.Linear(120, n_class))
  def forward(self, x):
    out = self.cnn(x)
    out = self.fc(out.view(-1, 128*16*16))
    return out

# 输入3层rgb ,输出 分类 2
model = CNN(3, 2)
loss、最適化関数:
line = viz.line(Y=np.arange(10))
loss_f = nn.CrossEntropyLoss()
optimizer = optim.SGD(model.parameters(), lr=LR, momentum=0.9)
scheduler = optim.lr_scheduler.StepLR(optimizer, step_size=7, gamma=0.1)
パラメータ:
BATCH_SIZE = 4
LR = 0.001
EPOCHS = 10
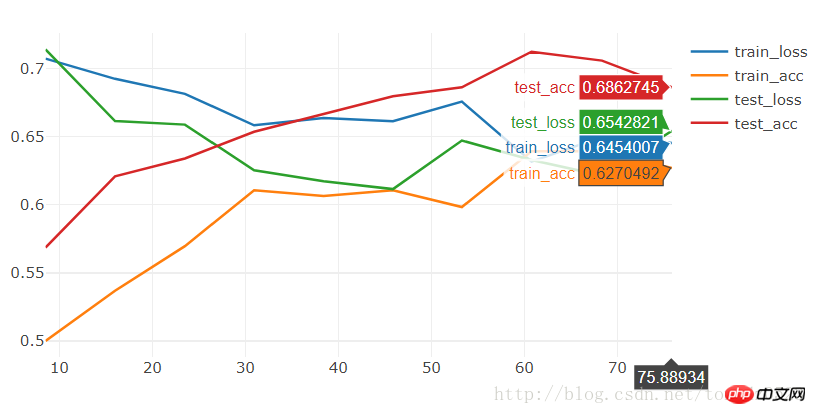
10 エポックを実行して見てください:
りー
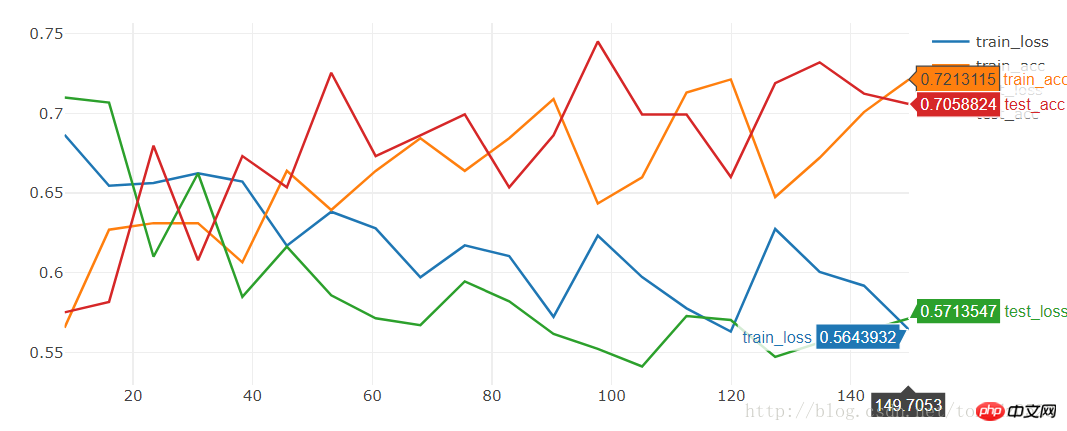
Run 20 見てください: 
[9/10] train_loss:0.650|train_acc:0.639|test_loss:0.621|test_acc0.706
[10/10] train_loss:0.645|train_acc:0.627|test_loss:0.654|test_acc0.686
Training complete in 1m 16s
Best val Acc: 0.712418
精度は比較的低く、わずか 74.5% です
[19/20] train_loss:0.592|train_acc:0.701|test_loss:0.563|test_acc0.712
[20/20] train_loss:0.564|train_acc:0.721|test_loss:0.571|test_acc0.706
Training complete in 2m 30s
Best val Acc: 0.745098
model = torchvision.models.resnet18(True)
num_ftrs = model.fc.in_features
model.fc = nn.Linear(num_ftrs, 2)
必要に応じて、効果も非常に平均的です。短時間でトレーニングすると、効果は非常に優れています。優れたモデルの場合、トレーニング済みの状態をダウンロードして、次の基準に基づいてトレーニングできます:
[9/10] train_loss:0.621|train_acc:0.652|test_loss:0.588|test_acc0.667
[10/10] train_loss:0.610|train_acc:0.680|test_loss:0.561|test_acc0.667
Training complete in 1m 24s
Best val Acc: 0.686275
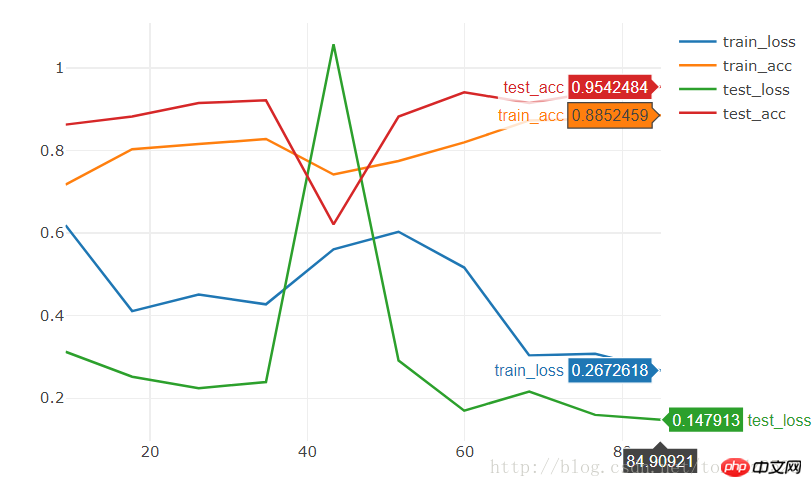
model = torchvision.models.resnet18(pretrained=True)
num_ftrs = model.fc.in_features
model.fc = nn.Linear(num_ftrs, 2)
10 エポックで直接 95% の精度に達します。
関連する推奨事項: 
pytorch + visdom は簡単な分類問題を処理します
以上がpytorch + visdom 独自に構築した画像データセットを処理する CNN 方法の詳細内容です。詳細については、PHP 中国語 Web サイトの他の関連記事を参照してください。
声明:
この記事の内容はネチズンが自主的に寄稿したものであり、著作権は原著者に帰属します。このサイトは、それに相当する法的責任を負いません。盗作または侵害の疑いのあるコンテンツを見つけた場合は、admin@php.cn までご連絡ください。

