ホームページ >Java >&#&チュートリアル >横スライド機能付き Android DrawerLayout レイアウトクラス (1)
横スライド機能付き Android DrawerLayout レイアウトクラス (1)
- 高洛峰オリジナル
- 2017-01-07 14:32:231770ブラウズ
DrawerLayout は、その名前が示すように、レイアウト マネージャーです。使用法は他のレイアウト クラスと同様です。
DrawerLayoutにはスライド機能があります。 drawerLayoutの規定のレイアウト方法に従ってレイアウトを記述していれば、横スライド効果を得ることができます。
DrawerLayout をルート レイアウトとして直接使用し、その中に使用します
最初のビューはコンテンツ領域です
2 番目のビューは左側のメニューです
3 番目のビューは右側のスライド メニューです
現在の 3 番目のビューはオプションです。
使用されるパッケージは次のとおりです:
import android.support.v4.widget.DrawerLayout;
これらのパッケージを使用すると、時々エラーが報告されます。このとき、android.support.v4 が最新バージョンであることを確認してください。
サポート パッケージを更新できます。ファイルは sdk/extres/support に保存されています。
次に、Eclipse>プロジェクトを右クリック>Android Tools>サポート ライブラリの追加を使用します...
または、ファイルをプロジェクトの libs フォルダーに直接コピーすることもできます。
<android.support.v4.widget.DrawerLayout
 xmlns:android="http://schemas.android.com/apk/res/android"
 android:id="@+id/drawer_layout"
 android:layout_width="match_parent"
 android:layout_height="match_parent">
 <FrameLayout
  android:id="@+id/content_frame"
  android:layout_width="match_parent"
  android:layout_height="match_parent" />
 <ListView
  android:id="@+id/left_drawer"
  android:layout_width="240dp"
  android:layout_height="match_parent"
  android:layout_gravity="start"
  android:choiceMode="singleChoice"
  android:divider="@android:color/transparent"
  android:dividerHeight="0dp"
  android:background="#111"/>
</android.support.v4.widget.DrawerLayout>
引き出しの位置とレイアウトは、引き出しを表示するビューのどちら側 (左または右) に対応する子ビューの android:layout_gravity 属性を使用して制御されます。
(または、レイアウト方向をサポートするプラットフォーム バージョンで開始/終了) .)
つまり、
android:layout_gravity="start" は、左側の MENU を右にスライドしてメニューを表示する、LEFT/START (RIGHT/END) と同等です
そして、レイアウト ファイルから次のことがわかります。
FrameLayoutはコンテンツエリア、ListViewは左側のメニューです。
コンテンツをロードするにはフラグメントを作成する必要があります:
public class PageFragment extends Fragment {
  public final static String ITEM_POSITION_NUMBER = "item_position_num";
  public PageFragment(){}
  @Override
  public View onCreateView(LayoutInflater inflater, ViewGroup container,
    Bundle savedInstanceState) {
   View convertView = inflater.inflate(R.layout.page_fragment_layout, null);
   TextView tv = (TextView) convertView.findViewById(R.id.textView);
   int num = getArguments().getInt(ITEM_POSITION_NUMBER);
   //从res/array中获取list数据
   String[] dynastyList = getResources().getStringArray(R.array.list_item);
   tv.setText(dynastyList[num]);
   return convertView;
  }
 }
このコードから、左側のメニューで SelectItem を選択すると、対応する値がコンテンツ領域に表示されることがわかります。
コード内のpage_fragment_layout.xmlはTextViewをFrameLayoutに追加するだけなので、コードは投稿されません。
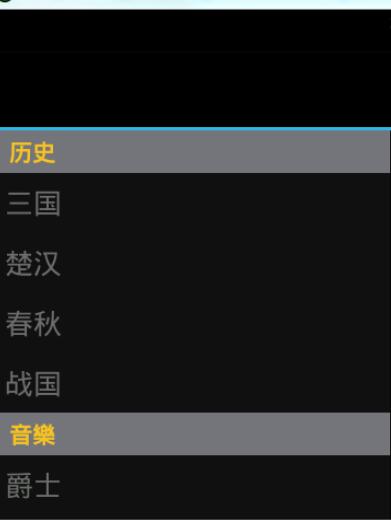
次に listView にデータを入力する必要があります。
private ListView menuList;
private String[] mMenuTitles;
private String[] historyTitles;
private String[] musicTitles;
private String[] movieTitles;
private String[] listTitles;
     // 历史栏
  historyTitles = getResources().getStringArray(R.array.history);
  // 音乐栏
  musicTitles = getResources().getStringArray(R.array.music);
  // 电影栏
  movieTitles = getResources().getStringArray(R.array.movie);
  // 标题数组
  mMenuTitles = getResources().getStringArray(R.array.title);
  // 每一項的標題
  listTitles = getResources().getStringArray(R.array.list_item);

  drawLayout = (DrawerLayout) findViewById(R.id.drawer_layout);
  menuList = (ListView) findViewById(R.id.left_menu);

  // 设置菜单阴影效果
  // drawLayout.setDrawerShadow(R.drawable.drawer_shadow,
  // GravityCompat.START);
  List<Item> list = new ArrayList<Item>();
  // 菜单加入历史标题和历史项
  HeaderItem historyHeader = new HeaderItem(mMenuTitles[0]);
  list.add(historyHeader);
  for (int i = 0; i < historyTitles.length; i++) {
   EventItem historyitem = new EventItem(historyTitles[i]);
   list.add(historyitem);
  }

  // 菜单加入音乐标题和音乐项
  HeaderItem musicHeader = new HeaderItem(mMenuTitles[1]);
  list.add(musicHeader);
  for (int i = 0; i < musicTitles.length; i++) {
   EventItem musicItem = new EventItem(musicTitles[i]);
   list.add(musicItem);
  }

  // 菜单加入电影标题和电影项
  HeaderItem movieHeader = new HeaderItem(mMenuTitles[2]);
  list.add(movieHeader);
  for (int i = 0; i < movieTitles.length; i++) {
   EventItem movieItem = new EventItem(movieTitles[i]);
   list.add(movieItem);
  }

  MyListAdapter adapter = new MyListAdapter(this, list);
  menuList.setAdapter(adapter);
このデータ入力はちょっと面倒です。 ListAdapter をカスタマイズして適応させます。
データは res/values/arrays.xml にあります
<?xml version="1.0" encoding="utf-8"?>
<resources>
 <string-array name="history">
  <item >三国</item>
  <item >楚汉</item>
  <item >春秋</item>
  <item >战国</item>
 </string-array>
  <string-array name="music">
  <item >爵士</item>
  <item >古典</item>
  <item >现代</item>
  <item >民谣</item>
 </string-array>
  <string-array name="movie">
  <item >悬疑</item>
  <item >爱情</item>
  <item >历史</item>
  <item >恐怖</item>
 </string-array>
 <string-array name="title">
  <item >历史</item>
  <item >音樂</item>
  <item >电影</item>
 </string-array>
 <string-array name="list_item">
  <item >歷史</item>
  <item >三国</item>
  <item >楚汉</item>
  <item >春秋</item>
  <item >战国</item>
  <item >音樂</item>
  <item >爵士</item>
  <item >古典</item>
  <item >现代</item>
  <item >民谣</item>
  <item >電影</item>
  <item >悬疑</item>
  <item >爱情</item>
  <item >历史</item>
  <item >恐怖</item>
 </string-array>
</resources>
次に listView の監視があります:
 private void initListener() {
 // 菜单单击事件监听器
 menuList.setOnItemClickListener(new DrawerItemClickListener());
}

/* The click listner for ListView in the navigation drawer */
private class DrawerItemClickListener implements
  ListView.OnItemClickListener {
 @Override
 public void onItemClick(AdapterView<?> parent, View view, int position,
   long id) {
  Log.i("Light", "position:" + position);
  selectItem(position);
 }
}

private void selectItem(int position) {
 // update the main content by replacing fragments
 PageFragment fragment = new PageFragment();
 // 将当前选择的项传递到Fragment
 Bundle args = new Bundle();
 args.putInt(PageFragment.ITEM_POSITION_NUMBER, position);
 fragment.setArguments(args);

 FragmentTransaction ft = MainActivity.this.getSupportFragmentManager()
   .beginTransaction();
 ft.replace(R.id.content_frame, fragment).commit();

 drawLayout.closeDrawer(menuList);
 // update selected item and title, then close the drawer
 menuList.setItemChecked(position, true);
 // 注意这里改变的是ActionBar的标题
 getActionBar().setTitle(listTitles[position]);
}
私たちが気にしているのは、Item がクリックされたときに何が起こるか、つまりコードです:
private void selectItem(int position) {
  // update the main content by replacing fragments
  PageFragment fragment = new PageFragment();
  // 将当前选择的项传递到Fragment
  Bundle args = new Bundle();
  args.putInt(PageFragment.ITEM_POSITION_NUMBER, position);
  fragment.setArguments(args);

  FragmentTransaction ft = MainActivity.this.getSupportFragmentManager()
    .beginTransaction();
  ft.replace(R.id.content_frame, fragment).commit();

  drawLayout.closeDrawer(menuList);
  // update selected item and title, then close the drawer
  menuList.setItemChecked(position, true);
  // 注意这里改变的是ActionBar的标题
  getActionBar().setTitle(listTitles[position]);
 }
コードから見てみましょう
1. まず、new PageFragment(); を通じてコンテンツ領域を取得します。
2. Bundle を介してデータをパッケージ化し、フラグメントがこのデータを取得できるように、fragment.setArguments(args) に挿入します。
フラグメント クラスでは、getArguments().getInt(ITEM_POSITION_NUMBER); を通じて渡された値を取得できます。
3. 次に、ft.replace(R.id.content_frame, flagment).commit(); を通じてコンテンツを以前に定義した PageFragment に置き換えます。コード全体 この関数
5.同時にActionBarのタイトルをselectedItemに対応する値に変更します。
*このとき、ListView と DrawerLayout の間にバインディング操作がないのはなぜかと尋ねられるでしょう。また、DrawerLayout の 2 番目の開始点は、内部的にバインドされているメニュー View であることも前に述べました。
これらのコンテンツのみが左右のスライドメニュー効果を実現できます。


