Bootstrap Table の使用経験の概要
- 高洛峰オリジナル
- 2017-01-04 10:48:281280ブラウズ
以前、管理のバックグラウンドで使用されているテーブル コントロールを調査し、http://bootstrap-table.wenzhixin.net.cn にある Bootstrap Table を見つけました。これは非常に良いと思いますが、公式ドキュメントがあまり完全ではないため、それは私自身のネットワークデータリクエストにつながります。
今日やっとデバッグが通過したのでここで共有したいと思います。
1. 関連する設定ファイルの紹介
<!-- jQuery文件。务必在bootstrap.min.js 之前引入 -->
<script src="//cdn.bootcss.com/jquery/1.11.3/jquery.min.js"></script>
<link rel="stylesheet" href="//cdn.bootcss.com/bootstrap/3.3.5/css/bootstrap.min.css">
<script src="//cdn.bootcss.com/bootstrap/3.3.5/js/bootstrap.min.js"></script>

<!-- bootstrap table -->
<link href="//cdn.bootcss.com/bootstrap-table/1.11.0/bootstrap-table.min.css" rel="stylesheet">
<script src="//cdn.bootcss.com/bootstrap-table/1.11.0/bootstrap-table.min.js"></script>
<script src="//cdn.bootcss.com/bootstrap-table/1.11.0/bootstrap-table-locale-all.js"></script>
<script src="//cdn.bootcss.com/bootstrap-table/1.11.0/extensions/export/bootstrap-table-export.min.js"></script>
<!-- bootstrap table 包含excel导出,pdf导出 -->
<script src="https://rawgit.com/hhurz/tableExport.jquery.plugin/master/tableExport.js"></script>
<script src="//cdn.bootcss.com/FileSaver.js/2014-11-29/FileSaver.min.js"></script>
注意!!!!! ここでの tableExport.js は、bootcdn の tableExport ではありません。使用しないと Excel のエラーが発生します。エクスポートできないようにします
2. テーブルのヘッダーとツールバーを作成します
実際、テーブルのヘッダー全体を記述するのは非常に簡単で、いくつかの簡単な設定のみが必要です。
ここに各 Bean の属性を書き込んでください
バインディング ツールバーに注目してください
次の設定を参照できます
<!-- 工具栏的按钮,可以自定义事件 -->
<div id="toolbar" class="btn-group">
<button type="button" class="btn btn-default">
<i class="glyphicon glyphicon-plus"></i>
</button>
<button type="button" class="btn btn-default">
<i class="glyphicon glyphicon-heart"></i>
</button>
<button type="button" class="btn btn-default">
<i class="glyphicon glyphicon-trash"></i>
</button>
</div>
<table id="demo" class="table table-striped table-hover table-bordered"
data-toolbar="#toolbar" // 这里必须绑定工具栏,不然布局会错乱
data-search="true"
data-show-refresh="true"
data-show-columns="true"
data-show-export="true"
data-export-types="['excel']"
data-export-options='{ // 导出的文件名
"fileName": "products",
"worksheetName": "products"
}'
>
<thead>
<tr>
<th width="3%" data-field="prodId">产品Id</th>
<th width="10%" data-field="nameOfProduct">产品名称</th>
<th width="4%" data-field="categoryId">产品类别</th>
<th width="5%" data-field="domicileOfCapital">资本类型</th>
<th width="8%" data-field="underwriter">发行机构</th>
<th width="6%" data-field="managementInstitution">基金公司</th>
<th width="5%" data-field="managementInstitution2">管理机构</th>
<th width="3%" data-field="flag">角标</th>
<th width="7%" data-field="beginTime">上线时间</th>
<th width="7%" data-field="endTime">下线时间</th>
<th width="4%" data-field="status">发布状态</th>
<th width="4%" data-field="fundRaisingStatus">募集状态</th>
<th width="3%" data-field="totalScore">打分</th>
<th width="3%" data-field="modesOfGuaranteeScore">担保</th>
<th width="3%" data-field="invsetmentTargetScore">投资</th>
<th width="3%" data-field="underwriterScore">发行</th>
<th width="3%" data-field="sourceOfPaymentScore">还款</th>
<th width="3%" data-field="issuerDescriptionScore">融资</th>
<th width="10%">操作</th>
</tr>
</thead>
</table>3. バインディング バックエンド ロジック
ブートストラップ テーブルはデフォルトでフォーム フォームを使用するためです。この方法で送信されたページング パラメータとクエリ パラメータは、バックエンド ロジック プロトコルと一致しません。 (この部分に関する公式ドキュメントは不足しています)
そのため、そのプロトコルのカスタム構成を作成する必要があります。
$(function() {
 $("#demo").bootstrapTable({
 url: "http://ydjr.dev.chengyiwm.com/goldman-mgr/listProduct",
 sortName: "prodId", //排序列
 striped: true, //條紋行
 sidePagination: "server", //服务器分页
 clickToSelect: true, //选择行即选择checkbox
 singleSelect: true, //仅允许单选
 searchOnEnterKey: true, //ENTER键搜索
 pagination: true, //启用分页
 escape: true, //过滤危险字符
 queryParams: getParams, //携带参数
 method: "post", //请求格式
 responseHandler: responseHandler,
 });

});


/**
 * 默认加载时携带参数
 *
 * 将自带的param参数转化到cy的请求逻辑协议
 */
function getParams(params) {
 var query = $("#searchKey").val();
 console.log(JSON.stringify(params));
 return {
 head: {
  userId: "11154",
  skey: "6FC19FCE5D8DCF130954D8AE2CADB30A",
  platform: "pc",
  imei: "",
  appVersion: "",
  cityId: "",
  platformVersion: "",
  deviceId: "",
  channel: "",
  protoVersion: 1,
  isPreview: 2
 },
 body: {
  'query': params.search, // 搜索参数
  'start': params.offset, // 分页开始位置
  'pageSize': params.limit, //每页多少条

 }
 }
}


/**
 * 获取返回的数据的时候做相应处理,让bootstrap table认识我们的返回格式
 * @param {Object} res
 */
function responseHandler(res) {
 return {
 "rows": res.body.listProduct, // 具体每一个bean的列表
 "total": res.body.totalCount // 总共有多少条返回数据
 }
}
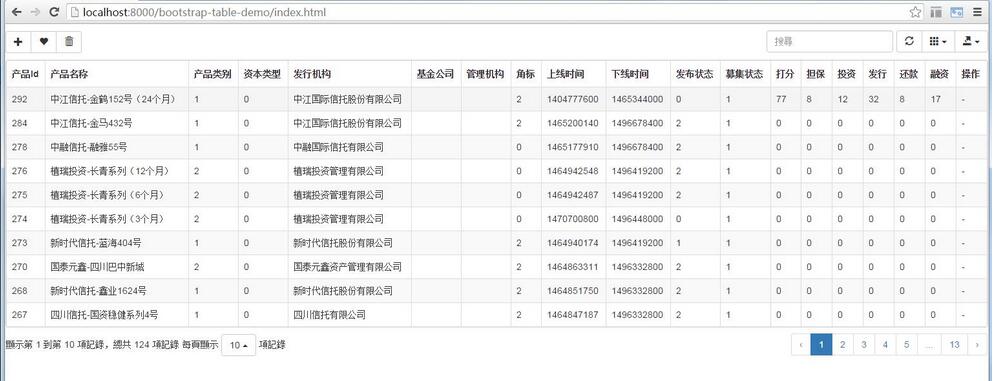
OK 設定が完了したら、表示効果をお見せしましょう:

以上がこの記事の全内容です。皆さんの学習に役立つことを願っています。 PHP 中国語 Web サイトをサポートします。
Bootstrap Table の使用体験の概要に関連するその他の記事については、PHP 中国語 Web サイトに注目してください。

