基本的な Linux コマンド形式とディレクトリ処理コマンド
- 高洛峰オリジナル
- 2016-11-14 12:38:311575ブラウズ
コマンドプロンプト
[root@localhost ~]#
root: 現在ログインしているユーザー
localhost: ホスト名
~: 現在のディレクトリ、これは「ホーム」ディレクトリです
#: root スーパーユーザープロンプト、一般ユーザーの場合、$
コマンド形式です
command [options] [parameters]
括弧[]はオプションを示します
ディレクトリの内容をクエリします: ls
ls [options] [file or directory]
Options :
-a: 隠しファイルを含むすべてのファイルを表示します
-l: 詳細情報を表示します
-d: ディレクトリ属性を表示します
-h: ファイルサイズを人間化して表示します
-i: inode を表示します
上記のオプションに従って、次のように入力しますコマンドに を入力し、表示される結果は次のとおりです:
[root@localhost ~]# lsanaconda-ks.cfg  test
[root@localhost ~]# ls -a.  ..  anaconda-ks.cfg  .bash_history  .bash_logout  .bash_profile  .bashrc  .cache  .config  .cshrc  .tcshrc  test
[root@localhost ~]# ls -l总用量 4-rw-------. 1 root root 2752 Nov 10 02:51 anaconda-ks.cfg
drwxr-xr-x. 2 root root    6 Nov 12 19:26 test
[root@localhost ~]# ls -l anaconda-ks.cfg -rw-------. 1 root root 2752 Nov 10 02:51 anaconda-ks.cfg
[root@localhost ~]# ls -ld test/drwxr-xr-x. 2 root root 6 Nov 12 19:26 test/
[root@localhost ~]# ls -lh总用量 4.0K
-rw-------. 1 root root 2.7K Nov 10 02:51 anaconda-ks.cfg
drwxr-xr-x. 2 root root    6 Nov 12 19:26 test
[root@localhost ~]# ls -i71259104 anaconda-ks.cfg  36099565 test
ls -l と ls -lh コマンドの結果の違いに注意してください
ここで説明が必要です:
-rw-------. 1 root root 2.7K Nov 10 02:51 anaconda-ks.cfg
drwxr-xr-x. 2 root root    6 Nov 12 19:26 test
まず、最初の記号「-」(引用符内は-))、ファイルの種類を示します(一般的に使用されるものは3つあり、-はファイルを意味し、dはディレクトリを意味し、lはソフトリンクファイルを意味します)。また、あまり一般的ではないものもあります。これらは、ブロック デバイス ファイル、キャラクタ デバイス ファイル、ソケット ファイル、および管理ファイルです。
上記では、anaconda-ks.cfg がファイルであり、test がディレクトリであることがわかります (Windows フォルダーの概念として理解できます)。
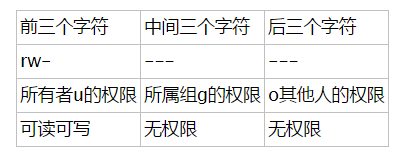
次に、最初の記号を除いて、rw------ を見てみましょう。合計 9 つの文字があり、それぞれ rw-、---、--- の 3 つのグループに分ける必要があります。 group 順に、u の所有者、g が属するグループ、および他の人の権限を表します。上記では、それぞれルートとルートに対応します。つまり、最初のルートは所有者の権限が root 権限であることを意味し、2 番目のルートはそれが属するグループの権限も root 権限であることを意味します。他の人にはそのような権限はまったくありません。
このうち、rは読み取り可能、wは書き込み可能、xは実行許可を意味します。
より明確にするために、anaconda-ks.cfg ファイルについて、次の表を示します:

したがって、テスト ファイル rwxr-xr-x については、読者はその権限を自分で判断するように求められます。 。
9 文字の後のドット「.」は ACL 権限を示し、その後の数字 1 は参照カウントを示します。たとえば、ファイルにソフト リンクがある場合、その参照カウントは次のようになります。 2.
ルートの後ろの 2.7k はファイルのサイズを表し、その後に日付、最後にファイルの名前が続きます。
ディレクトリ処理コマンド
ディレクトリの作成: mkdir
mkdir -p [ディレクトリ名]
-p : 再帰的作成
[root@localhost ~]# lsanaconda-ks.cfg  test

[root@localhost ~]# mkdir otherFolder[root@localhost ~]# lsanaconda-ks.cfg  otherFolder  test

[root@localhost ~]# mkdir folder_2/test_2mkdir: 无法创建目录"folder_2/test_2": 没有那个文件或目录

[root@localhost ~]# mkdir -p folder_2/test_2[root@localhost ~]# lsanaconda-ks.cfg  folder_2  otherFolder  test

[root@localhost ~]# ls folder_2/test_2
上記のように、mkdir がオプション -p を追加しない場合、空のディレクトリを作成できます。ただし、サブディレクトリを含むディレクトリを再帰的に作成することはできません。再帰的に作成するには -p を追加します。
ディレクトリの切り替え: cd
cd [ディレクトリ]
操作:
cd ~ : 現在のユーザーのホームディレクトリを入力します
cd-: 进入上次目录
cd.. : 进入上一级目录
cd : 回到家目录
[root@localhost ~]# lsanaconda-ks.cfg  folder_2  otherFolder  test

[root@localhost ~]# cd /folder_2/test_2[root@localhost test_2]# cd[root@localhost ~]# cd -/root/folder_2/test_2

[root@localhost test_2]# cd ../../otherFolder[root@localhost otherFolder]# cd ..[root@localhost ~]#
注意理清概念:相对路径和绝对路径
绝对路径:从根目录一级级找下去,需要写全路径
[root@localhost ~]# cd folder_2/test_2
[root@localhost test_2]#
相对路径:参照当前所在目录进行查找
[root@localhost test_2]# cd ../../otherFolder
[root@localhost otherFolder]#
查询所在目录位置:pwd
pwd
可以说是最简单的命令了,查询所在目录的位置
[root@localhost ~]# pwd/root

[root@localhost ~]# lsanaconda-ks.cfg  folder_2  otherFolder  test
[root@localhost ~]# cd folder_2/[root@localhost folder_2]# lstest_2
[root@localhost folder_2]# cd test_2/[root@localhost test_2]# pwd/root/folder_2/test_2
删除空目录:rmdir
rmdir [目录名]
只能删除空目录,这个命令用得比较少。
[root@localhost ~]# lsanaconda-ks.cfg  folder_2  otherFolder  test

[root@localhost ~]# rmdir otherFolder[root@localhost ~]# lsanaconda-ks.cfg  folder_2  test

[root@localhost ~]# rmdir folder_2rmdir: 删除 "folder_2" 失败: 目录非空
[root@localhost ~]#
删除文件或目录:rm
rm -rf [文件或目录]
r 表示可以同时删除文件和目录,f表示强制删除
如果不添加任何选项,那么只可以删除文件,删除时提示是否确认删除
如果只添加选项 -r,那么可以删除文件也可以删除目录,删除时提示是否确认删除
如果添加了选项 -rf,那么将不做任何提示删除文件或目录
[root@localhost ~]# lsabc.txt  anaconda-ks.cfg  folder_2  test

[root@localhost ~]# rm abc.txtrm:是否删除普通空文件 "abc.txt"?y

[root@localhost ~]# rm testrm: 无法删除"test": 是一个目录
[root@localhost ~]# rm -r testrm:是否删除目录 "test"?y

[root@localhost ~]# lsanaconda-ks.cfg  folder_2

[root@localhost ~]# rm -rf folder_2[root@localhost ~]# lsanaconda-ks.cfg
[root@localhost ~]#
复制命令:cp
cp [选项] [原文件或目录] [目标目录]
选项:
-r : 复制目录
-p : 同时复制文件属性
-d : 若源文件是链接文件,则复制链接属性
-a : 包含以上所有选项,相当于 -rpd
在[目标目录]后面加上文件名,就是改名复制。
[root@localhost ~]# lsanaconda-ks.cfg  bbc.txt  folder_a  folder_b

[root@localhost ~]# cp bbc.txt folder_a[root@localhost ~]# ls folder_a/bbc.txt

[root@localhost ~]# cp folder_a folder_bcp: 略过目录"folder_a"[root@localhost ~]# cp -r folder_a folder_b[root@localhost ~]# ls folder_bfolder_a  test_1

[root@localhost ~]# ll总用量 4-rw-------. 1 root root 2752 Nov 10 02:51 anaconda-ks.cfg
-rw-r--r--. 1 root root    0 Nov 13 17:21 bbc.txt
drwxr-xr-x. 2 root root   20 Nov 13 17:38 folder_a
drwxr-xr-x. 4 root root   34 Nov 13 17:39 folder_b

[root@localhost ~]# ll folder_a总用量 0-rw-r--r--. 1 root root 0 Nov 13 17:38 bbc.txt

[root@localhost ~]# cp -a bbc.txt folder_b[root@localhost ~]# ll folder_b总用量 0-rw-r--r--. 1 root root  0 Nov 13 17:21 bbc.txt
drwxr-xr-x. 2 root root 20 Nov 13 17:39 folder_a
drwxr-xr-x. 2 root root  6 Nov 13 17:38 test_1
[root@localhost ~]#
这里需要解释一下的是,在原文件 bbc.txt 中,其修改时间为 17:21,在普通复制下,它的时间这个属性是不会被复制,我们可以看到复制后的bbc.txt的时间为17:38,如果需要连同属性一起复制,那么就加上 -pd 或者 直接 -a,如上所示,我们把bbc.txt复制到folder_b,这时我们查看属性的时候,时间属性和原属性是一致的。
在上述命令中,ll 是 ls -l 的简写。
剪切或改名命令:mv
mv [原文件或目录] [目标目录]
如果原文件或者目录 与 目标目录在同一个目录下,那么就是重命名
如果不在同一个目录下,那么就是剪切
通过以下实践理解:
[root@localhost ~]# lsanaconda-ks.cfg  bbc.txt

[root@localhost ~]# mv bbc.txt abc.txt[root@localhost ~]# lsabc.txt  anaconda-ks.cfg

[root@localhost ~]# mkdir test[root@localhost ~]# lsabc.txt  anaconda-ks.cfg  test

[root@localhost ~]# mv abc.txt test/[root@localhost ~]# lsanaconda-ks.cfg  test

[root@localhost ~]# ls test/abc.txt
[root@localhost ~]#
链接命令:ln
ln -s [原文件] [目标文件]
生成链接文件
-s : 创建软连接
硬链接的特征:
拥有相同 i 节点和存储block块,可以看做是同一个文件
可通过i节点识别,i节点是相同的
不能跨分区
不能针对目录使用
通过上述命令,可以理解为为某个内容添加一个标签,通过打开这个标签就可以进入这个内容,硬连接,即再生成一个标签,同样可以通过这个标签进入这个内容。
如果内容被修改,那么不管从硬链接的哪个文件进入,都是被修改的。
软链接的特征:
类似windows的快捷方式
软链接拥有自己的i节点和block块,但是数据块只保存原文件的文件名和I节点号,并没有实际的文件数据
lrwxrwxrwx l为软链接(软链接的权限都为rwxrwxrwx,这只是软链接本身的权限)
修改任意文件,另一个都改变
删除原文件,软链接不能用(和windows的快捷方式一样)
硬链接:
[root@localhost ~]# lsanaconda-ks.cfg
[root@localhost ~]# mkdir folder[root@localhost ~]# lsanaconda-ks.cfg  folder
[root@localhost ~]# touch bbb.txt[root@localhost ~]# lsanaconda-ks.cfg  bbb.txt  folder
[root@localhost ~]# ln bbb.txt folder/ccc.txt[root@localhost ~]# ll folder/总用量 0-rw-r--r--. 2 root root 0 Nov 13 18:08 ccc.txt
[root@localhost ~]# ll bbb.txt -rw-r--r--. 2 root root 0 Nov 13 18:08 bbb.txt
软链接:
[root@localhost ~]# mkdir folder_b[root@localhost ~]# ln -s bbb.txt folder_b/eee.txt[root@localhost ~]# ll 总用量 4-rw-------. 1 root root 2752 Nov 10 02:51 anaconda-ks.cfg
-rw-r--r--. 2 root root    0 Nov 13 18:10 bbb.txt
drwxr-xr-x. 2 root root   20 Nov 13 18:09 folder
drwxr-xr-x. 2 root root   20 Nov 13 18:11 folder_b
[root@localhost ~]# ll folder_b总用量 0lrwxrwxrwx. 1 root root 7 Nov 13 18:11 eee.txt -> bbb.txt
[root@localhost ~]# rm -rf bbb.txt [root@localhost ~]# ll folder_b总用量 0lrwxrwxrwx. 1 root root 7 Nov 13 18:11 eee.txt -> bbb.txt
删除了原文件,软链接的箭头目标为红色一闪一闪,表示找不到目标文件。
常用目录作用
[root@localhost ~]# ls /
bin  boot  dev  etc  home  lib  lib64  media  mnt  opt  proc  root  run  sbin  srv  sys  temp  tmp  usr  var
说明:
/ 根目录
/bin 命令保存目录(普通用户权限)
/sbin 命令保存目录(root权限)
/boot 启动目录,包含启动相关文件,和开机有关
/dev 设备文件保存目录
/etc 配置文件保存目录
/home 普通用户家目录
/lib 系统库保存目录
/mnt 系统挂载目录
/media 挂载目录(常用于光盘挂载)
/root 超级用户家目录
/tmp 临时目录
/proc 直接写入内存的
/sys 直接写入内存的
/usr 系统软件资源目录
/var 系统相关文档内容

