


導入
グラフは、多数の頂点 (ノード) とそれらの間のエッジ (接続) を持つデータ構造です。
ツリーはグラフの一例です。すべてのツリーはグラフですが、すべてのグラフがツリーであるわけではありません。たとえば、サイクルを持つグラフはツリーではありません。ツリーには 2 つのノード間に 1 つのルートと 1 つの固有のパスがありますが、グラフには頂点間に多数のルートと複数のパスがある可能性があります。
基本用語
頂点: グラフ内のノード。
エッジ: 2 つの頂点間の接続。
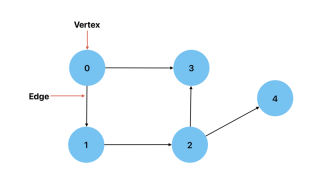
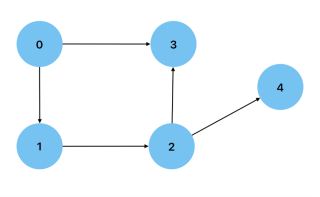
Directed: 2 つの頂点間の接続に方向がある場合。これは、ある頂点から別の頂点に到達する方法が 1 つしかないことを意味します。例としては、都市 (頂点) とそれらの間のルート (エッジ) を示すグラフが考えられます。
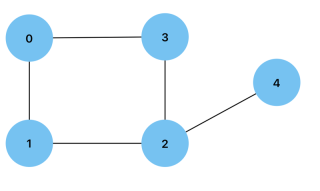
無向: グラフ上の 2 つの頂点間の接続が双方向になる場合。例としては、友情によってつながっている人々 (頂点) を示すグラフが考えられます。
Degree: 頂点に接続されているエッジの数。有向グラフの頂点は、それぞれ頂点に向かうエッジと頂点から遠ざかるエッジの数である入次数または出次数を持つことができます。
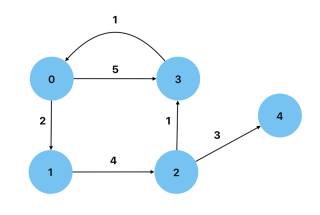
Weighted: エッジに重みとして値を持つグラフ。例としては、ノード間の距離が重みとして表される道路マップが挙げられます。
Cyclic: 少なくとも 1 つの頂点からそれ自体に戻るパスを持つグラフ。
Acyclic: サイクルを持たないグラフ。つまり、ノード自体に戻るパスを持たないグラフ。 有向非巡回グラフ は、データ処理フローを示すために使用できるグラフの一種です。
密: グラフのエッジが最大数に近い場合
Sparse: グラフのエッジが最小数に近い場合。
自己ループ: エッジにそれ自体にリンクする頂点が 1 つある場合。
マルチエッジ: グラフの 2 つの頂点間に複数のエッジがある場合。
単純: グラフに自己ループもマルチエッジもない場合。
単純な有向グラフのエッジの最大数を取得するには: n*(n-1) ここで、n はノードの数です。
単純な無向グラフのエッジの最大数を取得するには: n*(n-1)/2 ここで、n はノードの数です。
JavaScript でのグラフの実装
グラフを実装するには、グラフの頂点とエッジを指定することから始めることができます。以下は、次のグラフを例にしてこれを行う方法の例です:
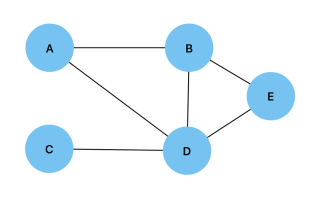
const vertices = ["A", "B", "C", "D", "E"];

const edges = [
  ["A", "B"],
  ["A", "D"],
  ["B", "D"],
  ["B", "E"],
  ["C", "D"],
  ["D", "E"],
];
次に、指定された頂点に隣接するものを見つける関数を作成できます。
const findAdjacentNodes = function (node) {
  const adjacentNodes = [];
  for (let edge of edges) {
    const nodeIndex = edge.indexOf(node);
    if (nodeIndex > -1) {
      let adjacentNode = nodeIndex === 0 ? edge[1] : edge[0];
      adjacentNodes.push(adjacentNode);
    }
  }
  return adjacentNodes;
};
2 つの頂点が接続されているかどうかを確認する別の関数:
const isConnected = function (node1, node2) {
  const adjacentNodes = new Set(findAdjacentNodes(node1));
  return adjacentNodes.has(node2);
};
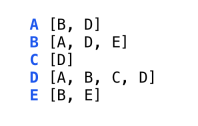
隣接リスト
隣接リストは、ノードに接続されているすべての頂点がリストとして保存されるグラフの表現です。以下は、対応する隣接リストのグラフと視覚的表現です。
隣接リストは、Node クラスと Graph クラスの 2 つのクラスを作成することで JavaScript で実装できます。 Node クラスは、コンストラクターと 2 つの頂点を結合する connect() メソッドで構成されます。また、上記とまったく同じように動作する isConnected() メソッドと getAdjacentNodes() メソッドもあります。
class Node {
  constructor(value) {
    this.value = value;
    this.edgesList = [];
  }
  connect(node) {
    this.edgesList.push(node);
    node.edgesList.push(this);
  }
  getAdjNodes() {
    return this.edgesList.map((edge) => edge.value);
  }
  isConnected(node) {
    return this.edgesList.map((edge) =>
    edge.value).indexOf(node.value) > -1;
  }
}
Graph クラスは、コンストラクターと、グラフに新しい頂点を追加する addToGraph() メソッドで構成されます。
class Graph {
  constructor(nodes) {
    this.nodes = [...nodes];
  }
  addToGraph(node) {
    this.nodes.push(node);
  }
}
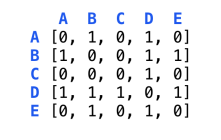
Adjacency Matrix
A 2-D array where each array represents a vertex and each index represents a possible connection between vertices. An adjacency matrix is filled with 0s and 1s, with 1 representing a connection. The value at adjacencyMatrix[node1][node2] will show whether or not there is a connection between the two specified vertices. Below is is a graph and its visual representation as an adjacency matrix.
To implement this adjacency matrix in JavaScript, we start by creating two classes, the first being the Node class:
class Node {
  constructor(value) {
    this.value = value;
  }
}
We then create the Graph class which will contain the constructor for creating the 2-D array initialized with zeros.
class Graph {
  constructor(nodes) {
    this.nodes = [...nodes];
    this.adjacencyMatrix = Array.from({ length: nodes.length },
    () => Array(nodes.length).fill(0));
   }
}
We will then add the addNode() method which will be used to add new vertices to the graph.
  addNode(node) {
    this.nodes.push(node);
    this.adjacencyMatrix.forEach((row) => row.push(0));
    this.adjacencyMatrix.push(new Array(this.nodes.length).fill(0));
  }
Next is the connect() method which will add an edge between two vertices.
  connect(node1, node2) {
    const index1 = this.nodes.indexOf(node1);
    const index2 = this.nodes.indexOf(node2);

    if (index1 > -1 && index2 > -1) {
      this.adjacencyMatrix[index1][index2] = 1;
      this.adjacencyMatrix[index2][index1] = 1;
    }
  }
We will also create the isConnected() method which can be used to check if two vertices are connected.
  isConnected(node1, node2) {
    const index1 = this.nodes.indexOf(node1);
    const index2 = this.nodes.indexOf(node2);

    if (index1 > -1 && index2 > -1) {
      return this.adjacencyMatrix[index1][index2] === 1;
    }
    return false;
  }
Lastly we will add the printAdjacencyMatrix() method to the Graph class.
  printAdjacencyMatrix() {
    console.log(this.adjacencyMatrix);
  }
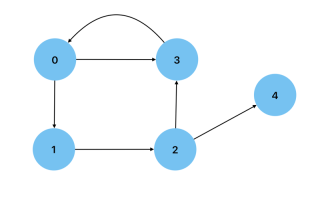
Breadth First Search
Similar to a Breadth First Search in a tree, the vertices adjacent to the current vertex are visited before visiting any subsequent children. A queue is the data structure of choice when performing a Breadth First Search on a graph.
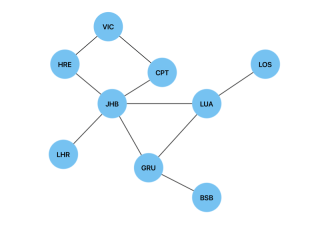
Below is a graph of international airports and their connections and we will use a Breadth First Search to find the shortest route(path) between two airports(vertices).
In order to implement this search algorithm in JavaScript, we will use the same Node and Graph classes we implemented the adjacency list above. We will create a breadthFirstTraversal() method and add it to the Graph class in order to traverse between two given vertices. This method will have the visitedNodes object, which will be used to store the visited vertices and their predecessors. It is initiated as null to show that the first vertex in our search has no predecessors.
breathFirstTraversal(start, end) {
    const queue = [start];
    const visitedNodes = {};
    visitedNodes[start.value] = null;

    while (queue.length > 0) {
      const node = queue.shift();

      if (node.value === end.value) {
        return this.reconstructedPath(visitedNodes, end);
      }
      for (const adjacency of node.edgesList) {
        if (!visitedNodes.hasOwnProperty(adjacency.value)) {
          visitedNodes[adjacency.value] = node;
          queue.push(adjacency);
        }
      }
    }
  }
Once the end vertex is found, we will use the reconstructedPath() method in the Graph class in order to return the shortest path between two vertices. Each vertex is added iteratively to the shortestPath array, which in turn must be reversed in order to come up with the correct order for the shortest path.
reconstructedPath(visitedNodes, endNode) {
    let currNode = endNode;

    const shortestPath = [];

    while (currNode !== null) {
      shortestPath.push(currNode.value);
      currNode = visitedNodes[currNode.value];
    }
    return shortestPath.reverse();
  }
In the case of the graph of international airports, breathFirstTraversal(JHB, LOS) will return JHB -> LUA -> LOS as the shortest path. In the case of a weighted graph, we would use Dijkstra's algorithm to find the shortest path.
Depth First Search
Similar to a depth first search in a tree, this algorithm will fully explore every descendant of a vertex, before backtracking to the root. A stack is the data structure of choice for depth first traversals in a graph.
A depth first search can be used to detect a cycle in a graph. We will use the same graph of international airports to illustrate this in JavaScript.
Similar to the Breadth First Search algorithm above, this implementation of a Depth First Search algorithm in JavaScript will use the previously created Node and Graph classes. We will create a helper function called depthFirstTraversal() and add it to the Graph class.
  depthFirstTraversal(start, visitedNodes = {}, parent = null) {
    visitedNodes[start.value] = true;

    for (const adjacency of start.edgesList) {
      if (!visitedNodes[adjacency.value]) {
        if (this.depthFirstTraversal(adjacency, visitedNodes, start)) {
          return true;
        }
      } else if (adjacency !== parent) {
        return true;
      }
    }

    return false;
  }
This will perform the Depth First Traversal of the graph, using the parent parameter to keep track of the previous vertex and prevent the detection of a cycle when revisiting the parent vertex. Visited vertices will be marked as true in the visitedNodes object. This method will then use recursion to visit previously unvisited vertices. If the vertex has already been visited, we check it against the parent parameter. A cycle has been found if the vertex has already been visited and it is not the parent.
We will also create the wrapper function hasCycle() in the Graph class. This function is used to detect a cycle in a disconnected graph. It will initialize the visitedNodes object and loop through all of the vertices in the graph.
hasCycle() {
    const visitedNodes = {};

    for (const node of this.nodes) {
      if (!visitedNodes[node.value]) {
        if (this.depthFirstTraversal(node, visitedNodes)) {
          return true;
        }
      }
    }
    return false;
  }
In the case of the graph of international airports, the code will return true.
Depth First Traversal of a graph is also useful for pathfinding(not necessarily shortest path) and for solving mazes.
結論
在進一步學習資料結構和演算法時,對圖作為一種資料結構及其相關演算法的深刻理解是絕對必要的。儘管不像本系列之前的文章那樣適合初學者,但本指南對於加深您對資料結構和演算法的理解應該很有用。
以上がデータ構造とアルゴリズム: グラフの詳細内容です。詳細については、PHP 中国語 Web サイトの他の関連記事を参照してください。

 JavaScriptのデータ型:ブラウザとNodejsに違いはありますか?May 14, 2025 am 12:15 AM
JavaScriptコアデータ型は、ブラウザとnode.jsで一貫していますが、余分なタイプとは異なる方法で処理されます。 1)グローバルオブジェクトはブラウザのウィンドウであり、node.jsのグローバルです2)バイナリデータの処理に使用されるNode.jsの一意のバッファオブジェクト。 3)パフォーマンスと時間の処理にも違いがあり、環境に従ってコードを調整する必要があります。
 JavaScriptコメント://および / * *を使用するためのガイドMay 13, 2025 pm 03:49 PM
javascriptusestwotypesofcomments:シングルライン(//)およびマルチライン(//)
 Python vs. JavaScript:開発者の比較分析May 09, 2025 am 12:22 AM
PythonとJavaScriptの主な違いは、タイプシステムとアプリケーションシナリオです。 1。Pythonは、科学的コンピューティングとデータ分析に適した動的タイプを使用します。 2。JavaScriptは弱いタイプを採用し、フロントエンドとフルスタックの開発で広く使用されています。この2つは、非同期プログラミングとパフォーマンスの最適化に独自の利点があり、選択する際にプロジェクトの要件に従って決定する必要があります。
 Python vs. JavaScript:ジョブに適したツールを選択するMay 08, 2025 am 12:10 AM
PythonまたはJavaScriptを選択するかどうかは、プロジェクトの種類によって異なります。1)データサイエンスおよび自動化タスクのPythonを選択します。 2)フロントエンドとフルスタック開発のためにJavaScriptを選択します。 Pythonは、データ処理と自動化における強力なライブラリに好まれていますが、JavaScriptはWebインタラクションとフルスタック開発の利点に不可欠です。
 PythonとJavaScript:それぞれの強みを理解するMay 06, 2025 am 12:15 AM
PythonとJavaScriptにはそれぞれ独自の利点があり、選択はプロジェクトのニーズと個人的な好みに依存します。 1. Pythonは、データサイエンスやバックエンド開発に適した簡潔な構文を備えた学習が簡単ですが、実行速度が遅くなっています。 2。JavaScriptはフロントエンド開発のいたるところにあり、強力な非同期プログラミング機能を備えています。 node.jsはフルスタックの開発に適していますが、構文は複雑でエラーが発生しやすい場合があります。
 JavaScriptのコア:CまたはCの上に構築されていますか?May 05, 2025 am 12:07 AM
javascriptisnotbuiltoncorc;それは、解釈されていることを解釈しました。
 JavaScriptアプリケーション:フロントエンドからバックエンドまでMay 04, 2025 am 12:12 AM
JavaScriptは、フロントエンドおよびバックエンド開発に使用できます。フロントエンドは、DOM操作を介してユーザーエクスペリエンスを強化し、バックエンドはnode.jsを介してサーバータスクを処理することを処理します。 1.フロントエンドの例:Webページテキストのコンテンツを変更します。 2。バックエンドの例:node.jsサーバーを作成します。
 Python vs. Javascript:どの言語を学ぶべきですか?May 03, 2025 am 12:10 AM
PythonまたはJavaScriptの選択は、キャリア開発、学習曲線、エコシステムに基づいている必要があります。1)キャリア開発:Pythonはデータサイエンスとバックエンド開発に適していますが、JavaScriptはフロントエンドおよびフルスタック開発に適しています。 2)学習曲線:Python構文は簡潔で初心者に適しています。 JavaScriptの構文は柔軟です。 3)エコシステム:Pythonには豊富な科学コンピューティングライブラリがあり、JavaScriptには強力なフロントエンドフレームワークがあります。


ホットAIツール

Undresser.AI Undress
リアルなヌード写真を作成する AI 搭載アプリ

AI Clothes Remover
写真から衣服を削除するオンライン AI ツール。

Undress AI Tool
脱衣画像を無料で

Clothoff.io
AI衣類リムーバー

Video Face Swap
完全無料の AI 顔交換ツールを使用して、あらゆるビデオの顔を簡単に交換できます。

人気の記事
ホットツール

SublimeText3 英語版
推奨: Win バージョン、コードプロンプトをサポート!

EditPlus 中国語クラック版
サイズが小さく、構文の強調表示、コード プロンプト機能はサポートされていません

VSCode Windows 64 ビットのダウンロード
Microsoft によって発売された無料で強力な IDE エディター

Dreamweaver Mac版
ビジュアル Web 開発ツール

AtomエディタMac版ダウンロード
最も人気のあるオープンソースエディター

