


導入
グラフは、多数の頂点 (ノード) とそれらの間のエッジ (接続) を持つデータ構造です。
ツリーはグラフの一例です。すべてのツリーはグラフですが、すべてのグラフがツリーであるわけではありません。たとえば、サイクルを持つグラフはツリーではありません。ツリーには 2 つのノード間に 1 つのルートと 1 つの固有のパスがありますが、グラフには頂点間に多数のルートと複数のパスがある可能性があります。
基本用語
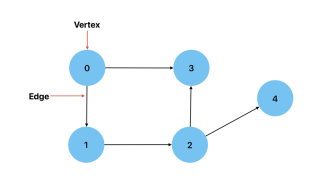
頂点: グラフ内のノード。
エッジ: 2 つの頂点間の接続。
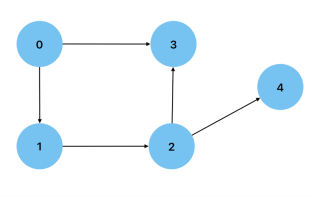
Directed: 2 つの頂点間の接続に方向がある場合。これは、ある頂点から別の頂点に到達する方法が 1 つしかないことを意味します。例としては、都市 (頂点) とそれらの間のルート (エッジ) を示すグラフが考えられます。
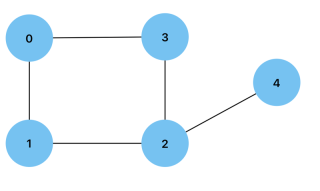
無向: グラフ上の 2 つの頂点間の接続が双方向になる場合。例としては、友情によってつながっている人々 (頂点) を示すグラフが考えられます。
Degree: 頂点に接続されているエッジの数。有向グラフの頂点は、それぞれ頂点に向かうエッジと頂点から遠ざかるエッジの数である入次数または出次数を持つことができます。
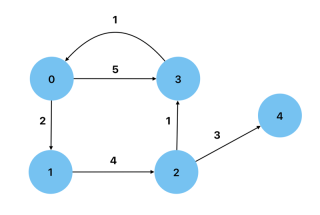
Weighted: エッジに重みとして値を持つグラフ。例としては、ノード間の距離が重みとして表される道路マップが挙げられます。
Cyclic: 少なくとも 1 つの頂点からそれ自体に戻るパスを持つグラフ。
Acyclic: サイクルを持たないグラフ。つまり、ノード自体に戻るパスを持たないグラフ。 有向非巡回グラフ は、データ処理フローを示すために使用できるグラフの一種です。
密: グラフのエッジが最大数に近い場合
Sparse: グラフのエッジが最小数に近い場合。
自己ループ: エッジにそれ自体にリンクする頂点が 1 つある場合。
マルチエッジ: グラフの 2 つの頂点間に複数のエッジがある場合。
単純: グラフに自己ループもマルチエッジもない場合。
単純な有向グラフのエッジの最大数を取得するには: n*(n-1) ここで、n はノードの数です。
単純な無向グラフのエッジの最大数を取得するには: n*(n-1)/2 ここで、n はノードの数です。
JavaScript でのグラフの実装
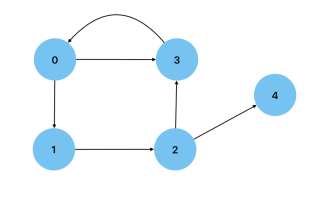
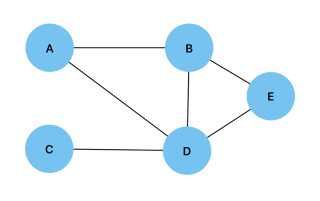
グラフを実装するには、グラフの頂点とエッジを指定することから始めることができます。以下は、次のグラフを例にしてこれを行う方法の例です:
const vertices = ["A", "B", "C", "D", "E"];

const edges = [
  ["A", "B"],
  ["A", "D"],
  ["B", "D"],
  ["B", "E"],
  ["C", "D"],
  ["D", "E"],
];
次に、指定された頂点に隣接するものを見つける関数を作成できます。
const findAdjacentNodes = function (node) {
  const adjacentNodes = [];
  for (let edge of edges) {
    const nodeIndex = edge.indexOf(node);
    if (nodeIndex > -1) {
      let adjacentNode = nodeIndex === 0 ? edge[1] : edge[0];
      adjacentNodes.push(adjacentNode);
    }
  }
  return adjacentNodes;
};
2 つの頂点が接続されているかどうかを確認する別の関数:
const isConnected = function (node1, node2) {
  const adjacentNodes = new Set(findAdjacentNodes(node1));
  return adjacentNodes.has(node2);
};
隣接リスト
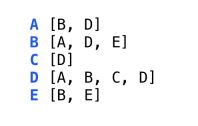
隣接リストは、ノードに接続されているすべての頂点がリストとして保存されているグラフの表現です。以下は、対応する隣接リストのグラフと視覚的表現です。
隣接リストは、Node クラスと Graph クラスの 2 つのクラスを作成することで JavaScript で実装できます。 Node クラスは、コンストラクターと 2 つの頂点を結合する connect() メソッドで構成されます。また、上記とまったく同じように動作する isConnected() メソッドと getAdjacentNodes() メソッドもあります。
class Node {
  constructor(value) {
    this.value = value;
    this.edgesList = [];
  }
  connect(node) {
    this.edgesList.push(node);
    node.edgesList.push(this);
  }
  getAdjNodes() {
    return this.edgesList.map((edge) => edge.value);
  }
  isConnected(node) {
    return this.edgesList.map((edge) =>
    edge.value).indexOf(node.value) > -1;
  }
}
Graph クラスは、コンストラクターと、グラフに新しい頂点を追加する addToGraph() メソッドで構成されます。
class Graph {
  constructor(nodes) {
    this.nodes = [...nodes];
  }
  addToGraph(node) {
    this.nodes.push(node);
  }
}
Adjacency Matrix
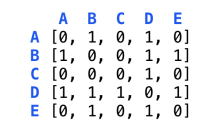
A 2-D array where each array represents a vertex and each index represents a possible connection between vertices. An adjacency matrix is filled with 0s and 1s, with 1 representing a connection. The value at adjacencyMatrix[node1][node2] will show whether or not there is a connection between the two specified vertices. Below is is a graph and its visual representation as an adjacency matrix.
To implement this adjacency matrix in JavaScript, we start by creating two classes, the first being the Node class:
class Node {
  constructor(value) {
    this.value = value;
  }
}
We then create the Graph class which will contain the constructor for creating the 2-D array initialized with zeros.
class Graph {
  constructor(nodes) {
    this.nodes = [...nodes];
    this.adjacencyMatrix = Array.from({ length: nodes.length },
    () => Array(nodes.length).fill(0));
   }
}
We will then add the addNode() method which will be used to add new vertices to the graph.
  addNode(node) {
    this.nodes.push(node);
    this.adjacencyMatrix.forEach((row) => row.push(0));
    this.adjacencyMatrix.push(new Array(this.nodes.length).fill(0));
  }
Next is the connect() method which will add an edge between two vertices.
  connect(node1, node2) {
    const index1 = this.nodes.indexOf(node1);
    const index2 = this.nodes.indexOf(node2);

    if (index1 > -1 && index2 > -1) {
      this.adjacencyMatrix[index1][index2] = 1;
      this.adjacencyMatrix[index2][index1] = 1;
    }
  }
We will also create the isConnected() method which can be used to check if two vertices are connected.
  isConnected(node1, node2) {
    const index1 = this.nodes.indexOf(node1);
    const index2 = this.nodes.indexOf(node2);

    if (index1 > -1 && index2 > -1) {
      return this.adjacencyMatrix[index1][index2] === 1;
    }
    return false;
  }
Lastly we will add the printAdjacencyMatrix() method to the Graph class.
  printAdjacencyMatrix() {
    console.log(this.adjacencyMatrix);
  }
Breadth First Search
Similar to a Breadth First Search in a tree, the vertices adjacent to the current vertex are visited before visiting any subsequent children. A queue is the data structure of choice when performing a Breadth First Search on a graph.
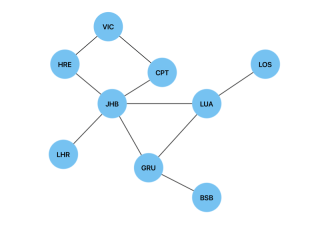
Below is a graph of international airports and their connections and we will use a Breadth First Search to find the shortest route(path) between two airports(vertices).
In order to implement this search algorithm in JavaScript, we will use the same Node and Graph classes we implemented the adjacency list above. We will create a breadthFirstTraversal() method and add it to the Graph class in order to traverse between two given vertices. This method will have the visitedNodes object, which will be used to store the visited vertices and their predecessors. It is initiated as null to show that the first vertex in our search has no predecessors.
breathFirstTraversal(start, end) {
    const queue = [start];
    const visitedNodes = {};
    visitedNodes[start.value] = null;

    while (queue.length > 0) {
      const node = queue.shift();

      if (node.value === end.value) {
        return this.reconstructedPath(visitedNodes, end);
      }
      for (const adjacency of node.edgesList) {
        if (!visitedNodes.hasOwnProperty(adjacency.value)) {
          visitedNodes[adjacency.value] = node;
          queue.push(adjacency);
        }
      }
    }
  }
Once the end vertex is found, we will use the reconstructedPath() method in the Graph class in order to return the shortest path between two vertices. Each vertex is added iteratively to the shortestPath array, which in turn must be reversed in order to come up with the correct order for the shortest path.
reconstructedPath(visitedNodes, endNode) {
    let currNode = endNode;

    const shortestPath = [];

    while (currNode !== null) {
      shortestPath.push(currNode.value);
      currNode = visitedNodes[currNode.value];
    }
    return shortestPath.reverse();
  }
In the case of the graph of international airports, breathFirstTraversal(JHB, LOS) will return JHB -> LUA -> LOS as the shortest path. In the case of a weighted graph, we would use Dijkstra's algorithm to find the shortest path.
Depth First Search
Similar to a depth first search in a tree, this algorithm will fully explore every descendant of a vertex, before backtracking to the root. A stack is the data structure of choice for depth first traversals in a graph.
A depth first search can be used to detect a cycle in a graph. We will use the same graph of international airports to illustrate this in JavaScript.
Similar to the Breadth First Search algorithm above, this implementation of a Depth First Search algorithm in JavaScript will use the previously created Node and Graph classes. We will create a helper function called depthFirstTraversal() and add it to the Graph class.
  depthFirstTraversal(start, visitedNodes = {}, parent = null) {
    visitedNodes[start.value] = true;

    for (const adjacency of start.edgesList) {
      if (!visitedNodes[adjacency.value]) {
        if (this.depthFirstTraversal(adjacency, visitedNodes, start)) {
          return true;
        }
      } else if (adjacency !== parent) {
        return true;
      }
    }

    return false;
  }
This will perform the Depth First Traversal of the graph, using the parent parameter to keep track of the previous vertex and prevent the detection of a cycle when revisiting the parent vertex. Visited vertices will be marked as true in the visitedNodes object. This method will then use recursion to visit previously unvisited vertices. If the vertex has already been visited, we check it against the parent parameter. A cycle has been found if the vertex has already been visited and it is not the parent.
We will also create the wrapper function hasCycle() in the Graph class. This function is used to detect a cycle in a disconnected graph. It will initialize the visitedNodes object and loop through all of the vertices in the graph.
hasCycle() {
    const visitedNodes = {};

    for (const node of this.nodes) {
      if (!visitedNodes[node.value]) {
        if (this.depthFirstTraversal(node, visitedNodes)) {
          return true;
        }
      }
    }
    return false;
  }
In the case of the graph of international airports, the code will return true.
Depth First Traversal of a graph is also useful for pathfinding(not necessarily shortest path) and for solving mazes.
Conclusion
A firm understanding of graphs as a data structure and of their associated algorithms is absolutely necessary when furthering one's studies of data structures and algorithms. Although not as beginner friendly as the previous posts in this series, this guide should prove useful to deepen your understanding of data structures and algorithms.
以上がデータ構造とアルゴリズム: グラフの詳細内容です。詳細については、PHP 中国語 Web サイトの他の関連記事を参照してください。

 JavaScriptアプリケーション:フロントエンドからバックエンドまでMay 04, 2025 am 12:12 AM
JavaScriptは、フロントエンドおよびバックエンド開発に使用できます。フロントエンドは、DOM操作を介してユーザーエクスペリエンスを強化し、バックエンドはnode.jsを介してサーバータスクを処理することを処理します。 1.フロントエンドの例:Webページテキストのコンテンツを変更します。 2。バックエンドの例:node.jsサーバーを作成します。
 Python vs. Javascript:どの言語を学ぶべきですか?May 03, 2025 am 12:10 AM
PythonまたはJavaScriptの選択は、キャリア開発、学習曲線、エコシステムに基づいている必要があります。1)キャリア開発:Pythonはデータサイエンスとバックエンド開発に適していますが、JavaScriptはフロントエンドおよびフルスタック開発に適しています。 2)学習曲線:Python構文は簡潔で初心者に適しています。 JavaScriptの構文は柔軟です。 3)エコシステム:Pythonには豊富な科学コンピューティングライブラリがあり、JavaScriptには強力なフロントエンドフレームワークがあります。
 JavaScriptフレームワーク:最新のWeb開発のパワーMay 02, 2025 am 12:04 AM
JavaScriptフレームワークのパワーは、開発を簡素化し、ユーザーエクスペリエンスとアプリケーションのパフォーマンスを向上させることにあります。フレームワークを選択するときは、次のことを検討してください。1。プロジェクトのサイズと複雑さ、2。チームエクスペリエンス、3。エコシステムとコミュニティサポート。
 JavaScript、C、およびブラウザの関係May 01, 2025 am 12:06 AM
はじめに私はあなたがそれを奇妙に思うかもしれないことを知っています、JavaScript、C、およびブラウザは正確に何をしなければなりませんか?彼らは無関係であるように見えますが、実際、彼らは現代のウェブ開発において非常に重要な役割を果たしています。今日は、これら3つの間の密接なつながりについて説明します。この記事を通して、JavaScriptがブラウザでどのように実行されるか、ブラウザエンジンでのCの役割、およびそれらが協力してWebページのレンダリングと相互作用を駆動する方法を学びます。私たちは皆、JavaScriptとブラウザの関係を知っています。 JavaScriptは、フロントエンド開発のコア言語です。ブラウザで直接実行され、Webページが鮮明で興味深いものになります。なぜJavascrを疑問に思ったことがありますか
 node.jsは、型を使用してストリーミングしますApr 30, 2025 am 08:22 AM
node.jsは、主にストリームのおかげで、効率的なI/Oで優れています。 ストリームはデータを段階的に処理し、メモリの過負荷を回避します。大きなファイル、ネットワークタスク、リアルタイムアプリケーションの場合。ストリームとTypeScriptのタイプの安全性を組み合わせることで、パワーが作成されます
 Python vs. JavaScript:パフォーマンスと効率の考慮事項Apr 30, 2025 am 12:08 AM
PythonとJavaScriptのパフォーマンスと効率の違いは、主に以下に反映されています。1)解釈された言語として、Pythonはゆっくりと実行されますが、開発効率が高く、迅速なプロトタイプ開発に適しています。 2)JavaScriptはブラウザ内の単一のスレッドに限定されていますが、マルチスレッドおよび非同期I/Oを使用してnode.jsのパフォーマンスを改善でき、両方とも実際のプロジェクトで利点があります。
 JavaScriptの起源:その実装言語の調査Apr 29, 2025 am 12:51 AM
JavaScriptは1995年に発信され、Brandon Ikeによって作成され、言語をCに実現しました。 2。JavaScriptのメモリ管理とパフォーマンスの最適化は、C言語に依存しています。 3. C言語のクロスプラットフォーム機能は、さまざまなオペレーティングシステムでJavaScriptを効率的に実行するのに役立ちます。
 舞台裏:JavaScriptをパワーする言語は何ですか?Apr 28, 2025 am 12:01 AM
JavaScriptはブラウザとnode.js環境で実行され、JavaScriptエンジンに依存してコードを解析および実行します。 1)解析段階で抽象的構文ツリー(AST)を生成します。 2)ASTをコンパイル段階のバイトコードまたはマシンコードに変換します。 3)実行段階でコンパイルされたコードを実行します。


ホットAIツール

Undresser.AI Undress
リアルなヌード写真を作成する AI 搭載アプリ

AI Clothes Remover
写真から衣服を削除するオンライン AI ツール。

Undress AI Tool
脱衣画像を無料で

Clothoff.io
AI衣類リムーバー

Video Face Swap
完全無料の AI 顔交換ツールを使用して、あらゆるビデオの顔を簡単に交換できます。

人気の記事
ホットツール

EditPlus 中国語クラック版
サイズが小さく、構文の強調表示、コード プロンプト機能はサポートされていません

SublimeText3 Linux 新バージョン
SublimeText3 Linux 最新バージョン

mPDF
mPDF は、UTF-8 でエンコードされた HTML から PDF ファイルを生成できる PHP ライブラリです。オリジナルの作者である Ian Back は、Web サイトから「オンザフライ」で PDF ファイルを出力し、さまざまな言語を処理するために mPDF を作成しました。 HTML2FPDF などのオリジナルのスクリプトよりも遅く、Unicode フォントを使用すると生成されるファイルが大きくなりますが、CSS スタイルなどをサポートし、多くの機能強化が施されています。 RTL (アラビア語とヘブライ語) や CJK (中国語、日本語、韓国語) を含むほぼすべての言語をサポートします。ネストされたブロックレベル要素 (P、DIV など) をサポートします。

SublimeText3 Mac版
神レベルのコード編集ソフト(SublimeText3)

Dreamweaver Mac版
ビジュアル Web 開発ツール

