Utilisation simple de DrawerLayout (menu coulissant latéral officiel)
Introduction à cette section :
Cette section vous apporte le dernier contrôle de la partie contrôle de base de l'interface utilisateur : DrawerLayout, une diapositive latérale fournie par le menu officiel Le contrôle, comme ViewPager dans la section précédente, a été introduit après la version 3.0. Pour l'utiliser dans les versions inférieures, vous avez besoin du package de compatibilité v4. En ce qui concerne le glissement latéral, je crois. De nombreuses personnes ont utilisé SlidingMenu sur github, mais il semble y avoir deux versions, l'une indépendante et l'autre dépend de l'autre. Un projet open source : ActionBarSherlock puisque Google nous fournit ce contrôle, pourquoi ne pas l'utiliser ? Dans les spécifications de conception de Material Design, les effets d'animation de nombreux menus coulissants latéraux visibles partout peuvent être principalement obtenus via la barre d'outils + DrawerLayout pour réaliser ~, dans cette section, nous explorerons une utilisation de base de ce DrawerLayout ~ Certaines personnes aiment l'utiliser Appelé le contrôle du tiroir~Document officiel : DrawerLayout
1 Précautions d'utilisation
- 1. doit être la première sous-vue de DrawerLayout
- 2 La largeur et la hauteur de la vue de contenu principale doivent correspondre à_parent
- 3. la diapositive doit être affichée Lorsque l'attribut android:layout_gravityandroid:layout_gravity = "start" de la vue, le menu glisse de gauche à droite. Lorsque android:layout_gravity = "end", faites glisser le menu de droite à gauche Il est déconseillé d'utiliser gauche et droite !!!
- La largeur de la vue coulissante latérale est en dp, et il est déconseillé de dépasser 320dp (afin d'en voir toujours vues du contenu principal)
- Définissez l'événement de glissement latéral : mDrawerLayout.setDrawerListener(DrawerLayout.DrawerListener);
- Un point à dire : il peut être utilisé en combinaison avec la barre d'action lorsque l'utilisateur clique sur la barre d'action. icône de l'application sur la barre d'action, le menu coulissant latéral apparaîtra ! Ici, nous devons transmettre ActionBarDrawerToggle, qui est la classe d'implémentation spécifique de DrawerLayout.DrawerListener. Nous pouvons remplacer onDrawerOpened() et onDrawerClosed() d'ActionBarDrawerToggle pour écouter le retrait du tiroir. Ou masquez les événements ! Mais nous n’en parlerons pas ici, car après la 5.0 nous utilisons Toolbar ! Si vous êtes intéressé, vous pouvez vérifier vous-même les informations pertinentes document!
2. Utilisation d'exemples de code
Exemple 1 : Implémentation d'un menu coulissant sur un seul côté
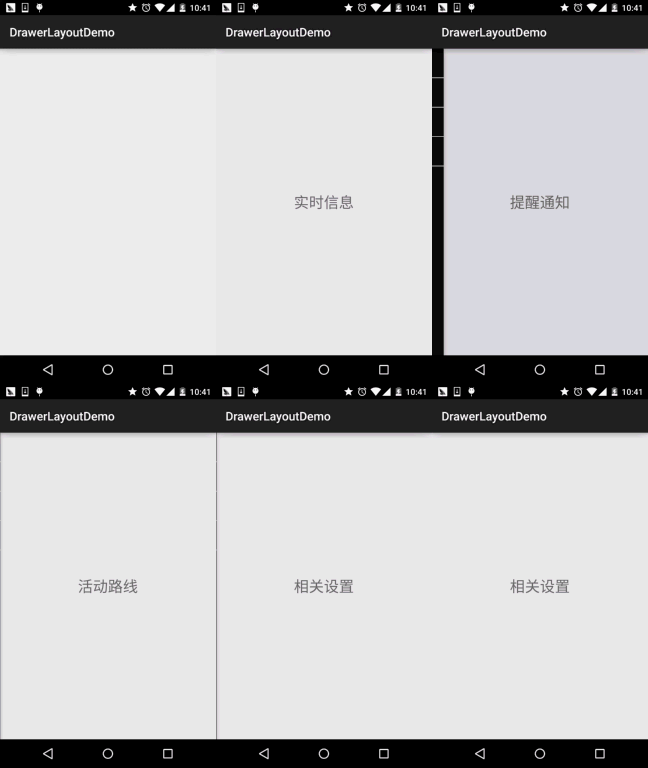
Exécution de rendus :

Implémenter le code clé :
Le premier est notre mise en page principale Remarque : la couche la plus externe doit être DrawerLayout. ! ! ! !
activity_main.xml:
android:id="@+id/ Drawer_layout"
android:layout_width="match_parent"
android:layout_height="match_parent">
<FrameLayout
android:id="@+id/ly_content"
android:layout_width="match_parent"
android:layout_height="match_parent" />
<ListView
android:id="@+id/list_left_drawer"
android:layout_width= "180dp"
android:layout_height="match_parent"
android:layout_gravity="start"
android:background="../style/images/android-tutorial-drawerlayout.html"
android :choiceMode="singleChoice"
android:divider="#FFFFFF"
android:dividerHeight="1dp" />
</android.support.v4.widget.DrawerLayout>
ListView的布局代码和domain类:Item比较简单,就不给出了,直接上中间Fragment的
fg_content.xml:
<RelativeLayout xmlns:android="http://schemas.android.com/apk/res/android"
android:layout_width=" match_parent"
android:layout_height="match_parent"
android:orientation="vertical">
<TextView
android:id="@+id/tv_content"
android:layout_width="wrap_content"
android:layout_height="wrap_content"
android:layout_centerInParent="true"
android:textSize="25sp" />
</RelativeLayout > ;
ContentFragment.java:
* Créé par Jay le 2015/10/8 0008.
*/
classe publique ContentFragment étend Fragment {
private TextView tv_content;<
tv_content = (TextView) view.findViewById(R.id.tv_content);
String text = getArguments().getString("text");
tv_content.setText(text);
return view;
>
}
Enfin notre classe d'activité
MainActivity.java:
private tiroirlayout tirher_layout;
private listView list_left_drawer;
private arrayList & lt; item & gt; menuLists;
privé MyAdapter<Item> myAdapter = null;
@Override
protected void onCreate(Bundle savedInstanceState) {
super.onCreate(savedInstanceState);
setContentView(R.layout.activity); _main);
drawer_layout = (DrawerLayout) findViewById(R.id.drawer_layout);
list_left_drawer = (ListView) findViewById(R.id.list_left_drawer);
menuLists = nouveau ArrayList<Item>() ;
menuLists.add(new Item(R.mipmap.iv_menu_realtime,"实时信息"));
menuLists.add(new Item(R.mipmap.iv_menu_alert,"提醒通知"));
menuLists.add(new Item(R.mipmap.iv_menu_trace,"活动路线"));
menuLists.add(new Item(R.mipmap.iv_menu_settings,"相关设置"));
myAdapter = new MyAdapter< ;Item>(menuLists,R.layout.item_list) {
@Override
public void bindView(ViewHolder holder, Item obj) {
holder.setImageResource(R.id.img_icon) ,obj.getIconId() );
holder.setText(R.id.txt_content, obj.getIconName());
}
};
list_left_drawer.setAdapter(mon adaptateur);
list_left_drawer.setOnItemClickListener(this) ;
}
@Override
public void onItemClick (AdapterView<?> parent, vue View, position int, identifiant long) {
ContentFragment contentFragment = new ContentFragment();
Bundle args = new Bundle();
args.putString( "text", menuLists.get(position).getIconName());
contentFragment.setArguments(args);
FragmentManager fm = getSupportFragmentManager();
fm.beginTransaction().replace(R.id .ly_content,contentFragment).commit();
Drawer_layout.closeDrawer(list_left_drawer);
}
}
Le code est très simple, donc je ne dirai pas grand chose ~
Exemple 2. Implémentation de deux menus coulissants latéraux gauche et droit
Eh bien, je ne sais pas si vous avez remarqué cela à partir de la disposition de DrawerLayout ci-dessus, on peut probablement deviner que DrawerLayout Il se compose de jusqu'à trois parties, la partie contenu au milieu, la partie menu coulissant latéral à gauche et la partie menu coulissant latéral à droite ! Écrivons un exemple avec deux menus latéraux coulissants !
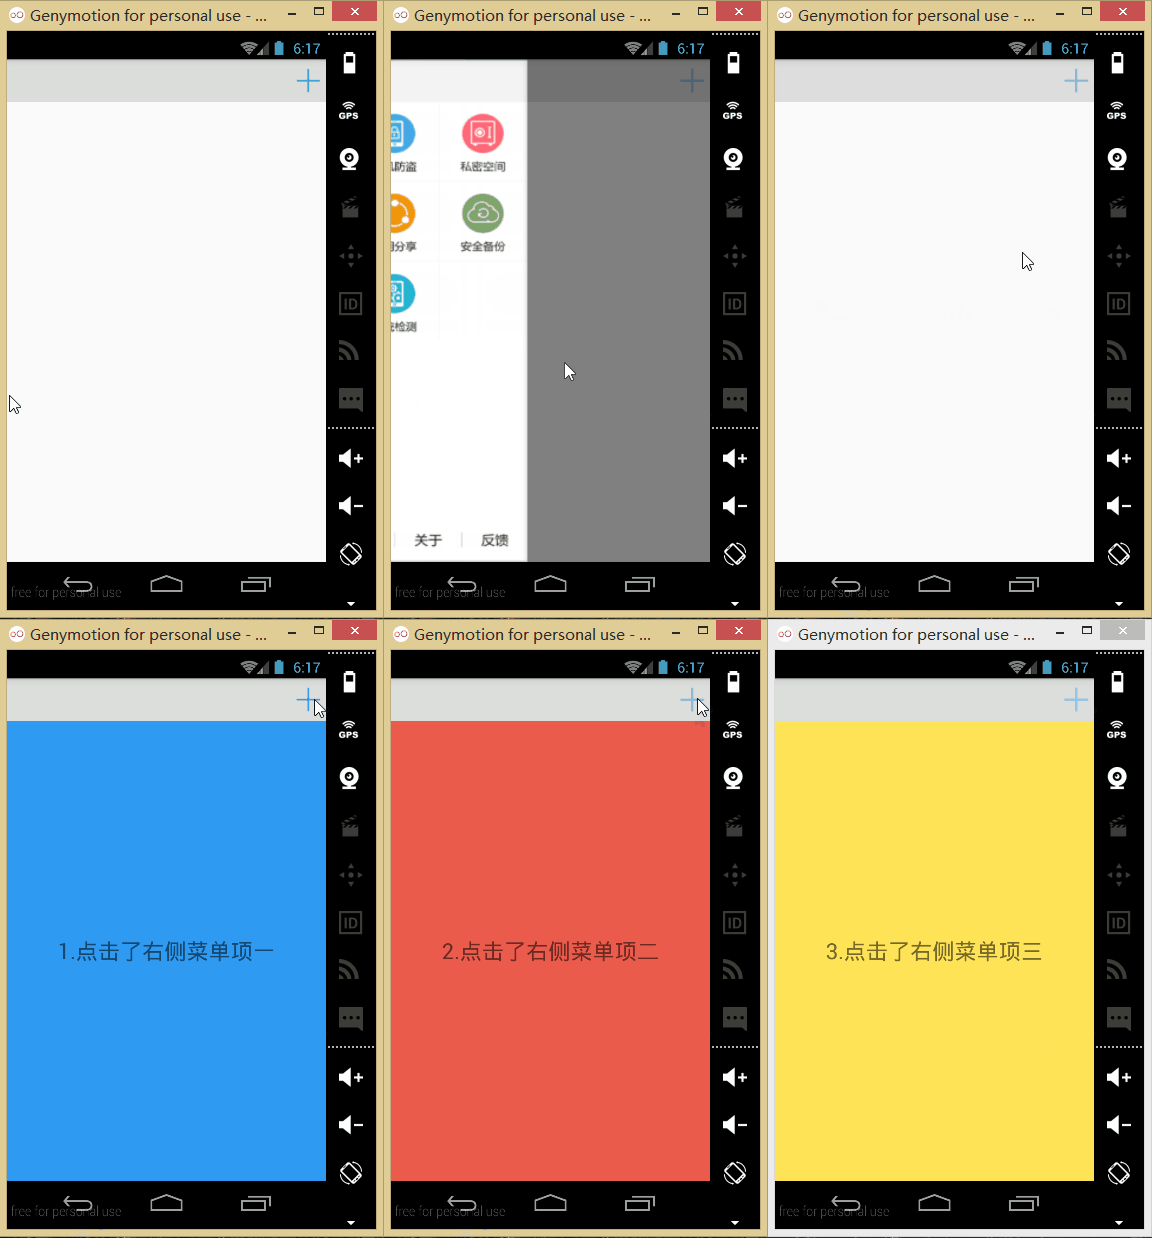
Exécution des rendus :

Implémentation du code :
Tout d'abord, nous créez deux fragments et les mises en page correspondantes. Ce sont les menus coulissants gauche et droit !
Fragment gauche :
Mise en page : fg_left.xml, une image est utilisée ici et une nouvelle activité apparaîtra après avoir cliqué ; Bien sûr, vous pouvez l'agrandir selon vos besoins !
<LinearLayout xmlns:android="http://schemas.android.com/apk /res/android"
android:orientation="vertical" android:layout_width="match_parent"
android:layout_height="match_parent">
<ImageView
android:id= "@+id/img_bg"
android:layout_width="match_parent"
android:layout_height="match_parent"
android:background="../style/images/bg_menu_left"/>
</LinearLayout>
对应的LeftFragment.java:
* Créé par Jay le 2015/10/9 0009.
*/
public class LeftFragment étend Fragment{
private DrawerLayout drawer_layout ;
@Override
public View onCreateView (LayoutInflater inflater, ViewGroup container, Bundle savedInstanceState) {
View view = inflater.inflate(R.layout.fg_left, container, false);
ImageView img_bg = (ImageView) view.findViewById(R.id.img_bg);
img_bg.setOnClickListener(new View.OnClickListener() {
@Override
public void onC lécher(Afficher v) {
getActivity().startActivity(new Intent(getActivity(),OtherActivity.class));
drawer_layout.closeDrawer(Gravity.START);
}
});
return view;
}
//暴露给Activity,用于传入DrawerLayout,因为点击后想关掉DrawerLayout
public void setDrawerLayout(DrawerLayout drawer_layout){
this.drawer_layout = drawer_layout;
}
}
Fragment à droite : La mise en page de
n'est que de trois boutons. Après avoir cliqué, remplacez le Fragment dans la partie médiane. La mise en page fg_right.xml. le code est le suivant :
<LinearLayout xmlns:android="http://schemas. android.com/apk/res/android "
android:layout_width="match_parent"
android:layout_height="match_parent"
android:background="../style/images/android-tutorial-drawerlayout .html"
android:gravity ="center"
android:orientation="vertical">
<Button
android:id="@+id/btn_one"
android:layout_width="wrap_content"
android:layout_height="wrap_content"
android:text="élément de menu un" />
<Button
android:id=" @+id/btn_two"
android:layout_width="wrap_content"
android: +id/btn_two"
android:layout_width="wrap_content"
android:layout_h huit="wrap_content"
android :text="Élément trois du menu" />
</LinearLayout> ;
correspond alors à RightFragment.java :
* Créé par Jay le 2015/10/9 0009.
*/
public class RightFragment étend Fragment implémente View.OnClickListener{
private DrawerLayout drawer_layout;
private FragmentManager fManager;
@Override
public View onCreateView(LayoutInflater inflater, ViewGroup container, Bundle savedInstanceState) {
View view = inflater.inflate(R.layout.fg_right, container, false);
view. findViewById(R.id .btn_one).setOnClickListener(this);
view.findViewById(R.id.btn_two).setOnClickListener(this);
view.findViewById(R.id.btn_two).setOnClickListener(this);
fManager = getActivity().getSupportFragmentManager();
return view;
}
@Override
public void onClick(View v) {
switch (v.getId()) {
case R.id.btn_one :
ContentFragment cFragment1 = new ContentFragment("1.点击了右侧菜单项一",R.color.blue);
fManager.beginTransaction().replace( R.id.fly_content,cFragment1).commit();
drawer_layout.closeDrawer(Gravity.END);
break;
case R.id.btn_two:
ContentFragment cFragment2 = new ContentFragment(" 2.点击了右侧菜单项二",R.color.red);
fManager.beginTransaction().replace(R.id.fly_content,cFragment2).commit();
drawer_layout.closeDrawer( La gravité .END);
pause ;
case R.id.btn_trois :
ContentFragment cFragment3 = new ContentFragment("3. J'ai cliqué sur le troisième élément du menu de droite", R.color.white);
fManager.beginTransaction().replace(R.id. fly_content,cFragment3).commit();
Drawer_layout.closeDrawer(Gravity.END);
break;
}
}
public void setDrawerLayout(DrawerLayout Drawer_layout){
this.drawer_layout = Drawer_layout;
}
}
De plus, il y a un ContentFragment rempli dans la partie centrale La mise en page : fg_content.xml<. 🎜> est le suivant :
android:layout_width="match_parent"
android:layout_height="match_parent"
android:orientation="vertical">
< ;TextView
android :id="@+id/tv_content"
android:layout_width="wrap_content"
android:layout_height="wrap_content"
android:layout_centerInParent="true"
android :textSize="25sp" />
</RelativeLayout>
ContentFragment.java:
private TextView tv_content;
private String strContent;
private int bgColor;
public ContentFragment(String strContent,int bgColor) {
this.strContent = strContent;
this.bgColor = bgColor;
}
@Override
public View onCreateView (LayoutInflater inflater, ViewGroup container, Bundle savedInstanceState) {
View view = inflater.inflate(R.layout.fg_content, container, false);
view.setBackgroundColor(getResource) s().getColor(bgColor ));
tv_content = (TextView) view.findViewById(R.id.tv_content);
tv_content.setText(strContent);
return view ;
}
}
编写好以后,就到我们的Activity的布局了以及Activity的代码了: 在此之前我们还需要些一个顶部条形栏的布局:
view_topbar.xml:
<RelativeLayout xmlns:android="http://schemas.android.com/apk/res/android"
android:layout_width="match_parent"
android :layout_height="wrap_content"
android:background="../style/images/android-tutorial-drawerlayout.html">
<Button
android:id="@+ id/btn_right"
android:layout_width="40dp"
android:layout_height="40dp"
android:layout_centerVertical="true"
android:layout_alignParentRight="tru e"
android : arrière-plan ="../style/images/btn_selctor"/>
</RelativeLayout>
Puis activity_main.xml :
xmlns:tools="http:// schemas.android.com/tools"
android:id="@+id/drawer_layout"
android:layout_width="match_parent"
android:layout_height="match_parent">
<LinearLayout
android:layout_width="match_parent"
android:layout_height="match_parent"
android:orientation="vertical">
<include
android:id ="@+id/topbar"
layout="@layout/view_topbar"
android:lay out_width="wrap_content"
android:layout_height="48dp" />
≪ FrameLayout
android:id="@+id/fly_content"
android:layout_width="match_parent"
android:layout_height="match_parent" />
</ Mise en page linéaire>
<fragment
android:id="@+id/fg_left_menu"
android:name="jay.com.drawerlayoutdemo2.LeftFragment"
android:layout_width="300dp"
android:layout_height="match_parent"
android:layout_gravity="start"
android:tag="LEFT"
outils:layout="@layout/fg_left" />
<fragment
android:id="@+id/fg_right_menu"
android:name="jay.com.drawerlayoutdemo2.RightFragment"
android:layout_width="100dp"
android:layout_height="match_parent"
android:layout_gravity="end"
android:tag="RIGHT"
tools:layout="@layout/fg_right" />
< ;/android.support.v4.widget.DrawerLayout>
Enfin MainActivity.java :
private DrawerLayout drawer_layout;
private FrameLayout fly_content;
private View topbar;
Bouton privé btn_right ;
private RightFragment fg_right_menu;
private LeftFragment fg_left_menu;
private FragmentManager fManager;
@Override
protected void onCreate(Bundle savedInstanceState) {
super.onCreate(savedInstanceState);
setContentView(R.layout.activity_main);
fManager = getSupportFragmentManager();
fg_right_menu = (RightFragment) fManager.findFragmentById(R.id.fg_right_menu);
fg_left_menu = (LeftF ragment) fManager.findFragmentById(R .id.fg_left_menu);
initViews();
}
private void initViews() {
drawer_layout = (DrawerLayout) findViewById(R.id.drawer_layout);
fly_content = (FrameLayout) findViewById(R.id.fly_content);
topbar = findViewById(R.id.topbar);
btn_right = (Button) topbar.findViewById(R.id.btn_right);
btn_right .setOnClickListener(this);
//设置右面的侧滑菜单只能通过编程来打开
drawer_layout.setDrawerLockMode(DrawerLayout.LOCK_MODE _LOCKED_CLOSED,
Gravity.END);
drawer_layout.setDrawerListener(new DrawerLayout.DrawerListener() {
@Override
public void onDrawerSlide(View view, float v) {
}
@Override
public void onDrawerOpened(View view) {
}
@Override
public void onDrawerClosed(View vue) {
drawer_layout.setDrawerLockMode(
DrawerLayout .LOCK_MODE_LOCKED_CLOSED, Gravity.END);
}
@Override
public void onDrawerStateChanged(int i) {
}
});
fg_right_menu.setDrawerLayout(drawer_layout);
fg_left_menu.setDrawerLayout(drawer_layout);
}
@Override
public void onClick(View v) {
drawer_layout.openDrawer(Gravity.RIGHT );
drawer_layout.setDrawerLockMode(DrawerLayout.LOCK_MODE_UNLOCKED,
Gravity.END); //解除锁定
}
}
D'accord, vous avez terminé maintenant~ Héhé, parlons des doutes que vous pourriez avoir en lisant le code :
- 1. .openDrawer(Gravity.END);
Cette phrase sert à définir le menu à ouvrir START représente la gauche et END représente la droite- 2. Drawer_layout.setDrawerLockMode (DrawerLayout.LOCK_MODE_LOCKED_CLOSED,Gravity.END); Le menu coulissant latéral à droite est verrouillé et ne peut pas être fermé ou ouvert par des gestes. Il ne peut être ouvert que par des codes ! Autrement dit, appelez la méthode openDrawer ! Puis Drawer_layout.setDrawerLockMode(DrawerLayout.LOCK_MODE_UNLOCKED,Gravity.END); Déverrouillez l'état de verrouillage, c'est-à-dire que vous pouvez fermer le menu coulissant latéral par des gestes Enfin, il est appelé lorsque le tiroir est fermé : Drawer_layout.setDrawerLockMode(DrawerLayout.LOCK_MODE_LOCKED_CLOSED, Gravity.END); Verrouillez à nouveau le menu coulissant à droite !
- 3. Quel est le rôle de l'attribut Tag dans le code de mise en page ? Réponse : Il n'est pas utilisé ici. Lors de la substitution de la méthode onDrawerSlide de DrawerListener, nous pouvons transmettre sa première. Paramètre DrawerView, appelez DrawerView.getTag().equals("START") pour déterminer lequel a déclenché l'événement de menu menu! Vous pourrez alors effectuer les opérations correspondantes !
3. Téléchargement d'un exemple de code
DrawerLayoutDemo.zip
DrawerLayoutDemo2.zip
Résumé de ceci section :
D'accord, cette section vous présente l'utilisation de base du contrôle coulissant latéral officiel DrawerLayout, qui est très pratique à utiliser ! Bien sûr, ce n'est qu'une simple démonstration d'utilisation.De plus, j'ai vu le grand maître Zhang Yang écrire un article : Menu coulissant latéral bidirectionnel Android DrawerLayout haute imitation QQ5.2. Si vous lisez le contenu de cette section, je pense que vous ne comprendrez pas à quel point c'est difficile ~ D'accord !
C'est tout pour cette section, dites adieu au chapitre des contrôles de l'interface utilisateur~ Nous commencerons le dessin et l'animation dans le prochain chapitre. Jeter les bases de notre série avancée de commandes personnalisées !


