
Maison >développement back-end >tutoriel php >Explorer les options de thème dans l'API des paramètres WordPress, partie 4
Explorer les options de thème dans l'API des paramètres WordPress, partie 4

- 王林original
- 2023-09-04 19:33:011364parcourir
Dans notre article précédent, nous avons examiné en profondeur les différents types de menus pris en charge par l'API WordPress. Bien qu’ils ne fassent pas nécessairement partie de l’API de paramètres, ils jouent un rôle clé dans le développement, notamment lors du développement de plugins et de thèmes plus avancés.
Cet article mettra le menu en pratique alors que nous commençons à créer un thème sandbox en refactorisant la configuration existante et en ajoutant quelques nouvelles pages. Notez que si vous venez de nous rejoindre, assurez-vous d'avoir lu les articles précédents et d'avoir récupéré la dernière version du thème sandbox dans le référentiel sur GitHub.
Avant de commencer : Cet article contient beaucoup de code. Dans la première moitié de cet article, nous refactoriserons le code existant. Au cours du second semestre, nous écrirons quelques fonctionnalités à partir de zéro. Il est important que vous preniez le temps de lire chaque section et son code et que vous vous assuriez de bien comprendre ce qui se passe avant de passer à la section suivante. Essayez d'éviter de copier et coller le code ci-dessous.
Note de l'auteur : Cet article vous guidera à travers le processus d'introduction d'une nouvelle section de paramètres d'options de thème, mais il ne termine pas le processus - lisez-en plus dans ce fil de commentaires. Je sais que je le sais, je suis désolé de ne pas l'avoir clarifié dans le message, et j'aurai une version complète de travail dans mon prochain message plus tard ce mois-ci !
Un peu de ménage
Si vous avez complété les exemples précédents, vous devriez avoir un certain nombre de menus différents configurés dans functions.php. Puisque nous allons adopter une approche plus pratique de notre sujet, nous devons nettoyer certaines des choses que nous avons écrites dans l'exemple précédent. Je sais qu'il semble un peu fastidieux d'écrire beaucoup de code juste pour le supprimer, mais les exemples précédents sont destinés à jeter les bases de la compréhension de ce que propose WordPress afin que nous puissions mettre la fonctionnalité en pratique.
La première chose que nous devons faire est de trouver les deux appels de fonction qui ajoutent l'option sandbox au menu du plugin :
function sandbox_example_plugin_menu() {

	add_plugins_page(
		'Sandbox Plugin', 			// The title to be displayed in the browser window for this page.
		'Sandbox Plugin',			// The text to be displayed for this menu item
		'administrator',			// Which type of users can see this menu item
		'sandbox_plugin_options',	// The unique ID - that is, the slug - for this menu item
		'sandbox_plugin_display'	// The name of the function to call when rendering this menu's page
	);

} // end sandbox_example_theme_menu
add_action('admin_menu', 'sandbox_example_plugin_menu');

function sandbox_plugin_display() {

	// Create a header in the default WordPress 'wrap' container
	$html = '<div class="wrap">';
		$html .= '<h2>Sandbox Plugin Options</h2>';
		$html .= '<p class="description">There are currently no options. This is just for demo purposes.</p>';
	$html .= '</div>';

	// Send the markup to the browser
	echo $html;

} // end sandbox_plugin_display
Supprimez-le de functions.php.
Ensuite, nous souhaitons supprimer l'option permettant d'ajouter un menu de niveau supérieur. Nous reviendrons sur ce code plus loin dans cet article, mais il est légèrement différent de celui que nous avons créé initialement.
function sandbox_create_menu_page() {

	add_menu_page(
		'Sandbox Options',			// The title to be displayed on this menu's corresponding page
		'Sandbox',					// The text to be displayed for this actual menu item
		'administrator',			// Which type of users can see this menu
		'sandbox',					// The unique ID - that is, the slug - for this menu item
		'sandbox_menu_page_display',// The name of the function to call when rendering this menu's page
		''
	);

	add_submenu_page(
		'sandbox',					// Register this submenu with the menu defined above
		'Sandbox Options',			// The text to the display in the browser when this menu item is active
		'Options',					// The text for this menu item
		'administrator',			// Which type of users can see this menu
		'sandbox_options',			// The unique ID - the slug - for this menu item
		'sandbox_options_display' 	// The function used to render this menu's page to the screen
	);

} // end sandbox_create_menu_page
add_action('admin_menu', 'sandbox_create_menu_page');

function sandbox_menu_page_display() {

	// Create a header in the default WordPress 'wrap' container
	$html = '<div class="wrap">';
		$html .= '<h2>Sandbox</h2>';
	$html .= '</div>';

	// Send the markup to the browser
	echo $html;

} // end sandbox_menu_page_display

function sandbox_options_display() {

	// Create a header in the default WordPress 'wrap' container
	$html = '<div class="wrap">';
		$html .= '<h2>Sandbox Options</h2>';
	$html .= '</div>';

	// Send the markup to the browser
	echo $html;

} // end sandbox_options_display
À ce stade, vous devez laisser deux fonctionnalités spécifiques dans la zone d'administration WordPress que nous avons créée :
- Élément de menu "Thème Sandbox" sous le menu Apparence.
- Un ensemble de trois options sous Paramètres généraux dans le menu Paramètres.
Si vous voyez ces deux options, vous êtes prêt à partir, sinon vérifiez que votre functions.php ressemble au code suivant :
function sandbox_example_theme_menu() {

	add_theme_page(
		'Sandbox Theme', 			// The title to be displayed in the browser window for this page.
		'Sandbox Theme',			// The text to be displayed for this menu item
		'administrator',			// Which type of users can see this menu item
		'sandbox_theme_options',	// The unique ID - that is, the slug - for this menu item
		'sandbox_theme_display'		// The name of the function to call when rendering this menu's page
	);

} // end sandbox_example_theme_menu
add_action('admin_menu', 'sandbox_example_theme_menu');

function sandbox_theme_display() {

	// Create a header in the default WordPress 'wrap' container
	$html = '<div class="wrap">';
		$html .= '<h2>Sandbox Theme Options</h2>';
		$html .= '<p class="description">There are currently no options. This is just for demo purposes.</p>';
	$html .= '</div>';

	// Send the markup to the browser
	echo $html;

} // end sandbox_theme_display

/* ------------------------------------------------------------------------ *
 * Setting Registration
 * ------------------------------------------------------------------------ */

function sandbox_initialize_theme_options() {

	// First, we register a section. This is necessary since all future options must belong to a
	add_settings_section(
		'general_settings_section',			// ID used to identify this section and with which to register options
		'Sandbox Options',					// Title to be displayed on the administration page
		'sandbox_general_options_callback',	// Callback used to render the description of the section
		'general'							// Page on which to add this section of options
	);

	// Next, we'll introduce the fields for toggling the visibility of content elements.
	add_settings_field(
		'show_header',						// ID used to identify the field throughout the theme
		'Header',							// The label to the left of the option interface element
		'sandbox_toggle_header_callback',	// The name of the function responsible for rendering the option interface
		'general',							// The page on which this option will be displayed
		'general_settings_section',			// The name of the section to which this field belongs
		array(								// The array of arguments to pass to the callback. In this case, just a description.
			'Activate this setting to display the header.'
		)
	);

	add_settings_field(
		'show_content',
		'Content',
		'sandbox_toggle_content_callback',
		'general',
		'general_settings_section',
		array(
			'Activate this setting to display the content.'
		)
	);

	add_settings_field(
		'show_footer',
		'Footer',
		'sandbox_toggle_footer_callback',
		'general',
		'general_settings_section',
		array(
			'Activate this setting to display the footer.'
		)
	);

	// Finally, we register the fields with WordPress

	register_setting(
		'general',
		'show_header'
	);

	register_setting(
		'general',
		'show_content'
	);

	register_setting(
		'general',
		'show_footer'
	);

} // end sandbox_initialize_theme_options
add_action('admin_init', 'sandbox_initialize_theme_options');

/* ------------------------------------------------------------------------ *
 * Section Callbacks
 * ------------------------------------------------------------------------ */

function sandbox_general_options_callback() {
	echo '<p>Select which areas of content you wish to display.</p>';
} // end sandbox_general_options_callback

/* ------------------------------------------------------------------------ *
 * Field Callbacks
 * ------------------------------------------------------------------------ */

function sandbox_toggle_header_callback($args) {

	// Note the ID and the name attribute of the element match that of the ID in the call to add_settings_field
	$html = '<input type="checkbox" id="show_header" name="show_header" value="1" ' . checked(1, get_option('show_header'), false) . '/>';

	// Here, we'll take the first argument of the array and add it to a label next to the checkbox
	$html .= '<label for="show_header"> '  . $args[0] . '</label>';

	echo $html;

} // end sandbox_toggle_header_callback

function sandbox_toggle_content_callback($args) {

	$html = '<input type="checkbox" id="show_content" name="show_content" value="1" ' . checked(1, get_option('show_content'), false) . '/>';
	$html .= '<label for="show_content"> '  . $args[0] . '</label>';

	echo $html;

} // end sandbox_toggle_content_callback

function sandbox_toggle_footer_callback($args) {

	$html = '<input type="checkbox" id="show_footer" name="show_footer" value="1" ' . checked(1, get_option('show_footer'), false) . '/>';
	$html .= '<label for="show_footer"> '  . $args[0] . '</label>';

	echo $html;

} // end sandbox_toggle_footer_callback
À ce stade, nous sommes prêts à commencer.
Planifier nos options
Avant d'écrire un code, il est important de planifier ce que nous allons faire. À ce stade, nous avons écrit quelques fonctionnalités utiles : nous permettons aux utilisateurs de basculer la visibilité des zones d'en-tête, de contenu et de pied de page. Le problème est que ces options se trouvent actuellement sur la page Général du menu Paramètres. Puisque nous développons un thème, nous devons l'inclure dans la page d'options du thème.
L'essentiel est que ces trois options ne suffisent pas pour un thème utile. Il est de plus en plus courant que les utilisateurs présentent leurs réseaux sociaux sur des blogs. Nous prévoyons donc de donner aux utilisateurs la possibilité d'ajouter des liens vers leurs comptes Twitter, Facebook et Google+.
Dans cette optique, nous pouvons planifier les deux parties suivantes :
- Options d'affichage
- Titre
- Contenu
- Pied de page
- Options sociales
- Google+
Pour aller plus loin, nous présenterons ces options dans la page d'options du thème Sandbox, accessible sous le menu Apparence. De plus, chaque section est accessible via son propre onglet dans la navigation des pages.
Options de création
Page des options de refactorisation
Notre page d'options va devenir plus avancée dans cet article, il est donc préférable de s'y préparer. En regardant notre page d'options, la fonction de rappel ressemble à ceci :
function sandbox_theme_display() {

	// Create a header in the default WordPress 'wrap' container
	$html = '<div class="wrap">';
		$html .= '<h2>Sandbox Theme Options</h2>';
		$html .= '<p class="description">There are currently no options. This is just for demo purposes.</p>';
	$html .= '</div>';

	// Send the markup to the browser
	echo $html;

} // end sandbox_theme_display
Comme il va être plus avancé, nous devrons le refactoriser un peu. Plus précisément, nous ferons ce qui suit :
- Fournissez à la page d'options une icône afin que le look soit plus cohérent avec le look WordPress
- Supprimer la description de la page
- Refactorisation des chaînes PHP de HTML en blocs HTML pour faciliter la gestion des délais d'attente
- Présentation de la fonction d'affichage des erreurs de réglage
- Créez un formulaire pour conserver nos options
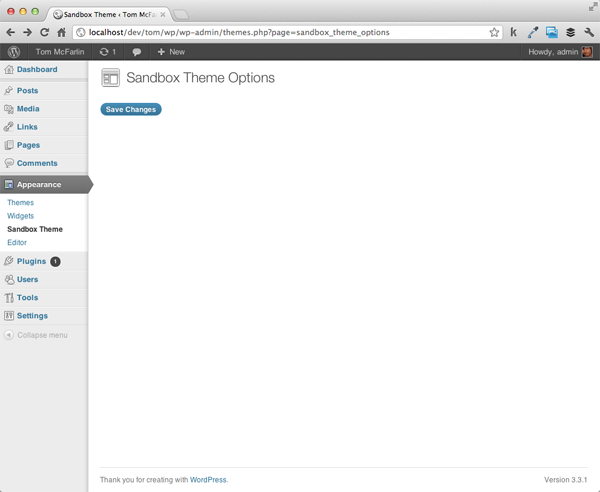
C'est relativement simple. Dans ce cas, le code peut mieux expliquer ce que nous faisons, essayez de le décomposer ligne par ligne. Regardez le code ci-dessous, portez une attention particulière aux commentaires et assurez-vous que votre rappel ressemble à ceci :
function sandbox_theme_display() {
?>
	<!-- Create a header in the default WordPress 'wrap' container -->
	<div class="wrap">

		<!-- Add the icon to the page -->
		<div id="icon-themes" class="icon32"></div>
		<h2>Sandbox Theme Options</h2>

		<!-- Make a call to the WordPress function for rendering errors when settings are saved. -->
		<?php settings_errors(); ?>

		<!-- Create the form that will be used to render our options -->
		<form method="post" action="options.php">
			<?php settings_fields( 'general' ); ?>
			<?php do_settings_sections( 'general' ); ?>
			<?php submit_button(); ?>
		</form>

	</div><!-- /.wrap -->
<?php
} // end sandbox_theme_display
Si tout votre code est correct, votre page d'options devrait ressembler à ceci :
重新调整我们的选择
现在主题的选项页面已经成型,是时候将我们到目前为止创建的选项(即显示选项)移动到主题的选项页面上。回想一下上一篇文章,我们将每个新选项添加到“常规”设置页面的“沙盒选项”标签下。现在我们要将其移至其自己的页面,我们将需要进行一些修改。我们将逐一详细介绍我们正在做的事情。
第 1 步验证选项是否存在
由于我们要创建自己的自定义选项组,而不是将字段添加到现有集合中,因此我们需要确保我们的选项集合存在于数据库中。为此,我们将调用 get_option 函数。如果它返回 false,那么我们将使用 add_option 函数添加新的选项集。
为此,请将以下代码块添加为 sandbox_initialize_theme_options 函数中的第一行:
if( false == get_option( 'sandbox_theme_display_options' ) ) {
	add_option( 'sandbox_theme_display_options' );
} // end if
第 2 步重构我们的部分
找到对 add_settings_section 的调用并记下“title”参数。现在,它应该看起来像这样:
add_settings_section(
	'general_settings_section',			// ID used to identify this section and with which to register options
	'Sandbox Options',					// Title to be displayed on the administration page
	'sandbox_general_options_callback',	// Callback used to render the description of the section
	'general'							// Page on which to add this section of options
);
由于这些选项现在位于“沙盒选项”页面下,因此我们不希望该部分被如此标记。相反,我们将其更改为“显示选项”。
add_settings_section(
	'general_settings_section',			// ID used to identify this section and with which to register options
	'Display Options',					// Title to be displayed on the administration page
	'sandbox_general_options_callback',	// Callback used to render the description of the section
	'sandbox_theme_display_options'		// Page on which to add this section of options
);
其次,我们不再在“常规设置”页面上呈现此内容,因此我们需要将最后一个参数更改为我们主题特有的内容。我选择使用 sandbox_theme_display_options:
add_settings_section(
	'general_settings_section',			// ID used to identify this section and with which to register options
	'Display Options',					// Title to be displayed on the administration page
	'sandbox_general_options_callback',	// Callback used to render the description of the section
	'sandbox_theme_display_options'		// Page on which to add this section of options
);
第 3 步更新我们的设置字段
现在我们已经为显示选项提供了唯一的页面标识符,我们需要确保我们的设置正确引用页面,以便正确呈现它们。目前,我们对 add_settings_field 的所有调用均指“常规设置”页面:
add_settings_field(
	'show_header',						// ID used to identify the field throughout the theme
	'Header',							// The label to the left of the option interface element
	'sandbox_toggle_header_callback',	// The name of the function responsible for rendering the option interface
	'general',							// The page on which this option will be displayed
	'general_settings_section',			// The name of the section to which this field belongs
	array(								// The array of arguments to pass to the callback. In this case, just a description.
		'Activate this setting to display the header.'
	)
);
我们需要更改第四个参数 - 即页面参数 - 以便它引用我们的新显示选项页面而不是常规页面。只需将字符串更改为 sandbox_theme_display_options 即可。这三个选项现在应如下所示:
add_settings_field(
	'show_header',						// ID used to identify the field throughout the theme
	'Header',							// The label to the left of the option interface element
	'sandbox_toggle_header_callback',	// The name of the function responsible for rendering the option interface
	'sandbox_theme_display_options',	// The page on which this option will be displayed
	'general_settings_section',			// The name of the section to which this field belongs
	array(								// The array of arguments to pass to the callback. In this case, just a description.
		'Activate this setting to display the header.'
	)
);

add_settings_field(
	'show_content',
	'Content',
	'sandbox_toggle_content_callback',
	'sandbox_theme_display_options',
	'general_settings_section',
	array(
		'Activate this setting to display the content.'
	)
);

add_settings_field(
	'show_footer',
	'Footer',
	'sandbox_toggle_footer_callback',
	'sandbox_theme_display_options',
	'general_settings_section',
	array(
		'Activate this setting to display the footer.'
	)
);
第 4 步注册新设置
到目前为止,我们已使用常规页面上的设置单独注册了每个选项:
register_setting(
	'general',
	'show_header'
);

register_setting(
	'general',
	'show_content'
);

register_setting(
	'general',
	'show_footer'
);
由于我们创建了自己的选项页面以及我们自己的部分,因此我们可以将这三个注册调用合并为一个调用,该调用将为我们的新选项部分注册字段:
register_setting(
	'sandbox_theme_display_options',
	'sandbox_theme_display_options'
);
这可能是最难掌握的想法。回想一下本系列的第二篇文章,设置是它们所属的字段和部分的组合。由于我们所有的字段都属于同一部分(显示选项),因此我们使用 WordPress 注册该部分。
第 5 步更新选项元素
不要错过这一点:到目前为止,我们的选项已作为单独的设置保存在数据库中。这意味着我们可以简单地通过 ID 查找它们(例如 get_option('show_header');,但由于我们现在已将它们添加到自定义部分,因此它们是选项集合的一部分。这意味着为了读取我们的选项,我们必须首先访问选项集合,然后请求该集合的单个选项。
现在我们需要更新每个输入元素。为此,请在 functions.php 文件中找到回调函数。第一个选项应如下所示:
function sandbox_toggle_header_callback($args) {

	$html = '<input type="checkbox" id="show_header" name="show_header" value="1" ' . checked(1, get_option('show_header'), false) . '/>';
	$html .= '<label for="show_header"> '  . $args[0] . '</label>';

	echo $html;

} // end sandbox_toggle_header_callback
如上所述,我们的每个选项现在都是集合的一部分,因此我们需要更新引用它们的方式。我们需要...
- 阅读 WordPress 的选项集合
- 访问集合中的单个选项
- 更新输入元素的属性以正确引用选项集合
虽然听起来很多,但步骤很简单。查看下面的代码,密切注意注释:
function sandbox_toggle_header_callback($args) {

	// First, we read the options collection
	$options = get_option('sandbox_theme_display_options');

	// Next, we update the name attribute to access this element's ID in the context of the display options array
	// We also access the show_header element of the options collection in the call to the checked() helper function
	$html = '<input type="checkbox" id="show_header" name="sandbox_theme_display_options[show_header]" value="1" ' . checked(1, $options['show_header'], false) . '/>';

	// Here, we'll take the first argument of the array and add it to a label next to the checkbox
	$html .= '<label for="show_header"> '  . $args[0] . '</label>';

	echo $html;

} // end sandbox_toggle_header_callback
很简单,对吧?由于我们有三个元素,因此我们需要对每个元素进行相应的更改。除了选项名称之外,每个函数看起来几乎相同。它将读取 show_content 或 show_footer,而不是 show_header。
完成后,三个表单元素的最终版本应如下所示:
function sandbox_toggle_header_callback($args) {

	$options = get_option('sandbox_theme_display_options');

	$html = '<input type="checkbox" id="show_header" name="sandbox_theme_display_options[show_header]" value="1" ' . checked(1, $options['show_header'], false) . '/>';
	$html .= '<label for="show_header"> '  . $args[0] . '</label>';

	echo $html;

} // end sandbox_toggle_header_callback

function sandbox_toggle_content_callback($args) {

	$options = get_option('sandbox_theme_display_options');

	$html = '<input type="checkbox" id="show_content" name="sandbox_theme_display_options[show_content]" value="1" ' . checked(1, $options['show_content'], false) . '/>';
	$html .= '<label for="show_content"> '  . $args[0] . '</label>';

	echo $html;

} // end sandbox_toggle_content_callback

function sandbox_toggle_footer_callback($args) {

	$options = get_option('sandbox_theme_display_options');

	$html = '<input type="checkbox" id="show_footer" name="sandbox_theme_display_options[show_footer]" value="1" ' . checked(1, $options['show_footer'], false) . '/>';
	$html .= '<label for="show_footer"> '  . $args[0] . '</label>';

	echo $html;

} // end sandbox_toggle_footer_callback
第 6 步渲染选项
最后,我们准备在新的主题选项页面上呈现选项。只需调用 Settings API 中的两个函数就可以了:
- settings_fields 负责为选项表单呈现多种安全措施。
- do_settings_sections 实际上将选项呈现到页面。
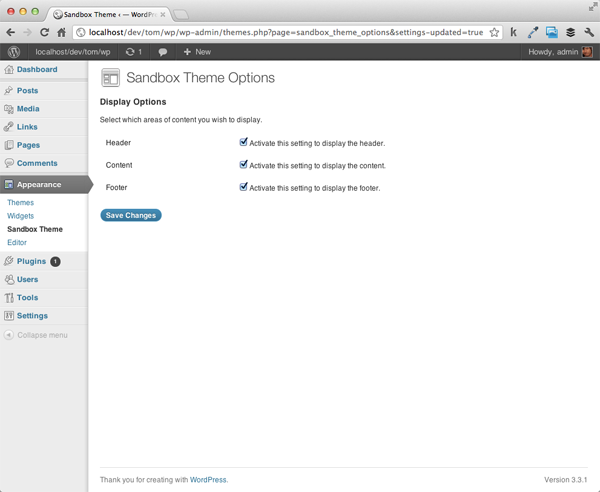
每个函数都采用我们将渲染的页面的 ID。在我们的例子中,这是 sandbox_theme_display_options。为了呈现我们的选项,我们将 form 更新为如下所示:
	<form method="post" action="options.php">
		<?php settings_fields( 'sandbox_theme_display_options' ); ?>
		<?php do_settings_sections( 'sandbox_theme_display_options' ); ?>
		<?php submit_button(); ?>
	</form>
此时,您应该能够刷新沙盒主题选项页面并看到我们的三个选项呈现如下:
functions.php 的最终版本现在应如下所示:
Select which areas of content you wish to display.'; } // end sandbox_general_options_callback function sandbox_toggle_header_callback($args) { // First, we read the options collection $options = get_option('sandbox_theme_display_options'); // Next, we update the name attribute to access this element's ID in the context of the display options array // We also access the show_header element of the options collection in the call to the checked() helper function $html = '<input type="checkbox" id="show_header" name="sandbox_theme_display_options[show_header]" value="1" ' . checked(1, $options['show_header'], false) . '/>'; // Here, we'll take the first argument of the array and add it to a label next to the checkbox $html .= '<label for="show_header"> ' . $args[0] . '</label>'; echo $html; } // end sandbox_toggle_header_callback function sandbox_toggle_content_callback($args) { $options = get_option('sandbox_theme_display_options'); $html = ''; $html .= ''; echo $html; } // end sandbox_toggle_content_callback function sandbox_toggle_footer_callback($args) { $options = get_option('sandbox_theme_display_options'); $html = ''; $html .= ''; echo $html; } // end sandbox_toggle_footer_callback ?>Sandbox Theme Options
引入社交选项
我知道这部分有点详尽。我们采用了之前编写的大量代码并对其进行了重构以适应全新的页面。设置 API 可能具有挑战性!仅仅将现有代码重构到新页面中是不够的。因此,为了确保我们采取了自定义选项页面的流程并从头到尾引入新选项,我们现在将引入一组全新的选项。
为了与我们通常的流程保持一致,让我们准确地计划一下我们要做什么:
- 我们需要创建一个新的字段部分
- 将添加三个字段:一个用于 Facebook,一个用于 Twitter,一个用于 Google+
- 我们需要更新选项页面以呈现这些新选项
创建我们的部分、字段和设置
社交选项部分
首先,让我们继续设置一个新函数并将其添加到 admin_init 挂钩中。该功能专门用于设置我们的社交选项。与我们的显示选项一样,它需要执行检查以确保选项存在,如果不存在,则应该创建它们。
这是初始函数。也请注意评论!
/**
 * Initializes the theme's social options by registering the Sections,
 * Fields, and Settings.
 *
 * This function is registered with the 'admin_init' hook.
 */
function sandbox_theme_intialize_social_options() {

	// If the social options don't exist, create them.
	if( false == get_option( 'sandbox_theme_social_options' ) ) {
		add_option( 'sandbox_theme_social_options' );
	} // end if

} // end sandbox_theme_intialize_social_options
add_action( 'admin_init', 'sandbox_theme_intialize_social_options' );
接下来,我们需要添加新的设置部分。这是在上面的代码之后立即完成的:
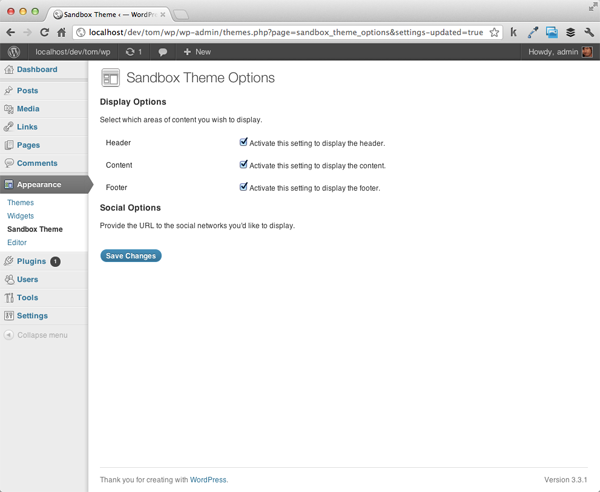
add_settings_section(
	'social_settings_section',			// ID used to identify this section and with which to register options
	'Social Options',					// Title to be displayed on the administration page
	'sandbox_social_options_callback',	// Callback used to render the description of the section
	'sandbox_theme_social_options'		// Page on which to add this section of options
);
但我们注意到已经完成了!回想一下,第三个选项是指本节的回调函数。不要忘记定义它:
function sandbox_social_options_callback() {
	echo '<p>Provide the URL to the social networks you\'d like to display.</p>';
} // end sandbox_general_options_callback
此时,我们可以进行健全性检查,以确保该部分已正确注册到设置 API。跳回 sandbox_theme_display 函数并将以下两行添加到表单元素中。他们可以直接转到 sandbox_theme_display_options 对应项下方:
<?php settings_fields( 'sandbox_theme_social_options' ); ?>
<?php do_settings_sections( 'sandbox_theme_social_options' ); ?>
如果您已正确编写代码,您的选项页面现在应如下所示:
社交选项字段
现在我们准备开始向页面添加社交选项字段。让我们首先为 Twitter 添加一个字段。在调用 add_settings_section 的下面,我们编写以下函数:
add_settings_field(
	'twitter',
	'Twitter',
	'sandbox_twitter_callback',
	'sandbox_theme_social_options',
	'social_settings_section'
);
请注意 - 我们已将回调定义为 sandbox_twitter_callback 因此我们也需要实现该函数。正如我们对之前的选项所做的那样,我们需要获取选项集合,为该选项创建 HTML 元素,并正确设置其属性以引用该选项。请特别注意下面代码中的条件 - 为了清楚起见,对其进行了注释,但这是确保我们不会尝试读取空选项的最佳实践:
function sandbox_twitter_callback() {

	// First, we read the social options collection
	$options = get_option( 'sandbox_theme_social_options' );

	// Next, we need to make sure the element is defined in the options. If not, we'll set an empty string.
	$url = '';
	if( isset( $options['twitter'] ) ) {
		$url = $options['twitter'];
	} // end if

	// Render the output
	echo '<input type="text" id="twitter" name="sandbox_theme_social_options[twitter]" value="' . $options['twitter'] . '" />';

} // end sandbox_twitter_callback
最后,我们跳回 sandbox_theme_intialize_social_options 函数并使用 WordPress 注册新设置:
register_setting(
	'sandbox_theme_social_options',
	'sandbox_theme_social_options',
	'sandbox_theme_sanitize_social_options'
);
这里有一个重要的区别:到目前为止,我们只为 register_setting 函数提供两个参数 – 选项组和选项名称 – 但这一次,我们提供了第三个参数: 回调函数的名称。具体来说,该函数在数据写入数据库之前被调用。它允许您在保存参数之前处理所有参数。一般来说,这是您想要清理数据以防止保存恶意代码或格式错误的信息的时间。
所以让我们继续并删除该函数:
function sandbox_theme_sanitize_social_options( $input ) {
} // end sandbox_theme_sanitize_social_options
请注意,上面的回调接受一个我们命名为 $input 的参数。此参数是社交选项部分存在的选项的集合。由于我们允许用户在输入字段中输入原始文本,因此我们需要防止保存任何恶意代码(例如 JavaScript 或 SQL)。
为此,我们需要执行以下操作:
- 创建一个数组,用于存储处理后的数据
- 循环遍历每个选项并正确清理数据
- 返回更新后的选项集合
让我们继续编写代码来执行此操作。将函数更新为如下所示:
function sandbox_theme_sanitize_social_options( $input ) {

	// Define the array for the updated options
	$output = array();

	// Loop through each of the options sanitizing the data
	foreach( $input as $key => $val ) {

		if( isset ( $input[$key] ) ) {
			$output[$key] = esc_url_raw( strip_tags( stripslashes( $input[$key] ) ) );
		} // end if

	} // end foreach

	// Return the new collection
	return apply_filters( 'sandbox_theme_sanitize_social_options', $output, $input );

} // end sandbox_theme_sanitize_social_options
请注意,上面我们使用了三个函数,每个函数都有助于确保用户提交的数据是干净的:
- stripslashes 是一个原生 PHP 函数,它将“取消引用带引号的”字符串
- strip_tags 是另一个原生 PHP 函数,用于从字符串中删除 HTML 和 PHP 标签
- esc_url_raw 是一个 WordPress 函数,它将强制使用干净的 URL
当然,上述过程很激进,但如果您想确保只允许将 URL 保存到数据库中,那么它是有效的。
请注意,最后一行实际上返回 apply_filters 函数的结果而不是数组本身。这是确保附加到同一钩子的其他函数也将被调用的最佳实践。在这个主题的背景下,显然没有其他功能;但是,这是进行专业主题开发的良好实践。
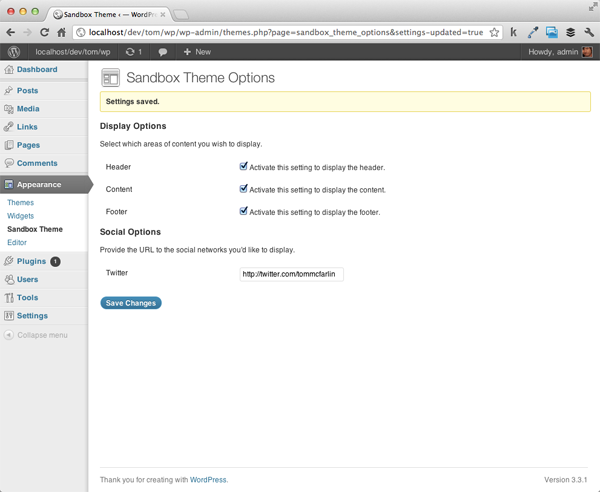
此时,保存您的工作并刷新浏览器。您的选项页面现在不仅应该显示“显示选项”,还应该显示第一个社交选项。更重要的是,您应该能够提供您的 Twitter 个人资料的 URL 并将其保存到数据库中。
包括其余选项
引入 Facebook 和 Google+ 将遵循与添加 Twitter 支持所需的完全相同的步骤。主要是:
- 定义设置字段
- 设置回调
很简单,对吧?由于设置 API,其他一切都已处理完毕。当然,我们需要完整 - 以下是如何添加对以下网络的支持。
首先,我们将定义两个设置字段:
add_settings_field(
	'facebook',
	'Facebook',
	'sandbox_facebook_callback',
	'sandbox_theme_social_options',
	'social_settings_section'
);

add_settings_field(
	'googleplus',
	'Google+',
	'sandbox_googleplus_callback',
	'sandbox_theme_social_options',
	'social_settings_section'
);
接下来,我们将定义它们的两个回调:
function sandbox_facebook_callback() {

	$options = get_option( 'sandbox_theme_social_options' );

	$url = '';
	if( isset( $options['facebook'] ) ) {
		$url = $options['facebook'];
	} // end if

	// Render the output
	echo '<input type="text" id="facebook" name="sandbox_theme_social_options[facebook]" value="' . $options['facebook'] . '" />';

} // end sandbox_facebook_callback

function sandbox_googleplus_callback() {

	$options = get_option( 'sandbox_theme_social_options' );

	$url = '';
	if( isset( $options['googleplus'] ) ) {
		$url = $options['googleplus'];
	} // end if

	// Render the output
	echo '<input type="text" id="googleplus" name="sandbox_theme_social_options[googleplus]" value="' . $options['googleplus'] . '" />';

} // end sandbox_googleplus_callback
保存您的工作,然后再次刷新您的选项页面。现在应该有两个额外的字段 - 一个用于 Facebook,一个用于 Google+。也请随意尝试一下。
关于安全性的说明:虽然此示例可以正常运行,但在将选项保存到数据库时,我们仍然应该采取一些安全措施。在本系列的后面部分,当我们更深入地了解每个输入字段时,我们将研究最佳实践,以确保在保存数据之前对其进行清理。
渲染字段
如果我们不在实际网站上访问它们,那么这些选项有什么用呢?在结束本文之前,让我们对主题的 index 模板进行一些小更新。也就是说,我们需要确保引用我们的新选项并引入显示社交网络的功能:
<!DOCTYPE html>
<html>
	<head>
		<title>The Complete Guide To The Settings API | Sandbox Theme</title>
	</head>
	<body>

		<?php $display_options = get_option( 'sandbox_theme_display_options' ); ?>
		<?php $social_options = get_option ( 'sandbox_theme_social_options' ); ?>

		<?php if( $display_options[ 'show_header' ] ) { ?>
			<div id="header">
				<h1>Sandbox Header</h1>
			</div><!-- /#header -->
		<?php } // end if ?>

		<?php if( $display_options[ 'show_content' ] ) { ?>
			<div id="content">
				<?php echo $social_options['twitter'] ? '<a href="' . $social_options['twitter'] . '">Twitter</a>' : ''; ?>
				<?php echo $social_options['facebook'] ? '<a href="' . $social_options['facebook'] . '">Facebook</a>' : ''; ?>
				<?php echo $social_options['googleplus'] ? '<a href="' . $social_options['googleplus'] . '">Google+</a>' : ''; ?>
			</div><!-- /#content -->
		<?php } // end if ?>

		<?php if( $display_options[ 'show_footer' ] ) { ?>
			<div id="footer">
				<p>© <?php echo date('Y'); ?> All Rights Reserved.</p>
			</div><!-- /#footer -->
		<?php } // end if ?>

	</body>
</html>
结论
这可以说是我们在这个特定系列中曾经(或将会)最激烈的文章。如果您喜欢它,您应该非常适合开始使用设置 API 进行更高级的工作。在接下来的两篇文章中,我们将介绍导航菜单(选项卡式导航和顶级导航)到我们的菜单中。这些文章应该更短一些,代码密集度也更少。之后,我们将研究每种元素类型。
同时,尝试一下我们到目前为止所介绍的内容!
作者注:
非常感谢那些花时间评论并分享此特定帖子问题的人。希望以下内容能够澄清这一点,并继续使其成为尽可能有价值的系列!
在本教程中,我们已经添加了大量代码;但是,仍然没有有效的设置页面。在下一篇文章中,我们将对此进行完善并添加功能,以便真正为这些选项注入一些活力,因此请务必继续阅读。
也就是说,如果您碰巧遇到许多选项未保存或某些验证错误的问题。验证错误已得到修复,最新代码可在 GitHub 上找到,因此请务必查看。请注意,我会保持该项目的最新状态,以便在出现问题时,我会尽快解决它们。
相关来源
- 获取选项
- 添加选项
- admin_init
- 设置字段
- do_settings_section
Ce qui précède est le contenu détaillé de. pour plus d'informations, suivez d'autres articles connexes sur le site Web de PHP en chinois!
Articles Liés
Voir plus- Comment utiliser cURL pour implémenter les requêtes Get et Post en PHP
- Comment utiliser cURL pour implémenter les requêtes Get et Post en PHP
- Comment utiliser cURL pour implémenter les requêtes Get et Post en PHP
- Comment utiliser cURL pour implémenter les requêtes Get et Post en PHP
- Tous les symboles d'expression dans les expressions régulières (résumé)