
Maison >interface Web >Questions et réponses frontales >Comment implémenter la fonction loupe en HTML5
Comment implémenter la fonction loupe en HTML5

- 藏色散人original
- 2023-01-28 11:00:442105parcourir
Comment implémenter la fonction loupe en html5 : 1. Créez un exemple de fichier HTML ; 2. Initialisez l'image à l'aide de la balise canevas html5 ; 3. Obtenez le canevas et les objets image ; 4. Grâce à des méthodes telles que "function drawAnchor( ) {...}" Agrandissez la zone sélectionnée, puis dessinez-la sur l'image originale, en vous assurant que les points centraux des deux zones sont cohérents.

L'environnement d'exploitation de ce tutoriel : système Windows 10, version HTML5, ordinateur DELL G3
Comment implémenter la fonction loupe en html5 ?
【HTML5】Canvas implémente l'effet loupe
Loupe d'image
Effet

Principe
Sélectionnez d'abord une zone de l'image, puis agrandissez cette zone, puis dessinez à l'image originale Assurez-vous que les points centraux des deux zones sont cohérents, comme indiqué dans la figure ci-dessous : 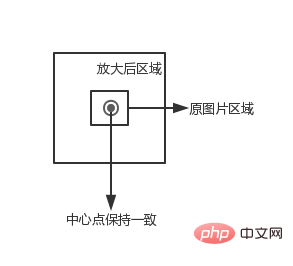
Initialisation
<canvas id="canvas" width="500" height="500">
</canvas>

<img src="image.png" style="display: none" id="img">
obtient le canevas et les objets image, ici le a1f02c36ba31691bcfe87b2722de723b La balise code> est utilisée pour précharger l'image<code>a1f02c36ba31691bcfe87b2722de723b 标签预加载图片
var canvas = document.getElementById("canvas");
var context = canvas.getContext("2d");
var img = document.getElementById("img");
设置相关变量
// 图片被放大区域的中心点,也是放大镜的中心点
var centerPoint = {};
// 图片被放大区域的半径
var originalRadius = 100;
// 图片被放大区域
var originalRectangle = {};
// 放大倍数
var scale = 2;
// 放大后区域
var scaleGlassRectangle
画背景图片
function drawBackGround() {
    context.drawImage(img, 0, 0);
}
计算图片被放大的区域的范围
这里我们使用鼠标的位置作为被放大区域的中心点(放大镜随着鼠标移动而移动),因为 canvas 在画图片的时候,需要知道左上角的坐标以及区域的宽高,所以这里我们计算区域的范围
function calOriginalRectangle(point) {
    originalRectangle.x = point.x - originalRadius;
    originalRectangle.y = point.y - originalRadius;
    originalRectangle.width = originalRadius * 2;
    originalRectangle.height = originalRadius * 2;
}
绘制放大镜区域
裁剪区域
放大镜一般是圆形的,这里我们使用 clip 函数裁剪出一个圆形区域,然后在该区域中绘制放大后的图。一旦裁减了某个区域,以后所有的绘图都会被限制的这个区域里,这里我们使用 save 和 restore 方法清除裁剪区域的影响。save 保存当前画布的一次状态,包含 canvas 的上下文属性,例如 style,lineWidth 等,然后会将这个状态压入一个堆栈。restore 用来恢复上一次 save 的状态,从堆栈里弹出最顶层的状态。
context.save();
context.beginPath();
context.arc(centerPoint.x, centerPoint.y, originalRadius, 0, Math.PI * 2, false);
context.clip();
......
context.restore();
计算放大镜区域
通过中心点、被放大区域的宽高以及放大倍数,获得区域的左上角坐标以及区域的宽高。
scaleGlassRectangle = {
    x: centerPoint.x - originalRectangle.width * scale / 2,
    y: centerPoint.y - originalRectangle.height * scale / 2,
    width: originalRectangle.width * scale,
    height: originalRectangle.height * scale
}
绘制图片
在这里我们使用 context.drawImage(img,sx,sy,swidth,sheight,x,y,width,height); 方法,将 canvas 自身作为一副图片,然后取被放大区域的图像,将其绘制到放大镜区域里。
context.drawImage(canvas,
    originalRectangle.x, originalRectangle.y,
    originalRectangle.width, originalRectangle.height,
    scaleGlassRectangle.x, scaleGlassRectangle.y,
    scaleGlassRectangle.width, scaleGlassRectangle.height
);
绘制放大边缘
createRadialGradient 用来绘制渐变图像
context.beginPath();
var gradient = context.createRadialGradient(
    centerPoint.x, centerPoint.y, originalRadius - 5,
    centerPoint.x, centerPoint.y, originalRadius);
gradient.addColorStop(0, 'rgba(0,0,0,0.2)');
gradient.addColorStop(0.80, 'silver');
gradient.addColorStop(0.90, 'silver');
gradient.addColorStop(1.0, 'rgba(150,150,150,0.9)');

context.strokeStyle = gradient;
context.lineWidth = 5;
context.arc(centerPoint.x, centerPoint.y, originalRadius, 0, Math.PI * 2, false);
context.stroke();
添加鼠标事件
为 canvas 添加鼠标移动事件
canvas.onmousemove = function (e) {
    ......
}
转换坐标
鼠标事件获得坐标一般为屏幕的或者 window 的坐标,我们需要将其装换为 canvas 的坐标。getBoundingClientRect 用于获得页面中某个元素的左,上,右和下分别相对浏览器视窗的位置。
function windowToCanvas(x, y) {
    var bbox = canvas.getBoundingClientRect();
    return {x: x - bbox.left, y: y - bbox.top}
}
修改鼠标样式
我们可以通过 css 来修改鼠标样式
#canvas {
    display: block;
    border: 1px solid red;
    margin: 0 auto;
    cursor: crosshair;
}
图表放大镜
我们可能基于 canvas 绘制一些图表或者图像,如果两个元素的坐标离得比较近,就会给元素的选择带来一些影响,例如我们画两条线,一个线的坐标是(200.5, 400) -> (200.5, 200),另一个线的坐标为 (201.5, 400) -> (201.5, 20)
function Line(xStart, yStart, xEnd, yEnd, index, color) {
    // 起点x坐标
    this.xStart = xStart;
    // 起点y坐标
    this.yStart = yStart;
    // 终点x坐标
    this.xEnd = xEnd;
    // 终点y坐标
    this.yEnd = yEnd;
    // 用来标记是哪条线段
    this.index = index;
    // 线段颜色
    this.color = color;
}
Définir les variables associées

// 原始线段
var chartLines = new Array();
// 处于放大镜中的原始线段
var glassLines;
// 放大后的线段
var scaleGlassLines;
// 位于放大镜中的线段数量
var glassLineSize;

function initLines() {

    var line;
    line = new Line(200.5, 400, 200.5, 200, 0, "#888");
    chartLines.push(line);
    line = new Line(201.5, 400, 201.5, 20, 1, "#888");
    chartLines.push(line);


    glassLineSize = chartLines.length;
    glassLines = new Array(glassLineSize);
    for (var i = 0; i < glassLineSize; i++) {
        line = new Line(0, 0, 0, 0, i);
        glassLines[i] = line;
    }

    scaleGlassLines = new Array(glassLineSize);
    for (var i = 0; i < glassLineSize; i++) {
        line = new Line(0, 0, 0, 0, i);
        scaleGlassLines[i] = line;
    }
}
Dessiner l'image d'arrière-planfunction drawLines() {
var line;
context.lineWidth = 1;
for (var i = 0; i < chartLines.length; i++) {
line = chartLines[i];
context.beginPath();
context.strokeStyle = line.color;
context.moveTo(line.xStart, line.yStart);
context.lineTo(line.xEnd, line.yEnd);
context.stroke();
}
} Calculez l'étendue de la zone où l'image est agrandie
Ici, nous utilisons la souris. La position est utilisée comme point central de la zone agrandie (la loupe bouge lorsque la souris bouge), car le canevas a besoin de connaître les coordonnées du coin supérieur gauche et la largeur et la hauteur de la zone lors du dessin d'une image, donc ici nous calculons la plage de la zone
function calGlassRectangle(point) {
originalRectangle.x = point.x - originalRadius;
originalRectangle.y = point.y - originalRadius;
originalRectangle.width = originalRadius * 2;
originalRectangle.height = originalRadius * 2;
scaleGlassRectangle.width = originalRectangle.width * scale;
scaleGlassRectangle.height = originalRectangle.height * scale;
scaleGlassRectangle.x = originalRectangle.x + originalRectangle.width / 2 - scaleGlassRectangle.width / 2;
scaleGlassRectangle.y = originalRectangle.y + originalRectangle.height / 2 - scaleGlassRectangle.height / 2;
// 将值装换为整数
scaleGlassRectangle.width = parseInt(scaleGlassRectangle.width);
scaleGlassRectangle.height = parseInt(scaleGlassRectangle.height);
scaleGlassRectangle.x = parseInt(scaleGlassRectangle.x);
scaleGlassRectangle.y = parseInt(scaleGlassRectangle.y);
}
Dessiner la zone de la loupeZone de recadrage
La loupe est généralement circulaire. Ici, nous utilisons la fonction clip pour recadrer une zone circulaire, puis dessinons la zone agrandie dans l'image de la zone. Une fois qu'une certaine zone est découpée, tous les futurs dessins seront limités à cette zone. Ici, nous utilisons les méthodes save et restore pour effacer l'impact de la zone découpée. save enregistre un état du canevas actuel, y compris les attributs contextuels du canevas, tels que style, lineWidth, etc., puis pousse cet état dans une pile. restore est utilisé pour restaurer l'état de la dernière sauvegarde et extraire l'état le plus haut de la pile.
function calScaleLines() {
var xStart = originalRectangle.x;
var xEnd = originalRectangle.x + originalRectangle.width;
var yStart = originalRectangle.y;
var yEnd = originalRectangle.y + originalRectangle.height;
var line, gLine, sgLine;
var glassLineIndex = 0;
for (var i = 0; i < chartLines.length; i++) {
line = chartLines[i];
// 判断线段是否在放大镜中
if (line.xStart < xStart || line.xEnd > xEnd) {
continue;
}
if (line.yEnd > yEnd || line.yStart < yStart) {
continue;
}
gLine = glassLines[glassLineIndex];
sgLine = scaleGlassLines[glassLineIndex];
if (line.yEnd > yEnd) {
gLine.yEnd = yEnd;
}
if (line.yStart < yStart) {
gLine.yStart = yStart;
}
gLine.xStart = line.xStart - xStart;
gLine.yStart = line.yStart - yStart;
gLine.xEnd = line.xEnd - xStart;
gLine.yEnd = line.yEnd - yStart;
sgLine.xStart = parseInt(gLine.xStart * scale);
sgLine.yStart = parseInt(gLine.yStart * scale);
sgLine.xEnd = parseInt(gLine.xEnd * scale);
sgLine.yEnd = parseInt(gLine.yEnd * scale);
sgLine.color = line.color;
glassLineIndex++;
}
glassLineSize = glassLineIndex;
} Calculez la zone de la loupe
Utilisez le point central, la largeur et la hauteur de la zone agrandie et le facteur de grossissement pour obtenir les coordonnées du coin supérieur gauche de la zone ainsi que la largeur et la hauteur de la zone.
function drawAnchor() {
context.beginPath();
context.lineWidth = 2;
context.fillStyle = "#fff";
context.strokeStyle = "#000";
context.arc(parseInt(centerPoint.x), parseInt(centerPoint.y), 10, 0, Math.PI * 2, false);
var radius = 15;
context.moveTo(parseInt(centerPoint.x - radius), parseInt(centerPoint.y));
context.lineTo(parseInt(centerPoint.x + radius), parseInt(centerPoint.y));
context.moveTo(parseInt(centerPoint.x), parseInt(centerPoint.y - radius));
context.lineTo(parseInt(centerPoint.x), parseInt(centerPoint.y + radius));
//context.fill();
context.stroke();
} Dessiner des images🎜Ici, nous utilisons la méthode
 context.drawImage(img,sx,sy,swidth,sheight,x,y,width,height); pour utiliser la toile elle-même comme image , puis prenez l'image de la zone agrandie et dessinez-la dans la zone de la loupe. 🎜function drawMagnifyingGlass() {
calScaleLines();
context.save();
context.beginPath();
context.arc(centerPoint.x, centerPoint.y, originalRadius, 0, Math.PI * 2, false);
context.clip();
context.beginPath();
context.fillStyle = "#fff";
context.arc(centerPoint.x, centerPoint.y, originalRadius, 0, Math.PI * 2, false);
context.fill();
context.lineWidth = 4;
for (var i = 0; i < glassLineSize; i++) {
context.beginPath();
context.strokeStyle = scaleGlassLines[i].color;
context.moveTo(scaleGlassRectangle.x + scaleGlassLines[i].xStart, scaleGlassRectangle.y + scaleGlassLines[i].yStart);
context.lineTo(scaleGlassRectangle.x + scaleGlassLines[i].xEnd, scaleGlassRectangle.y + scaleGlassLines[i].yEnd);
context.stroke();
}
context.restore();
context.beginPath();
var gradient = context.createRadialGradient(
parseInt(centerPoint.x), parseInt(centerPoint.y), originalRadius - 5,
parseInt(centerPoint.x), parseInt(centerPoint.y), originalRadius);
gradient.addColorStop(0.50, 'silver');
gradient.addColorStop(0.90, 'silver');
gradient.addColorStop(1, 'black');
context.strokeStyle = gradient;
context.lineWidth = 5;
context.arc(parseInt(centerPoint.x), parseInt(centerPoint.y), originalRadius, 0, Math.PI * 2, false);
context.stroke();
drawAnchor();
}🎜Dessinez le bord agrandi🎜🎜createRadialGradient est utilisé pour dessiner des images dégradées🎜canvas.onmousedown = function (e) {
var point = windowToCanvas(e.clientX, e.clientY);
var x1, x2, y1, y2, dis;
x1 = point.x;
y1 = point.y;
x2 = centerPoint.x;
y2 = centerPoint.y;
dis = Math.pow(x2 - x1, 2) + Math.pow(y2 - y1, 2);
if (dis < Math.pow(originalRadius, 2)) {
lastPoint.x = point.x;
lastPoint.y = point.y;
moveGlass = true;
}
}
canvas.onmousemove = function (e) {
if (moveGlass) {
var xDis, yDis;
var point = windowToCanvas(e.clientX, e.clientY);
xDis = point.x - lastPoint.x;
yDis = point.y - lastPoint.y;
centerPoint.x += xDis;
centerPoint.y += yDis;
lastPoint.x = point.x;
lastPoint.y = point.y;
draw();
}
}
canvas.onmouseup = function (e) {
moveGlass = false;
}Ajouter un événement de souris🎜🎜Ajouter un événement de mouvement de la souris au canevas🎜canvas.ondblclick = function (e) {
var xStart, xEnd, yStart, yEnd;
var clickPoint = {};
clickPoint.x = scaleGlassRectangle.x + scaleGlassRectangle.width / 2;
clickPoint.y = scaleGlassRectangle.y + scaleGlassRectangle.height / 2;
var index = -1;
for (var i = 0; i < scaleGlassLines.length; i++) {
var scaleLine = scaleGlassLines[i];
xStart = scaleGlassRectangle.x + scaleLine.xStart - 3;
xEnd = scaleGlassRectangle.x + scaleLine.xStart + 3;
yStart = scaleGlassRectangle.y + scaleLine.yStart;
yEnd = scaleGlassRectangle.y + scaleLine.yEnd;
if (clickPoint.x > xStart && clickPoint.x < xEnd && clickPoint.y < yStart && clickPoint.y > yEnd) {
scaleLine.color = "#f00";
index = scaleLine.index;
break;
}
}
for (var i = 0; i < chartLines.length; i++) {
var line = chartLines[i];
if (line.index == index) {
line.color = "#f00";
} else {
line.color = "#888";
}
}
draw();
}🎜Convertir coordinates🎜 🎜Les coordonnées obtenues par les événements de souris sont généralement des coordonnées d'écran ou de fenêtre, et nous devons les convertir en coordonnées de canevas. getBoundingClientRect est utilisé pour obtenir les positions gauche, haut, droite et bas d'un élément de la page par rapport à la fenêtre du navigateur. 🎜document.onkeyup = function (e) {
if (e.key == 'w') {
centerPoint.y = intAdd(centerPoint.y, -0.2);
}
if (e.key == 'a') {
centerPoint.x = intAdd(centerPoint.x, -0.2);
}
if (e.key == 's') {
centerPoint.y = intAdd(centerPoint.y, 0.2);
}
if (e.key == 'd') {
centerPoint.x = intAdd(centerPoint.x, 0.2);
}
draw();
}🎜Modifier le style de la souris🎜🎜Nous pouvons modifier le style de la souris via CSS🎜rrreeeChart Magnifier🎜🎜Nous pouvons dessiner des graphiques ou des images basés sur le canevas, si les coordonnées de deux éléments sont relativement éloignées à part Cela aura un certain impact sur la sélection des éléments. Par exemple, si nous dessinons deux lignes, les coordonnées d'une ligne sont (200.5, 400) -> les coordonnées de l'autre ligne sont Les coordonnées sont (201.5, 400) -> (201.5, 20), alors les deux lignes se chevaucheront presque, comme le montre la figure ci-dessous : 🎜🎜🎜🎜La effet de l'utilisation de la loupe de la carte🎜 🎜🎜🎜Principe🎜🎜Semblable à la légende de la carte, la loupe utilise une légende plus précise, comme le montre la figure ci-dessous : 🎜🎜🎜🎜Dans le système de coordonnées de la loupe, le la zone d'origine deviendra plus grande, comme le montre la figure ci-dessous🎜🎜🎜绘制原始线段
首先创建一个线段对象
function Line(xStart, yStart, xEnd, yEnd, index, color) {
// 起点x坐标
this.xStart = xStart;
// 起点y坐标
this.yStart = yStart;
// 终点x坐标
this.xEnd = xEnd;
// 终点y坐标
this.yEnd = yEnd;
// 用来标记是哪条线段
this.index = index;
// 线段颜色
this.color = color;
}初始化线段
// 原始线段
var chartLines = new Array();
// 处于放大镜中的原始线段
var glassLines;
// 放大后的线段
var scaleGlassLines;
// 位于放大镜中的线段数量
var glassLineSize;
function initLines() {
var line;
line = new Line(200.5, 400, 200.5, 200, 0, "#888");
chartLines.push(line);
line = new Line(201.5, 400, 201.5, 20, 1, "#888");
chartLines.push(line);
glassLineSize = chartLines.length;
glassLines = new Array(glassLineSize);
for (var i = 0; i < glassLineSize; i++) {
line = new Line(0, 0, 0, 0, i);
glassLines[i] = line;
}
scaleGlassLines = new Array(glassLineSize);
for (var i = 0; i < glassLineSize; i++) {
line = new Line(0, 0, 0, 0, i);
scaleGlassLines[i] = line;
}
}绘制线段
function drawLines() {
    var line;
    context.lineWidth = 1;

    for (var i = 0; i < chartLines.length; i++) {
        line = chartLines[i];
        context.beginPath();
        context.strokeStyle = line.color;
        context.moveTo(line.xStart, line.yStart);
        context.lineTo(line.xEnd, line.yEnd);
        context.stroke();
    }
}计算原始区域和放大镜区域
function calGlassRectangle(point) {
    originalRectangle.x = point.x - originalRadius;
    originalRectangle.y = point.y - originalRadius;
    originalRectangle.width = originalRadius * 2;
    originalRectangle.height = originalRadius * 2;

    scaleGlassRectangle.width = originalRectangle.width * scale;
    scaleGlassRectangle.height = originalRectangle.height * scale;
    scaleGlassRectangle.x = originalRectangle.x + originalRectangle.width / 2 - scaleGlassRectangle.width / 2;
    scaleGlassRectangle.y = originalRectangle.y + originalRectangle.height / 2 - scaleGlassRectangle.height / 2;

    // 将值装换为整数
    scaleGlassRectangle.width = parseInt(scaleGlassRectangle.width);
    scaleGlassRectangle.height = parseInt(scaleGlassRectangle.height);
    scaleGlassRectangle.x = parseInt(scaleGlassRectangle.x);
    scaleGlassRectangle.y = parseInt(scaleGlassRectangle.y);
}计算线段在新坐标系统的位置
由原理图我们知道,放大镜中使用坐标系的图例要比原始坐标系更加精确,比如原始坐标系使用 1:100,那么放大镜坐标系使用 1:10,因此我们需要重新计算线段在放大镜坐标系中的位置。同时为了简便,我们将线段的原始坐标进行了转化,减去原始区域起始的x值和y值,即将原始区域左上角的点看做为(0,0)。
function calScaleLines() {
    var xStart = originalRectangle.x;
    var xEnd = originalRectangle.x + originalRectangle.width;
    var yStart = originalRectangle.y;
    var yEnd = originalRectangle.y + originalRectangle.height;
    var line, gLine, sgLine;
    var glassLineIndex = 0;
    for (var i = 0; i < chartLines.length; i++) {
        line = chartLines[i];

        // 判断线段是否在放大镜中
        if (line.xStart < xStart || line.xEnd > xEnd) {
            continue;
        }
        if (line.yEnd > yEnd || line.yStart < yStart) {
            continue;
        }

        gLine = glassLines[glassLineIndex];
        sgLine = scaleGlassLines[glassLineIndex];
        if (line.yEnd > yEnd) {
            gLine.yEnd = yEnd;
        }
        if (line.yStart < yStart) {
            gLine.yStart = yStart;
        }

        gLine.xStart = line.xStart - xStart;
        gLine.yStart = line.yStart - yStart;
        gLine.xEnd = line.xEnd - xStart;
        gLine.yEnd = line.yEnd - yStart;

        sgLine.xStart = parseInt(gLine.xStart * scale);
        sgLine.yStart = parseInt(gLine.yStart * scale);
        sgLine.xEnd = parseInt(gLine.xEnd * scale);
        sgLine.yEnd = parseInt(gLine.yEnd * scale);
        sgLine.color = line.color;
        glassLineIndex++;
    }
    glassLineSize = glassLineIndex;
}绘制放大镜中心点
绘制放大镜中心的瞄准器
function drawAnchor() {
    context.beginPath();
    context.lineWidth = 2;
    context.fillStyle = "#fff";
    context.strokeStyle = "#000";
    context.arc(parseInt(centerPoint.x), parseInt(centerPoint.y), 10, 0, Math.PI * 2, false);

    var radius = 15;
    context.moveTo(parseInt(centerPoint.x - radius), parseInt(centerPoint.y));
    context.lineTo(parseInt(centerPoint.x + radius), parseInt(centerPoint.y));
    context.moveTo(parseInt(centerPoint.x), parseInt(centerPoint.y - radius));
    context.lineTo(parseInt(centerPoint.x), parseInt(centerPoint.y + radius));
    //context.fill();
    context.stroke();
}绘制放大镜
function drawMagnifyingGlass() {
calScaleLines();
context.save();
context.beginPath();
context.arc(centerPoint.x, centerPoint.y, originalRadius, 0, Math.PI * 2, false);
context.clip();
context.beginPath();
context.fillStyle = "#fff";
context.arc(centerPoint.x, centerPoint.y, originalRadius, 0, Math.PI * 2, false);
context.fill();
context.lineWidth = 4;
for (var i = 0; i < glassLineSize; i++) {
context.beginPath();
context.strokeStyle = scaleGlassLines[i].color;
context.moveTo(scaleGlassRectangle.x + scaleGlassLines[i].xStart, scaleGlassRectangle.y + scaleGlassLines[i].yStart);
context.lineTo(scaleGlassRectangle.x + scaleGlassLines[i].xEnd, scaleGlassRectangle.y + scaleGlassLines[i].yEnd);
context.stroke();
}
context.restore();
context.beginPath();
var gradient = context.createRadialGradient(
parseInt(centerPoint.x), parseInt(centerPoint.y), originalRadius - 5,
parseInt(centerPoint.x), parseInt(centerPoint.y), originalRadius);
gradient.addColorStop(0.50, 'silver');
gradient.addColorStop(0.90, 'silver');
gradient.addColorStop(1, 'black');
context.strokeStyle = gradient;
context.lineWidth = 5;
context.arc(parseInt(centerPoint.x), parseInt(centerPoint.y), originalRadius, 0, Math.PI * 2, false);
context.stroke();
drawAnchor();
}添加事件
鼠标拖动
鼠标移动到放大镜上,然后按下鼠标左键,可以拖动放大镜,不按鼠标左键或者不在放大镜区域都不可以拖动放大镜。
为了实现上面的效果,我们要实现3种事件 mousedown, mousemove, 'mouseup', 当鼠标按下时,检测是否在放大镜区域,如果在,设置放大镜可以移动。鼠标移动时更新放大镜中兴点的坐标。鼠标松开时,设置放大镜不可以被移动。
canvas.onmousedown = function (e) {
    var point = windowToCanvas(e.clientX, e.clientY);
    var x1, x2, y1, y2, dis;

    x1 = point.x;
    y1 = point.y;
    x2 = centerPoint.x;
    y2 = centerPoint.y;
    dis = Math.pow(x2 - x1, 2) + Math.pow(y2 - y1, 2);
    if (dis < Math.pow(originalRadius, 2)) {
        lastPoint.x = point.x;
        lastPoint.y = point.y;
        moveGlass = true;
    }
}

canvas.onmousemove = function (e) {
    if (moveGlass) {
        var xDis, yDis;
        var point = windowToCanvas(e.clientX, e.clientY);
        xDis = point.x - lastPoint.x;
        yDis = point.y - lastPoint.y;
        centerPoint.x += xDis;
        centerPoint.y += yDis;
        lastPoint.x = point.x;
        lastPoint.y = point.y;
        draw();
    }
}

canvas.onmouseup = function (e) {
    moveGlass = false;
}鼠标双击
当移动到对应的线段上时,鼠标双击可以选择该线段,将该线段的颜色变为红色。
canvas.ondblclick = function (e) {
    var xStart, xEnd, yStart, yEnd;
    var clickPoint = {};
    clickPoint.x = scaleGlassRectangle.x + scaleGlassRectangle.width / 2;
    clickPoint.y = scaleGlassRectangle.y + scaleGlassRectangle.height / 2;
    var index = -1;

    for (var i = 0; i < scaleGlassLines.length; i++) {
        var scaleLine = scaleGlassLines[i];

        xStart = scaleGlassRectangle.x + scaleLine.xStart - 3;
        xEnd = scaleGlassRectangle.x + scaleLine.xStart + 3;
        yStart = scaleGlassRectangle.y + scaleLine.yStart;
        yEnd = scaleGlassRectangle.y + scaleLine.yEnd;

        if (clickPoint.x > xStart && clickPoint.x < xEnd && clickPoint.y < yStart && clickPoint.y > yEnd) {
            scaleLine.color = "#f00";
            index = scaleLine.index;
            break;
        }
    }

    for (var i = 0; i < chartLines.length; i++) {
        var line = chartLines[i];
        if (line.index == index) {
            line.color = "#f00";
        } else {
            line.color = "#888";
        }
    }

    draw();
}键盘事件
因为线段离得比较近,所以使用鼠标移动很难精确的选中线段,这里使用键盘的w, a, s, d 来进行精确移动
document.onkeyup = function (e) {
    if (e.key == 'w') {
        centerPoint.y = intAdd(centerPoint.y, -0.2);
    }
    if (e.key == 'a') {
        centerPoint.x = intAdd(centerPoint.x, -0.2);
    }
    if (e.key == 's') {
        centerPoint.y = intAdd(centerPoint.y, 0.2);
    }
    if (e.key == 'd') {
        centerPoint.x = intAdd(centerPoint.x, 0.2);
    }
    draw();
}推荐学习:《HTML5视频教程》
(200.5, 400) -> les coordonnées de l'autre ligne sont Les coordonnées sont (201.5, 400) -> (201.5, 20), alors les deux lignes se chevaucheront presque, comme le montre la figure ci-dessous : 🎜🎜🎜🎜La effet de l'utilisation de la loupe de la carte🎜 🎜🎜🎜Principe🎜🎜Semblable à la légende de la carte, la loupe utilise une légende plus précise, comme le montre la figure ci-dessous : 🎜🎜🎜🎜Dans le système de coordonnées de la loupe, le la zone d'origine deviendra plus grande, comme le montre la figure ci-dessous🎜🎜🎜绘制原始线段
首先创建一个线段对象
function Line(xStart, yStart, xEnd, yEnd, index, color) {
// 起点x坐标
this.xStart = xStart;
// 起点y坐标
this.yStart = yStart;
// 终点x坐标
this.xEnd = xEnd;
// 终点y坐标
this.yEnd = yEnd;
// 用来标记是哪条线段
this.index = index;
// 线段颜色
this.color = color;
}初始化线段
// 原始线段
var chartLines = new Array();
// 处于放大镜中的原始线段
var glassLines;
// 放大后的线段
var scaleGlassLines;
// 位于放大镜中的线段数量
var glassLineSize;
function initLines() {
var line;
line = new Line(200.5, 400, 200.5, 200, 0, "#888");
chartLines.push(line);
line = new Line(201.5, 400, 201.5, 20, 1, "#888");
chartLines.push(line);
glassLineSize = chartLines.length;
glassLines = new Array(glassLineSize);
for (var i = 0; i < glassLineSize; i++) {
line = new Line(0, 0, 0, 0, i);
glassLines[i] = line;
}
scaleGlassLines = new Array(glassLineSize);
for (var i = 0; i < glassLineSize; i++) {
line = new Line(0, 0, 0, 0, i);
scaleGlassLines[i] = line;
}
}绘制线段
function drawLines() {
var line;
context.lineWidth = 1;
for (var i = 0; i < chartLines.length; i++) {
line = chartLines[i];
context.beginPath();
context.strokeStyle = line.color;
context.moveTo(line.xStart, line.yStart);
context.lineTo(line.xEnd, line.yEnd);
context.stroke();
}
}计算原始区域和放大镜区域
function calGlassRectangle(point) {
originalRectangle.x = point.x - originalRadius;
originalRectangle.y = point.y - originalRadius;
originalRectangle.width = originalRadius * 2;
originalRectangle.height = originalRadius * 2;
scaleGlassRectangle.width = originalRectangle.width * scale;
scaleGlassRectangle.height = originalRectangle.height * scale;
scaleGlassRectangle.x = originalRectangle.x + originalRectangle.width / 2 - scaleGlassRectangle.width / 2;
scaleGlassRectangle.y = originalRectangle.y + originalRectangle.height / 2 - scaleGlassRectangle.height / 2;
// 将值装换为整数
scaleGlassRectangle.width = parseInt(scaleGlassRectangle.width);
scaleGlassRectangle.height = parseInt(scaleGlassRectangle.height);
scaleGlassRectangle.x = parseInt(scaleGlassRectangle.x);
scaleGlassRectangle.y = parseInt(scaleGlassRectangle.y);
}计算线段在新坐标系统的位置
由原理图我们知道,放大镜中使用坐标系的图例要比原始坐标系更加精确,比如原始坐标系使用 1:100,那么放大镜坐标系使用 1:10,因此我们需要重新计算线段在放大镜坐标系中的位置。同时为了简便,我们将线段的原始坐标进行了转化,减去原始区域起始的x值和y值,即将原始区域左上角的点看做为(0,0)。
function calScaleLines() {
var xStart = originalRectangle.x;
var xEnd = originalRectangle.x + originalRectangle.width;
var yStart = originalRectangle.y;
var yEnd = originalRectangle.y + originalRectangle.height;
var line, gLine, sgLine;
var glassLineIndex = 0;
for (var i = 0; i < chartLines.length; i++) {
line = chartLines[i];
// 判断线段是否在放大镜中
if (line.xStart < xStart || line.xEnd > xEnd) {
continue;
}
if (line.yEnd > yEnd || line.yStart < yStart) {
continue;
}
gLine = glassLines[glassLineIndex];
sgLine = scaleGlassLines[glassLineIndex];
if (line.yEnd > yEnd) {
gLine.yEnd = yEnd;
}
if (line.yStart < yStart) {
gLine.yStart = yStart;
}
gLine.xStart = line.xStart - xStart;
gLine.yStart = line.yStart - yStart;
gLine.xEnd = line.xEnd - xStart;
gLine.yEnd = line.yEnd - yStart;
sgLine.xStart = parseInt(gLine.xStart * scale);
sgLine.yStart = parseInt(gLine.yStart * scale);
sgLine.xEnd = parseInt(gLine.xEnd * scale);
sgLine.yEnd = parseInt(gLine.yEnd * scale);
sgLine.color = line.color;
glassLineIndex++;
}
glassLineSize = glassLineIndex;
}绘制放大镜中心点
绘制放大镜中心的瞄准器
function drawAnchor() {
context.beginPath();
context.lineWidth = 2;
context.fillStyle = "#fff";
context.strokeStyle = "#000";
context.arc(parseInt(centerPoint.x), parseInt(centerPoint.y), 10, 0, Math.PI * 2, false);
var radius = 15;
context.moveTo(parseInt(centerPoint.x - radius), parseInt(centerPoint.y));
context.lineTo(parseInt(centerPoint.x + radius), parseInt(centerPoint.y));
context.moveTo(parseInt(centerPoint.x), parseInt(centerPoint.y - radius));
context.lineTo(parseInt(centerPoint.x), parseInt(centerPoint.y + radius));
//context.fill();
context.stroke();
}绘制放大镜
function drawMagnifyingGlass() {
calScaleLines();
context.save();
context.beginPath();
context.arc(centerPoint.x, centerPoint.y, originalRadius, 0, Math.PI * 2, false);
context.clip();
context.beginPath();
context.fillStyle = "#fff";
context.arc(centerPoint.x, centerPoint.y, originalRadius, 0, Math.PI * 2, false);
context.fill();
context.lineWidth = 4;
for (var i = 0; i < glassLineSize; i++) {
context.beginPath();
context.strokeStyle = scaleGlassLines[i].color;
context.moveTo(scaleGlassRectangle.x + scaleGlassLines[i].xStart, scaleGlassRectangle.y + scaleGlassLines[i].yStart);
context.lineTo(scaleGlassRectangle.x + scaleGlassLines[i].xEnd, scaleGlassRectangle.y + scaleGlassLines[i].yEnd);
context.stroke();
}
context.restore();
context.beginPath();
var gradient = context.createRadialGradient(
parseInt(centerPoint.x), parseInt(centerPoint.y), originalRadius - 5,
parseInt(centerPoint.x), parseInt(centerPoint.y), originalRadius);
gradient.addColorStop(0.50, 'silver');
gradient.addColorStop(0.90, 'silver');
gradient.addColorStop(1, 'black');
context.strokeStyle = gradient;
context.lineWidth = 5;
context.arc(parseInt(centerPoint.x), parseInt(centerPoint.y), originalRadius, 0, Math.PI * 2, false);
context.stroke();
drawAnchor();
}添加事件
鼠标拖动
鼠标移动到放大镜上,然后按下鼠标左键,可以拖动放大镜,不按鼠标左键或者不在放大镜区域都不可以拖动放大镜。
为了实现上面的效果,我们要实现3种事件 mousedown, mousemove, 'mouseup', 当鼠标按下时,检测是否在放大镜区域,如果在,设置放大镜可以移动。鼠标移动时更新放大镜中兴点的坐标。鼠标松开时,设置放大镜不可以被移动。
canvas.onmousedown = function (e) {
var point = windowToCanvas(e.clientX, e.clientY);
var x1, x2, y1, y2, dis;
x1 = point.x;
y1 = point.y;
x2 = centerPoint.x;
y2 = centerPoint.y;
dis = Math.pow(x2 - x1, 2) + Math.pow(y2 - y1, 2);
if (dis < Math.pow(originalRadius, 2)) {
lastPoint.x = point.x;
lastPoint.y = point.y;
moveGlass = true;
}
}
canvas.onmousemove = function (e) {
if (moveGlass) {
var xDis, yDis;
var point = windowToCanvas(e.clientX, e.clientY);
xDis = point.x - lastPoint.x;
yDis = point.y - lastPoint.y;
centerPoint.x += xDis;
centerPoint.y += yDis;
lastPoint.x = point.x;
lastPoint.y = point.y;
draw();
}
}
canvas.onmouseup = function (e) {
moveGlass = false;
}鼠标双击
当移动到对应的线段上时,鼠标双击可以选择该线段,将该线段的颜色变为红色。
canvas.ondblclick = function (e) {
var xStart, xEnd, yStart, yEnd;
var clickPoint = {};
clickPoint.x = scaleGlassRectangle.x + scaleGlassRectangle.width / 2;
clickPoint.y = scaleGlassRectangle.y + scaleGlassRectangle.height / 2;
var index = -1;
for (var i = 0; i < scaleGlassLines.length; i++) {
var scaleLine = scaleGlassLines[i];
xStart = scaleGlassRectangle.x + scaleLine.xStart - 3;
xEnd = scaleGlassRectangle.x + scaleLine.xStart + 3;
yStart = scaleGlassRectangle.y + scaleLine.yStart;
yEnd = scaleGlassRectangle.y + scaleLine.yEnd;
if (clickPoint.x > xStart && clickPoint.x < xEnd && clickPoint.y < yStart && clickPoint.y > yEnd) {
scaleLine.color = "#f00";
index = scaleLine.index;
break;
}
}
for (var i = 0; i < chartLines.length; i++) {
var line = chartLines[i];
if (line.index == index) {
line.color = "#f00";
} else {
line.color = "#888";
}
}
draw();
}键盘事件
因为线段离得比较近,所以使用鼠标移动很难精确的选中线段,这里使用键盘的w, a, s, d 来进行精确移动
document.onkeyup = function (e) {
if (e.key == 'w') {
centerPoint.y = intAdd(centerPoint.y, -0.2);
}
if (e.key == 'a') {
centerPoint.x = intAdd(centerPoint.x, -0.2);
}
if (e.key == 's') {
centerPoint.y = intAdd(centerPoint.y, 0.2);
}
if (e.key == 'd') {
centerPoint.x = intAdd(centerPoint.x, 0.2);
}
draw();
}推荐学习:《HTML5视频教程》
Ce qui précède est le contenu détaillé de. pour plus d'informations, suivez d'autres articles connexes sur le site Web de PHP en chinois!
Articles Liés
Voir plus- Qu'est-ce que la technologie hors écran sur toile ? Comment obtenir un effet loupe sur toile ?
- Image loupe exemple d'utilisation de jquery.jqzoom.js avec icône en forme de loupe
- Exemple de code d'implémentation de la technologie Canvas hors écran et de la loupe
- Introduction à deux méthodes d'implémentation de la loupe Taobao en JavaScript (exemples de code)
- Utilisez jQuery pour implémenter une loupe d'image