Maison >Applet WeChat >Développement de mini-programmes >Résumé des fonctions communes pour le développement du mini-programme WeChat
Résumé des fonctions communes pour le développement du mini-programme WeChat
- WBOYWBOYWBOYWBOYWBOYWBOYWBOYWBOYWBOYWBOYWBOYWBOYWBavant
- 2022-08-30 13:56:233795parcourir
Cet article vous apporte des connaissances pertinentes sur le WeChat Mini Program. Il présente principalement les fonctions courantes du développement du WeChat Mini Program. Cet article vous présente en détail à travers un exemple de code, qui a certaines références pour votre étude ou votre travail. j'espère que cela sera utile à tout le monde.

【Recommandations d'apprentissage associées : Tutoriel d'apprentissage du mini programme】
Obtenir des informations sur l'utilisateur
Appelez la méthode wx.getUserProfile pour obtenir les informations de base de l'utilisateur. Il ne peut être appelé qu'après qu'un événement de clic se produit sur la page (par exemple, lors du rappel de bindtap sur button). Une fenêtre d'autorisation apparaîtra pour chaque requête, et userInfo sera renvoyé une fois que l'utilisateur aura accepté code><code>wx.getUserProfile 方法获取用户基本信息。页面产生点击事件(例如 button 上 bindtap 的回调中)后才可调用,每次请求都会弹出授权窗口,用户同意后返回 userInfo
具体参数如下:
| 属性 | 类型 | 默认值 | 必填 | 说明 |
|---|---|---|---|---|
| lang | string | en | 否 | 显示用户信息的语言 |
| desc | string | 是 | 声明获取用户个人信息后的用途,不超过30个字符 | |
| success | function | 否 | 接口调用成功的回调函数 | |
| fail | function | 否 | 接口调用失败的回调函数 | |
| complete | function | 否 | 接口调用结束的回调函数(调用成功、失败都会执行) |
示例代码
wx.getUserProfile({
    desc: '用于完善用户基本资料', // 声明获取用户个人信息后的用途,不超过30个字符
    success: (res) => {
        console.log(res.userInfo));
    }
})
获取到的返回值
{
  "nickName": "秋梓", // 微信昵称
  "gender": 0,
  "language": "zh_CN",
  "city": "",
  "province": "",
  "country": "",
  "avatarUrl": "https://thirdwx.qlogo.cn/mmopen/vi_32/qrSYVbDbBhunywgP5HTx4mhT8HVNzhmlibd8pfYo4guPJ5w/132" // 头像
}
获取手机号
目前该接口针对非个人开发者,且完成了认证的小程序开放(不包含海外主体)。需谨慎使用,若用户举报较多或被发现在不必要场景下使用,微信有权永久回收该小程序的该接口权限。
使用方法
需要将 button 组件 open-type 的值设置为 getPhoneNumber,当用户点击并同意之后,可以通过 bindgetphonenumber 事件回调获取到动态令牌code,然后把code传到开发者后台,并在开发者后台调用微信后台提供的 phonenumber.getPhoneNumber 接口,消费code来换取用户手机号。每个code有效期为5分钟,且只能消费一次。
注:getPhoneNumber 返回的 code 与 wx.login 返回的 code
| Valeur par défaut | Obligatoire | Description | |
|---|---|---|---|
| string | fr | No | Langue pour afficher les informations de l'utilisateur |
| succès | fonction | Non | ||
|---|---|---|---|---|
| échec | fonction | Non | ||
| complète | fonction | Non |
Page({
  getPhoneNumber (e) {
    console.log(e.detail.code)
  }
}) | Obtenir le numéro de téléphone portableActuellement, cette interface est ouverte aux développeurs non individuels et aux mini programmes ayant obtenu une certification (hors entités étrangères). Il doit être utilisé avec prudence s'il y a trop de rapports d'utilisateurs ou s'il s'avère utilisé dans des scénarios inutiles, WeChat a le droit de révoquer définitivement les autorisations d'interface du mini-programme. | Utilisation |
|---|---|---|
| Remarque : Le | Échantillon de code | POST https://api.weixin.qq.com/wxa/business/getuserphonenumber?access_token=ACCESS_TOKEN {
"errcode":0,
"errmsg":"ok",
"phone_info": {
"phoneNumber":"xxxxxx",
"purePhoneNumber": "xxxxxx",
"countryCode": 86,
"watermark": {
"timestamp": 1637744274,
"appid": "xxxx"
}
}
} | Description du paramètre de retour
| Paramètre | Type | |
| Version minimale | code |
返回结果示例
{
    "errcode":0,
    "errmsg":"ok",
    "phone_info": {
        "phoneNumber":"xxxxxx",
        "purePhoneNumber": "xxxxxx",
        "countryCode": 86,
        "watermark": {
            "timestamp": 1637744274,
            "appid": "xxxx"
        }
    }
}实现微信支付
唤起微信支付的核心方法调用 wx.requestPayment 方法,该方法具体参数如下
| 属性 | 类型 | 默认值 | 必填 | 说明 |
|---|---|---|---|---|
| timeStamp | string | 是 | 时间戳,从 1970 年 1 月 1 日 00:00:00 至今的秒数,即当前的时间 | |
| nonceStr | string | 是 | 随机字符串,长度为32个字符以下 | |
| package | string | 是 | 统一下单接口返回的 prepay_id 参数值,提交格式如:prepay_id=*** | |
| signType | string |
MD5 仅在 v2 版本接口适用 |
否 | 签名算法,应与后台下单时的值一致 |
HMAC-SHA256 仅在 v2 版本接口适用 |
||||
RSA 仅在 v3 版本接口适用 |
||||
| paySign | string | 是 | 签名,具体见微信支付文档 | |
| success | function | 否 | 接口调用成功的回调函数 | |
| fail | function | 否 | 接口调用失败的回调函数 | |
| complete | function | 否 | 接口调用结束的回调函数(调用成功、失败都会执行) |
/**
 * 微信支付方法
 * @param {string} oderId 订单id
 * @param {string} total 订单金额
 * @param {stromg} openId 登陆人openid
 */
function weixinPayFun(data) {
  wx.showLoading({
    mask: true
  })
  const http = new Http()
  return new Promise((resolve, reject) => {
    // 请求支付接口
    http.post(`${env.fayongApi}/app/shopping/order/pay`, data).then(res => {
      // 获取支付签名信息
      let payInfo = res.data
      // 调起微信支付
      wx.requestPayment({
        "timeStamp": payInfo.timeStamp + '',
        "nonceStr": payInfo.nonceStr,
        "package": payInfo.package,
        "signType": "RSA",
        "paySign": payInfo.paySign,
        "success": function (res) {
          console.log(res, 'success');
          // 支付成功
          resolve(res)
        },
        "fail": function (err) {
          // 支付失败
          reject(err)
        },
        "complete": function (res) {
          wx.hideLoading()
        }
      })
    })
  })
}
添加分享功能
在需要分享的分享的页面中添加 onShareAppMessage 事件函数,此事件处理函数需要 return 一个 Object,用于自定义转发内容,只有定义了此事件处理函数,右上角菜单才会显示“转发”按钮
onShareAppMessage 方法具体参数如下
| 字段 | 说明 | 默认值 | 最低版本 |
|---|---|---|---|
| title | 转发标题 | 当前小程序名称 | |
| path | 转发路径 | 当前页面 path ,必须是以 / 开头的完整路径 | |
| imageUrl | 自定义图片路径,可以是本地文件路径、代码包文件路径或者网络图片路径。支持PNG及JPG。显示图片长宽比是 5:4。 | 使用默认截图 | 1.5.0 |
| promise | 如果该参数存在,则以 resolve 结果为准,如果三秒内不 resolve,分享会使用上面传入的默认参数 | 2.12.0 |
静态分享
示例代码
Page({
    // 分享
    onShareAppMessage() {
        return {
            title: "乐福健康", // 分享标题
            path: "pages/newhome/index", // 分享地址路径
        }
    }
})
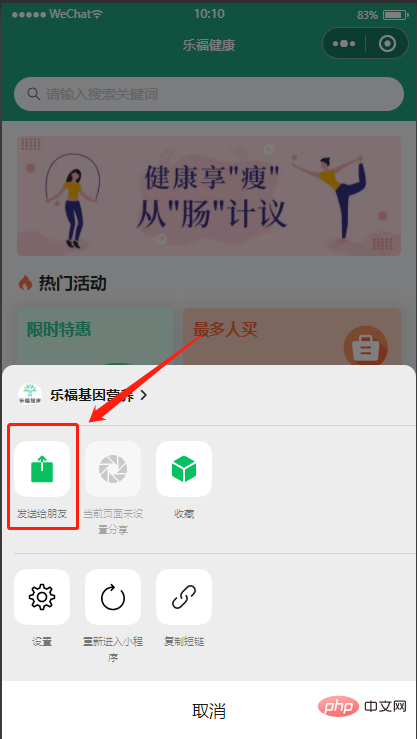
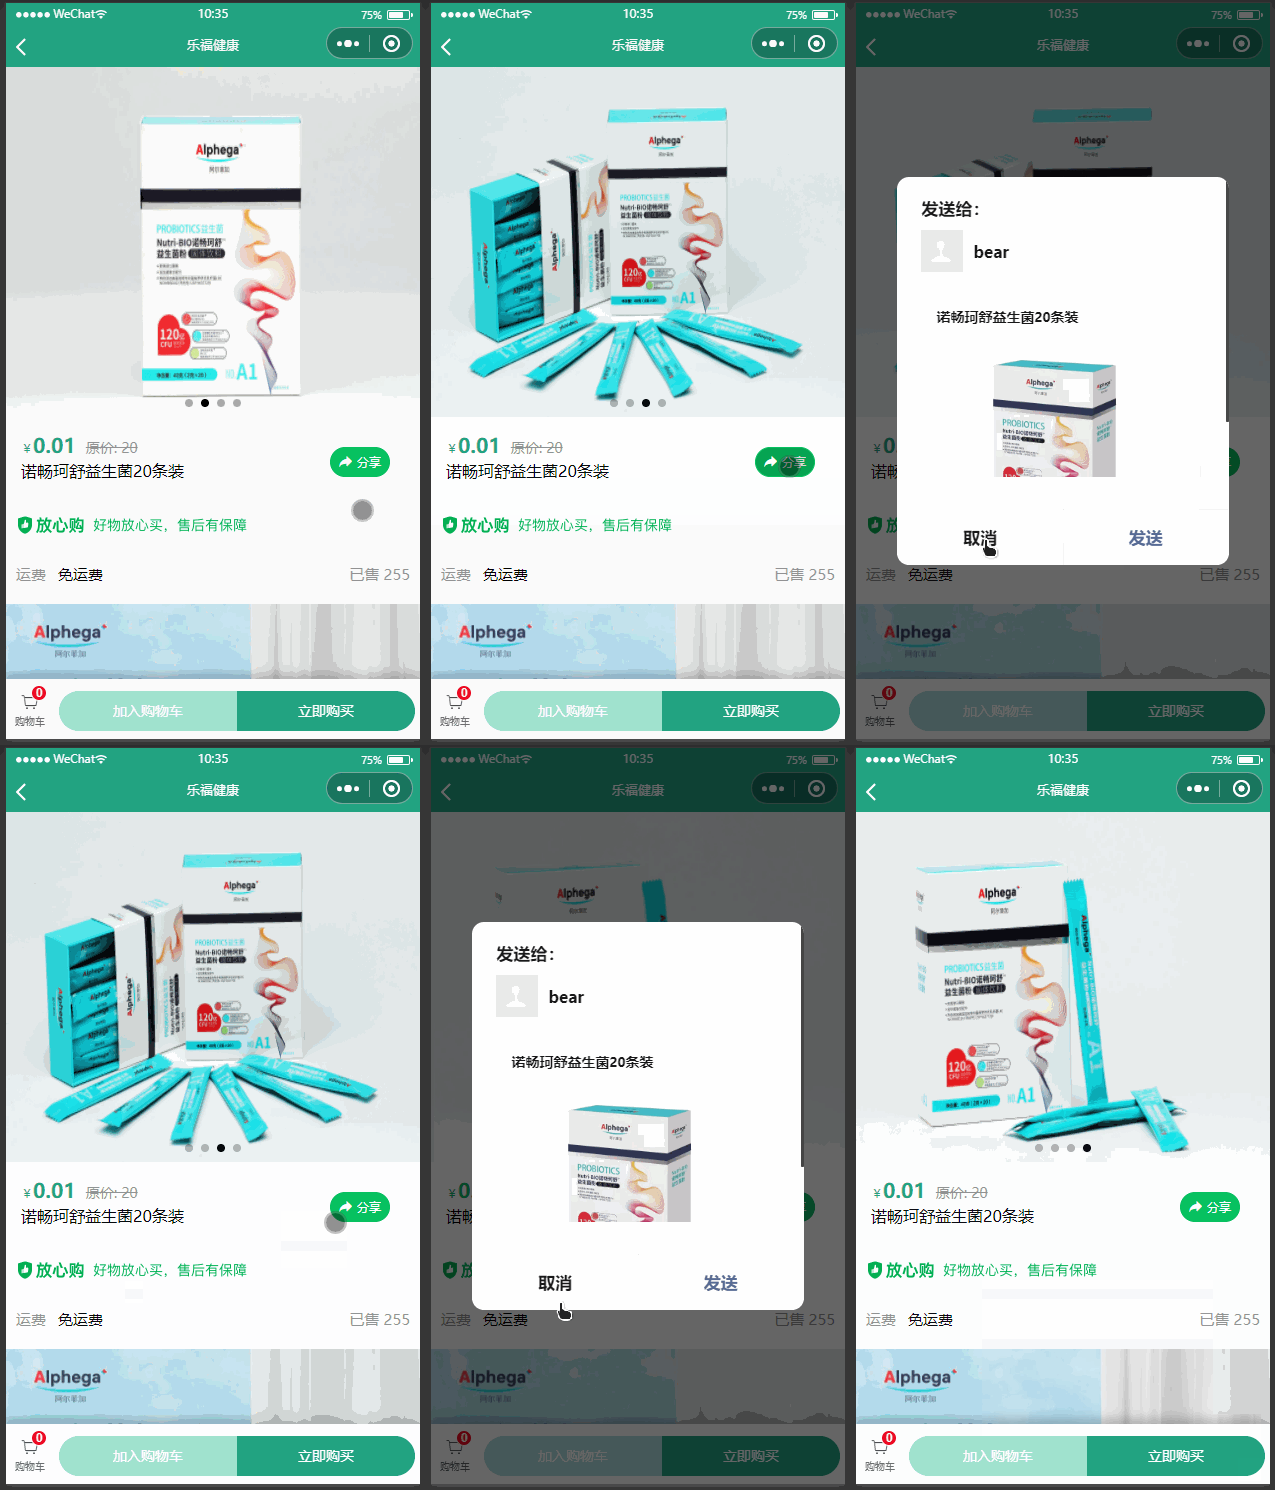
添加完成后点击右上角胶囊按钮会分享图标会亮起

带参分享
上面的分享是不带参数的,我们可以直接在路径中动态添加参数,分享后用户点击时会触发 onLoad 函数获取路径中的参数值
// 分享
onShareAppMessage() {
    const that = this;
    return {
        title: that.data.goodInfo.goodName, // 动态获取商品名称
        path: "pages/component/orderparticulars/orderparticulars?id=" + that.data.productId, // 动态传递当前商品id
        imageUrl: that.data.background[0] // 获取商品封面图
    }
}
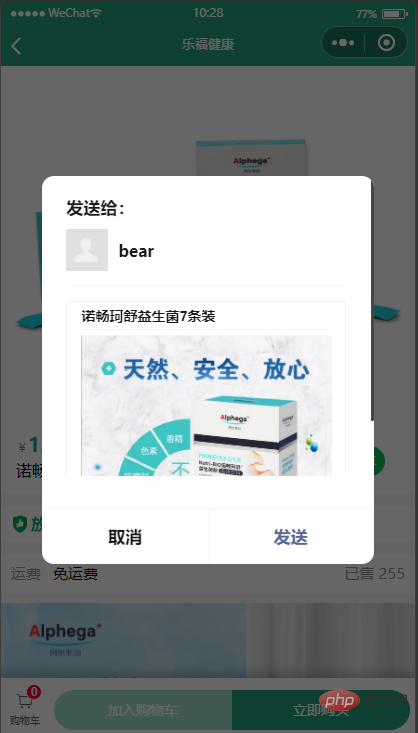
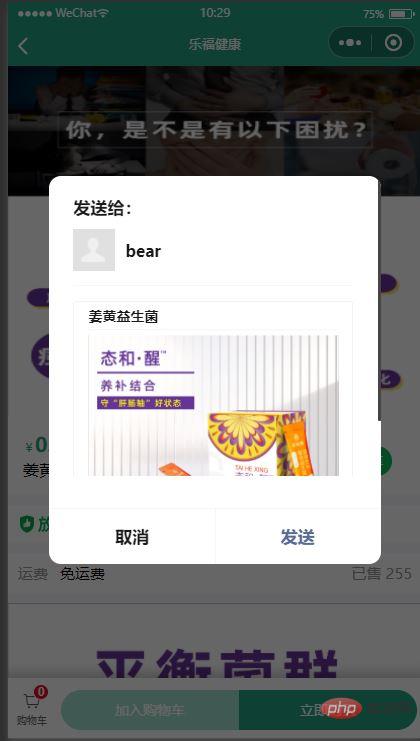
动态获取分享图片和标题后我们每次分享时会出现不同内容
全局分享
除此之外我们也可以添加全局分享功能
首先要在每个页面中添加 onShareAppMessage 函数,函数体内容可以为空,如果函数体内容为空,则会使用我们在 app.js 中定义的默认分享方法,如果该函数返回了一个 object 则使用我们自定义的分享功能
在需要被分享的页面添加如下代码
Page({
    /**
     * 用户点击右上角分享
     */
    onShareAppMessage: function () {
		// 函数体内容为空即可
    }
})
接着在 app.js 中添加重写分享方法
//重写分享方法
overShare: function () {
    //间接实现全局设置分享内容
    wx.onAppRoute(function () {
        //获取加载的页面
        let pages = getCurrentPages(),
            //获取当前页面的对象
            view = pages[pages.length - 1],
            data;
        if (view) {
            data = view.data;
            // 判断是否需要重写分享方法
            if (!data.isOverShare) {
                data.isOverShare = true;
                view.onShareAppMessage = function () {
                    //重写分享配置
                    return {
                        title: '分享标题',
                        path: "/pages/index/index"    //分享页面地址
                    };
                }
            }
        }
    })
},
然后在 onLaunch 函数中调用该方法
onLaunch() {
    this.overShare()
}
分享按钮
在开发中我们也会碰到点击分享按钮实现分享功能,实现代码如下
首先在 html 中添加 button 按钮。其中 open-typ 要等于 share,表示点击这个按钮注定触发分享函数
<!-- 分享按钮 -->
<van-button type="primary" icon="share" round class="search" open-type="share" size="small">
    分享
</van-button>
之后要确保我们在 js 中添加了 onShareAppMessage 函数
效果如下:
获取用户收货地址
获取用户收货地址。调起用户编辑收货地址原生界面,并在编辑完成后返回用户选择的地址。
wx.chooseAddress({
    success(res) {
        console.log(res.userName)
        console.log(res.postalCode)
        console.log(res.provinceName)
        console.log(res.cityName)
        console.log(res.countyName)
        console.log(res.detailInfo)
        console.log(res.nationalCode)
        console.log(res.telNumber)
    }
})
参数说明
| 属性 | 类型 | 说明 |
|---|---|---|
| userName | string | 收货人姓名 |
| postalCode | string | 邮编 |
| provinceName | string | 国标收货地址第一级地址 |
| cityName | string | 国标收货地址第二级地址 |
| countyName | string | 国标收货地址第三级地址 |
| streetName | string | 国标收货地址第四级地址 |
| detailInfo | string | 详细收货地址信息(包括街道地址) |
| detailInfoNew | string | 新选择器详细收货地址信息 |
| nationalCode | string | 收货地址国家码 |
| telNumber | string | 收货人手机号码 |
| errMsg | string | 错误信息 |
Aperçu de l'image
Méthode d'appel : wx.previewImage(Object object)wx.previewImage(Object object)
在新页面中全屏预览图片。预览的过程中用户可以进行保存图片、发送给朋友等操作。
| 属性 | 类型 | 默认值 | 必填 | 说明 | 最低版本 | |||||||||||||||||||||||||||||||||||||||||||||||||||||||||||||||||||||||||||||||||||||||||||||||||||||||||||||||||
|---|---|---|---|---|---|---|---|---|---|---|---|---|---|---|---|---|---|---|---|---|---|---|---|---|---|---|---|---|---|---|---|---|---|---|---|---|---|---|---|---|---|---|---|---|---|---|---|---|---|---|---|---|---|---|---|---|---|---|---|---|---|---|---|---|---|---|---|---|---|---|---|---|---|---|---|---|---|---|---|---|---|---|---|---|---|---|---|---|---|---|---|---|---|---|---|---|---|---|---|---|---|---|---|---|---|---|---|---|---|---|---|---|---|---|---|---|---|---|
| urls | Array. | 是 | 需要预览的图片链接列表。2.2.3 起支持云文件ID。 | |||||||||||||||||||||||||||||||||||||||||||||||||||||||||||||||||||||||||||||||||||||||||||||||||||||||||||||||||||
| showmenu | boolean | true | 否 | 是否显示长按菜单。 支持识别的码:小程序码 仅小程序支持识别的码:微信个人码、微信群码、企业微信个人码、 企业微信群码与企业微信互通群码; | 2.13.0 | |||||||||||||||||||||||||||||||||||||||||||||||||||||||||||||||||||||||||||||||||||||||||||||||||||||||||||||||||
| current | string | urls 的第一张 | 否 | 当前显示图片的链接 | ||||||||||||||||||||||||||||||||||||||||||||||||||||||||||||||||||||||||||||||||||||||||||||||||||||||||||||||||||
| referrerPolicy | string | no-referrer | 否 |
origin: 发送完整的referrer; no-referrer: 不发送。格式固定为 https://servicewechat.com/{appid}/{version}/page-frame.html
| Prévisualisez l'image en plein écran sur la nouvelle page. Pendant le processus de prévisualisation, les utilisateurs peuvent enregistrer des images, les envoyer à des amis, etc.
origin : envoyer le référent complet ; no-referrer : ne pas envoyer. Le format est fixé à https://servicewechat.com/{appid}/{version}/page-frame.html, où {appid} est l'appid du mini programme et {version} est la version du mini programme. Le numéro de version est 0, ce qui signifie la version de développement, la version d'essai et la version de révision, le numéro de version est devtools, ce qui signifie les outils de développement, et le reste sont des versions officielles 🎜🎜2.13.0🎜 ; 🎜🎜🎜success🎜🎜fonction🎜🎜🎜🎜Non 🎜🎜La fonction de rappel pour un appel d'interface réussi🎜🎜🎜🎜🎜🎜fail🎜🎜fonction🎜🎜🎜🎜Non🎜🎜La fonction de rappel pour un appel d'interface échoué🎜🎜🎜🎜🎜 🎜fonction🎜🎜complète 🎜🎜 🎜🎜Non🎜🎜Appel d'interface La fonction de rappel de fin (sera exécutée si l'appel réussit ou échoue)🎜🎜🎜🎜🎜🎜🎜示例代码 wx.previewImage({
current: '', // 当前显示图片的http链接
urls: [] // 需要预览的图片http链接列表
})页面跳转跳转普通页面 wx.navigateTo({
url: '',
})保留当前页面,跳转到应用内的某个页面。但是不能跳到 tabbar 页面。使用 wx.navigateBack 可以返回到原页面。小程序中页面栈最多十层 跳转tabBar 页面 跳转到 tabBar 页面,并关闭其他所有非 tabBar 页面 wx.switchTab({
url: '/index'
})自定义组件在小程序中的组件和普通页面的 // pages/TestComponent/test.js
Component({
/**
* 组件的属性列表
*/
properties: {
userName:""
},
* 组件的初始数据
data: {
* 组件的方法列表
methods: {
// 获取父组件传递过来的参数
getPropName(){
console.log(this.data.userName);
}
}
})其中我们在 然后再组件中添加触发 <button bind:tap="getPropName">获取名称</button> 在我们需要引入这个组件的页面去声明这个组件的名称和地址,找到后缀为 {
"usingComponents": {
"test-component":"../TestComponent/test"
}
}之后我们在页面中像使用普通标签一样使用这个组件,并且给组件传递数据 <test-component userName="张三"></test-component> 传递数据后我们即可实现点击组件中的按钮获取父组件传递过来的值 定义全局组件我们定义完组件后想要在全局使用,我们可以将这个组件定义为全局组件 首先找到项目中的 {
......省略其他代码
"usingComponents": {
"test-component":"./pages/TestComponent/test"
}
}声明完成后我们即可在全局像使用标签的方式使用该组件 设置默认顶部导航栏样式在 {
"window": {
"backgroundTextStyle": "light",
"navigationBarBackgroundColor": "#22a381",
"navigationBarTitleText": "乐福健康",
"navigationBarTextStyle": "white"
}
}全部参数列表
效果
取消顶部默认的导航栏找到页面 {
"usingComponents": {
},
"navigationStyle":"custom"
}添加自定义样式后可以达到如下效果
【相关学习推荐:小程序学习教程】 |
Ce qui précède est le contenu détaillé de. pour plus d'informations, suivez d'autres articles connexes sur le site Web de PHP en chinois!
Articles Liés
Voir plus- Résumer et partager les étapes de développement des mini programmes WeChat
- Navigation inférieure de développement de mini-programmes WeChat
- Résumer et organiser les composants de formulaire communs des mini-programmes WeChat
- Analysez brièvement les éléments des mini-programmes WeChat
- Résumé de la syntaxe du modèle WXML du mini programme WeChat


