Maison >interface Web >js tutoriel >Native JS utilise la transformation pour obtenir un effet de défilement infini de la bannière
Native JS utilise la transformation pour obtenir un effet de défilement infini de la bannière
- hzcavant
- 2020-06-20 09:15:252501parcourir
Fonction

- Par défaut, la boucle infinie se déplace vers la droite
- Cliquez sur le numéro pour passer à l'image correspondante
- Cliquez à gauche et à droite pour changer d'image
Principe
Tout d'abord, parlons du principe.
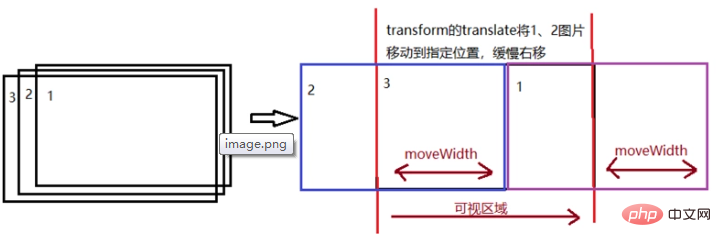
- Toutes les images se chevauchent dans la mise en page, c'est-à-dire que tant qu'elles sont alignées dans la direction Y, l'image actuellement visible a le niveau d'index z le plus élevé.
- Changez une image toutes les 3 secondes et utilisez setTimeout pour le chronométrage.
- Utilisez gIndex pour enregistrer quel indice d'image est affiché dans la zone visible actuelle et calculez l'indice de l'image suivante à chaque fois qu'il est modifié.
- Utilisez requestAnimationFrame pour implémenter une animation de changement d'image.
Cette méthode peut également garantir que la page entière n'a toujours que 2 balises img, sans avoir à créer tous les nœuds img. Le point clé est de remplacer le src de l'img invisible à chaque fois. 
Implémentation de l'animation
- Définissez d'abord un horodatage, cette valeur enregistre la distance parcourue par chaque image. Définissez le pas initial = 0 et enregistrez le nombre de pas en mouvement.
- La distance moveWidth de chaque mouvement est timestamp*step. L'image 1 se déplace vers la droite pour augmenter moveWidth, et l'image 2 entre moveWidth par la gauche. Par conséquent, la transformation de l’image 1 est Translate(moveWidth) et la transformation de l’image 2 est Translate(moveWidth-picture width).
- étape+1
- Si moveWidth> largeur de l'image, étape 5, sinon requestAnimationFrame demande la prochaine exécution, continuez 2-4.
- Les deux images 1 et 2 seront positionnées À la position de départ, l'indice z de l'image 2 est réglé au plus haut.
Cela complète une animation en mouvement.
code html
<header>
    <p>
        <img  alt="Native JS utilise la transformation pour obtenir un effet de défilement infini de la bannière" >
        <img  alt="Native JS utilise la transformation pour obtenir un effet de défilement infini de la bannière" >
        <img  alt="Native JS utilise la transformation pour obtenir un effet de défilement infini de la bannière" >
        <img  alt="Native JS utilise la transformation pour obtenir un effet de défilement infini de la bannière" >
    </p>
    <p>
        </p>
<p>1</p>
        <p>2</p>
        <p>3</p>
        <p>4</p>

    <p>
        </p>
<p></p>

    <p>
        </p>
<p></p>

</header>
code JS
var timeout = null;
window.onload = function () {
    var oLeft = document.querySelector('.left');
    var oRight = document.querySelector('.right');
    var oButton = document.querySelector('.buttons');
    var oButtons = document.querySelectorAll('.buttons p');
    var oImgs = document.querySelectorAll('.box img');
    var imgWidth = oImgs[0].width;
    var gIndex = 0;
    begainAnimate();

    // 绑定左右点击事件
    oLeft.onclick = function () {
        clearTimeout(timeout);
        leftMove();
        begainAnimate();
    };
    oRight.onclick = function () {
        clearTimeout(timeout);
        rightMove();
        begainAnimate();
    };
    // 绑定数字序号事件
    oButton.onclick = function (event) {
        clearTimeout(timeout);
        var targetEl = event.target;
        var nextIndex = (+targetEl.innerText) - 1;
        console.log(nextIndex);
        rightMove(nextIndex);
        begainAnimate();
    }
    // 默认初始动画朝右边
    function begainAnimate() {
        clearTimeout(timeout);
        timeout = setTimeout(function () {
            rightMove();
            begainAnimate();
        }, 3000);
    }
    // 向左移动动画
    function leftMove() {
        var nextIndex = (gIndex - 1 = oImgs.length) ? 0 : gIndex + 1;
        }
        animateSteps(nextIndex, 50);
    }
    // 一次动画
    function animateSteps(nextIndex, timestamp) {
        var currentImg = oImgs[gIndex];
        var nextImg = oImgs[nextIndex];
        nextImg.style.zIndex = 10;
        var step = 0;
        requestAnimationFrame(goStep);
        // 走一帧的动画,移动timestamp
        function goStep() {
            var moveWidth = timestamp * step++;
            if (Math.abs(moveWidth)  0 ? (moveWidth - imgWidth) : (imgWidth + moveWidth)}px)`;
                requestAnimationFrame(goStep);
            } else {
                currentImg.style.zIndex = 1;
                currentImg.style.transform = `translate(0px)`;
                nextImg.style.transform = `translate(0px)`;
                oButtons[gIndex].setAttribute('class', '');
                oButtons[nextIndex].setAttribute('class', 'active');
                gIndex = nextIndex;
            }
        }
    }
}
window.onclose = function () {
    clearTimeout(timeout);
}
style de mise en page CSS
<style>
    /* 首先设置图片box的区域,将图片重叠在一起  */
    header {
        width: 100%;
        position: relative;
        overflow: hidden;
    }
    .box {
        width: 100%;
        height: 300px;
    }
    .box img {
        width: 100%;
        height: 100%;
        position: absolute;
        transform: translateX(0);
        z-index: 1;
    }
    .box img:first-child {
        z-index: 10;
    }

    /* 数字序列按钮 */
    .buttons {
        position: absolute;
        right: 10%;
        bottom: 5%;
        display: flex;
        z-index: 100;
    }

    .buttons p {
        width: 30px;
        height: 30px;
        background-color: #aaa;
        border: 1px solid #aaa;
        text-align: center;
        margin: 10px;
        cursor: pointer;
        opacity: .7;
        border-radius: 15px;
        line-height: 30px;
    }

    .buttons p.active {
        background-color: white;
    }

    /* 左右切换按钮 */
    .left,
    .right {
        position: absolute;
        width: 80px;
        height: 80px;
        background-color: #ccc;
        z-index: 100;
        top: 110px;
        border-radius: 40px;
        opacity: .5;
        cursor: pointer;
    }

    .left {
        left: 2%;
    }

    .right {
        right: 2%;
    }

    .left .arrow {
        width: 30px;
        height: 30px;
        border-left: solid 5px #666;
        border-top: solid 5px #666;
        transform: translate(-5px, 25px) rotate(-45deg) translate(25px, 25px);
    }

    .right .arrow {
        width: 30px;
        height: 30px;
        border-left: solid 5px #666;
        border-top: solid 5px #666;
        transform: translate(50px, 25px) rotate(135deg) translate(25px, 25px);
    }
</style>
Tutoriel recommandé : "tutoriel js"
Ce qui précède est le contenu détaillé de. pour plus d'informations, suivez d'autres articles connexes sur le site Web de PHP en chinois!
Déclaration:
Cet article est reproduit dans:. en cas de violation, veuillez contacter admin@php.cn Supprimer

