Maison >interface Web >js tutoriel >Intégration du framework JQuery+Ajax+Struts2+Hibernate pour réaliser un enregistrement de connexion complet
Intégration du framework JQuery+Ajax+Struts2+Hibernate pour réaliser un enregistrement de connexion complet
- 亚连original
- 2018-05-24 15:35:183004parcourir
Je n'ai travaillé sur aucun projet récemment et je n'ai rien à faire. J'ai vu un site Web de librairie qui était très bon, alors je l'ai copié et j'ai utilisé directement l'interface utilisateur. J'ai écrit le front-end et le back-end. Fin moi - même. La plupart des fonctions ont été implémentées jusqu'à présent.
1. Déploiement de l'environnement de développement
Structure du programme :
BootStrap+Ajax+Struts2+Hibernate+MySql
Pour référence uniquement : tant que les fonctions pertinentes peuvent être implémentées
Système d'exploitation : Ubuntu 14.10
Framework front-end : BootStrap Remarque : Ce framework est uniquement destiné à réaliser l'interface utilisateur et n'a rien à voir avec des fonctions spécifiques
Base de données : mysql-5.5 Outil de base de données : emma
Serveur : tomcat Outil serveur : Myeclipse 10 (les environnements Struts2 et Hibernate ont été configurés)
Remarque :
Le processus de débogage du programme peut produire du code tronqué, il suffit de conserver tous les outils codés de la même manière.
2. Configuration du fichier de projet
1. Créez un nouveau projet Web et nommez-le ROOT
2. WebRoot/ WEB-INF/web.xml
<?xml version="1.0" encoding="UTF-8"?>
<web-app xmlns:xsi="http://www.w3.org/2001/XMLSchema-instance"
 xmlns="http://java.sun.com/xml/ns/javaee"
 xsi:schemaLocation="http://java.sun.com/xml/ns/javaee http://java.sun.com/xml/ns/javaee/web-app_3_0.xsd"
 id="WebApp_ID" version="3.0">
 <display-name>ROOT</display-name>
 <filter>
  <filter-name>struts2</filter-name>
  <filter-class>
     org.apache.struts2.dispatcher.ng.filter.StrutsPrepareAndExecuteFilter
   </filter-class>
 </filter>
 <filter-mapping>
  <filter-name>struts2</filter-name>
  <url-pattern>/*</url-pattern>
 </filter-mapping>
 <error-page>
  <error-code>404</error-code>
  <location>/error.jsp</location>
 </error-page>
 <error-page>
  <error-code>500</error-code>
  <location>/error.jsp</location>
 </error-page>
 <welcome-file-list>
  <welcome-file>index.html</welcome-file>
  <welcome-file>index.htm</welcome-file>
  <welcome-file>index.jsp</welcome-file>
  <welcome-file>default.html</welcome-file>
  <welcome-file>default.htm</welcome-file>
  <welcome-file>default.jsp</welcome-file>
 </welcome-file-list>
</web-app>
3. Configurez /src/struts.xml (fichier de configuration struts) Cela suffit.
<?xml version="1.0" encoding="UTF-8" ?>
<!DOCTYPE struts PUBLIC "-//Apache Software Foundation//DTD Struts Configuration 2.1//EN" "http://struts.apache.org/dtds/struts-2.1.dtd">
<struts>
 <package name="default" namespace="/" extends="struts-default">
  <!-- 登录 -->
  <action name="login" class="com.action.Login" method="login"></action>
  <!-- 登出 -->
  <action name="logout" class="com.action.Logout" method="logout"></action>
  <!-- 注册 -->
   <action name="register" class="com.action.Register" method="register"></action>
  <!-- 邮件发送 -->
   <action name="sendmail" class="com.action.SendMail" method="sendmail"></action>
 </package>
</struts>
4. Configurez /src/hibernate.cfg.xml (fichier de configuration de la base de données Hibernate). Notez qu'il y a un bc669b3395d963c75058ae15772107e0 faites-le vous-même, ce qui sera fait à l'étape suivante. Configurez
<?xml version='1.0' encoding='UTF-8'?> <!DOCTYPE hibernate-configuration PUBLIC "-//Hibernate/Hibernate Configuration DTD 3.0//EN" "http://www.hibernate.org/dtd/hibernate-configuration-3.0.dtd"> <!-- Generated by MyEclipse Hibernate Tools. --> <hibernate-configuration> <session-factory> <property name="myeclipse.connection.profile">Myeclipse Mysql</property> <!--指明JDBC路径、指明数据库名称--> <property name="connection.url">jdbc:mysql://localhost:3306/test</property> <!--指明数据库账户和密码--> <property name="connection.username">root</property> <property name="connection.password">root</property> <!--指明JDBC驱动--> <property name="connection.driver_class">com.mysql.jdbc.Driver</property> <!--指明mysql方言--> <property name="dialect">org.hibernate.dialect.MySQLDialect</property> <property name="hibernate.current_session_context_class">thread</property> <property name="hibernate.dialect">org.hibernate.dialect.MySQLDialect</property> <property name="show_sql">true</property> <property name="format_sql">true</property> <mapping resource="com/hibernate/bookchat.hbm.xml" /> </session-factory> </hibernate-configuration>
5. Créez le package com.hibernate sous /src, créez bookchat.hbm.xml (fichier de mappage relationnel d'objet hibernate) sous le package. , et configurez
Remarque5b64e621b10f64959bafc2cedd9dcd20 est une classe d'objet de base de données personnalisée (pojo), qui sera configurée à l'étape suivante
<?xml version="1.0"?>
<!DOCTYPE hibernate-mapping PUBLIC "-//Hibernate/Hibernate Mapping DTD 3.0//EN" "http://hibernate.sourceforge.net/hibernate-mapping-3.0.dtd">
<hibernate-mapping>
 <!--指明Bean类名,指明数据库表名-->
 <class name="com.hibernate.User" table="user">
  <id column="id" type="int">
   <generator class="native" />
  </id>
  <!--指明数据库字段名、字段类型-->
  <property name="user_id" column="user_id" type="int" />
  <property name="phone" column="phone" type="int" />
  <property name="email" column="email" type="string" />
  <property name="username" column="username" type="string" />
  <property name="password" column="password" type="string" />
  <property name="icon" column="icon" type="string" />
  <property name="description" column="description" type="string" />
  <property name="followThreadNum" column="followThreadNum" type="int" />
  <property name="followPeopleNum" column="followPeopleNum" type="int" />
  <property name="fansNum" column="fansNum" type="int" />
  <property name="haveMsg" column="haveMsg" type="int" />
 </class>
</hibernate-mapping>
6. com sous /src. Créez la classe User sous le package hibernate
package com.hibernate;
public class User {
 private int user_id; //对应数据库中user_id
 private int phone; //手机号
 private String email; //邮件
 private String username; //用户名
 private String password; //密码
 private String icon; //用户头像
 private String description;  //自定义描述
 private int followThreadNum; //关注书单数量
 private int followPeopleNum; //关注的人数量
 private int fansNum; //粉丝数量
 private int haveMsg; //当前是否有新消息
 public User() {
  super();
 }
   //这个构造方法在注册时有用
 public User(String email, String username, String password) {
  // 用户内容:username,password,email
  // 系统定义:user_id,icon,followThreadNum,followPeopleNum,fansNum,haveMsg
  // 留空:phone,description,
  this.user_id = 39212;
  // this.phone = phone;
  this.email = email;
  this.username = username;
  this.password = password;
  this.icon = "images/icon.png";
  // this.description = description;
  this.followThreadNum = 0;
  this.followPeopleNum = 0;
  this.fansNum = 0;
  this.haveMsg = 0;
 }
 public int getUser_id() {
  return user_id;
 }
 public void setUser_id(int user_id) {
  this.user_id = user_id;
 }
 public int getPhone() {
  return phone;
 }
 public void setPhone(int phone) {
  this.phone = phone;
 }
 public String getEmail() {
  return email;
 }
 public void setEmail(String email) {
  this.email = email;
 }
 public String getUsername() {
  return username;
 }
 public void setUsername(String username) {
  this.username = username;
 }
 public String getPassword() {
  return password;
 }
 public void setPassword(String password) {
  this.password = password;
 }
 public String getIcon() {
  return icon;
 }
 public void setIcon(String icon) {
  this.icon = icon;
 }
 public String getDescription() {
  return description;
 }
 public void setDescription(String description) {
  this.description = description;
 }
 public int getFollowThreadNum() {
  return followThreadNum;
 }
 public void setFollowThreadNum(int followThreadNum) {
  this.followThreadNum = followThreadNum;
 }
 public int getFollowPeopleNum() {
  return followPeopleNum;
 }
 public void setFollowPeopleNum(int followPeopleNum) {
  this.followPeopleNum = followPeopleNum;
 }
 public int getFansNum() {
  return fansNum;
 }
 public void setFansNum(int fansNum) {
  this.fansNum = fansNum;
 }
 public int getHaveMsg() {
  return haveMsg;
 }
 public void setHaveMsg(int haveMsg) {
  this.haveMsg = haveMsg;
 }
}
7. Créez la classe CreateTable sous le package com.db sous /src, puis exécutez en tant que - Java. Application et vérifiez si la console génère l'instruction SQL
package com.db;
import org.hibernate.cfg.Configuration;
import org.hibernate.tool.hbm2ddl.SchemaExport;
public class CREATTABLEDONOT {
 public static void main(String[] args) {
  // 默认读取hibernate.cfg.xml文件
  Configuration cfg = new Configuration().configure();
  SchemaExport export = new SchemaExport(cfg);
  export.create(true, true);
 }
}
3. Vérifiez la base de données
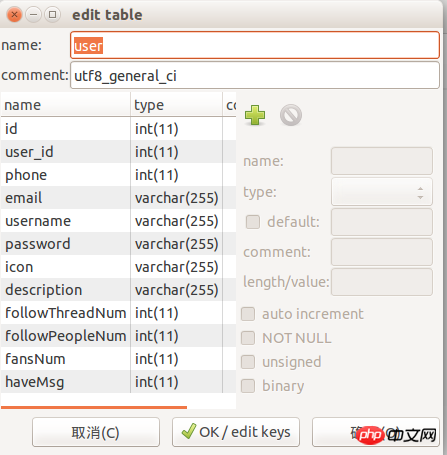
1. Ouvrez l'outil GUI de la base de données et vérifiez s'il existe une table utilisateur sous la base de données de test. Si vous pouvez ouvrir la table utilisateur, expliquez avant que la configuration soit réussie.
2. Modifiez la table utilisateur : définissez la valeur par défaut du champ et ajoutez des données à la table.


4. Conception de l'interface utilisateur Web
1. La préfiguration a été posée dans la configuration du fichier struts.xml :
<action name="login" class="com.action.Login" method="login"></action>
<action name="logout" class="com.action.Logout" method="logout"></action>
<action name="register" class="com.action.Register" method="register"></action>
<action name="sendmail" class="com.action.SendMail" method="sendmail"></action>
Nous pouvons demander /login, /logout, /register dans la page Web pour accéder à ces trois classes de traitement d'action. Bien sûr, ces trois-là. les cours sont spécifiques. Nous n’avons pas encore écrit le contenu, nous le laissons donc pour le moment.
2. Commencez maintenant à réfléchir à ce qui est nécessaire pour la conception Web...
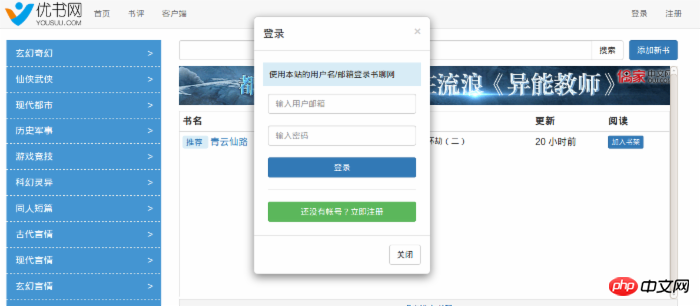
f35d6e602fd7d0f0edfa6f7d103c1b57 La page d'accueil fournit des liens de connexion et d'inscription

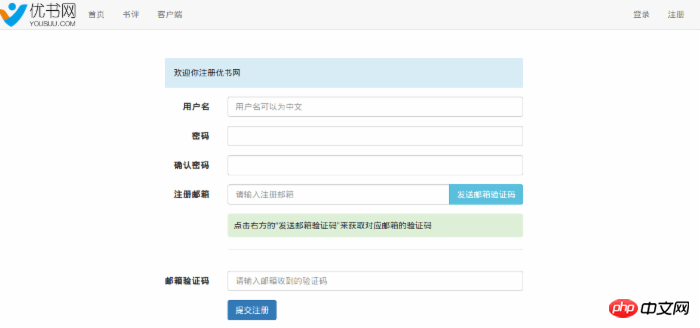
2cc198a1d5eb0d3eb508d858c9f5cbdb Boîte contextuelle de connexion et page d'inscription


5bdf4c78156c7953567bb5a0aef2fc53 sont affichés

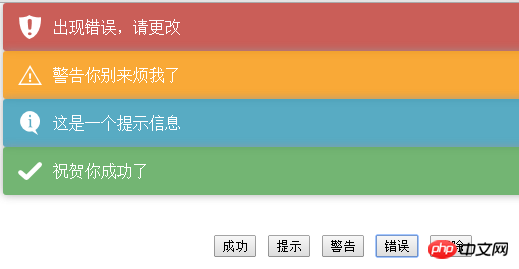
23889872c2e8594e0f446a471a78ec4c L'effet que nous souhaitons obtenir : afficher le nom d'utilisateur après une connexion/inscription réussie et demander dynamiquement les détails de l'erreur après un échec de connexion !
5. Conception JQuery+Ajax
1. Code principal JQuery et Ajax
(function(window, $) {
 var SOKK = {};
 ys.common = SOKK;
 //邮箱验证
 SOKK.sendmail = function(){
  var email = $("#inputEmail").val().trim();
  if(!checkEmail(email)){
   return false;
  }
  //发送请求
  $.get("/sendmail","email="+email,function(data){
   data = JSON.parse(data);
   tip(data.code);
  })
 }
 //注册
 SOKK.signup = function(form){
  var form = $(form);
  //成功方可继续执行
  if(!checkSignUp(form.find("input")))
   return false;
  //序列化表单,生成JSON对象
  var JStr =form.serialize();
  // var JStr = JSON.stringify(JForm);
  tip(JStr);
  $.post("/register",JStr,function(data){
   data = JSON.parse(data);
   if (data.code == 200) {
    location.reload(); //如何跳转到首页?
   } else {
    tip(data.code);
   }
  })
 };
 // 登录
 SOKK.login = function(form) {
  var form = $(form);
  var input = form.find("input");
  var username=$.trim(input[0].value);
  var password=$.trim(input[1].value);
  if(checkLogin(username,password)){
   return false;
  }
  var dataParam = {};
  dataParam.username = username;
  dataParam.password = password;
  // 这里的dataParam是键值对,但服务器获取的时候是?username=xx&password=xx;
  // 如果使用json传输那么就不能用这种方式而必须用$.ajax,而且json在服务器端还要再解析,
  // 所以在发送请求时,不建议使用json。接受数据可以使用json
  $.post("/login", dataParam, function(data) {
   // json字符串->json对象
   data = JSON.parse(data);
   if (data.code == 200) {
    location.reload();
   } else {
    tip(data.code);
   }
  })
 };
 //登出
 SOKK.logout = function(){
  $.get("/logout", function (data) {
   //json字符串->json对象
   data = JSON.parse(data);
   if (data.code==200){
    location.reload();
   }
  })
 };
})(window, $)
2. code
// 自定义提示
function tip(info){
 if(isNaN(info)){
  toastr.info(info);
 }else{
  var msg;
  if(info<300){
   switch(info){
    case 100: msg="加入书架成功!"; break;
    case 101: msg="关注本书成功!"; break;
    case 102: msg="已移动到【正在看】!"; break;
    case 103: msg="已移动到【准备看】!"; break;
    case 104: msg="已移动到【已看完】!"; break;
    case 105: msg="已移动到【回收站】!"; break;
    case 110: msg="验证邮件已发送到你的邮箱!";break;
    case 200: msg="请求成功!"; break;
    case 202: msg="请求已接受,但尚未处理。"; break;
    case 204: msg="请求成功,但无返回内容。"; break;
    default : break;
   }
   toastr.success(msg);
  }else if(info<1000){
   switch(info){
    case 301: msg="请求网页的位置发生改变!"; break;
    case 400: msg="错误请求,请输入正确信息!"; break;
    case 401: msg="非法请求,未授权进入此页面!"; break;
    case 403: msg="拒绝请求!"; break;
    case 404: msg="请求页面不存在!"; break;
    case 408: msg="请求超时!"; break;
    case 500: msg="服务器出错!"; break;
    case 500: msg="服务不可用!"; break;
    case 900: msg="用户名/密码错误,请重新输入"; break;
    case 903: msg="服务器出错,请重试!"; break;
    case 904: msg="服务器无返回信息!"; break;
    case 905: msg="网络出错!"; break;
    case 906: msg="注册失败,请重试!";break;
    case 907: msg="邮箱验证码错误!";break;
    case 908: msg="用户名已存在!";break;
    case 909: msg="邮箱已被注册!";break;
    case 910: msg="验证邮件发送失败!";break;
    default : break;
   }
   toastr.error(msg);
  }else{
   toastr.info(info);
  }
 }
}
//注册检查
function checkSignUp(input){
 var username = $.trim(input[0].value);
 var password1 = $.trim(input[1].value);
 var password2 = $.trim(input[2].value);
 var email = $.trim(input[3].value);
 var emailcode = $.trim(input[4].value);
 for (var i = 0; i < input.length; i++) {
  if(input[i].value.length<=0){
   tip("所有内容不得为空!");
   return false;
  }
 };
 if(username.length<4){
  tip("用户名不得少于4个字符!");
  return false;
 }
 if(password1!==password2){
  tip("两次输入的密码不同!");
  return false;
 }
 if(password1.length<6){
  tip("密码不得少于6个字符!");
  return false;
 }
 return true;
}
function checkLogin(username,password){
 if(!username){
  tip("请输入用户名!");
  return false;
 }
 if(!password){
  tip("请输入密码!");
  return false;
 }
}
function checkEmail(email){
 var reg = /^([a-zA-Z0-9]+[_|\_|\.]?)*[a-zA-Z0-9]+@([a-zA-Z0-9]+[_|\_|\.]?)*[a-zA-Z0-9]+\.[a-zA-Z]{2,3}$/;
 if(email){
  if(reg.test(email)){
   return true;
  }else{
   tip("邮箱地址不符合规范!");
   return false;
  }
 }else{
  tip("邮箱地址不得为空!");
  return false;
 }
}
3. toastr est un plug-in d'invite frontal non bloquant, qui peut être téléchargé et utilisé depuis http://www.bootcdn.cn/toastr.js/

6. Conception d'action
1. Logout.java
package com.action;
import javax.servlet.http.HttpServletRequest;
import org.apache.struts2.ServletActionContext;
import com.opensymphony.xwork2.ActionSupport;
import com.service.BaseService;
import com.service.BaseServiceImpl;
import com.util.OperateJSON;
public class Login extends ActionSupport {
 private static final long serialVersionUID = 4679952956618457478L;
 private String username;
 private String password;
 public void login() {
  HttpServletRequest request = ServletActionContext.getRequest();
  BaseService hs = new BaseServiceImpl();
  OperateJSON oj = new OperateJSON();
  username = request.getParameter("username");
  password = request.getParameter("password");
  System.out.println("用户名:" + username + "--密码:" + password);
  // 登陆返回用户id
  Object obj = hs.login(username, password);
  if (obj != null) {
   System.out.println("用户名密码正确");
   request.getSession().setAttribute("username", username);
   request.getSession().setAttribute("userid", obj);
   System.out.println("用户名" + username + "的Session设置完毕~");
   System.out.println("用户id的Session设置完毕~");
   oj.putCode(200);
  } else {
   System.out.println("用户名密码错误");
   oj.putCode(900);
  }
  oj.send();
 }
}
3. Register.java
package com.action;
import javax.servlet.http.HttpServletRequest;
import javax.servlet.http.HttpServletResponse;
import org.apache.struts2.ServletActionContext;
import com.opensymphony.xwork2.ActionSupport;
import com.util.OperateJSON;
public class Logout extends ActionSupport {
 private static final long serialVersionUID = -6758897982192371466L;
 HttpServletRequest request = ServletActionContext.getRequest();
 HttpServletResponse response = ServletActionContext.getResponse();
 OperateJSON oj = new OperateJSON();
 public void logout() {
  request.getSession().removeAttribute("username");
  request.getSession().invalidate();
  if (request.getSession().getAttribute("username") == null) {
   oj.putCode(200);
  } else {
   oj.putCode(903);
  }
  oj.send();
 }
}
4. SendMail.java est une classe pour l'envoi d'e-mails via le protocole SMTP. Avant utilisation, vous devez importer le courrier. jar et configurez le fichier de développement pour la boîte aux lettres humaine
package com.action;
import javax.servlet.http.HttpServletRequest;
import javax.servlet.http.HttpServletResponse;
import org.apache.struts2.ServletActionContext;
import com.hibernate.User;
import com.opensymphony.xwork2.ActionSupport;
import com.service.BaseService;
import com.service.BaseServiceImpl;
import com.util.OperateJSON;
public class Register extends ActionSupport {
 private static final long serialVersionUID = -3356620731966076779L;
 HttpServletRequest request = ServletActionContext.getRequest();
 HttpServletResponse response = ServletActionContext.getResponse();
 BaseService bs = new BaseServiceImpl();
 OperateJSON oj = new OperateJSON();
 SendMail sm = new SendMail();
 public void register() {
  String username = request.getParameter("username");
  String password1 = request.getParameter("password1");
  String password2 = request.getParameter("password2");
  String password = (password1.equals(password2) ? password1 : null);
  String email = request.getParameter("email");
  String emailcode = request.getParameter("emailcode");
  // 判断用户输入和生成的邮箱验证码是否相同
  if (!(emailcode.equals(sm.getMailCode()))) {
   oj.putCode(907);
   oj.send();
   return;
  }
  // 检测用户名/邮箱是否唯一
  if (!bs.isUnique("User", "username", username)) {
   oj.putCode(908);
   oj.send();
   return;
  }
  if (!bs.isUnique("User", "email", email)) {
   oj.putCode(909);
   oj.send();
   return;
  }
  // 构建User对象
  User user = new User(email, username, password);
  // 建立对象关系映射
  Boolean reged = bs.register(user);
  if (reged) {
   System.out.println("用户注册成功");
   request.getSession().setAttribute("username", username);
   oj.putCode(200);
  } else {
   System.out.println("注册失败");
   oj.putCode(906);
  }
  oj.send();
 }
}
5. OpreateJSON
package com.action;
import java.util.Date;
import java.util.Properties;
import javax.mail.BodyPart;
import javax.mail.Message;
import javax.mail.MessagingException;
import javax.mail.Multipart;
import javax.mail.Session;
import javax.mail.Transport;
import javax.mail.internet.InternetAddress;
import javax.mail.internet.MimeBodyPart;
import javax.mail.internet.MimeMessage;
import javax.mail.internet.MimeMultipart;
import javax.servlet.http.HttpServletRequest;
import org.apache.struts2.ServletActionContext;
import com.opensymphony.xwork2.ActionSupport;
import com.util.OperateJSON;
public class SendMail extends ActionSupport {
  private static final long serialVersionUID = -4724909293302616101L;
  private static String QQ = "392102018"; // qq
  private static String HOST = "qq.com"; // SMTP服务器主机名
  private static String PASS = "xxxxxxxx"; // SMTP服务器密码
  private static String mailCode; // 邮件验证码

  OperateJSON oj = new OperateJSON();
  public void sendmail() {
 HttpServletRequest request = ServletActionContext.getRequest();
 String email = request.getParameter("email");
 System.out.println(email);
 String mailCode = SendMail.setMailCode();
 try {
   beginSend(email, mailCode);
   oj.putCode(110);
 } catch (MessagingException e) {
   oj.putCode(910);
 } finally {
   oj.send();
 }
  }
  public static String setMailCode() {
 mailCode = 100000 + (int) (Math.random() * 900000) + "BC";
 System.out.println(mailCode);
 return mailCode;
  }
  public String getMailCode() {
 return SendMail.mailCode;
  }
  public void beginSend(String email, String mailCode)
   throws MessagingException {
 String mailTo = email; // 收件方mail地址
 String mailTitle = "欢迎您使用书聊网! 立即激活您的账户";
 String mailContent = "<p>尊敬的用户:</p><p>你好!立即激活您的账户,和书聊网会员一起看书交流。要激活您的账户,只需复制下面的验证码到注册页面确认。 </p>"
  + mailCode + "<p>版权所有© 1999 - 2015 BookChat。保留所有权利。</p>";
 // 设置主要信息
 Properties props = new Properties();
 props.put("mail.smtp.host", "smtp." + HOST);
 props.put("mail.smtp.auth", "true");
 Session session = Session.getInstance(props);
 session.setDebug(true);
 // 开启邮件对象
 MimeMessage message = new MimeMessage(session);
 // 设置发件人/收件人/主题/发信时间
 InternetAddress from = new InternetAddress(QQ + "@" + HOST);
 message.setFrom(from);
 InternetAddress to = new InternetAddress(mailTo);
 message.setRecipient(Message.RecipientType.TO, to);
 message.setSubject(mailTitle);
 message.setSentDate(new Date());
 // 设置消息对象内容
 BodyPart mdp = new MimeBodyPart();// 新建一个存放信件内容的BodyPart对象
 mdp.setContent(mailContent, "text/html;charset=utf-8");// 给BodyPart对象设置内容和格式/编码方式
 Multipart mm = new MimeMultipart();// 新建一个MimeMultipart对象用来存放BodyPart对象(事实上可以存放多个)
 mm.addBodyPart(mdp);// 将BodyPart加入到MimeMultipart对象中(可以加入多个BodyPart)
 message.setContent(mm);// 把mm作为消息对象的内容
 message.saveChanges();
 // 开启传输对象
 Transport transport = session.getTransport("smtp");
 transport.connect("smtp." + HOST, QQ, PASS); // 这里的115798090也要修改为您的QQ号码
 transport.sendMessage(message, message.getAllRecipients());
 transport.close();
  }
}
package com.util;
import java.io.IOException;
import java.io.PrintWriter;
import org.apache.struts2.ServletActionContext;
import net.sf.json.JSONObject;
public class OperateJSON {
JSONObject json;
public OperateJSON() {
json = new JSONObject();
json.put("code", "");
json.put("msg", "");
json.put("data", "");
}
public OperateJSON(String str) {
json = JSONObject.fromObject(str);
}
public void put(String key, Object value) {
json.remove(key);
json.put(key, value);
}
public void putCode(Object value) {
json.remove("code");
this.put("code", value);
}
public void putMsg(Object value) {
json.remove("msg");
this.put("msg", value);
}
public void remove(String key) {
json.remove(key);
}
public void send() {
System.out.println("----------返回的数据是:" + json);
try {
PrintWriter out = ServletActionContext.getResponse().getWriter();
out.print(json);
out.flush();
} catch (IOException e) {
e.printStackTrace();
}
}
} 7. Conception Hibernate Dao Ces blocs sont tous du contenu pour faire fonctionner la base de données. Chacun a son propre style, alors écrivez-les soigneusement. Le code est trop compliqué, donc je ne le montrerai pas pour effrayer les gens -.- !
8. RésuméJe voulais montrer les résultats au début, mais oubliez ça, c'est tout. Un petit exemple, les défauts sont inévitables, j'espère que les experts pourront me corriger.
J'ai fini d'écrire et je me sens beaucoup mieux. Ce n'est pas grave d'aller au salon de l'emploi. Peu importe que je puisse trouver un emploi ou non. Ce qui compte, c'est que je sois sur la bonne voie. sur moi-même, puis-je être fort...
Ce qui précède est ce que j'ai compilé pour tout le monde. J'espère que cela sera utile à tout le monde à l'avenir.
Articles associés :
Solution pour éviter les requêtes Ajax répétées
Comment résoudre l'erreur d'erreur qui apparaît toujours lorsque ajax renvoie la vérification
Ce qui précède est le contenu détaillé de. pour plus d'informations, suivez d'autres articles connexes sur le site Web de PHP en chinois!
Articles Liés
Voir plus- Une analyse approfondie du composant de groupe de liste Bootstrap
- Explication détaillée du currying de la fonction JavaScript
- Exemple complet de génération de mot de passe JS et de détection de force (avec téléchargement du code source de démonstration)
- Angularjs intègre l'interface utilisateur WeChat (weui)
- Comment basculer rapidement entre le chinois traditionnel et le chinois simplifié avec JavaScript et l'astuce permettant aux sites Web de prendre en charge le basculement entre les compétences en chinois simplifié et traditionnel_javascript

