Maison >développement back-end >tutoriel php >PHP crée une instance de classe encapsulée personnalisée pour un avatar d'utilisateur circulaire
PHP crée une instance de classe encapsulée personnalisée pour un avatar d'utilisateur circulaire
- 黄舟original
- 2017-09-18 09:14:401286parcourir
L'éditeur suivant vous présentera un exemple de création d'un avatar d'utilisateur rond dans le code source de la classe d'encapsulation PHP_custom. L'éditeur le trouve plutôt bon, je vais donc le partager avec vous maintenant et le donner comme référence pour tout le monde. Suivons l'éditeur pour jeter un œil
Réflexion
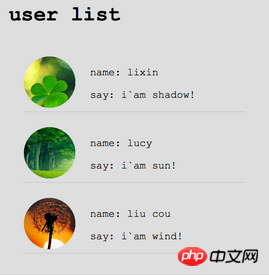
Utilisez la méthode des calques pour concevoir, un total de 3 calques d'image doivent être créés
1. Couche inférieure : la dernière image générée
2. Avatar de l'utilisateur réel : comme couche intermédiaire, la véritable image de l'avatar téléchargée par l'utilisateur
3. : comme couche supérieure, dessinez un cercle dans le masque et réglez-le sur transparent
comme indiqué :

Le code est le suivant :
Classe de fonction principale avatar.class.php
<?php
class avatar
{
private $fileName; //文件的绝对路径(或基于最终调用文件的相对路径)
private $rgb; //颜色索引(数组 array(255,255,0) 或 16进制值 ffff00/#ffff00/ff0/#ff0)
private $size; //图像大小
private $imgInfo; //图像信息
/**
* 初始化
* Enter description here ...
* @param string $fileName 文件的绝对路径(或基于最终调用文件的相对路径)
* @param mixed $rgb 颜色索引(数组 array(255,255,0) 或 16进制值 ffff00/#ffff00/ff0/#ff0)
* @param int $size 图像大小
*/
public function __construct($fileName, $rgb, $size)
{
$this->fileName = $fileName;
if(is_array($rgb)){
$this->rgb = $rgb; //rgb颜色数组 array(255,255,0)
}else{
//有的人喜欢带#号
$rgb = trim($rgb, '#');
//处理缩写形式
if (strlen($rgb)==3){
$_tmp = $rgb[0].$rgb[0].$rgb[1].$rgb[1].$rgb[2].$rgb[2];
$rgb = $_tmp;
}
$this->rgb = $this->createRGB($rgb); //16进制值 ffff00
}
$this->size = $size;
$this->imgInfo = getimagesize($this->fileName);
if(!$this->imgInfo){
throw Exception("无法读取图像文件");
}
if(!in_array($this->imgInfo[2], array(2,3))){
//仅允许jpg和png
throw Exception("图像格式不支持");
}
}
/**
* 显示图像
* Enter description here ...
*/
public function show()
{
header("content-type:image/png");
$shadow = $this->createshadow(); //遮罩图片
//创建一个方形图片
$imgbk = imagecreatetruecolor($this->size, $this->size); //目标图片
switch ($this->imgInfo[2]){
case 2:
$imgfk = imagecreatefromjpeg($this->fileName); //原素材图片
break;
case 3:
$imgfk = imagecreatefrompng($this->fileName); //原素材图片
default:
return ;
break;
}
$realSize = $this->imgInfo[0]<$this->imgInfo[1]? $this->imgInfo[0] : $this->imgInfo[1];
imagecopyresized($imgbk, $imgfk, 0, 0, 0, 0, $this->size, $this->size, $realSize, $realSize);
imagecopymerge($imgbk, $shadow, 0, 0, 0, 0, $this->size, $this->size, 100);
//创建图像
imagepng($imgbk);
//销毁资源
imagedestroy($imgbk);
imagedestroy($imgfk);
imagedestroy($shadow);
}
/**
* 创建一个圆形遮罩
* Enter description here ...
* @param array 10进制颜色数组
*/
private function createshadow()
{
$img = imagecreatetruecolor($this->size, $this->size);
imageantialias($img, true); //开启抗锯齿
$color_bg = imagecolorallocate($img, $this->rgb[0], $this->rgb[1], $this->rgb[2]); //背景色
$color_fg = imagecolorallocate($img, 0, 0, 0); //前景色,主要用来创建圆形
imagefilledrectangle($img, 0, 0, 200, 200, $color_bg);
imagefilledarc($img, 100, 100, 200, 200, 0, 0, $color_fg, IMG_ARC_PIE);
imagecolortransparent($img, $color_fg); //将前景色转换为透明
return $img;
}
/**
* 将字符形式16进制串转为10进制
* Enter description here ...
* @param $str
*/
private function getIntFromHexStr($str)
{
$format = '0123456789abcdef';
$sum = 0;
for($i=strlen($str)-1, $c=0, $j=0; $i>=$c; $i--,$j++){
$index = strpos($format, $str[$i]);//strpos从0计算
$sum+=$index * pow(16,$j);
}
return $sum;
}
/**
* 将16进制颜色转为10进制颜色值数组(RGB)
* Enter description here ...
* @param $str 16进制串(如:ff9900)
*/
private function createRGB($str)
{
$rgb = array();
if(strlen($str) != 6){
$rgb[] = 0xff;
$rgb[] = 0xff;
$rgb[] = 0xff;
return $rgb; //默认白色
}
$rgb[] = $this->getIntFromHexStr(substr($str, 0, 2));
$rgb[] = $this->getIntFromHexStr(substr($str, 2, 2));
$rgb[] = $this->getIntFromHexStr(substr($str, 4, 2));
return $rgb;
}
}Ce qui précède est le contenu détaillé de. pour plus d'informations, suivez d'autres articles connexes sur le site Web de PHP en chinois!
Articles Liés
Voir plus- Comment utiliser cURL pour implémenter les requêtes Get et Post en PHP
- Comment utiliser cURL pour implémenter les requêtes Get et Post en PHP
- Comment utiliser cURL pour implémenter les requêtes Get et Post en PHP
- Comment utiliser cURL pour implémenter les requêtes Get et Post en PHP
- Tous les symboles d'expression dans les expressions régulières (résumé)

