Maison >interface Web >Tutoriel PS >Photoshop et WPF travaillent ensemble pour créer un contrôle de barre de progression sympa et personnalisé
Photoshop et WPF travaillent ensemble pour créer un contrôle de barre de progression sympa et personnalisé
- 高洛峰original
- 2017-02-18 13:42:321959parcourir
De nos jours, si vous souhaitez créer une application professionnelle, la conception de l'interface utilisateur et la facilité d'utilisation sont très importantes. La conception d'interface utilisateur peut utiliser des outils de conception tels que Photoshop ou AI. J'ai déjà appris que l'outil de conception WPF Expression Blend peut importer directement des fichiers PSD ou des fichiers de conception AI (bien sûr, toutes les fonctionnalités ne sont pas prises en charge). des ennuis. Heureusement, finalement, l’effet escompté a été atteint. Ce qui suit est un exemple étape par étape de la façon d'utiliser d'abord PS pour créer un modèle de graphiques vectoriels, puis d'utiliser Expression Blend pour importer le fichier PSD et d'obtenir la valeur de données de PATH pour créer une belle interface utilisateur permettant de créer une barre de progression personnalisée et sympa. contrôle.
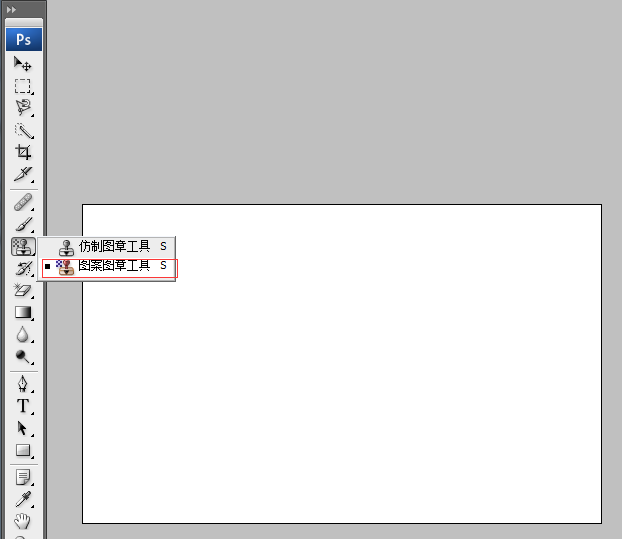
1. Ouvrez Photoshop, créez un nouveau calque vierge et cliquez sur l'outil de tampon de motif PS :
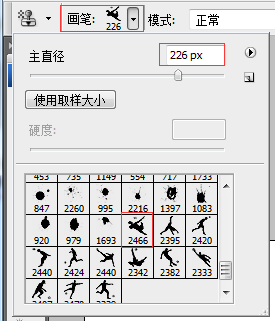
2. Sélectionnez le pinceau que vous aimez (vous pouvez télécharger des pinceaux gratuits sur le site Web), comme indiqué ci-dessous :
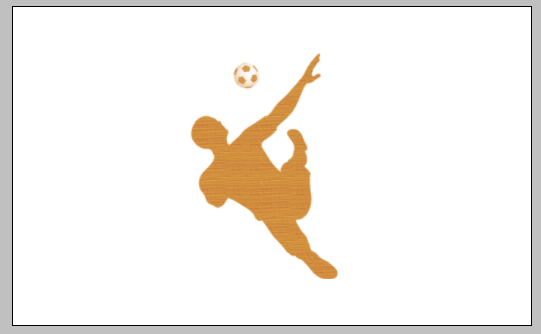
Cliquez sur l'emplacement approprié, comme indiqué dans l'image ci-dessous.
3. Maintenez la touche CTRL enfoncée, sélectionnez le calque, passez au panneau Chemins et cliquez sur [Créer un chemin de travail à partir de sélection], comme indiqué ci-dessous :
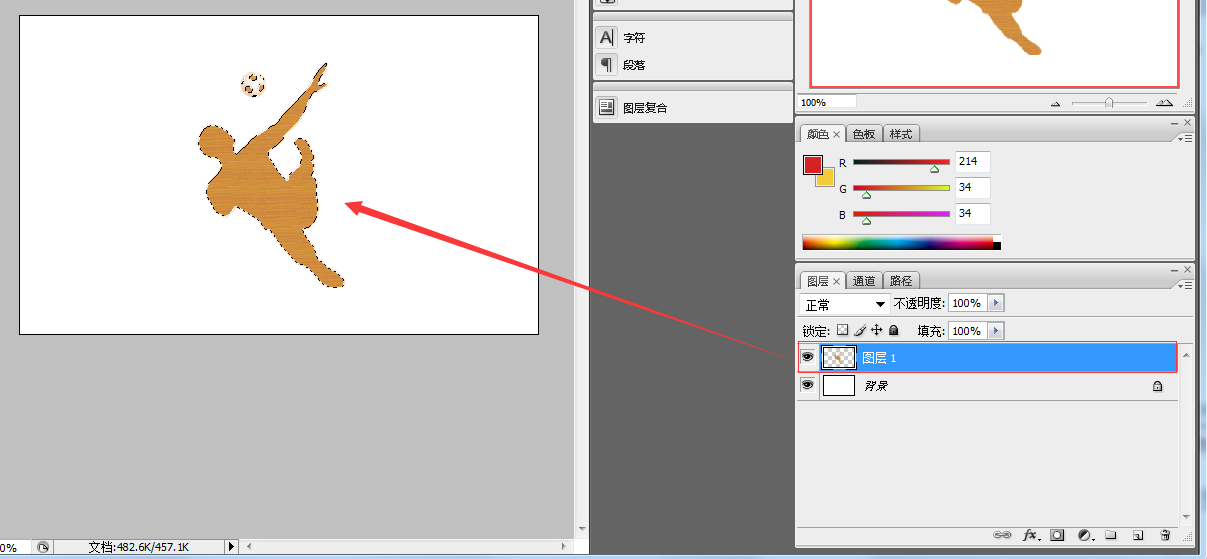
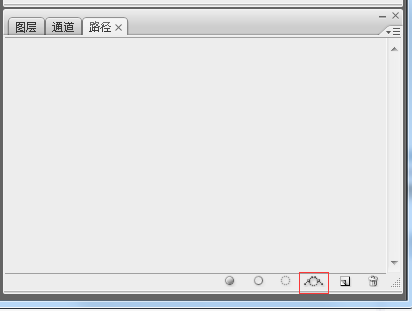
Faites attention à l'image ci-dessus. Le bouton de la boîte rouge est [Créer un chemin de travail à partir de la sélection]. Après avoir cliqué, l'image suivante apparaîtra :
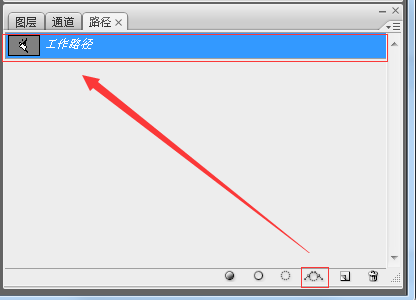
4. Il s'agit de l'étape la plus critique. Créez un masque vectoriel, passez au panneau des calques, cliquez sur l'outil [Stylo] et sélectionnez l'élément [Créer un masque vectoriel] dans le menu contextuel du menu contextuel. graphique, comme le montre la figure suivante :
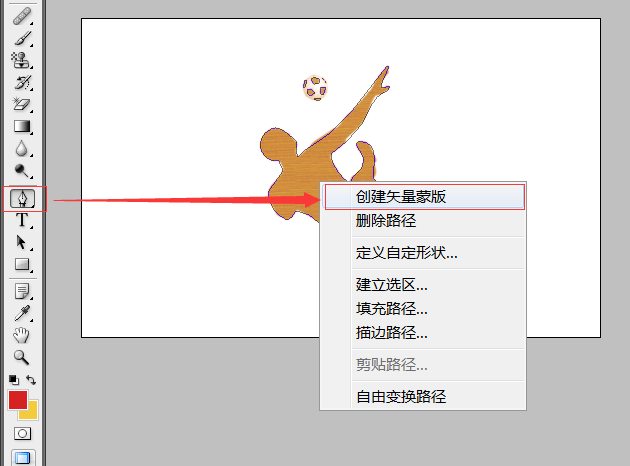
Ensuite, vous pouvez voir l'effet de l'image ci-dessous en PS, indiquant que la création est réussie.
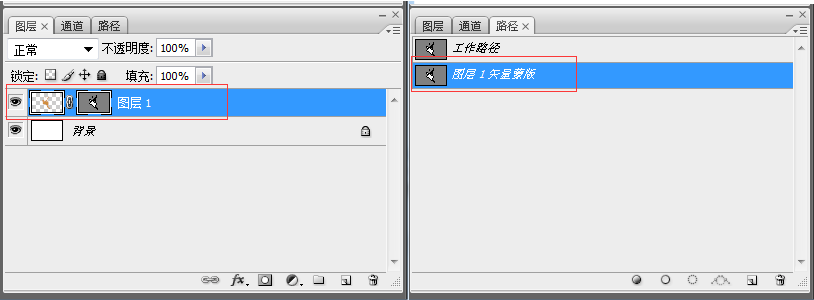
Enregistrez le fichier PS en tant que fichier barre de progression.PSD pour une utilisation ultérieure.
5. Ouvrez Expression Blend 4 pour créer un nouveau projet WPF, puis importez le fichier PSD, comme indiqué ci-dessous :
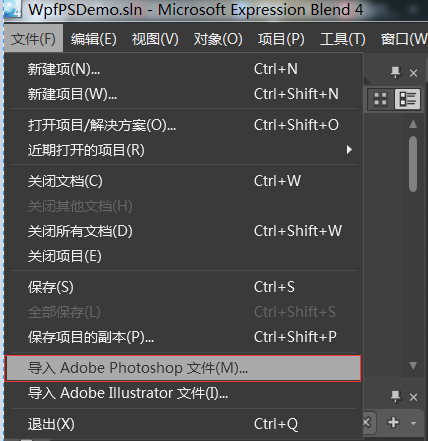
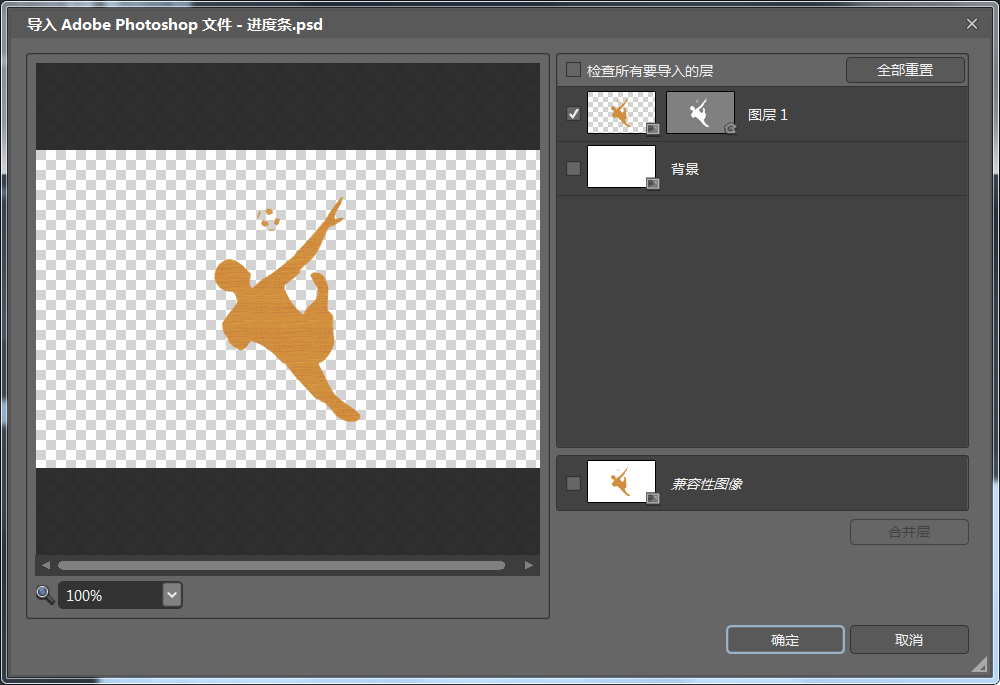
Une fois l'importation réussie, vous pouvez copier les données du clip du graphique, il s’agit de la valeur de données requise par PATH dans WPF.
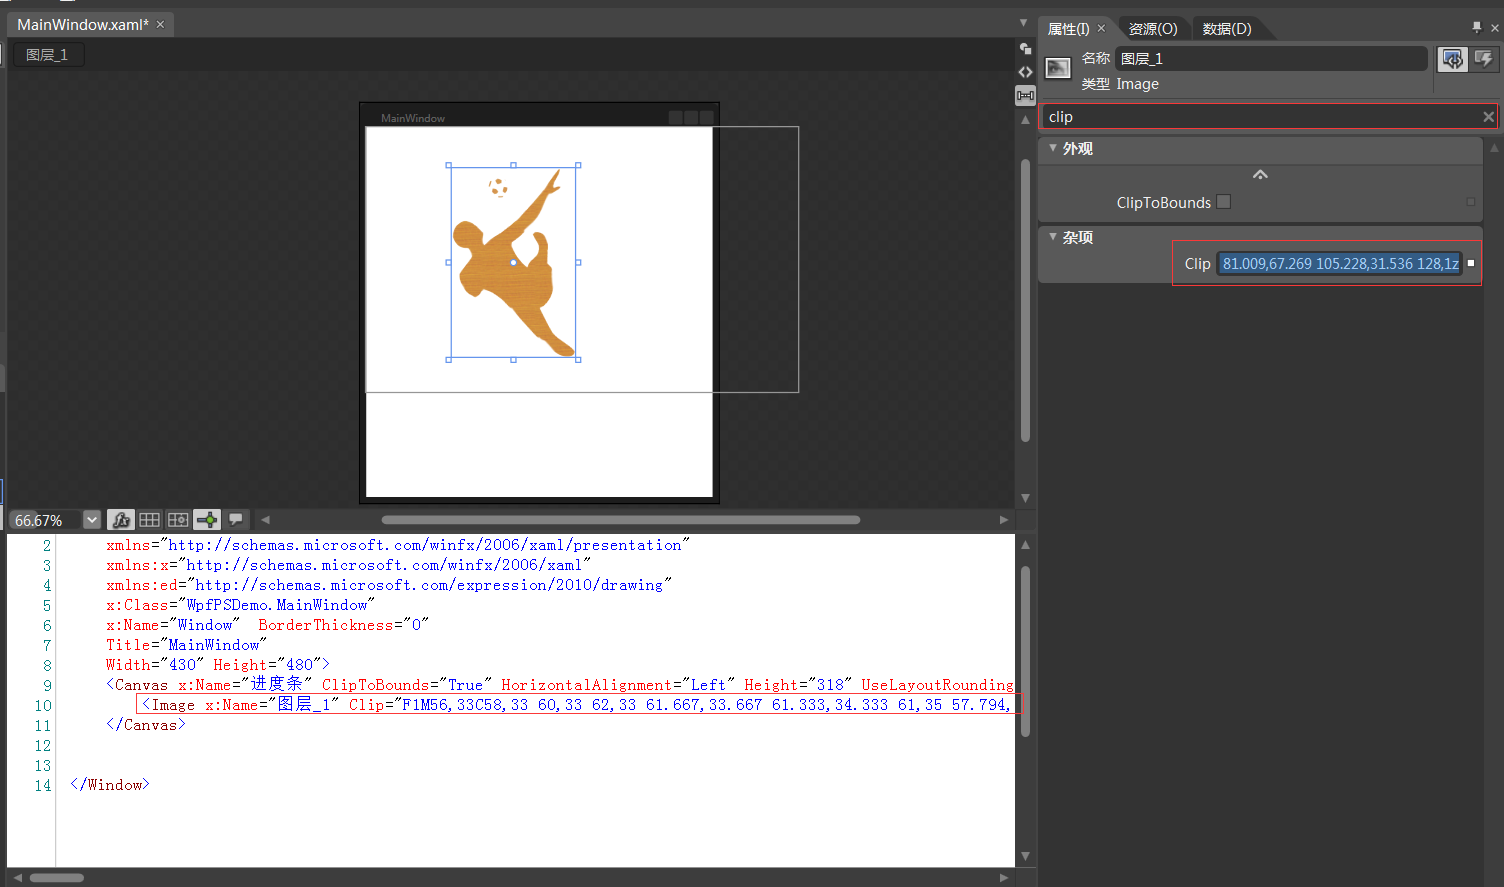
Créons un contrôle de barre de progression WPF sympa.
6. Rouvrez le projet dans VS2010 et ajoutez une bibliothèque de contrôles personnalisés WPF, comme indiqué ci-dessous :
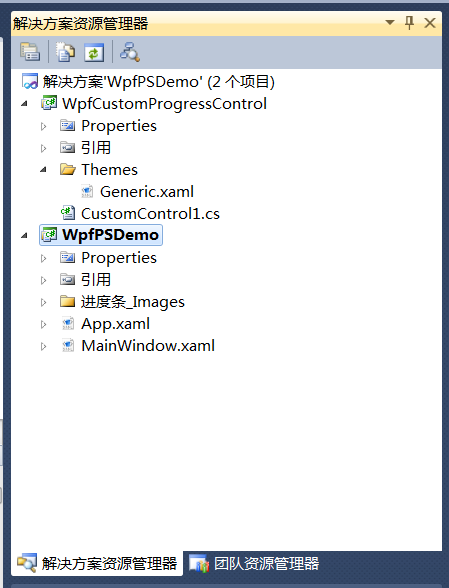
17 Écrivez l'interface utilisateur de contrôle et le code d'arrière-plan comme suit :
<resourcedictionary>

    <style>
        <Setter Property="Template">
            <Setter.Value>
                <ControlTemplate TargetType="{x:Type local:CustomProgressControl}">
                    <Grid x:Name="PART_container"
                          Background="{TemplateBinding Background}"
                          Width="{TemplateBinding Width}"
                          Height="{TemplateBinding Height}">
                        <Path x:Name="PART_foreground_P"
                              Visibility="Collapsed"
                              Stretch="Fill"
                              Stroke="Transparent"
                              Fill="{TemplateBinding Foreground}"
                              StrokeThickness="2"
                              Data="F1M56,33C58,33 60,33 62,33 61.667,33.667 61.333,34.333 61,35 57.794,34.859 53.856,36.079 56,33z M49,24C54.364,24.735 53.554,24.821 56,28 53.807,30.696 55.287,29.902 51,31 50,30 49,29 48,28 48.333,26.667 48.667,25.333 49,24z M62,22C63.666,22.333 65.333,22.667 67,23 66.333,27.571 65.935,27.376 64,30 63,29.333 62,28.667 61,28 61,27.667 61,27.333 61,27 61.333,25.333 61.667,23.666 62,22z M46,15C46.667,15 47.333,15 48,15 47.333,17.333 46.667,19.667 46,22 45.333,22 44.667,22 44,22 44.667,19.667 45.333,17.333 46,15z M63,13C64.923,14.392 63.599,13.101 65,15 64.333,14.333 63.667,13.667 63,13z M55,12C56.666,12.667 58.333,13.333 60,14 60,15.333 60,16.667 60,18 59.333,18 58.667,18 58,18 54.722,21.928 52.838,16.561 52,14 53,13.333 54,12.667 55,12z M128,1C128.667,1 129.333,1 130,1 128.882,10.058 122.793,12.326 122,23 126.364,22.028 126.876,21.206 131,22 130,23.333 129,24.667 128,26 110.659,32.752 112.704,45.252 103,59 95.769,69.245 82.761,82.131 72,89 72.621,101.092 82.373,112.463 90,118 90.333,118 90.667,118 91,118 93.274,107.421 107.464,106.386 104,92 101.667,87.667 99.333,83.333 97,79 98,78 99,77 100,76 122.812,77.152 112.786,100.488 115,114 116.666,115.666 118.333,117.333 120,119 127.359,142.373 118.776,160.626 106,168 110.337,176.877 114.918,188.188 121,197 127.441,206.332 140.794,210.508 148,220 146.506,223.067 146.885,223.215 144,225 113.08,236.802 62.376,138.34 36,147 34.077,151.751 32.347,152.761 28,155 17.556,150.255 9.333,141.565 9,127 13.999,120.001 19,112.999 24,106 22.667,102.667 21.333,99.333 20,96 7.555,96.019 4.392,90.889 1,82 1.465,74.486 3.768,68.82 9,66 19.848,56.341 31.922,71.946 38,77 37.406,83.299 36.792,87.413 39,92 41.333,89.667 43.667,87.333 46,85 81.009,67.269 105.228,31.536 128,1z" />

                        <Rectangle x:Name="PART_mask"
                                   Fill="{TemplateBinding Background}"
                                   VerticalAlignment="Stretch"
                                   HorizontalAlignment="Stretch" />

                        <Path x:Name="PART_outline_P"
                              Visibility="Collapsed"
                              Stretch="Fill"
                              Stroke="{TemplateBinding BorderBrush}"
                              Fill="Transparent"
                              StrokeThickness="2"
                              Data="F1M56,33C58,33 60,33 62,33 61.667,33.667 61.333,34.333 61,35 57.794,34.859 53.856,36.079 56,33z M49,24C54.364,24.735 53.554,24.821 56,28 53.807,30.696 55.287,29.902 51,31 50,30 49,29 48,28 48.333,26.667 48.667,25.333 49,24z M62,22C63.666,22.333 65.333,22.667 67,23 66.333,27.571 65.935,27.376 64,30 63,29.333 62,28.667 61,28 61,27.667 61,27.333 61,27 61.333,25.333 61.667,23.666 62,22z M46,15C46.667,15 47.333,15 48,15 47.333,17.333 46.667,19.667 46,22 45.333,22 44.667,22 44,22 44.667,19.667 45.333,17.333 46,15z M63,13C64.923,14.392 63.599,13.101 65,15 64.333,14.333 63.667,13.667 63,13z M55,12C56.666,12.667 58.333,13.333 60,14 60,15.333 60,16.667 60,18 59.333,18 58.667,18 58,18 54.722,21.928 52.838,16.561 52,14 53,13.333 54,12.667 55,12z M128,1C128.667,1 129.333,1 130,1 128.882,10.058 122.793,12.326 122,23 126.364,22.028 126.876,21.206 131,22 130,23.333 129,24.667 128,26 110.659,32.752 112.704,45.252 103,59 95.769,69.245 82.761,82.131 72,89 72.621,101.092 82.373,112.463 90,118 90.333,118 90.667,118 91,118 93.274,107.421 107.464,106.386 104,92 101.667,87.667 99.333,83.333 97,79 98,78 99,77 100,76 122.812,77.152 112.786,100.488 115,114 116.666,115.666 118.333,117.333 120,119 127.359,142.373 118.776,160.626 106,168 110.337,176.877 114.918,188.188 121,197 127.441,206.332 140.794,210.508 148,220 146.506,223.067 146.885,223.215 144,225 113.08,236.802 62.376,138.34 36,147 34.077,151.751 32.347,152.761 28,155 17.556,150.255 9.333,141.565 9,127 13.999,120.001 19,112.999 24,106 22.667,102.667 21.333,99.333 20,96 7.555,96.019 4.392,90.889 1,82 1.465,74.486 3.768,68.82 9,66 19.848,56.341 31.922,71.946 38,77 37.406,83.299 36.792,87.413 39,92 41.333,89.667 43.667,87.333 46,85 81.009,67.269 105.228,31.536 128,1z" />

                        <TextBlock x:Name="PART_percentage_text"
                                   VerticalAlignment="Center"
                                   HorizontalAlignment="Center"
                                   FontSize="16"
                                   FontWeight="ExtraBlack"
                                   Foreground="{TemplateBinding TextForeground}"/>


    </style>

</resourcedictionary>
using System;
using System.Collections.Generic;
using System.Linq;
using System.Text;
using System.Windows;
using System.Windows.Controls;
using System.Windows.Data;
using System.Windows.Documents;
using System.Windows.Input;
using System.Windows.Media;
using System.Windows.Media.Imaging;
using System.Windows.Navigation;
using System.Windows.Shapes;
namespace WpfCustomProgressControl
{
[TemplatePart(Name = "PART_mask", Type = typeof(Rectangle))]
[TemplatePart(Name = "PART_container", Type = typeof(Grid))]
[TemplatePart(Name = "PART_percentage_text", Type = typeof(TextBlock))]
[TemplatePart(Name = "PART_foreground_P", Type = typeof(Path))]
[TemplatePart(Name = "PART_outline_P", Type = typeof(Path))]
public class CustomProgressControl : ProgressBar
{
static CustomProgressControl()
{
DefaultStyleKeyProperty.OverrideMetadata(typeof(CustomProgressControl), new FrameworkPropertyMetadata(typeof(CustomProgressControl)));
}
Rectangle mask;
Grid container;
TextBlock percentageText;
Path foreground_P;
Path outline_P;
#region TextForeground 文本
public SolidColorBrush TextForeground
{
get { return (SolidColorBrush)GetValue(TextForegroundProperty); }
set { SetValue(TextForegroundProperty, value); }
}
public static readonly DependencyProperty TextForegroundProperty =
DependencyProperty.Register("TextForeground", typeof(SolidColorBrush),
typeof(CustomProgressControl),
new FrameworkPropertyMetadata(new SolidColorBrush(Colors.DarkGray)));
#endregion
public override void OnApplyTemplate()
{
base.OnApplyTemplate();
foreground_P = this.Template.FindName("PART_foreground_P", this) as Path;
outline_P = this.Template.FindName("PART_outline_P", this) as Path;
mask = this.Template.FindName("PART_mask", this) as Rectangle;
container = this.Template.FindName("PART_container", this) as Grid;
percentageText = this.Template.FindName("PART_percentage_text", this) as TextBlock;
if (foreground_P != null)
{
foreground_P.Visibility = Visibility.Visible;
outline_P.Visibility = Visibility.Visible;
}
Width = double.IsNaN(Width) ? 50 : Width;
Height = double.IsNaN(Height) ? 135 : Height;
Minimum = double.IsNaN(Minimum) ? 0 : Minimum;
Maximum = double.IsNaN(Maximum) ? 100 : Maximum;
if (mask != null)
{
var percentageValue = Value / Maximum;
var awayMargin = percentageValue * Height;
var percentageString = string.Empty;
if (percentageValue > 0)
percentageString = (percentageValue * 100).ToString("##");
else if (percentageValue == 0)
percentageString = "0";
percentageText.Text = string.Format("{0}%", string.IsNullOrEmpty(percentageString) ? "0" : percentageString);
mask.Margin = new Thickness(0, 0, 0, awayMargin);
}
container.Clip = new RectangleGeometry
{
Rect = new Rect(0, 0, Width, Height)
};
mask.Width = Width;
mask.Height = Height;
}
protected override void OnValueChanged(double oldValue, double newValue)
{
base.OnValueChanged(oldValue, newValue);
if (Value < Minimum)
{
Value = Minimum;
}
if (Value > Maximum)
{
Value = Maximum;
}
if (mask != null)
{
var percentageValue = Value / Maximum;
var awayMargin = percentageValue * Height;
var percentageString = string.Empty;
if (percentageValue > 0)
percentageString = (percentageValue * 100).ToString("##");
else if (percentageValue == 0)
percentageString = "0";
percentageText.Text = string.Format("{0}%", string.IsNullOrEmpty(percentageString) ? "0" : percentageString);
//蒙板来变更进度
mask.Margin = new Thickness(0, 0, 0, awayMargin);
}
}
}
}
18 Faites glisser le contrôle dans l'interface principale de WpfPSDemo et personnalisez les propriétés. Le code est le suivant :
 <window>
    <customprogresscontrol></customprogresscontrol>
</window>
using System;
using System.Collections.Generic;
using System.Text;
using System.Windows;
using System.Windows.Controls;
using System.Windows.Data;
using System.Windows.Documents;
using System.Windows.Input;
using System.Windows.Media;
using System.Windows.Media.Imaging;
using System.Windows.Shapes;
using System.Threading;
namespace WpfPSDemo
{
    /// <summary>
    /// MainWindow.xaml 的交互逻辑
    /// </summary>
    public partial class MainWindow : Window
    {
        Thread timeThread;
        int i = 0;
        public MainWindow()
        {
            this.InitializeComponent();
            this.customProgressControl1.Value = 0;
            this.Background = Brushes.Yellow;
            timeThread = new Thread(new ThreadStart(DispatcherThread));
            timeThread.Start();

        }
        public void DispatcherThread()
        {
            //可以通过循环条件来控制UI的更新
            while (true)
            {
                ///线程方法委托(无参方法)
                this.customProgressControl1.Dispatcher.BeginInvoke(new Action(UpdateTime));
                Thread.Sleep(200);
            }
        }

        private void UpdateTime()
        {

            if (i < 100)
            {
                i++;
                this.customProgressControl1.Value = i;
            }
            else
            {
                timeThread.Abort();
            }

        }
    }
}
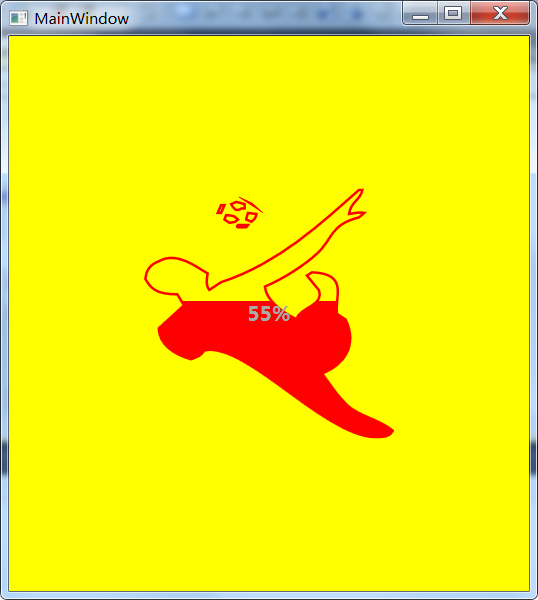
<.>Exécutez le code, l'effet est le suivant :
Articles Liés
Voir plus- PhotoShop ajoute un faisceau de lumière à l'image
- Retouche photo PS丨C'est ainsi que le modèle de couverture du magazine a été retouché
- Effet de police de papier plié réaliste PS
- Technologie frontale-coupe PS
- Tutoriel de conception de sites Web PS XII - Créer une mise en page Web professionnelle Web2.0 dans PS

