Maison >développement back-end >tutoriel php >Série de contrôles de l'interface utilisateur Android : LinearLayout (disposition linéaire)
Série de contrôles de l'interface utilisateur Android : LinearLayout (disposition linéaire)
- 黄舟original
- 2017-01-19 09:47:231349parcourir
LinearLayout est un ViewGroup qui affiche les éléments View dans une direction linéaire, horizontalement ou verticalement.
Vous pouvez réutiliser LinearLayout Si vous souhaitez utiliser un LinearLayout multicouche imbriqué, vous pouvez envisager d'utiliser RelativeLayout à la place. .
1. Commencez à créer un projet nommé HelloLinearLayout
2. Ouvrez le fichier res/layout/main.xml et insérez le contenu suivant
<?xml version="1.0" encoding="utf-8"?>
<LinearLayout xmlns:android="http://schemas.android.com/apk/res/android"
    android:orientation="vertical"
    android:layout_width="fill_parent"
    android:layout_height="fill_parent"
    >
        <LinearLayout
                android:orientation="horizontal"
                android:layout_width="fill_parent"
                android:layout_height="fill_parent"
                android:layout_weight="1">
                <TextView
                        android:text="red"
                        android:gravity="center_horizontal"
                        android:background="#aa0000"
                        android:layout_width="wrap_content"
                        android:layout_height="fill_parent"
                        android:layout_weight="1"
                />
                <TextView
                        android:text="green"
                        android:gravity="center_horizontal"
                        android:background="#00aa00"
                        android:layout_width="wrap_content"
                        android:layout_height="fill_parent"
                        android:layout_weight="1"
                />
                <TextView
                        android:text="blue"
                        android:gravity="center_horizontal"
                        android:background="#0000aa"
                        android:layout_width="wrap_content"
                        android:layout_height="fill_parent"
                        android:layout_weight="1"
                />
                <TextView
                        android:text="yellow"
                        android:gravity="center_horizontal"
                        android:background="#aaaa00"
                        android:layout_width="wrap_content"
                        android:layout_height="fill_parent"
                        android:layout_weight="1"
                />
        </LinearLayout>
        <LinearLayout
                android:orientation="vertical"
                android:layout_width="fill_parent"
                android:layout_height="fill_parent"
                android:layout_weight="1">
                <TextView
                        android:text="row one"
                        android:textSize="15pt"
                        android:layout_width="fill_parent"
                        android:layout_height="wrap_content"
                        android:layout_weight="1"
                />
                <TextView
                        android:text="row two"
                        android:textSize="15pt"
                        android:layout_width="fill_parent"
                        android:layout_height="wrap_content"
                        android:layout_weight="1"
                />
                <TextView
                        android:text="row three"
                        android:textSize="15pt"
                        android:layout_width="fill_parent"
                        android:layout_height="wrap_content"
                        android:layout_weight="1"
                />
                <TextView
                        android:text="row four"
                        android:textSize="15pt"
                        android:layout_width="fill_parent"
                        android:layout_height="wrap_content"
                        android:layout_weight="1"
                />
        </LinearLayout>
</LinearLayout>
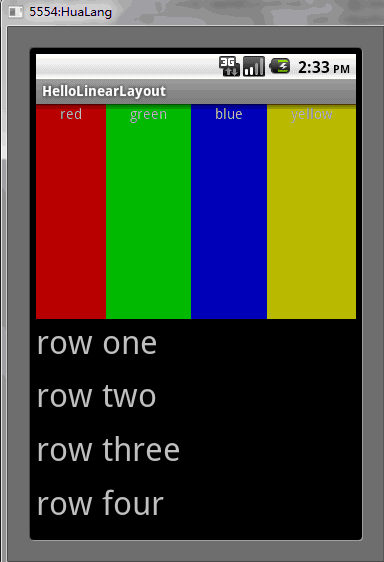
Vérifiez ce XML. classer soigneusement. Il existe un élément racine LinearLayout qui définit sa direction comme verticale. Toutes les vues enfants (2 au total) sont empilées verticalement. Le premier enfant est un autre LinearLayout disposé dans la direction horizontale et le deuxième enfant est empilé verticalement. un LinearLayout avec une disposition verticale. Chacun de ces LinearLayouts imbriqués contient plusieurs éléments TextView et leurs directions sont définies par la balise LinearLayout parent.
3. Maintenant, ouvrez HelloLinearLayout.java et assurez-vous qu'il a chargé le fichier de mise en page res/layout/main.xml dans la méthode onCreate()
public void onCreate(Bundle savedInstanceState) {
        super.onCreate(savedInstanceState);
        setContentView(R.layout.main);
la méthode setContentView(int) est Activité Le fichier de mise en page est chargé, spécifié par l'ID de ressource - R.layout.main fait référence au fichier de mise en page res/layout/main.xml
4. Exécutez le programme, vous pouvez voir la situation suivante

Ce qui précède est le contenu de la série de contrôles de l'interface utilisateur Android : LinearLayout (mise en page linéaire). Pour plus de contenu connexe, veuillez faire attention au site Web PHP chinois (www.php.cn). )!
Articles Liés
Voir plus- Comment utiliser cURL pour implémenter les requêtes Get et Post en PHP
- Comment utiliser cURL pour implémenter les requêtes Get et Post en PHP
- Comment utiliser cURL pour implémenter les requêtes Get et Post en PHP
- Comment utiliser cURL pour implémenter les requêtes Get et Post en PHP
- Tous les symboles d'expression dans les expressions régulières (résumé)

