


本教程的效果非常漂亮。画面构成看上去比较复杂,不过都是用一些最为基础的自定义画笔加上去的。只要稍微设置好笔刷的颜色及相关属性,就可以用画出漂亮的潮流装饰元素。教程中很多参数都是英文的,制作的时候多参照下中文。
最终效果 
<点小图查看大图>
1、首先我们在photoshop中打开摇滚美女的素材图片,然后选择钢笔工具,在属性栏中单击“路径”、“重叠路径区域除外”按钮,并大致抠画出人物路径,如图所示。在创建路径前,建议先放大图片。 
<点小图查看大图> 
2、按下Ctrl+Enter把路径转为选区,然后在工具栏中单击“快速蒙版”按钮,或按下Q打开“快速蒙版”,如图所示。 
3、在快速蒙版模式下,选区部分的内容会变成红色,这时使用“涂抹工具”,强度设置为30%,然后涂抹软化人物头发的边缘,如图所示。 
4、再次单击“快速蒙版”按钮,或按下Q退出“快速蒙版”,然后按下Ctrl+J复制一层并命名为“lady”,如图所示。 
5、下面我们要扩大图片的背景空间。使用“裁剪工具”创建一个比原图片更大的裁剪区域,然后按下Enter确定,如图所示。 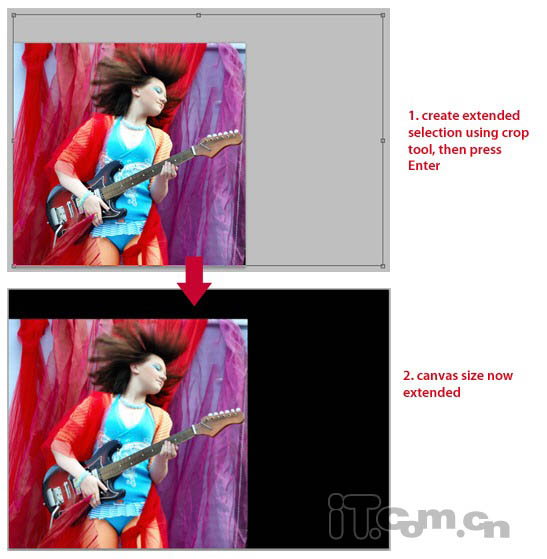
6、使用“渐变工具”,在背景图层创建一个红色到暗红色的径向渐变效果,如图所示。 
7、按下Ctrl+N创建新文档,大小为372*569像素,背景为白色。然后选择画笔工具,载入“纺织图案画笔”,如图所示。 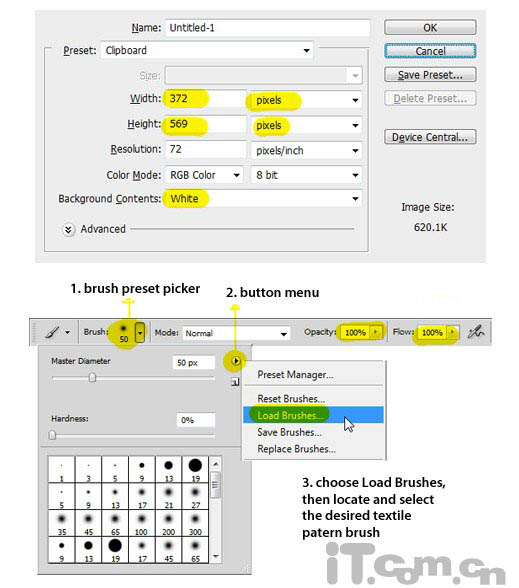
8、打开下图所示的花纹图案。
9、编辑—定义图案,图案命名为“flowery”,在“lady图层”和背景图层之前新建一个图层,命名为“flowery”,如图所示。 


10、选择“编辑—填充”,在对话框中设置使用前面定义的“flowery”图案,不透明度为100%,如图所示。 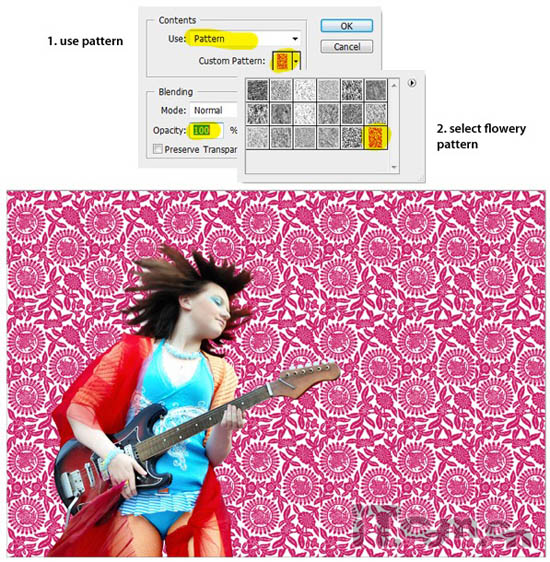
11、设置“flowery”图层的混合模式为“正片双底”,不透明度为50%,如图所示。 
12、复制“lady”图层,命名为“lady2”,并设置混合模式为“滤色”,按下Ctrl+T设置其向左倾斜,如图所示。 
13、使用“橡皮擦工具”擦除下图黄色圈所示的部分。 
14、再次复制得到“lady3”图案,并设置混合模式为滤色,向右倾斜,如图所示。 
15、使用“橡皮擦工具”擦除下图黄色圈所示的部分。 
16、对“lady3”图层设置“滤镜—模糊—径向模糊”效果,数量:8、模糊方法:旋转、品质:好。如图所示。 
17、创建一个新图层,大小为1500*300像素,使用“矩形工具”制作一个黑色的矩形,如图所示。 
18、为矩形图层设置渐变叠加图层样式,样式:对称的、缩放:150%,颜色见下图所示。 
19、设置投影图层样式,距离:0、扩展:0、大小:10,如图所示。 
20、选择“编辑—变换—斜切”,做成平行四边形的效果,然后选择“编辑—定义画笔预设”,命名为“grey flow”,如图所示。 
21、返回人物图片,新建一个图层命名为“color flow”,选择画笔工具,并在画笔预设中选择前面定义的“grey flow”笔刷,如图所示。 
22、选择“窗口—画笔”打开画笔面板,参考下图所示设置画笔工具。 


23、选择“窗口—画笔”打开画笔面板,参考下图所示设置画笔工具。 
24、设置前景色为品红色,然后在“color flow”图层中画出色彩流动的图案,如图所示。 
25、继续画出不同颜色的色彩流,这里使用了蓝色、黄色、绿色、紫色,如图所示。 
26、复制两次“color flow”得到“color flow copy”和“color flow copy2”图层,并分别命名为“color flow2”和“color flow3”,然后移动“color flow”“color flow2”这两个图层到“lady3”图层的下面,如图所示。 
27、隐藏“color flow3”图层。设置“color flow”图层混合模式为“亮度”。“color flow2”图层混合模式为“颜色减淡”,不透明度为“55%”,如图所示。  28、对“color flow2”图层设置“滤镜—模糊—运动模糊”,角度为0 ,距离为500,如图所示。
29、取消隐藏“color flow3”图层,按下Ctrl+T,设置其角度,如图所示。 
30、使用“编辑—变换—扭曲”命令,调整出流水般的形状,如图所。 
31、复制“color flow3”,命名为“color flow4”,然后设置“color flow3”的图层混合模式为“线性减淡”,“color flow4”的混合模式为“颜色减淡”,如图所示。  31、复制“color flow3”,命名为“color flow4”,然后设置“color flow3”的图层混合模式为“线性减淡”,“color flow4”的混合模式为“颜色减淡”,如图所示。
33、新建一个图层,混合模式设置为“叠加”,然后选择画笔工具,并在画笔面板中设置画笔预设效果,如图所示。 
34、设置前景色为白色,使用参照下图所示,画出发光的粒子。 
35、使用“横排文字工具”,输入“ladyrocker”,然后对文字图层设置“外发光”图层样式,如图所示。  36、使用“横排文字工具”,输入“ladyrocker”,然后对文字图层设置“外发光”图层样式,如图所示。
37、选择画笔工具,载入“翅膀自定义画笔”,然后新建一个图层,如图所示。 
38、使用画笔工具,在新图层上人物耳朵位置画出一个适合的翅膀图案,并设置“外发光”图层样式,如图所示。 
到此这个photoshop教程就完毕了,希望大家喜欢。
<点小图查看大图>

 Photoshop Trials and Alternatives: Exploring Free AccessApr 26, 2025 am 12:23 AM
Photoshop offers a free 7-day trial period. To maximize the use of the trial period, 1) sign up for multiple Adobe accounts, 2) use the student or education version, and 3) subscribe to Adobe CreativeCloud. Free alternatives include: 1) GIMP, 2) Photopea, 3) Krita, these software can meet daily image editing needs.
 Photoshop for Photographers: Enhancing and Retouching ImagesApr 25, 2025 am 12:01 AM
Enhance and retouching photos in Photoshop can be achieved by adjusting brightness and contrast, using the Repair Brush Tool. 1) Adjust brightness and contrast: Increase brightness and contrast to improve underexposed photos through the Image->Adjustments->Brightness/Contrast menu. 2) Use the Repair Brush Tool: Select HealingBrushTool in the toolbar and apply to remove miscellaneous points or scars in the image.
 Accessing Photoshop: Methods and AvailabilityApr 24, 2025 am 12:07 AM
Photoshop can be obtained by purchasing a permanent license or subscribing to CreativeCloud. 1. Purchase a permanent license for long-term use, no monthly payment, but no latest updates are available. 2. Subscribe to CreativeCloud to access the latest version and other Adobe software, and you need to pay a monthly or annual fee. The choice should be based on frequency of use and requirements.
 What Photoshop Does Best: Common Tasks and ProjectsApr 23, 2025 am 12:06 AM
Photoshop is specialized in image editing, layering and masking, digital painting and a variety of design applications. 1) Image editing and repair: remove defects and adjust color and brightness. 2) Layers and masks: non-destructive editing and creation. 3) Digital paintings and illustrations: create art works. 4) Practical applications: graphic design, web design and digital art creation.
 Using Photoshop: Creative Possibilities and Practical UsesApr 22, 2025 am 12:09 AM
Photoshop is very practical and creative in practical applications. 1) It provides basic editing, repairing and synthesis functions, suitable for beginners and professionals. 2) Advanced features such as content recognition fill and layer style can improve image effects. 3) Mastering shortcut keys and optimizing layer structure can improve work efficiency.
 Photoshop: Advanced Techniques and ToolsApr 21, 2025 am 12:08 AM
Advanced features of Adobe Photoshop include advanced selection tools, layer blending modes, and actions and scripts. 1) Advanced selection tools such as the Quick Selection Tool and the Color Range Selection Tool can accurately select image areas. 2) Layer blending mode such as "overlapping" mode can create unique visual effects. 3) Actions and scripts can automate repetition of tasks and improve work efficiency.
 Photoshop's Main Feature: Retouching and EnhancementApr 20, 2025 am 12:07 AM
Photoshop's powerful functions in photo editing and enhancement include: 1. Use the "Repair Brush Tool" to remove acne, 2. Use the "Liquefaction Tool" to slim face, 3. Use the "Frequency Separation" technology to accurately retouch images. These functions are implemented through algorithms and image processing technology to optimize image processing effects.
 Photoshop's Key Features: A Deep DiveApr 19, 2025 am 12:08 AM
Key features of Photoshop include layers and masks, adjustment tools, filters and effects. 1. Layers and masks allow independent editing of image parts. 2. Adjust tools such as brightness/contrast can modify image tone and brightness. 3. Filters and effects can quickly add visual effects. Mastering these features can help creative professionals achieve their creative vision.


Hot AI Tools

Undresser.AI Undress
AI-powered app for creating realistic nude photos

AI Clothes Remover
Online AI tool for removing clothes from photos.

Undress AI Tool
Undress images for free

Clothoff.io
AI clothes remover

Video Face Swap
Swap faces in any video effortlessly with our completely free AI face swap tool!

Hot Article
Hot Tools

MinGW - Minimalist GNU for Windows
This project is in the process of being migrated to osdn.net/projects/mingw, you can continue to follow us there. MinGW: A native Windows port of the GNU Compiler Collection (GCC), freely distributable import libraries and header files for building native Windows applications; includes extensions to the MSVC runtime to support C99 functionality. All MinGW software can run on 64-bit Windows platforms.

PhpStorm Mac version
The latest (2018.2.1) professional PHP integrated development tool

SublimeText3 Linux new version
SublimeText3 Linux latest version

mPDF
mPDF is a PHP library that can generate PDF files from UTF-8 encoded HTML. The original author, Ian Back, wrote mPDF to output PDF files "on the fly" from his website and handle different languages. It is slower than original scripts like HTML2FPDF and produces larger files when using Unicode fonts, but supports CSS styles etc. and has a lot of enhancements. Supports almost all languages, including RTL (Arabic and Hebrew) and CJK (Chinese, Japanese and Korean). Supports nested block-level elements (such as P, DIV),

Dreamweaver Mac version
Visual web development tools

