


桃子制作可能要比苹果及梨子等果实的制作稍微难一点。因为部分桃子中间有凹槽,而且凹槽两边的果实肌色有所不同,尤其是暗调和高光部分会有一些差别。制作的时候最好把桃子分为两部分制作,这样即方便控制选
最终效果
1、新建一个800 * 600像素的画布,背景选择白色。新建一个图层用钢笔勾出桃子果实部分的路径如图1,转为选区后填充黑色如图2。
<图1> 
<图2>
2、新建一个图层,用钢笔勾出图3所示的选区,选择渐变工具颜色设置如图4,拉出图5所示的径向渐变。
<图3> 
<图4> 
<图5>
3、新建一个图层,用钢笔勾出图6所示的选区,按Ctrl + Alt + D 羽化12个像素后填充颜色:#D9713C,确定后按Ctrl + Alt + G 与前一图层编组,效果如图7。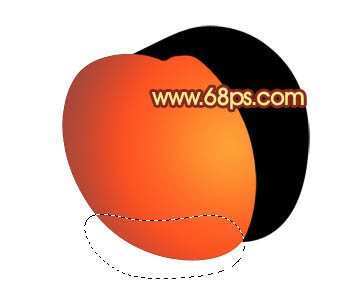
<图6> 
<图7>
4、在当前图层下面新建一个图层,新建的图层会自动跟前一图层编组。用钢笔勾出图8所示的选区羽化8个像素后填充颜色:#EF481C,效果如图9。
<图8> 
<图9>
5、新建一个图层,用钢笔勾出图10所示的选区,羽化10个像素后填充颜色:#76221A。
<图10>
6、新建一个图层,用钢笔勾出图11所示的选区羽化15个像素后填充颜色:#A36A53。
<图11>
7、新建一个图层,用钢笔勾出下图所示的选区,羽化15个像素后填充颜色:#FD4E26,如果觉得边缘不均匀的话还可以适当高斯模糊处理。
<图12>
8、制作底部暗调部分,新建一个图层用钢笔沿着边缘线勾出图13所示的选区羽化5个像素后填充颜色:#712B0B。
<图13>
9、制作顶部暗调部分,新建一个图层用钢笔勾出图14所示的选区,羽化8个像素后填充颜色:#D03D23。
<图14>
10、制作顶部凹陷部分,新建一个图层用钢笔勾出图15所示的选区羽化5个像素后填充颜色:#AF4D34,取消选区后加上图层蒙版,用黑色画笔稍微把两端涂点透明效果。
<图15>
11、制作顶部反光区域,新建一个图层把前景颜色设置为:#B97C60,用钢笔勾出图16所示的选区后用画笔涂出下图所示的色块。
<图16>
12、制作中间部分的高光部分,用钢笔勾出图17所示的选区羽化10个像素后,新建一个图层填充颜色:#FE9233。
<图17>
13、新建一个图层,用钢笔勾出下图所示的选区,羽化3个像素后填充颜色:#FC8453,取消选区后加上图层蒙版,用黑色画笔把底部稍微涂点透明效果。
<图18>
14、制作边缘部分高光选区,新建一个图层,用钢笔勾出下图所示的选区,羽化20个像素后填充颜色:#FE9440。
<图19>
15、新建一个图层,用钢笔勾出图20所示的选区羽化5个像素后填充颜色:#FEC151,加强一下高光效果。
<图20>
16、大致半边桃子完成后的效果,如果觉得有不满意的地方可以适当调整一下。
<图21>
17、回到背景图层上面的主体轮廓图层,新建一个图层用钢笔勾出下图所示的选区填充颜色:#DD5918。现在开始制作另半个桃子。
<图22>
18、制作边缘的暗调部分,新建一个图层按Ctrl + Alt + G 与前一图层编组。用钢笔勾出下图所示的选区羽化10个像素后填充颜色:#953E0E。
<图23>
19、制作中间高光部分,在当前图层下面新建一个图层,用钢笔勾出下图所示的选区羽化16个像素后填充颜色:#FC9B3F,效果如下图。
<图24>
20、制作边缘的反光部分,用钢笔勾出下图所示的选区,羽化15个像素后填充颜色:#C07A5B,效果如下图。
<图25>
21、制作底部暗调部分,新建一个图层用钢笔勾出下图所示的选区羽化15个像素后填充颜色:#8E3A0E。
<图26>
22、新建一个图层,用钢笔勾出下图所示的边缘部分高光选区,羽化5个像素后填充颜色:#F5860E。
<图27>
23、同样的方法制作顶部的高光和暗调部分,过程如图28 - 32。颜色可以参照过程图,做好一部分需要新建一个新的图层,这样方便后面修改。
<图28> 
<图29> 
<图30> 
<图31> 
<图32>
24、新建一个图层,用钢笔勾出图33所示的选区羽化5个像素后填充颜色:#F47312。
<图33>
25、大致桃子主体完成的效果如下图。如果有不满意的部分可以微调一下。
<图34>
26、最后加上叶子,完成最终效果。
<图35>

 Using Photoshop: Creative Possibilities and Practical UsesApr 22, 2025 am 12:09 AM
Photoshop is very practical and creative in practical applications. 1) It provides basic editing, repairing and synthesis functions, suitable for beginners and professionals. 2) Advanced features such as content recognition fill and layer style can improve image effects. 3) Mastering shortcut keys and optimizing layer structure can improve work efficiency.
 Photoshop: Advanced Techniques and ToolsApr 21, 2025 am 12:08 AM
Advanced features of Adobe Photoshop include advanced selection tools, layer blending modes, and actions and scripts. 1) Advanced selection tools such as the Quick Selection Tool and the Color Range Selection Tool can accurately select image areas. 2) Layer blending mode such as "overlapping" mode can create unique visual effects. 3) Actions and scripts can automate repetition of tasks and improve work efficiency.
 Photoshop's Main Feature: Retouching and EnhancementApr 20, 2025 am 12:07 AM
Photoshop's powerful functions in photo editing and enhancement include: 1. Use the "Repair Brush Tool" to remove acne, 2. Use the "Liquefaction Tool" to slim face, 3. Use the "Frequency Separation" technology to accurately retouch images. These functions are implemented through algorithms and image processing technology to optimize image processing effects.
 Photoshop's Key Features: A Deep DiveApr 19, 2025 am 12:08 AM
Key features of Photoshop include layers and masks, adjustment tools, filters and effects. 1. Layers and masks allow independent editing of image parts. 2. Adjust tools such as brightness/contrast can modify image tone and brightness. 3. Filters and effects can quickly add visual effects. Mastering these features can help creative professionals achieve their creative vision.
 Photoshop and Digital Art: Painting, Illustration, and CompositingApr 18, 2025 am 12:01 AM
Photoshop's applications in digital art include painting, illustration and image synthesis. 1) Painting: Using brushes, pencils and mixing tools, the artist can create realistic effects. 2) Illustration: With vector and shape tools, artists can accurately draw complex graphics and add effects. 3) Synthesis: Using mask and layer blending mode, artists can seamlessly blend different image elements.
 Advanced Photoshop Tutorial: Master Retouching & CompositingApr 17, 2025 am 12:10 AM
Photoshop's advanced photo editing and synthesis technologies include: 1. Use layers, masks and adjustment layers for basic operations; 2. Use image pixel values to achieve photo editing effects; 3. Use multiple layers and masks for complex synthesis; 4. Use "liquefaction" tools to adjust facial features; 5. Use "frequency separation" technology to perform delicate photo editing, these technologies can improve image processing level and achieve professional-level effects.
 Using Photoshop for Graphic Design: Branding and MoreApr 16, 2025 am 12:02 AM
The steps to using Photoshop for brand design include: 1. Use the Pen tool to draw basic shapes, 2. Add shadows and highlights through layer styles, 3. Adjust colors and details, 4. Use smart objects and actions to automatically generate different versions of the design. Photoshop helps designers create and optimize brand elements with the flexibility of layers and masks, ensuring consistency and professionalism of designs, from simple logos to complex branding guides.
 Photoshop's Subscription Model: What You Get for Your MoneyApr 15, 2025 am 12:17 AM
Photoshop's subscription model is worth buying. 1) Users can access the latest version and use across devices at any time. 2) The subscription fee is low, and continuous updates and technical support are provided. 3) Advanced functions such as neural filters can be used for complex image processing. Despite the high long-term costs, its convenience and feature updates are valuable to professional users.


Hot AI Tools

Undresser.AI Undress
AI-powered app for creating realistic nude photos

AI Clothes Remover
Online AI tool for removing clothes from photos.

Undress AI Tool
Undress images for free

Clothoff.io
AI clothes remover

Video Face Swap
Swap faces in any video effortlessly with our completely free AI face swap tool!

Hot Article
Hot Tools

SecLists
SecLists is the ultimate security tester's companion. It is a collection of various types of lists that are frequently used during security assessments, all in one place. SecLists helps make security testing more efficient and productive by conveniently providing all the lists a security tester might need. List types include usernames, passwords, URLs, fuzzing payloads, sensitive data patterns, web shells, and more. The tester can simply pull this repository onto a new test machine and he will have access to every type of list he needs.

DVWA
Damn Vulnerable Web App (DVWA) is a PHP/MySQL web application that is very vulnerable. Its main goals are to be an aid for security professionals to test their skills and tools in a legal environment, to help web developers better understand the process of securing web applications, and to help teachers/students teach/learn in a classroom environment Web application security. The goal of DVWA is to practice some of the most common web vulnerabilities through a simple and straightforward interface, with varying degrees of difficulty. Please note that this software

SAP NetWeaver Server Adapter for Eclipse
Integrate Eclipse with SAP NetWeaver application server.

MinGW - Minimalist GNU for Windows
This project is in the process of being migrated to osdn.net/projects/mingw, you can continue to follow us there. MinGW: A native Windows port of the GNU Compiler Collection (GCC), freely distributable import libraries and header files for building native Windows applications; includes extensions to the MSVC runtime to support C99 functionality. All MinGW software can run on 64-bit Windows platforms.

Safe Exam Browser
Safe Exam Browser is a secure browser environment for taking online exams securely. This software turns any computer into a secure workstation. It controls access to any utility and prevents students from using unauthorized resources.

