


效果图看是非常简单的书本,制作起来的工序是相当复杂的。首先要把书本分好层次,如封面、书页等。然后由下至上慢慢刻画细节。
由于书本是对称的,做好一半后另一半复制后稍做修改即可。
最终效果
1、新建一个512 * 512 像素的文档,如下图。
2、将背景填充中性灰色:#7a7a7a,然后新建一个层,选择矩形工具,拉出一个填充颜色为:#e7c681的长方形。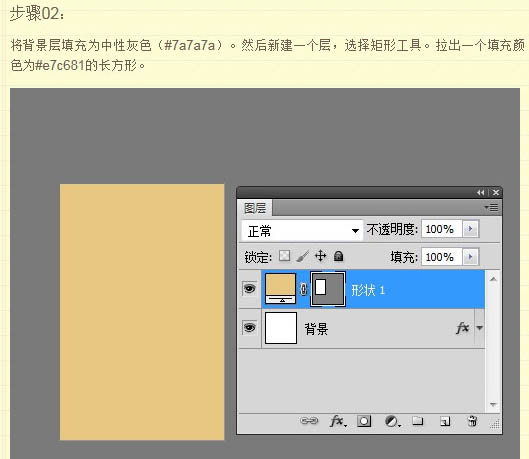
3、拖曳长方形的各个顶点,将形状调整为如下图类似于书页的样子。然后如法炮制一个防盗右侧,如下图。
4、为了避免后面图层过多造成制作困难,给每个图层做好重命名是个好习惯。我们可以将左边的书页图层命名为“Cover1”,右边的命名为“Cover2”。接下来对这两个图层应用图层样式,一个是浮雕效果,一个是渐变填充,具体设置如下图。

这里左右的颜色均为:#503e25,中间那个定位在75%左右,颜色为:#fbebab,效果如下图。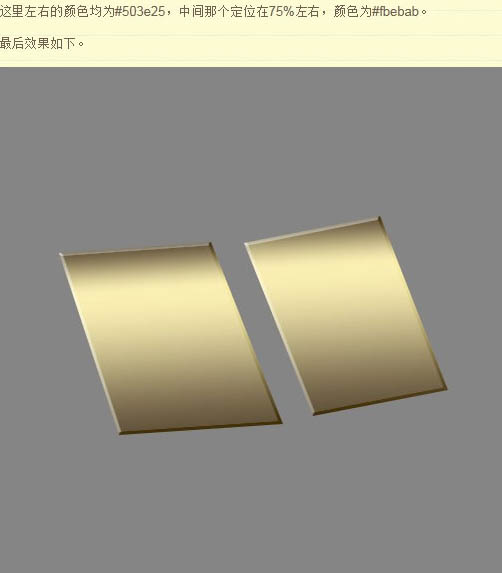
5、按Ctrl键点击“Cover1”图层的缩略图,获得选区,接着按Ctrl + Shift键点击“Cover2”图层的缩略图,获得两个图层的选区,然后创建色相/饱和度调整图层,参数设置如下图。


6、建立一个图层组,将刚才建立的几个图层归纳到这个组中。接下来开始做书角包边的效果。在刚才的图层组之上,新建一个图层“Corner1”,使用多边形套索工具勾出一个三角形,形状如下。然后随意填充一个颜色。
还记得最初给“Cover1”应用的图层样式吗,复制这个图层样式,然后粘贴到“Corner1”上。
剩下3个角按照这个方法做好,得到下图所示的效果。
7、合并包边的四个图层,得到一个没有任何应用样式的图层,点击图层面板下的创建新的填充或调整图层中的照片滤镜,给图层加一个暖调滤镜,设置如下图。
然后把两个图层合并掉,再次得到唯一的图层。
接着就是先用加深工具给包边增强阴影效果,然后再用减淡工具给包边增强高光效果,具体设置如下图。
基本上都是用50左右的笔刷大小,加深工具只影响阴影范围,减淡工具只影响高光范围,最后效果如下图。
8、接下来要开始书页纸张的制作。把“Cover1”图层找出来复制一个,然后拖到最顶层。
右键把图层样式去掉。
使用“直接选择工具”激活边框角点,然后用“钢笔工具”在左下角添加一个角点,然后拖动手柄,让形状如下。最后命名为“Pages base”。
9、然后制作模拟的书页厚度,先把前景色设置为:#d6bb8e,然后用矩形工具拖出一个长条,调整顶点变成如下形状。
接着选择“转换点工具”把长方形的右上角和右下角转换为分别可拖曳的角点。
10、这里需要下载一个Pages-pat图案,加载,然后执行:编辑 > 填充,选择好图案如下图。


11、合并这两个图层,重命名为“Light side”使用橡皮擦工具,用1 - 2像素尺寸轻轻擦去书页和书页之间的像素,努力达成一种真实纸张的效果。
12、现在开始制作底部的效果。先设置前景色为:#9c8d6e,然后用之前相同的方法拖出一个长条,然后调整形状如下图。


13、同上的方法把右侧的也做出来。


14、现在反过头去处理一些阴影效果。把图层组“Covers”全部合并得到“Covers”图层,然后在图层上新建一个空白图层,右键它,建立一个剪辑蒙版,然后安装Ctrl 键点击“Golden Corners”图层缩略图获得选区。


15、在图层面板最上面新建一个空白图层,使用钢笔工具勾出打开面的形状,别忘了提前设置前景色为:#efd5a9。效果如下图。


16、制作翻开的纸张。先开始制作左边的。设置前景色为:#cc9c6a,用钢笔工具勾出形状,调整为如下效果。


17、制作右侧的过程同上,各种颜色等设置参照上一步。


18、现在要制作的是翻开的页面的阴影。很简单,获得两个书页的合并选区,然后在“Base pages”上再建一个剪辑蒙版图层,使用:#815130的颜色填充。


19、将最上面的4个图层全部合并,重命名为“Flip pages”。


20、使用直线工具,粗细为3像素,类型调整为“填充像素”,做出如下的一个形状。然后设置前景颜色为:#7e7633。


21、接着完成书脊的第二部分。设置前景色为:#544a15。使用钢笔工具画出如下的形状,注意图层顺序,让这个形状压在最下面,重命名这个层为“Spine base”。


22、开始添加文字。


最终效果:
以上就是Photoshop将制作出一本非常逼真的棕色古书的内容,更多相关内容请关注PHP中文网(www.php.cn)!

 Photoshop Trials and Alternatives: Exploring Free AccessApr 26, 2025 am 12:23 AM
Photoshop offers a free 7-day trial period. To maximize the use of the trial period, 1) sign up for multiple Adobe accounts, 2) use the student or education version, and 3) subscribe to Adobe CreativeCloud. Free alternatives include: 1) GIMP, 2) Photopea, 3) Krita, these software can meet daily image editing needs.
 Photoshop for Photographers: Enhancing and Retouching ImagesApr 25, 2025 am 12:01 AM
Enhance and retouching photos in Photoshop can be achieved by adjusting brightness and contrast, using the Repair Brush Tool. 1) Adjust brightness and contrast: Increase brightness and contrast to improve underexposed photos through the Image->Adjustments->Brightness/Contrast menu. 2) Use the Repair Brush Tool: Select HealingBrushTool in the toolbar and apply to remove miscellaneous points or scars in the image.
 Accessing Photoshop: Methods and AvailabilityApr 24, 2025 am 12:07 AM
Photoshop can be obtained by purchasing a permanent license or subscribing to CreativeCloud. 1. Purchase a permanent license for long-term use, no monthly payment, but no latest updates are available. 2. Subscribe to CreativeCloud to access the latest version and other Adobe software, and you need to pay a monthly or annual fee. The choice should be based on frequency of use and requirements.
 What Photoshop Does Best: Common Tasks and ProjectsApr 23, 2025 am 12:06 AM
Photoshop is specialized in image editing, layering and masking, digital painting and a variety of design applications. 1) Image editing and repair: remove defects and adjust color and brightness. 2) Layers and masks: non-destructive editing and creation. 3) Digital paintings and illustrations: create art works. 4) Practical applications: graphic design, web design and digital art creation.
 Using Photoshop: Creative Possibilities and Practical UsesApr 22, 2025 am 12:09 AM
Photoshop is very practical and creative in practical applications. 1) It provides basic editing, repairing and synthesis functions, suitable for beginners and professionals. 2) Advanced features such as content recognition fill and layer style can improve image effects. 3) Mastering shortcut keys and optimizing layer structure can improve work efficiency.
 Photoshop: Advanced Techniques and ToolsApr 21, 2025 am 12:08 AM
Advanced features of Adobe Photoshop include advanced selection tools, layer blending modes, and actions and scripts. 1) Advanced selection tools such as the Quick Selection Tool and the Color Range Selection Tool can accurately select image areas. 2) Layer blending mode such as "overlapping" mode can create unique visual effects. 3) Actions and scripts can automate repetition of tasks and improve work efficiency.
 Photoshop's Main Feature: Retouching and EnhancementApr 20, 2025 am 12:07 AM
Photoshop's powerful functions in photo editing and enhancement include: 1. Use the "Repair Brush Tool" to remove acne, 2. Use the "Liquefaction Tool" to slim face, 3. Use the "Frequency Separation" technology to accurately retouch images. These functions are implemented through algorithms and image processing technology to optimize image processing effects.
 Photoshop's Key Features: A Deep DiveApr 19, 2025 am 12:08 AM
Key features of Photoshop include layers and masks, adjustment tools, filters and effects. 1. Layers and masks allow independent editing of image parts. 2. Adjust tools such as brightness/contrast can modify image tone and brightness. 3. Filters and effects can quickly add visual effects. Mastering these features can help creative professionals achieve their creative vision.


Hot AI Tools

Undresser.AI Undress
AI-powered app for creating realistic nude photos

AI Clothes Remover
Online AI tool for removing clothes from photos.

Undress AI Tool
Undress images for free

Clothoff.io
AI clothes remover

Video Face Swap
Swap faces in any video effortlessly with our completely free AI face swap tool!

Hot Article
Hot Tools

Dreamweaver Mac version
Visual web development tools

SublimeText3 Mac version
God-level code editing software (SublimeText3)

Safe Exam Browser
Safe Exam Browser is a secure browser environment for taking online exams securely. This software turns any computer into a secure workstation. It controls access to any utility and prevents students from using unauthorized resources.

EditPlus Chinese cracked version
Small size, syntax highlighting, does not support code prompt function

PhpStorm Mac version
The latest (2018.2.1) professional PHP integrated development tool

