


小海螺构造并不复杂,不过构成的段还是很多的,同时需要绘制的面也是很多的。由于海螺的颜色较淡,绘制的时候重点是边缘的高光及暗部渲染出来,这样主体的立体感才会更强。
最终效果
1、新建一个1024 * 768像素的文件,选择渐变工具,颜色设置如图1,拉出图2所示的径向渐变作为背景。
<图1> 
<图2>
2、先来制作海螺的主体部分,需要完成的效果如下图。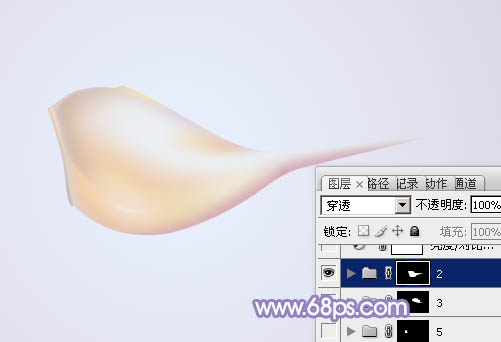
<图3>
3、新建一个组,用钢笔勾出主体轮廓,转为选区后给组添加蒙版,如下图。
<图4>
4、在组里新建一个图层,填充红灰色:#D2B8AB,边缘部分可以用画笔加上一些橙黄色,如下图。
<图5>
5、新建一个图层,用钢笔勾出中间高光部分的选区,羽化25个像素后填充橙黄色:#F4DCC4,如下图。
<图6>
6、调出当前图层选区,把选区往右上稍微移动一下,然后新建一个图层填充淡蓝色:#E8E8EE,如下图。
<图7>
7、新建一个图层,用钢笔勾出中间局部高光选区,羽化8个像素后填充淡蓝色:#EFF8FD,效果如下图。
<图8>
8、新建一个图层,用钢笔勾出顶部中间位置的暗部选区,羽化5个像素后填充橙红色:#EDC49F,边缘部分可以用减淡工具稍微涂亮一点,效果如下图。
<图9>
9、新建一个图层,用钢笔勾出左下角部分的暗部选区,羽化15个像素后填充红灰色:#F2CDA6,如下图。
<图10>
10、新建一个图层,用钢笔勾出左下角中间部分的高光选区,羽化10个像素后填充淡黄色:#F1D6AA,如下图。
<图11>
11、新建一个图层,用钢笔勾出底部中间位置的高光选区,羽化6个像素后填充淡黄色:#EBE3C6,取消选区后添加图层蒙版,用黑色画笔把边缘部分的过渡擦出来,如下图。
<图12>
12、新建一个图层,用钢笔勾出顶部暗部选区,羽化3个像素后填充紫灰色:#DED4DC,如下图。
<图13>
13、新建一个图层,用钢笔勾出右侧底部暗部选区,羽化2个像素后填充紫灰色:#D5B7C7,如下图。
<图14>
14、新建一个图层,用钢笔勾出底部暗部选区,羽化3个像素后填充紫灰色:#D8AFB6,如下图。
<图15>
15、新建一个图层,用钢笔勾出右侧顶部的高光选区,羽化3个像素后填充淡蓝色:#EAF1F6,如下图。
<图16>
16、新建一个图层,用钢笔勾出左侧边缘的暗部选区,羽化1个像素后填充红灰色:#D0B9AD,取消选区后添加图层蒙版,用黑色画笔把边缘过渡擦出来,效果如下图。
<图17>
17、新建一个图层,用钢笔勾出左上角反光选区,填充淡红色:#D7C8CB,如下图。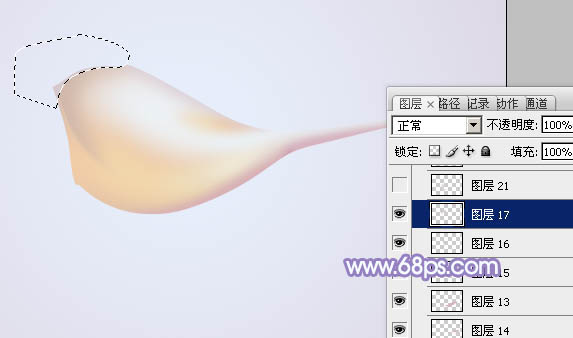
<图18>
18、新建一个图层,用钢笔勾出左侧部分的高光选区,羽化3个像素后填充淡红色:#DED3D4。
<图19>
19、新建一个图层,用钢笔勾出边缘高光选区,填充淡黄色,底部用加深工具稍微涂暗一点,如下图。
<图20>
20、新建一个图层,用画笔添加一些高光,主体基本完成。
<图21>
21、在当前图层下面新建一个组,用钢笔勾出下图所示的选区,给组添加蒙版。
<图22>
22、新建一个图层,填充淡黄色作为底色,然后给底部添加一些暗部,如图23,24。
<图23> 
<图24>
23、用钢笔勾出图25所示的选区,羽化3个像素后创建曲线调整图层,稍微调暗一点,如图26,27。
<图25> 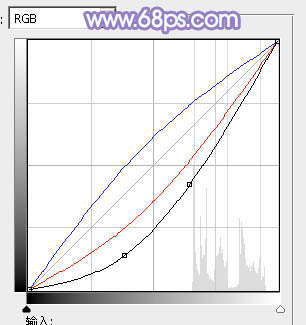
<图26> 
<图27>
24、同上的方法制作暗部及高光,过程如图28 - 30,如下图。
<图28> 
<图29> 
<图30>
25、其它部分的制作方法相同,过程如图31,32。
<图31> 
<图32>
最后加上投影,再调整一下细节,完成最终效果。

 Photoshop's Key Features: A Deep DiveApr 19, 2025 am 12:08 AM
Key features of Photoshop include layers and masks, adjustment tools, filters and effects. 1. Layers and masks allow independent editing of image parts. 2. Adjust tools such as brightness/contrast can modify image tone and brightness. 3. Filters and effects can quickly add visual effects. Mastering these features can help creative professionals achieve their creative vision.
 Photoshop and Digital Art: Painting, Illustration, and CompositingApr 18, 2025 am 12:01 AM
Photoshop's applications in digital art include painting, illustration and image synthesis. 1) Painting: Using brushes, pencils and mixing tools, the artist can create realistic effects. 2) Illustration: With vector and shape tools, artists can accurately draw complex graphics and add effects. 3) Synthesis: Using mask and layer blending mode, artists can seamlessly blend different image elements.
 Advanced Photoshop Tutorial: Master Retouching & CompositingApr 17, 2025 am 12:10 AM
Photoshop's advanced photo editing and synthesis technologies include: 1. Use layers, masks and adjustment layers for basic operations; 2. Use image pixel values to achieve photo editing effects; 3. Use multiple layers and masks for complex synthesis; 4. Use "liquefaction" tools to adjust facial features; 5. Use "frequency separation" technology to perform delicate photo editing, these technologies can improve image processing level and achieve professional-level effects.
 Using Photoshop for Graphic Design: Branding and MoreApr 16, 2025 am 12:02 AM
The steps to using Photoshop for brand design include: 1. Use the Pen tool to draw basic shapes, 2. Add shadows and highlights through layer styles, 3. Adjust colors and details, 4. Use smart objects and actions to automatically generate different versions of the design. Photoshop helps designers create and optimize brand elements with the flexibility of layers and masks, ensuring consistency and professionalism of designs, from simple logos to complex branding guides.
 Photoshop's Subscription Model: What You Get for Your MoneyApr 15, 2025 am 12:17 AM
Photoshop's subscription model is worth buying. 1) Users can access the latest version and use across devices at any time. 2) The subscription fee is low, and continuous updates and technical support are provided. 3) Advanced functions such as neural filters can be used for complex image processing. Despite the high long-term costs, its convenience and feature updates are valuable to professional users.
 Photoshop: Investigating Free Trials and Discount OptionsApr 14, 2025 am 12:06 AM
You can get the access to Photoshop in the most economical way: 1. Experience the software features with a 7-day free trial; 2. Find student or teacher discounts, as well as seasonal promotions; 3. Use coupons on third-party websites; 4. Subscribe to Adobe CreativeCloud's monthly or annual plan.
 Photoshop for Designers: Creating Visual ConceptsApr 13, 2025 am 12:09 AM
Creating visual concepts in Photoshop can be achieved through the following steps: 1. Create a new document, 2. Add a background layer, 3. Use the brush tool to draw basic shapes, 4. Adjust colors and brightness, 5. Add text and graphics, 6. Use masks for local editing, 7. Apply filter effects, these steps help designers build a complete visual work from scratch.
 Is Photoshop Free? Understanding Subscription PlansApr 12, 2025 am 12:11 AM
Photoshop is not free, but there are several ways to use it at low cost or free: 1. The free trial period is 7 days, and you can experience all functions during this period; 2. Student and teacher discounts can cut costs by half, and school proof is required; 3. The CreativeCloud package is suitable for professional users and includes a variety of Adobe tools; 4. PhotoshopElements and Lightroom are low-cost alternatives, with fewer functions but lower prices.


Hot AI Tools

Undresser.AI Undress
AI-powered app for creating realistic nude photos

AI Clothes Remover
Online AI tool for removing clothes from photos.

Undress AI Tool
Undress images for free

Clothoff.io
AI clothes remover

Video Face Swap
Swap faces in any video effortlessly with our completely free AI face swap tool!

Hot Article
Hot Tools

MinGW - Minimalist GNU for Windows
This project is in the process of being migrated to osdn.net/projects/mingw, you can continue to follow us there. MinGW: A native Windows port of the GNU Compiler Collection (GCC), freely distributable import libraries and header files for building native Windows applications; includes extensions to the MSVC runtime to support C99 functionality. All MinGW software can run on 64-bit Windows platforms.

WebStorm Mac version
Useful JavaScript development tools

mPDF
mPDF is a PHP library that can generate PDF files from UTF-8 encoded HTML. The original author, Ian Back, wrote mPDF to output PDF files "on the fly" from his website and handle different languages. It is slower than original scripts like HTML2FPDF and produces larger files when using Unicode fonts, but supports CSS styles etc. and has a lot of enhancements. Supports almost all languages, including RTL (Arabic and Hebrew) and CJK (Chinese, Japanese and Korean). Supports nested block-level elements (such as P, DIV),

DVWA
Damn Vulnerable Web App (DVWA) is a PHP/MySQL web application that is very vulnerable. Its main goals are to be an aid for security professionals to test their skills and tools in a legal environment, to help web developers better understand the process of securing web applications, and to help teachers/students teach/learn in a classroom environment Web application security. The goal of DVWA is to practice some of the most common web vulnerabilities through a simple and straightforward interface, with varying degrees of difficulty. Please note that this software

SecLists
SecLists is the ultimate security tester's companion. It is a collection of various types of lists that are frequently used during security assessments, all in one place. SecLists helps make security testing more efficient and productive by conveniently providing all the lists a security tester might need. List types include usernames, passwords, URLs, fuzzing payloads, sensitive data patterns, web shells, and more. The tester can simply pull this repository onto a new test machine and he will have access to every type of list he needs.

