

 Computer TutorialsTroubleshootingHow to assemble a desktop computer and what are the steps for wiring a desktop computer?
How to assemble a desktop computer and what are the steps for wiring a desktop computer?

If you want to assemble a desktop computer, correct wiring steps are essential. PHP editor Baicao will explain in detail the wiring steps for assembling a desktop computer, from motherboard installation to peripheral connection, guiding you step by step through the assembly process. Whether you're a newbie or an experienced player, you'll find useful help here. Next, let us learn about the wiring secrets of desktop computer assembly, so that you can easily build your own personalized computer!

How to assemble a desktop computer and what are the steps for wiring a desktop computer?
The wiring steps for assembling a desktop computer are as follows:
1. Insert the CPU. Find the CPU socket on the motherboard, open the socket protective cover, and insert the CPU in the direction of the arrow on the corner. Be careful not to bend the pins. Apply a layer of thermal conductive glue to the CPU.
2. Install the radiator. Place the heat conduction pad at the bottom of the radiator on the CPU, then align the hooks and fastening buckles on the radiator with the fixing holes on the motherboard, and secure the radiator to the motherboard.
3. Install the memory module. Open the memory slot of the motherboard and insert the memory module vertically according to the direction of the slot.
4. Connect the power cord. Plug the power cord into an electrical outlet and plug the other end into the power plug on the motherboard.
5. Connect the hard drive and solid state drive. Connect the SATA data cable to the SATA interface of the hard drive, then plug the power cord of the hard drive into the power supply and secure the hard drive.
6. Connect the graphics card. Insert the graphics card into the PCI slot of the motherboard and plug in the power plug.
7. Connect the front panel interface. Connect the front panel connector on the motherboard to the front panel cable on the chassis. Standard motherboard front panel interfaces include power and reset switches, hard drive and power lights, speakers and USB interfaces.
8. Connect the fan, USB interface, etc. Connect all fans, USB interfaces, etc. to the corresponding interfaces on the motherboard.
9. Connect the monitor. Connect the monitor's interface to the graphics card.
10. Install the chassis side panel. After all the lines are connected, install the side panel of the chassis.
After completing these steps, connect the power and turn on the computer to confirm that the computer is working properly.
How much does it cost to assemble computer hardware?
Intel i5 9400F six-core, 960 pieces of loose chips, Asus B360M-PLUS GAMING motherboard, 649 pieces, ADATA 8G DDR4 2666 gaming Veyron, two pieces, 489 pieces, Kingston A1000 480G solid state drive, 499 pieces, Leadtek P1000 4G professional graphics card, 2700 yuan, Huntkey WD500K rated 500W power supply, 299 yuan, Jiuzhou Fengshen Xuanbing 400 radiator, 99 yuan, Xingulux chassis, 189 yuan, a total of 5900 yuan, because it is an i7 7700HQ notebook CPU, so it is for desktop use No, the i5 9400F six cores and six threads are as powerful as the i7 7700. The P1000 4G is a graphics card used for professional 3D, design, graphics, video editing, etc. If you are using it for work, you can assemble it according to these hardware,
Computer hardware assembly process?
Basic steps for computer hardware assembly:
1. Disassemble the chassis, install the bottom plate and blank; install the power supply; fix the motherboard in the chassis;
2. Install the CPU in the CPU slot in the motherboard; fix the fan above the CPU; fix the hard drive in the case and connect the power supply; fix the optical drive in the case and connect the power supply; connect the hard drive and optical drive with the hard drive data cable Connect to the motherboard;
3. Insert the memory into the memory slot of the motherboard; Connect the monitor, insert the monitor's data cable into the AGP slot behind the motherboard; Connect the keyboard, insert the keyboard into the keyboard behind the motherboard socket; Connect the mouse and insert the mouse into the mouse socket behind the motherboard; Plug the audio cable of the speaker & headphone into the audio interface behind the motherboard;
4. Plug the network cable into the network card interface behind the motherboard; Turn on the computer to test the hardware ; After the test is correct, package the chassis.
Notes:
1. Purchase all accessories according to the configuration plan you have drawn up first. Usually, the configuration plan prepared in advance may not match the market supply situation, so the desired product cannot be purchased. At this time, adjustments have to be made according to the market supply situation. However, as long as the principle of obtaining the best performance-price ratio is followed, accurate adjustment results will be easily obtained within the established plan.
2. Check the appearance of each accessory to see if it is damaged. Especially for boxed products, be sure to check whether there are traces of unpacking. For loose parts, pay attention to whether there are traces of disassembly or assembly. For products with surface Be especially careful with scratched parts, as they may cause instability in the computer's operation.
What is the general order of purchase when assembling desktop computer hardware?
Find a quote from another one. Change another one and quote again. Change another one and quote again. Check online, compare, confirm, install, check whether the hardware corresponds to the configuration sheet. Pay the money and go home.
DELL desktop computer hardware upgrade?
Please replace your desktop computer with a new one if it is more than 3 years old. If you upgrade it if it is more than 3 years old, add a memory stick and buy a second-hand graphics card. All other upgrades are in one line. If you change the CPU, you need to replace the motherboard. The motherboard requires a new chassis. The motherboard CPU is out of power and the power supply is not enough. The memory is also incompatible and needs to be replaced. Well, after replacing one line, only the hard drive and monitor can be assembled using
. Are all computer hardware compatible?
Yes, compatibility is taken into consideration when installing the hardware. Generally, it will be perfectly compatible. Only a few pieces of hardware may have incompatibility issues.
Desktop assembly computer configuration?
The computer configuration is as follows:
Processor sixth generation I5-6500 processor, radiator: Kyushu Fengshen Xuanbian Shooter Edition, motherboard: Colorful B150M-K, graphics card: Colorful Netchi GTX950 , Memory: Kintek 8GB, Hard drive: SanDisk 128GB solid state, Chassis: Xingu, Power supply: Xingu, Monitor: Samsung 17-inch high-definition display. The price of this configuration is about 2,800 yuan, and the configuration is also quite impressive.
How to assemble a desktop computer?
1: The first step: Determine your own needs:
1. Determining your own needs is the first step in doing anything. Before buying a machine, think clearly about buying a new machine. Finally, what is the main purpose? Different groups of people use computers for very different purposes. A clerk in a company and a person who mainly plays games have very different needs for computer configuration. We should, while meeting our own needs, It is only right to choose according to the most suitable budget.
2. For example, as an optional computer for general office use (except for professional software office needs), the Pentium G4560 without independent graphics is enough for daily office work, but if you have graphic design software such as PS and need it, a larger computer will be needed. Memory and gaming requirements require a better graphics card, so before you start choosing a computer, it is most important to determine your own needs.
2: Step 2: Determine the CPU
1. The first choice for all computer accessories must be the CPU. The order of selection should be to select the CPU first, then determine the motherboard, and then Determine the memory module (memory modules are so expensive now!), then select the graphics card, cooling, hard disk, etc., calculate the power consumption, and finally select the power supply and chassis.
2. If you are not a garbage person, it is recommended to buy new rather than old CPUs first. Although CPUs will not wear out, there are no new motherboards equipped with old CPUs. Old motherboards are very It's easy to have all kinds of problems, and if you're a novice and can't get a good motherboard, it's easy to fall over. Of course, it doesn't matter if you're a trash guy.
3. You can actually choose either AMD or Intel platform. After all, AMD has successfully turned around with Ryzen and is not inferior to Intel in all aspects. If I have to give a recommendation, then this is enough. For those who use it (watching movies, playing LOL games, browsing the web, and those who do light work), just choose Intel’s Pentium processor. For those who play games, choose Intel Core processor with a higher single-core frequency (in fact, i3 is enough Because games require more graphics cards), professional practitioners who need a lot of video rendering design and so on choose AMD's Ryzen platform.
Three: Step 3: Determine the motherboard
1. After determining the CPU, the pins are determined, and then there is a rough range of motherboards with the same number of pins, and then take a look at yourself Do you have any special needs, such as whether you need overclocking, how expandable the memory module is, whether you need an m.2 interface, whether all the required interfaces are complete, etc. As long as they are met, the rest is worth every penny. The goods are divided, just choose a motherboard you like.
2. Many people have two extreme attitudes towards motherboards. One type of people prefers to use the lowest-end graphics card, while the other type of people have a very large budget for motherboards. The author Do you think you should choose a motherboard that can meet your needs?
Lenovo computer hardware installation steps?
Right-click My Computer--Properties--Hardware--Device Manager, then select an item, right-click, scan to detect hardware changes, and then the computer should prompt that new hardware is found, and then Wait for it to automatically search for the driver. If you have deleted the driver, just search for the driver online based on the model of your audio source hardware, and then install it.
How to upgrade Lenovo ThinkCentre desktop computer hardware?
Hello, if you need to upgrade your computer's graphics card equipment, it is recommended that you first check the computer's chassis space and the computer's power supply to avoid insufficient power power affecting the normal use of the computer; upgrade the computer's memory capacity, and finally It is best to choose a model with the same frequency specifications as the original memory of the laptop to ensure the compatibility of the computer.
The above is the detailed content of How to assemble a desktop computer and what are the steps for wiring a desktop computer?. For more information, please follow other related articles on the PHP Chinese website!

 Understanding Data Loss Risks of SSD Drives & How to PreventMay 15, 2025 pm 08:06 PM
Despite their impressive speed and reliability, SSDs are not immune to failures. This article from MiniTool delves into the most common data loss risks associated with SSD drives and provides effective strategies to minimize the risk of file loss.Qui
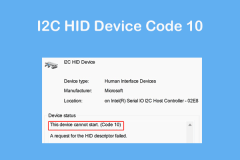 I2C HID Device Code 10 Happens on Win11/10? 8 Proven TipsMay 15, 2025 pm 08:05 PM
Have you encountered problems with I2C HID device code 10 on your Windows 11/10 computer? Learn how to fix code 10 errors with some proven solutions. Here, MiniTool will provide you with detailed guidance to help you solve your problem. Quick navigation: - I2C HID device cannot start code 10 - Fix 1: Disable and enable I2C HID devices - Fix 2: Change the power management settings - Fix 3: Uninstalling I2C HID device drivers - Fix 4: Uninstall and reinstall HID-compliant mouse driver - Fix 5: Update I2C HID device driver - Fix 6: Change BIOS settings - Fixed
 Laptop Shuts Down Without Low Battery Notification? Fix ItMay 15, 2025 pm 08:04 PM
If your laptop shuts down directly without warning when it is low, this may affect your work. To solve this problem, you can refer to the guide provided by MiniTool. Quick navigation: - No low battery notifications in Windows 11/10 - Method 1. Turn on Windows Notifications - Method 2. Run the power supply troubleshooting tool - Method 3. Change the battery power saving settings - Method 4. Check the power option settings - Method 5. Restore the default power plan - at last There is no low battery notification in Windows 11/10 When the battery is low, the desktop displays a warning message so that you can save your current work or plug in the charger. Usually, when the battery is low,
 A Complete Guide to Fix TeamViewer Protocol Negotiation FailedMay 15, 2025 pm 08:03 PM
TeamViewer enables users to remotely control another computer, share files, and engage in real-time communication. However, issues like "TeamViewer protocol negotiation failed" can arise, disrupting the connection. This article from MiniToo
 Windows 11 KB5058411 Not Installing? Try These MethodsMay 15, 2025 pm 08:02 PM
Microsoft has rolled out the KB5058411 update for Windows 11 version 24H2 users. If you're curious about the new features, how to download and install it, or what to do if KB5058411 fails to install, this MiniTool article has you covered.Quick Naviga
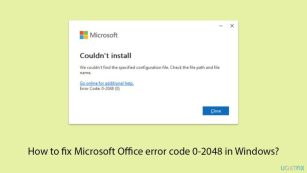 How to fix Microsoft Office error code 0-2048 in Windows?May 15, 2025 pm 08:00 PM
Microsoft Office is a cornerstone Windows productivity software that enables applications like Word, Excel, and Outlook to execute document creation all the way
 Revenge of the Savage Planet Crashing/Not Launching: FixedMay 15, 2025 pm 06:01 PM
Nothing is more satisfying than having a problem with Survival: Revenge crashing or failing to start on PC. Don't worry, here are several fixes provided by MiniTool to solve these annoying problems. Quick navigation: - Fix 1. Run the game as administrator - Fix 2. Disable overlay - Fix 3. Update GPU drivers - Fix 4. Verify the integrity of the game file - in conclusion Survival of the Wild: Revenge is an exciting new adventure game where players travel between different planets, collecting resources and finding ways to return to Earth. Although the game isn't hardware-required, if you have problems with your download or your PC isn't fully updated, you may encounter Survival of the Wild: Revenge
 Top 5 Proven Fixes for VPN Not Working on ChromeMay 14, 2025 pm 08:02 PM
Are you experiencing issues with websites not loading on Google Chrome while using a VPN, yet other browsers function normally? This guide from MiniTool will help you understand the causes and provide solutions to fix VPN issues on Chrome.Quick Navig


Hot AI Tools

Undresser.AI Undress
AI-powered app for creating realistic nude photos

AI Clothes Remover
Online AI tool for removing clothes from photos.

Undress AI Tool
Undress images for free

Clothoff.io
AI clothes remover

Video Face Swap
Swap faces in any video effortlessly with our completely free AI face swap tool!

Hot Article
Hot Tools

Safe Exam Browser
Safe Exam Browser is a secure browser environment for taking online exams securely. This software turns any computer into a secure workstation. It controls access to any utility and prevents students from using unauthorized resources.

SublimeText3 English version
Recommended: Win version, supports code prompts!

MinGW - Minimalist GNU for Windows
This project is in the process of being migrated to osdn.net/projects/mingw, you can continue to follow us there. MinGW: A native Windows port of the GNU Compiler Collection (GCC), freely distributable import libraries and header files for building native Windows applications; includes extensions to the MSVC runtime to support C99 functionality. All MinGW software can run on 64-bit Windows platforms.

mPDF
mPDF is a PHP library that can generate PDF files from UTF-8 encoded HTML. The original author, Ian Back, wrote mPDF to output PDF files "on the fly" from his website and handle different languages. It is slower than original scripts like HTML2FPDF and produces larger files when using Unicode fonts, but supports CSS styles etc. and has a lot of enhancements. Supports almost all languages, including RTL (Arabic and Hebrew) and CJK (Chinese, Japanese and Korean). Supports nested block-level elements (such as P, DIV),

Dreamweaver CS6
Visual web development tools

