
Home >Web Front-end >JS Tutorial >jQuery plug-in slider implements dragging slider to select price range_jquery
jQuery plug-in slider implements dragging slider to select price range_jquery

- WBOYWBOYWBOYWBOYWBOYWBOYWBOYWBOYWBOYWBOYWBOYWBOYWBOriginal
- 2016-05-16 16:01:371404browse
On some product quotation websites, a series of price ranges need to be given for users to filter. We add a custom price range in addition to the filtered range, which provides users with one more choice. This article will use the jQuery plug-in combined with CSS to select the price range using a slider. Please read this article for explanation.
jQuery ui has a slider plug-in, which is a very useful drag slider plug-in. To implement slider dragging, you need to load the following js in the page head.
<script type="text/javascript" src="js/jquery.js"></script>
<script type="text/javascript" src="js/ui/jquery.ui.core.js"></script>
<script type="text/javascript" src="js/ui/jquery.ui.widget.js"></script>
<script type="text/javascript" src="js/ui/jquery.ui.mouse.js"></script>
<script type="text/javascript" src="js/ui/jquery.ui.slider.js"></script>
Of course, if you consider project operation efficiency, you can compress the above several js into one js. We must consider these in large-scale WEB application projects.
You can download these related js from the jquery ui official website,
Next, we build the main html code:
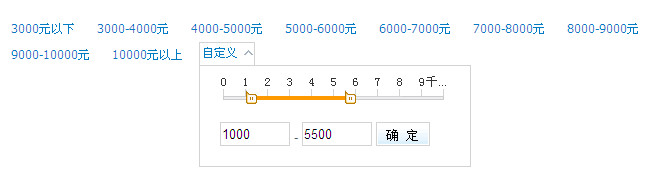
<ul class="price_list">
  <li class="title">价格范围:</li>
  <li><a href="#">3000元以下</a></li>
  <li><a href="#">3000-4000元</a></li>
  <li><a href="#">4000-5000元</a></li>
  <li><a href="#">5000-6000元</a></li>
  <li><a href="#">6000-7000元</a></li>
  <li><a href="#">7000-8000元</a></li>
  <li><a href="#">8000-9000元</a></li>
  <li><a href="#">9000-10000元</a></li>
  <li><a href="#">10000元以上</a></li>
  <li id="custom"><a href="javascript:;" id="show">自定义</a>
    <div id="slider_wrap">
     <div id="slider">
       <div id="range"></div>
     </div>
     <p><input type="text" class="input" id="start" value="0" /> -
     <input type="text" class="input" id="end" value="3000" />
     <input type="button" class="btn" id="btn_ok" value="确 定" /></p>
    </div>
  </li>
</ul>
The price range consists of a series of li's. For the last li, we give it a set id of custom, and contain the div #slider_wrap that needs to display the slider selection. Of course, this div is hidden by default. We need to use CSS to achieve the appearance effect.
CSS
Give the page a nice appearance through CSS:
.price_list{list-style:none}
.price_list li{float:left; line-height:22px; margin-right:10px; padding:2px 6px}
.price_list li.title{display:block; width:60px; height:60px;}
#custom{border:1px solid #d3d3d3; padding:0 16px 0 2px; background:url(images/icon.gif)
 no-repeat right 8px; position:relative;}
.custom_show{background:url(images/icon.gif) no-repeat right 18px;}
#show{width:100%; height:26px}
.input{width:66px; height:20px; line-height:20px; border:1px solid #d3d3d3}
.btn{width:54px; height:24px; line-height:24px; background:url(images/btn_bg.gif)
repeat-x; border:1px solid #d3d3d3; cursor:pointer}
#slider_wrap{width:250px; height:80px; padding:10px; position:absolute; left:-1px;
top:22px; border:1px solid #d3d3d3; background:#fff; display:none; z-index:1001}
#slider{width:230px; height:40px; margin:5px auto; border:none; background:
url(images/line_bg.gif) no-repeat}
#range{width:220px; margin-left:4px}
#slider_wrap p{width:230px; margin:4px auto}
The key is to pop up the drop-down div to display the CSS of the sliding selection range, and determine the position of the display layer through absolute and relative positioning.
The CSS of the slider plug-in in the display layer comes from the CSS that comes with jquery ui, and I made some minor modifications.
.ui-slider {position:relative; text-align:left;}
.ui-slider .ui-slider-handle {position:absolute; z-index:2; width:11px; height:14px;
cursor: default; background:url(images/arr.gif) no-repeat }
.ui-slider .ui-slider-range {position:absolute; z-index:1; display:block; border:0;
background:#f90}
.ui-slider-horizontal {height:10px; }
.ui-slider-horizontal .ui-slider-handle {top:14px; margin-left:0; }
.ui-slider-horizontal .ui-slider-range {top:20px; height:4px; }
.ui-slider-horizontal .ui-slider-range-min {left:0; }
.ui-slider-horizontal .ui-slider-range-max {right:0; }
jQuery
First of all, we need to pull down the layer displayed in the slider range when clicking "Customize". When "Customize" is clicked, the drop-down layer is displayed and the arrow style is changed. When clicked again, the drop-down layer is hidden.
$(function(){
  $("#show").click(function(){
    if($("#slider_wrap").css("display")=="none"){
      $("#slider_wrap").show();
      $("#custom").css("background-position","right -18px");
    }else{
      $("#slider_wrap").hide();
      $("#custom").css("background-position","right 8px");
    }
  });
});
Some students may wonder why not just use the toggle method instead of click. I tried it and it worked, but later we have to click "OK" in the drop-down layer to hide the drop-down layer. If you use the toggle method, you need to click twice to pop up the drop-down layer after clicking the "OK" button, so I chose the click method plus judgment to solve this problem.
Then call the slider plug-in:
$("#range").slider({
  min: 0,
  max: 10000,
  step: 500,
  values: [0, 3000],
  slide: function(event, ui){
    $("#start").val(ui.values[0]);
    $("#end").val(ui.values[1]);
  }
});
We set the maximum value of the slider max to 10000, the minimum value min to 0, the distance step for each slide of the slider is 500, and the default initial range values is 0 to 3000. When sliding the slider, assign values to the two text boxes #start and #end. For more parameter settings and method calls, please check the jquery ui official website:
Finally, after we select the price range, click the "OK" button to close the slider selection box and change the "Custom" state. The code is as follows:
$("#btn_ok").click(function(){
  $("#slider_wrap").hide();
  $("#custom").css("background-position","right 8px");
  var start = $("#start").val();
  var end = $("#end").val();
  $("#show").html(start+"-"+end);
});
In this way, we can see the effect we want, let’s go and try it.
The above is the entire content of this article, I hope you all like it.
Related articles
See more- An in-depth analysis of the Bootstrap list group component
- Detailed explanation of JavaScript function currying
- Complete example of JS password generation and strength detection (with demo source code download)
- Angularjs integrates WeChat UI (weui)
- How to quickly switch between Traditional Chinese and Simplified Chinese with JavaScript and the trick for websites to support switching between Simplified and Traditional Chinese_javascript skills