


Redmi phone call forwarding setup tutorial, done in one step!
In modern society, mobile communications are crucial, especially Redmi mobile phones are very popular because of their high cost performance. The call forwarding feature is crucial when we are unable to answer calls in a timely manner. In this article, PHP editor Zimo will give you a comprehensive explanation of the call forwarding setup tutorial for Redmi mobile phones, allowing you to easily solve the problem of being unable to answer calls in time.
Step 1: Open the dial-up interface
We need to open the dialing interface of the Redmi phone. Find the "Phone" icon on the homepage or application list and click to enter. You'll then see an interface that looks like traditional phone buttons.
Step 2: Enter the setting interface
In the lower right corner of the dialing interface, you will find a "More" button, click it. Next, you will see a pop-up menu, find and click on the "Settings" option.
Step 3: Select call settings
In the settings interface, you will see a lot of options. Please scroll the screen and find the "Call Settings" option and click to enter.
Step 4: Find Call Forwarding
In the call settings interface, you need to look for the "Call Forward" option. Typically, it will be in the lower half of the page, so you may have to scroll down a bit to find it.
Step 5: Set call forwarding number
Now, you have entered the call forwarding setting interface. On this interface, you will see an input box that allows you to enter your forwarding number. Please note that the forwarding number must be a valid mobile phone number.
Please enter the mobile phone number you want the calls to be forwarded to and make sure it is entered correctly. After entering, click the Save or Confirm button to complete the settings.
Step 6: Enable call forwarding
After the above steps, you have successfully set up the call forwarding number. Now, you only need to return to the dialing interface and click the "Call" button in the upper right corner to turn on the call transfer function.
At this time, when someone calls your Redmi phone, the system will automatically transfer the call to the transfer number you set. This way, you can ensure you don't miss an important call even if you can't answer the call in time.
Summarize
Through the above simple steps, you have learned how to set up the call forwarding function on your Redmi phone. Whether at work or in life, this feature can help you better respond to various emergencies.
The above is the detailed content of Redmi phone call forwarding setup tutorial, done in one step!. For more information, please follow other related articles on the PHP Chinese website!

 15 Hidden Galaxy S25 Tips and Tricks You Should Know AboutMar 03, 2025 am 03:02 AM
Unlock the Hidden Power of Your Samsung Galaxy S25: 15 Essential Tips and Tricks The Samsung Galaxy S25 boasts a wealth of features, making it one of the most advanced Android smartphones available. However, navigating its capabilities can be challe
 1Password's New 'Nearby Items' Is a Useful Twist on Password ManagersMar 08, 2025 am 06:01 AM
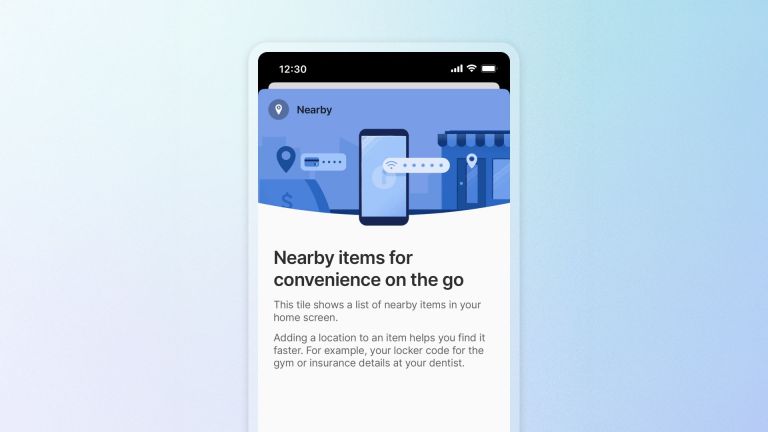
1Password launches new location-based features to facilitate users to access relevant data. This feature allows users to associate data stored in 1Password apps such as passwords, PINs, and codes with specific physical locations. When the user is close to the specified location, the 1Password mobile app displays relevant information. Users can assign a single physical location to any item in their 1Password account. Just select the item in the app and click on the "Add Location" option. When the user is in a specified geographic area, the 1Password mobile app's home screen displays the associated item. The app also provides map views for easy setting and viewing of locations. This feature is designed to improve convenience,
 The 10 Weirdest Android Phones EverMar 12, 2025 am 12:18 AM
All modern phones look the same, but it wasn't always like that. Android has produced some of the most innovative, unique, and outright odd phones over the years. These are the weirdest. 10 LG G5 (20
 This Is the Nothing Phone (3a) Pro: A Lot of Phone for Less Than $500Mar 06, 2025 am 03:02 AM
Nothing Phone (3a) and (3a) Pro: Strong upgrades to the mid-range phone market Nothing Phone (3a) and (3a) Pro are officially released and they are expected to be the leader in the mid-range smartphone market. The two phones have significantly improved on the Phone (2a), focusing on improving the camera system, design and performance. Design and Durability The (3a) series continues the design style of the previous generation, but is more refined in terms of details. The upgraded glass back cover, more optimized symmetry and finer processing all enhance the texture of the phone. In addition, the IP64 dust and waterproof rating also enhances the durability of the phone. In terms of camera system, (3a
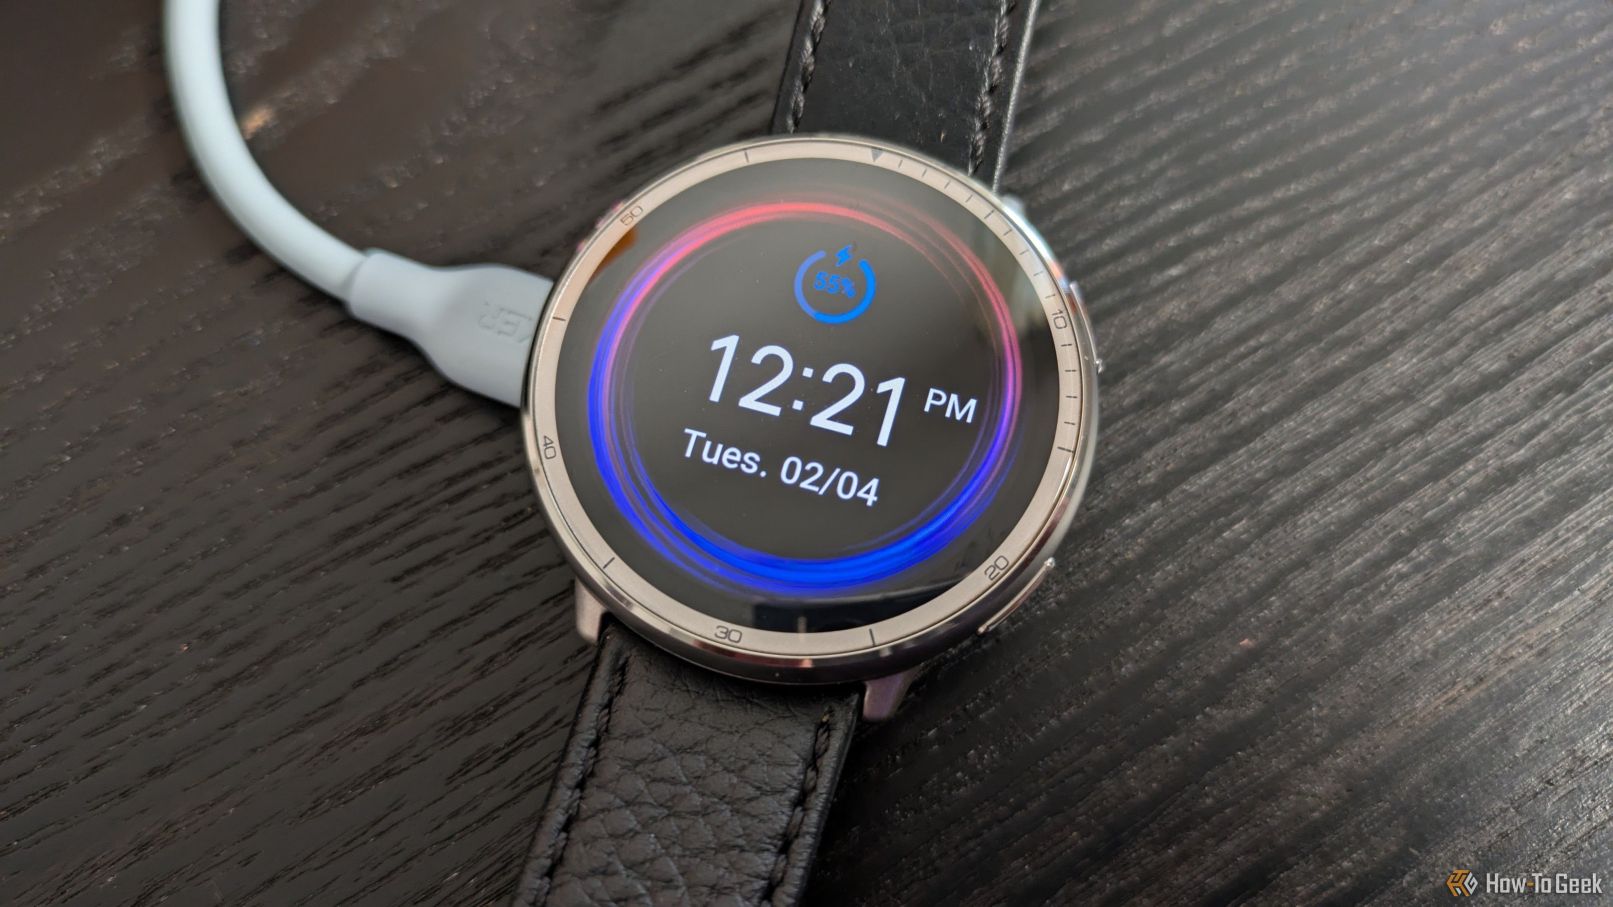 Amazfit Active 2 Review: Threatening to Take Apple's ThroneMar 10, 2025 am 03:01 AM
Amazfit Active 2 Smart Watch Review: The Perfect Combination of Fashion and Health The Amazfit Active 2 impressed me with its stylish look and 10-day long battery life. Not only does it look beautiful, it also has almost perfect synchronization with mainstream fitness apps such as Google Fit and Apple Health. Although notifications are sometimes a little direct, Active 2 can really push you to focus on your health and living habits. Amazfit Active 2 Rating: 9/10 Active 2 is designed for groups that focus on fashion and health, combining excellent looks and functions. BioTracker Technology Essence
 Tweak These Settings to Get the Best Out of Your Galaxy S25's DisplayMar 04, 2025 am 03:02 AM
Unlock the Full Potential of Your Galaxy S25 Display: 10 Essential Settings The Samsung Galaxy S25 boasts impressive display features, but maximizing its potential requires some fine-tuning. Here are ten key settings to optimize your viewing experie
 Latest Android Feature Drop Includes Scam Message Detection, Find My Device Updates, and Loss of Pulse DetectionMar 07, 2025 am 01:17 AM
Google unveils exciting new Android and Pixel features! From AI-powered scam detection to enhanced live location sharing, this update brings a wealth of improvements to your Android experience. AI-Powered Scam Detection in Google Messages: Google M
 Google Maps Is Completely Wiping Timeline History for Some UsersMar 14, 2025 am 03:02 AM
Google Maps Timeline Data Mysteriously Vanishing for Users Many Google Maps users are reporting the inexplicable disappearance of their location history from the Timeline feature. This issue, which has escalated recently, leaves users with empty tim


Hot AI Tools

Undresser.AI Undress
AI-powered app for creating realistic nude photos

AI Clothes Remover
Online AI tool for removing clothes from photos.

Undress AI Tool
Undress images for free

Clothoff.io
AI clothes remover

AI Hentai Generator
Generate AI Hentai for free.

Hot Article
Hot Tools

SAP NetWeaver Server Adapter for Eclipse
Integrate Eclipse with SAP NetWeaver application server.

EditPlus Chinese cracked version
Small size, syntax highlighting, does not support code prompt function

Dreamweaver Mac version
Visual web development tools

Notepad++7.3.1
Easy-to-use and free code editor

VSCode Windows 64-bit Download
A free and powerful IDE editor launched by Microsoft

