


Have you encountered problems with margin settings when using Microsoft Word 2003? PHP editor Zimo will provide you with a step-by-step guide detailing how to easily adjust the page margins according to your needs. This guide covers the concept of margins and how to customize them for top, bottom, left, and right sides. Read on to discover our comprehensive guide to setting margins in Word 2003.
The first step is to open word2003 and click the [File] option above the column.

The second step is to open the [Page Settings] option in the secondary column options bar. (Picture)

The third step is to click [Margins] in the page settings to enter the column, and you can see the options for setting margins.


#The fourth step is to select the setting value according to the needs of your manuscript page. Set the distance values for the top, bottom, left, and right margins in sequence. After the settings are completed, click the OK button.

The fifth step is to return to the page to view the adjusted page margins. If the page settings are not ideal, you can follow the above steps to adjust and modify them again.


The above is the detailed content of Detailed process of setting page margins in word2003. For more information, please follow other related articles on the PHP Chinese website!

 How to do a running total in Excel (Cumulative Sum formula)Apr 21, 2025 am 11:16 AM
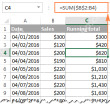
This concise guide demonstrates how to efficiently calculate running totals (cumulative sums) in Excel using a SUM formula with strategically placed absolute and relative cell references. A running total displays the accumulated sum of a dataset as
 Excel LEN function: count characters in cellApr 21, 2025 am 10:10 AM
Are you looking for an Excel formula to count characters in a cell? If so, then you have certainly landed up on the right page. This short tutorial will teach you how you can use the LEN function to count characters in Excel, with or with
 How to count words in Excel - formula examplesApr 21, 2025 am 09:59 AM
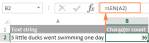
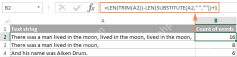
This tutorial demonstrates how to count words in Excel using a combination of the LEN, SUBSTITUTE, and TRIM functions. It offers both case-sensitive and case-insensitive formulas for counting total words or specific words/text within a cell or range
 Excel: Split string by delimiter or pattern, separate text and numbersApr 21, 2025 am 09:19 AM
This tutorial demonstrates how to efficiently split cells in Excel using both formulas and the advanced "Split Text" feature. Learn to separate text using commas, spaces, or any delimiter, and to split alphanumeric strings into their text
 Excel Solver tutorial with step-by-step examplesApr 21, 2025 am 09:15 AM
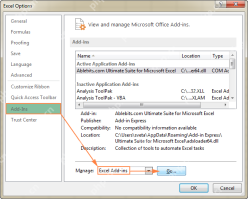
This tutorial explains how to locate and utilize the Solver add-in within various Excel versions, ranging from 2003 to 365. Step-by-step instructions and practical examples demonstrate Solver's application in optimizing solutions for linear programm
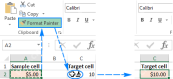 Excel Format Painter and other ways to copy formattingApr 20, 2025 am 10:29 AM
This tutorial demonstrates three efficient methods for copying formatting in Excel: Format Painter, Fill Handle, and Paste Special. These techniques are compatible with all Excel versions (2007-365). Proper formatting enhances worksheet presentation
 Clear formatting in Excel: how to remove all formats in a cellApr 20, 2025 am 10:12 AM
This tutorial offers two efficient methods for removing formatting from Excel spreadsheets. Dealing with extensive formatting in large spreadsheets can be cumbersome. These techniques streamline the process. Manually removing formatting is ineffici
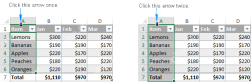 Excel table: comprehensive tutorial with examplesApr 20, 2025 am 09:48 AM
This tutorial unveils the power of Excel tables, often overlooked yet incredibly efficient tools for data management. Discover how tables simplify tasks like dynamic named ranges, formula updates, and data formatting, saving you significant time and


Hot AI Tools

Undresser.AI Undress
AI-powered app for creating realistic nude photos

AI Clothes Remover
Online AI tool for removing clothes from photos.

Undress AI Tool
Undress images for free

Clothoff.io
AI clothes remover

Video Face Swap
Swap faces in any video effortlessly with our completely free AI face swap tool!

Hot Article
Hot Tools

SecLists
SecLists is the ultimate security tester's companion. It is a collection of various types of lists that are frequently used during security assessments, all in one place. SecLists helps make security testing more efficient and productive by conveniently providing all the lists a security tester might need. List types include usernames, passwords, URLs, fuzzing payloads, sensitive data patterns, web shells, and more. The tester can simply pull this repository onto a new test machine and he will have access to every type of list he needs.

WebStorm Mac version
Useful JavaScript development tools

Atom editor mac version download
The most popular open source editor

EditPlus Chinese cracked version
Small size, syntax highlighting, does not support code prompt function

DVWA
Damn Vulnerable Web App (DVWA) is a PHP/MySQL web application that is very vulnerable. Its main goals are to be an aid for security professionals to test their skills and tools in a legal environment, to help web developers better understand the process of securing web applications, and to help teachers/students teach/learn in a classroom environment Web application security. The goal of DVWA is to practice some of the most common web vulnerabilities through a simple and straightforward interface, with varying degrees of difficulty. Please note that this software

