
Home >Software Tutorial >Computer Software >How to use PS to right photos
How to use PS to right photos

- WBOYWBOYWBOYWBOYWBOYWBOYWBOYWBOYWBOYWBOYWBOYWBOYWBforward
- 2024-04-23 15:20:22987browse
How to straighten the picture so that it is no longer skewed? This problem troubles many photography enthusiasts and designers. PHP editor Strawberry will introduce you to a simple and practical method of straightening pictures in PS, so that your pictures can be straightened instantly. Next, let’s take a deeper look at the specific steps for correcting photos in PS to make your photos more professional and beautiful.
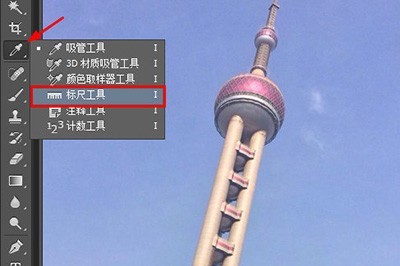
First we import the original image, right-click on the [Eye Straw Tool] and select [].
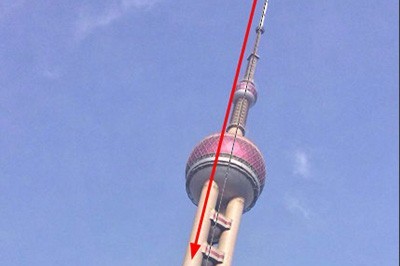
Then we hold down the left mouse button along the inclined line on the original image.
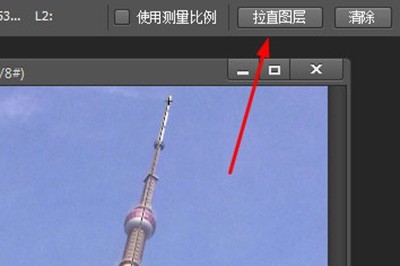
After dragging it out, we can click directly above. You can also click [Image]-[Image Rotation]-[Any Angle] above. Click OK in the dialog box.
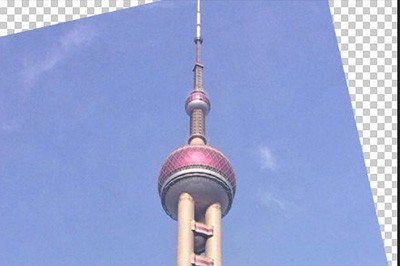
Finally your photo can be corrected, but. No need to be careful here, use the [Magic Wand] tool to select the surrounding area.
Then press the shortcut key SHIFT F5 to pop up the fill dialog box, select [ ] in use, and press OK.

Finally, the surrounding area of your photo will be automatically filled to make the photo look more natural. Also, if you find that there are unnatural white edges around the filled area, then you can Use [] to apply on the white edge to eliminate it.
The above is the detailed content of How to use PS to right photos. For more information, please follow other related articles on the PHP Chinese website!