
Home >Software Tutorial >Computer Software >How to cut out hair in Photoshop_Detailed explanation of how to cut out hair in Photoshop
How to cut out hair in Photoshop_Detailed explanation of how to cut out hair in Photoshop

- 王林forward
- 2024-04-22 11:13:06759browse
How to use Photoshop to pick out hair has always puzzled many designers and photographers. This delicate and time-consuming task requires great skill and patience. In order to solve this challenge, PHP editor Baicao has carefully prepared this tutorial, which will take you step by step to understand the detailed method of picking out hair in Photoshop. From an introduction to basic tools to advanced techniques, this guide will help you master the art and improve your image editing abilities.
1. The photos with the best effects are of course from those professional studios, because they will take pictures with a solid color background. This type of film can make it easier for the software to find the edges of objects, but it is still a little tricky to extract a perfect hairline effect. In this example, we will use the traditional channel cutout method to cut out this cute girl with flowing long hair and put it into a more attitude-oriented background.
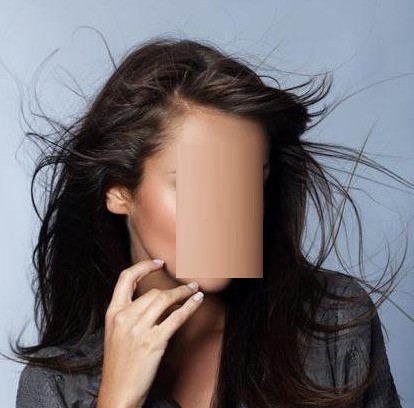
2. Open this photo in PS. You can see that it is not a pure white background, but the color is still very plain and simple and has a good contrast with the cute girl.
Call up the channel panel and view the images in the three channels of red, green and blue at the same time. The image under each channel will show different gray tones. Find the channel with the best contrast between the foreground color and the background color. Drag the thumbnail of the channel to the icon of the new channel to copy the channel image. Then, use the zoom tool to reduce the size of the thumbnail so that it is the same size as the original image. Next, add a color overlay using the Layer Styles panel to add foreground and background colors to the channel image. Finally drag the channel image onto the new channel's icon to rebuild the channel.
4. Select only this newly created channel, Ctrl L (CMD L for Mac users) to bring up the level adjustment command, move the dark slider (left slider) to the right, and the highlight slider (right slider) Slider) to the left to significantly increase the contrast between highlights and shadows. But don't go too far, otherwise there will be some annoying noise in the picture.
5. At this time, the cute girl turned into a black girl, and there was still a large gray area in the background area. Select the Dodge Tool, lower the opacity of the brush, select Highlights as the range of effect, and then paint over the background area repeatedly until the gray part of the background is brightened to white.
6. Switch to the burn tool, select the shadow range, and keep applying the black girl paper until you can’t apply it anymore.
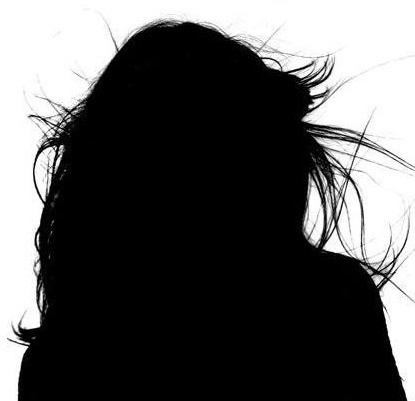
7. What should I do if I can’t apply it anymore? Directly use the black brush tool to paint the remaining areas (usually the nails, the whites of the eyes, the bridge of the nose and the highlight areas of the hands) black. At this point, the cute girl is completely reduced to a black shadow.
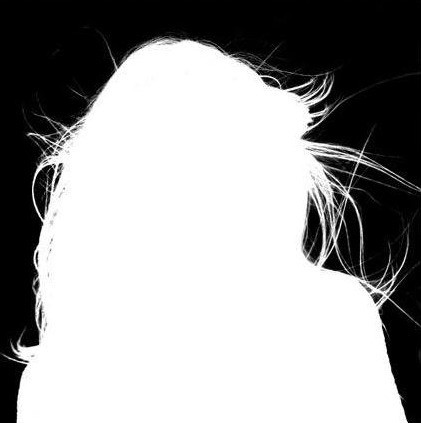
8. Use the shortcut key Ctrl I (CMD I for Mac) to invert the resulting channel map and check if there are any areas missed by the brush in the previous step. If there are any, black stains in the white areas will be very obvious, so quickly paint them away with a white paintbrush!
9. Hold down Ctrl (CMD for Mac) and click the thumbnail of the channel to load the selection, restore the visibility of the original RGB channel, return to the layer panel, copy the selection content to a new layer, and hide the original Layer, observe how the cutout cute girl looks on a transparent background, it seems to be OK.
10. In this way, we used the selection made by modifying the channel to pick out almost perfect hair, but it was not enough. Place the cut-out picture of the girl on a background with attitude, zoom in and carefully observe whether there is a light-colored translucent area on the edge of the girl's hair, especially when the picture is pasted on a dark background, there will be a The gray and gray feeling is uncomfortable. It's fun to deal with this bug. We can choose to use the burn tool, set the range to highlight, and then gently paint (lower the opacity and concentration) on the edge of the girl's hair, and the gray edge problem will be solved.
The above is the detailed content of How to cut out hair in Photoshop_Detailed explanation of how to cut out hair in Photoshop. For more information, please follow other related articles on the PHP Chinese website!