这篇教程是向PHP中文网的朋友介绍PS滤镜功能打造逼真的闪电电击效果方法,教程制作出来的闪电电击非常逼真,推荐到PHP中文网,喜欢的朋友可以跟着教程一起来学习

方法/步骤
第一步,启动PS软件,使用组合键ctrl+n,新建一个文件,如图所示,文档大小没有太大的要求,但是为了保证雷电效果建议按照图中参数设置。养成一个好习惯给每一个文件命名。

第二步,接下来我们需要给这个图层进行渐变填充,如图所示,选择渐变填充工具,点击一下图中箭头所指的地方,选择渐变颜色和填充的样式,颜色我们选择黑色到白色的渐变,朋友们可以研究一下其他不同种类的渐变效果。

第三步,选择黑色到白色的渐变,注意选择渐变类型一定要选择线性填充样式,图中圈起来的地方就是填充样式选择对话框,包括:线性渐变、径向渐变、角度渐变、对称渐变和棱形渐变。

第四步,这一步要注意渐变填充是有方向性的,要在图层的上方点击一下,往下方拉伸到底部,填充效果如图所示。这样的话上方是黑色的,图层底部就是白色的,否则达不到我们预期的效果,当然了有兴趣的朋友可以尝试一下看看其他渐变类型的效果。

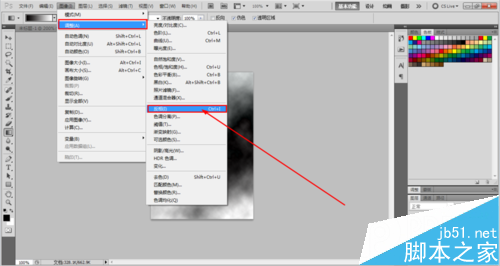
第五步,接下来我们要借助滤镜功能进行图层的的变化,依次在工具滤镜--渲染--分层云彩,滤镜的功能实在是太多了,而且不同数值产生的效果也是各有差异,但是分层云彩这个效果没有数值的设置,直接点击一下就可以了。

第六步,对图像进行色阶的调整,图像--调整--色阶,这样操作是在是太慢了,但是可以给大家讲解的详细,如果掌握了快捷键的话,直接Ctrl+L,调成色阶对话框。

第七步,这一步不用太多设置,直接点击一下自动色阶,这样的话系统自动把色阶平均的分布起来,点击一下确定按钮。如图所示,可以看到图层的变化。建议大家熟悉一下快捷键的使用,太有用了。

第八步,在图像--调整--反相,使图层的颜色进行反相跳转,如图所示。在每一个功能键的后边都有一个相应的快捷键,Ctrl+I。还是建议大家熟悉一下快捷键的使用,太有用了。

第九步,再次进行图层的色阶的调整,相信大家知道怎么调出来色阶了吧!Ctrl+L,参数设置从左到右依次为:0 0.14 255,大家可以在图像图层查看效果,可以根据我们想要的预期的效果进行调节数值。

第十步,接下来要图层的色相进行调整更改,图像--调整--色相饱和度,其实就是快捷键Ctrl+U。色相饱和度的调整就要根据图层效果进行多次数值的尝试了,往往不是一下就能完成的,朋友们可以多尝试几个数值。

第十一步,这一步的关键点是一定要点击下方的着色对话框,否则调整是无效的。色相、饱和度、明度的参数设置分别为225 50 0.这样效果就出来,如图所示,还蛮不错的。

第十二步,放大查看效果,闪电效果就完成了,万变不离其宗,这个效果还是利用了滤镜效果,那么我们真的有必要多研究一下滤镜的其他功能。希望能够给大家带来帮助,谢谢大家。

以上就是PS滤镜功能打造逼真的闪电电击效果方法介绍,万变不离其宗,这个效果还是利用了滤镜效果,那么我们真的有必要多研究一下滤镜的其他功能。希望能够给大家带来帮助,谢谢大家。
 Using Photoshop: Creative Possibilities and Practical UsesApr 22, 2025 am 12:09 AM
Photoshop is very practical and creative in practical applications. 1) It provides basic editing, repairing and synthesis functions, suitable for beginners and professionals. 2) Advanced features such as content recognition fill and layer style can improve image effects. 3) Mastering shortcut keys and optimizing layer structure can improve work efficiency.
 Photoshop: Advanced Techniques and ToolsApr 21, 2025 am 12:08 AM
Advanced features of Adobe Photoshop include advanced selection tools, layer blending modes, and actions and scripts. 1) Advanced selection tools such as the Quick Selection Tool and the Color Range Selection Tool can accurately select image areas. 2) Layer blending mode such as "overlapping" mode can create unique visual effects. 3) Actions and scripts can automate repetition of tasks and improve work efficiency.
 Photoshop's Main Feature: Retouching and EnhancementApr 20, 2025 am 12:07 AM
Photoshop's powerful functions in photo editing and enhancement include: 1. Use the "Repair Brush Tool" to remove acne, 2. Use the "Liquefaction Tool" to slim face, 3. Use the "Frequency Separation" technology to accurately retouch images. These functions are implemented through algorithms and image processing technology to optimize image processing effects.
 Photoshop's Key Features: A Deep DiveApr 19, 2025 am 12:08 AM
Key features of Photoshop include layers and masks, adjustment tools, filters and effects. 1. Layers and masks allow independent editing of image parts. 2. Adjust tools such as brightness/contrast can modify image tone and brightness. 3. Filters and effects can quickly add visual effects. Mastering these features can help creative professionals achieve their creative vision.
 Photoshop and Digital Art: Painting, Illustration, and CompositingApr 18, 2025 am 12:01 AM
Photoshop's applications in digital art include painting, illustration and image synthesis. 1) Painting: Using brushes, pencils and mixing tools, the artist can create realistic effects. 2) Illustration: With vector and shape tools, artists can accurately draw complex graphics and add effects. 3) Synthesis: Using mask and layer blending mode, artists can seamlessly blend different image elements.
 Advanced Photoshop Tutorial: Master Retouching & CompositingApr 17, 2025 am 12:10 AM
Photoshop's advanced photo editing and synthesis technologies include: 1. Use layers, masks and adjustment layers for basic operations; 2. Use image pixel values to achieve photo editing effects; 3. Use multiple layers and masks for complex synthesis; 4. Use "liquefaction" tools to adjust facial features; 5. Use "frequency separation" technology to perform delicate photo editing, these technologies can improve image processing level and achieve professional-level effects.
 Using Photoshop for Graphic Design: Branding and MoreApr 16, 2025 am 12:02 AM
The steps to using Photoshop for brand design include: 1. Use the Pen tool to draw basic shapes, 2. Add shadows and highlights through layer styles, 3. Adjust colors and details, 4. Use smart objects and actions to automatically generate different versions of the design. Photoshop helps designers create and optimize brand elements with the flexibility of layers and masks, ensuring consistency and professionalism of designs, from simple logos to complex branding guides.
 Photoshop's Subscription Model: What You Get for Your MoneyApr 15, 2025 am 12:17 AM
Photoshop's subscription model is worth buying. 1) Users can access the latest version and use across devices at any time. 2) The subscription fee is low, and continuous updates and technical support are provided. 3) Advanced functions such as neural filters can be used for complex image processing. Despite the high long-term costs, its convenience and feature updates are valuable to professional users.


Hot AI Tools

Undresser.AI Undress
AI-powered app for creating realistic nude photos

AI Clothes Remover
Online AI tool for removing clothes from photos.

Undress AI Tool
Undress images for free

Clothoff.io
AI clothes remover

Video Face Swap
Swap faces in any video effortlessly with our completely free AI face swap tool!

Hot Article

Hot Tools

Dreamweaver CS6
Visual web development tools

SAP NetWeaver Server Adapter for Eclipse
Integrate Eclipse with SAP NetWeaver application server.

MantisBT
Mantis is an easy-to-deploy web-based defect tracking tool designed to aid in product defect tracking. It requires PHP, MySQL and a web server. Check out our demo and hosting services.

Zend Studio 13.0.1
Powerful PHP integrated development environment

PhpStorm Mac version
The latest (2018.2.1) professional PHP integrated development tool


