
 Software TutorialOffice SoftwareDetailed method to set up infinite loop scrolling of pictures in PPT slideshow
Detailed method to set up infinite loop scrolling of pictures in PPT slideshow

1. Insert Picture
Click [Insert]--[Picture]--[From File] command

In the open [Insert Picture] In the dialog box, hold down Ctrl and click with the mouse, select the picture to be inserted, and click the [Open] command button.

Select the twelve inserted zodiac pictures, double-click to enter the [Format Object] dialog box, click the [Size] tab, set the height to 3 cm and the width to 4 cm. As shown in the picture, click the [OK] button to complete the setting

Drag the mouse to adjust the correct order of the twelve zodiac signs.

The width of each picture is 4cm, and the width of 12 pictures is 48cm, so the horizontal position of the first mouse picture is 25.4cm-48cm=-22.6cm. Double-click the first mouse picture to enter the [Format Object] dialog box, click the [Position] tab, set the level to -22.6 cm, as shown in the figure, and click the [OK] button to complete the setting.

The horizontal position of the twelfth pig picture is 25.4cm-4cm=21.4cm. Double-click the twelve pig pictures to enter the [Set Object Format] dialog box and click [ Position] label, set the level to 21.4 cm, as shown in the figure, click the [OK] button to complete the setting.

Click the drop-down button after [Display Ratio] and select the ratio of 50%.

This setting is to enable you to see all the pictures clearly , by holding down Ctrl and clicking with the mouse, select the twelve inserted pictures, click [Drawing] - [Alignment and Distribution] - [Align to Equal Ends], and click [Drawing] - [Alignment and Distribution] in sequence. 】-【Horizontal distribution】.

Right-click the twelve selected pictures and select the [Combine] command in the [Combine] submenu of the shortcut menu to combine the twelve pictures into a whole.

Copy an identical combination by using the key combination ctrl and dragging with the left mouse button. Double-click the copied combination to enter the [Format Object] dialog box and click [Position] Label, set the level to -70.6 cm, as shown in the figure, click the [OK] button to complete the setting.

The width of each picture is 4, there are 24 pictures in the two combinations, the width is 96 cm, 25.4 cm-96 cm =-70.6 cm, so its horizontal position is determined to be - 70.6 cm. Select these two combinations and click the [Draw] - [Align and Distribute] - [Align Equal Ends] command in sequence. Right-click the selected item to select the two combinations, and select the [Combine] command in the [Combine] submenu of the shortcut menu to combine the two combinations into a whole.
2. Animation settings
Select the combined objects and click [Slide Show]-[Custom Animation]-[Add Effect]-[Action Path]-[Draw from Define path]-[Straight line],

At this time in the editing window, the mouse turns into a black cross, pointing to the center of the combination, that is, the middle position of the two control points, this is the path The animation start point.

While holding down the left mouse button, hold down the Shift key and drag to the right until it reaches the middle of the control points on the right. This is the end point of the path animation. Release Turn on the mouse to complete the settings.

While holding down the left mouse button, hold down the Shift key and drag to the right to ensure that the dragged path is a straight line. In the custom animation character pane, select the animation object, click the drop-down button after [Start] and select [Before] to start.

In the Define Animation task pane, click the drop-down button behind the animation object and select the [Timing] option in its drop-down list. In the [Custom Path] effect dialog box that opens, click the drop-down button after the [Repeat] option, and select the [Until the end of the slide] option in its drop-down list,

Set the speed to 24 seconds, select the number in the input box after the [Speed] option, and enter the number 24. The default unit is seconds.

Click the [Effect] tab, remove [Smooth Start] and [Smooth End], and click the [OK] button to complete the settings.


The above is the detailed content of Detailed method to set up infinite loop scrolling of pictures in PPT slideshow. For more information, please follow other related articles on the PHP Chinese website!

 How to add and subtract dates in ExcelMay 08, 2025 am 11:36 AM
In this tutorial, you will find a variety of useful formulas to add and subtract dates in Excel, such as subtracting two dates, adding days, weeks, months and years to a date, and more. If you have been following our tutorials to working
 Excel WORKDAY and NETWORKDAYS functions to calculate working daysMay 08, 2025 am 10:49 AM
This tutorial demonstrates how to use Excel's WORKDAY, WORKDAY.INTL, NETWORKDAYS, and NETWORKDAYS.INTL functions to efficiently calculate weekdays, considering custom weekend settings and holidays. Microsoft Excel offers specialized functions for wor
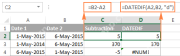
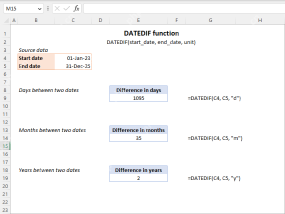 Excel DATEDIF function to get difference between two datesMay 08, 2025 am 10:45 AM
This tutorial provides a concise explanation of Excel's DATEDIF function and offers formula examples for calculating date differences in days, weeks, months, or years. We've previously covered date and time manipulation in Excel, including formattin
 Excel YEAR function - convert date to yearMay 08, 2025 am 09:19 AM
This tutorial explains the syntax and uses of the Excel YEAR function and provides formula examples to extract year from date, convert date to month and year, calculate age from the date of birth and determine leap years. In a few recent
 Time formatting in Excel: 12/24 hour, custom, defaultMay 07, 2025 am 10:42 AM
This tutorial explains the basics and beyond of the Excel time format. Microsoft Excel has a handful of time features and knowing them in depth can save you a lot of time. To leverage powerful time functions, it helps to know how Excel st
 Excel date functions - formula examples of DATE, TODAY, etc.May 07, 2025 am 09:03 AM
This is the final part of our Excel Date Tutorial that offers an overview of all Excel date functions, explains their basic uses and provides lots of formula examples. Microsoft Excel provides a ton of functions to work with dates and ti
 RAND and RANDBETWEEN functions to generate random numbers in ExcelMay 07, 2025 am 09:02 AM
The tutorial explains the specificities of the Excel random number generator algorithm and demonstrates how to use RAND and RANDBETWEEN functions to generate random numbers, dates, passwords and other text strings in Excel. Before we delv
 5 Excel Tips for Power UsersMay 07, 2025 am 12:55 AM
Excel efficiency improvement: Five practical tips to help you process tables quickly Even users who have been using Microsoft Excel for decades can always discover new techniques to improve efficiency. This article shares five practical Excel tips I have accumulated over the years to help you speed up your spreadsheet workflow. 1. No need to freeze the first line: Use Excel tables cleverly When working with Excel tables containing a lot of data, you may get used to freezing the first row through the View tab so that the header is always visible when scrolling. But in fact, if you format the data as an Excel table, you don't need this step. First, make sure that the first row of the data contains the column title. Then, select the data and click "Table" in the "Insert" tab. 2.


Hot AI Tools

Undresser.AI Undress
AI-powered app for creating realistic nude photos

AI Clothes Remover
Online AI tool for removing clothes from photos.

Undress AI Tool
Undress images for free

Clothoff.io
AI clothes remover

Video Face Swap
Swap faces in any video effortlessly with our completely free AI face swap tool!

Hot Article
Hot Tools

Safe Exam Browser
Safe Exam Browser is a secure browser environment for taking online exams securely. This software turns any computer into a secure workstation. It controls access to any utility and prevents students from using unauthorized resources.

ZendStudio 13.5.1 Mac
Powerful PHP integrated development environment

SecLists
SecLists is the ultimate security tester's companion. It is a collection of various types of lists that are frequently used during security assessments, all in one place. SecLists helps make security testing more efficient and productive by conveniently providing all the lists a security tester might need. List types include usernames, passwords, URLs, fuzzing payloads, sensitive data patterns, web shells, and more. The tester can simply pull this repository onto a new test machine and he will have access to every type of list he needs.

PhpStorm Mac version
The latest (2018.2.1) professional PHP integrated development tool

MinGW - Minimalist GNU for Windows
This project is in the process of being migrated to osdn.net/projects/mingw, you can continue to follow us there. MinGW: A native Windows port of the GNU Compiler Collection (GCC), freely distributable import libraries and header files for building native Windows applications; includes extensions to the MSVC runtime to support C99 functionality. All MinGW software can run on 64-bit Windows platforms.

