


php editor Xigua will give you a detailed analysis of the operation process of making bouncy ball animations using PPT. Through simple and easy-to-understand step-by-step guidance, you can easily master how to use PPT to create vivid and interesting bouncy ball animations. Following the guidance of this article, you will be able to quickly get started and create stunning PPT animation content, adding more highlights and interest to your presentations!
1. Open PPT and add a blank PPT.

2. Draw a small ball outside the page (imagine it as a bouncy ball).

3. Select the ball and click [Animation] - [Add Animation] - [Custom Path].

4. The drawing of [custom path] is the same as the drawing pencil, PS brush and other tools. You can draw it by dragging it several times.

5. After drawing the path, click [Effect Options]. There is a small arrow in the lower right corner. After clicking, enter the settings of the custom path. Set the start time of the animation here. Whether Delay, whether to repeat and animation speed, etc. After the settings are completed, click [OK].


6. Return to the page, select the ball, copy the ball, and drag the copied ball to the appropriate position ( (you think it looks good), continue to select the ball, click the [Custom Path] setting, set the animation start time to [at the same time as the previous animation], and delay the time by 0.1 seconds to 0.3 seconds (yourself Decide).
Continue to copy the ball and continue to increase the delay time of the ball. The editor has increased it to 2.9 seconds before giving up copying (because the speed set by the editor is slow 3 seconds, which is the first small ball). The end of the ball's movement is 3 seconds, and the last one starts 2.9 seconds after the beginning of the ball's movement, forming a cycle with a difference of 0.1 seconds.)
Note:
1. Copy , note that the starting position and ending position of the ball must be outside the page.
2. Teach you a simple method of using paths to create animations. You will no longer need to use Flash to create animations in the future.
The above is the detailed content of Operation process of making bouncy ball animation using PPT. For more information, please follow other related articles on the PHP Chinese website!

 How to make a histogram in ExcelApr 22, 2025 am 10:33 AM
This tutorial explores three distinct methods for creating histograms in Excel: leveraging the Analysis ToolPak's Histogram tool, employing the FREQUENCY or COUNTIFS functions, and utilizing PivotCharts. While creating basic charts in Excel is strai
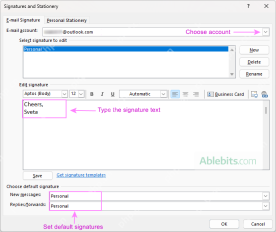 Outlook signature: how to make, add and changeApr 22, 2025 am 09:54 AM
This comprehensive guide provides step-by-step instructions for creating and managing professional email signatures in Microsoft Outlook. Learn how to craft compelling signatures with images, clickable links, and more, across all Outlook versions (i
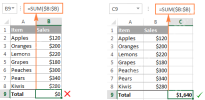 Excel SUM formula to total a column, rows or only visible cellsApr 22, 2025 am 09:17 AM
This tutorial demonstrates how to calculate sums in Excel using the AutoSum feature and custom SUM formulas for columns, rows, and selected ranges. It also covers summing only visible cells, calculating running totals, summing across multiple sheets
 How to AutoSum in ExcelApr 22, 2025 am 09:05 AM
This concise guide explains Excel's AutoSum feature and its efficient uses. Learn to quickly sum columns, rows, or visible cells, and troubleshoot common AutoSum issues. Excel's SUM function is incredibly popular, prompting Microsoft to include a ded
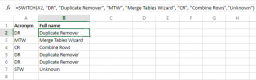 Excel Switch function – the compact form of nested IF statementApr 22, 2025 am 09:04 AM
This article introduces the Excel SWITCH function, explaining its syntax and demonstrating its use in simplifying complex nested IF statements. If you've struggled with lengthy nested IF formulas, the SWITCH function offers a significant time-saving
 How to do a running total in Excel (Cumulative Sum formula)Apr 21, 2025 am 11:16 AM
This concise guide demonstrates how to efficiently calculate running totals (cumulative sums) in Excel using a SUM formula with strategically placed absolute and relative cell references. A running total displays the accumulated sum of a dataset as
 Excel LEN function: count characters in cellApr 21, 2025 am 10:10 AM
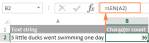
Are you looking for an Excel formula to count characters in a cell? If so, then you have certainly landed up on the right page. This short tutorial will teach you how you can use the LEN function to count characters in Excel, with or with
 How to count words in Excel - formula examplesApr 21, 2025 am 09:59 AM
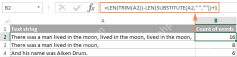
This tutorial demonstrates how to count words in Excel using a combination of the LEN, SUBSTITUTE, and TRIM functions. It offers both case-sensitive and case-insensitive formulas for counting total words or specific words/text within a cell or range


Hot AI Tools

Undresser.AI Undress
AI-powered app for creating realistic nude photos

AI Clothes Remover
Online AI tool for removing clothes from photos.

Undress AI Tool
Undress images for free

Clothoff.io
AI clothes remover

Video Face Swap
Swap faces in any video effortlessly with our completely free AI face swap tool!

Hot Article
Hot Tools

SublimeText3 English version
Recommended: Win version, supports code prompts!

mPDF
mPDF is a PHP library that can generate PDF files from UTF-8 encoded HTML. The original author, Ian Back, wrote mPDF to output PDF files "on the fly" from his website and handle different languages. It is slower than original scripts like HTML2FPDF and produces larger files when using Unicode fonts, but supports CSS styles etc. and has a lot of enhancements. Supports almost all languages, including RTL (Arabic and Hebrew) and CJK (Chinese, Japanese and Korean). Supports nested block-level elements (such as P, DIV),

SublimeText3 Mac version
God-level code editing software (SublimeText3)

MinGW - Minimalist GNU for Windows
This project is in the process of being migrated to osdn.net/projects/mingw, you can continue to follow us there. MinGW: A native Windows port of the GNU Compiler Collection (GCC), freely distributable import libraries and header files for building native Windows applications; includes extensions to the MSVC runtime to support C99 functionality. All MinGW software can run on 64-bit Windows platforms.

Atom editor mac version download
The most popular open source editor

