
 Software TutorialOffice SoftwareOperation content of inserting lace brackets and resizing in PPT
Operation content of inserting lace brackets and resizing in PPT

php editor Xinyi teaches you how to insert lace brackets and adjust the size in PPT. First, open the PPT document and select the slide where you want to insert lace brackets. Next, select the "Curves" option under "Shapes" in the "Insert" tab and select the appropriate lace bracket shape. Then, drag the lace bracket onto the slide and adjust its size and position. Finally, you can adjust the color and style as needed to make the lace brackets more beautiful and consistent with the PPT theme.
1. Insert——>Shape——>Select lace brackets.

2. Press and hold down the left mouse button to draw lace brackets, then release it.

3. Click the lace brackets in the window to operate them. If you pull the small circle around it, you can adjust the size. Press and hold the arc arrow at the top to rotate the lace bracket.

4. Click the lace bracket, and then select Drawing Tools -> Format. Modify its color and shape.

5. To insert text, right-click the lace bracket. There is an option to edit the text, but enter inside the bracket. We generally need to use lace brackets to grade one by one. The editor generally A well-understood method is used to insert a text box so that the text box can be edited and moved at will.

#6. After the layout is adjusted, everyone will definitely think that each text box and the lace brackets are separated, making the overall operation inconvenient. Then we have to combine them. Hold down the shift key, then use the mouse to select the text boxes and lace brackets you want to combine, and then release the shift key. Right-click any selected part and select Group from the right-click menu bar.

7. So now they are a whole. You can drag together to enlarge, cut, copy, and delete.

The above is the detailed content of Operation content of inserting lace brackets and resizing in PPT. For more information, please follow other related articles on the PHP Chinese website!

 Consolidate in Excel: Merge multiple sheets into oneApr 29, 2025 am 10:04 AM
This tutorial explores various methods for combining Excel sheets, catering to different needs: consolidating data, merging sheets via data copying, or merging spreadsheets based on key columns. Many Excel users face the challenge of merging multipl
 Calculate moving average in Excel: formulas and chartsApr 29, 2025 am 09:47 AM
This tutorial shows you how to quickly calculate simple moving averages in Excel, using functions to determine moving averages over the last N days, weeks, months, or years, and how to add a moving average trendline to your charts. Previous articles
 How to calculate average in Excel: formula examplesApr 29, 2025 am 09:38 AM
This tutorial demonstrates various methods for calculating averages in Excel, including formula-based and formula-free approaches, with options for rounding results. Microsoft Excel offers several functions for averaging numerical data, and this gui
 How to calculate weighted average in Excel (SUM and SUMPRODUCT formulas)Apr 29, 2025 am 09:32 AM
This tutorial shows you two simple ways to calculate weighted averages in Excel: using the SUM or SUMPRODUCT function. Previous articles covered basic Excel averaging functions. But what if some values are more important than others, impacting the f
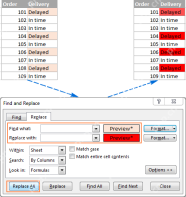 Using Excel Find and Replace in the most efficient wayApr 29, 2025 am 09:07 AM
This tutorial demonstrates how to efficiently locate and modify data within Excel spreadsheets using the Find and Replace function. We'll cover basic and advanced techniques, including wildcard searches and modifications across multiple workbooks. W
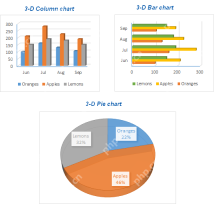 How to make a chart (graph) in Excel and save it as templateApr 28, 2025 am 09:31 AM
This Excel charting tutorial provides a comprehensive guide to creating and customizing graphs within Microsoft Excel. Learn to visualize data effectively, from basic chart creation to advanced techniques. Everyone uses Excel charts to visualize dat
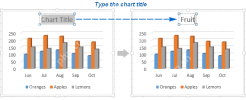 Excel charts: add title, customize chart axis, legend and data labelsApr 28, 2025 am 09:18 AM
After you have created a chart in Excel, what's the first thing you usually want to do with it? Make the graph look exactly the way you've pictured it in your mind! In modern versions of Excel, customizing charts is easy and fun. Microsof
 Using Excel REPLACE and SUBSTITUTE functions - formula examplesApr 28, 2025 am 09:16 AM
This tutorial demonstrates the Excel REPLACE and SUBSTITUTE functions with practical examples. Learn how to use REPLACE with text, numbers, and dates, and how to nest multiple REPLACE or SUBSTITUTE functions within a single formula. Last week, we ex


Hot AI Tools

Undresser.AI Undress
AI-powered app for creating realistic nude photos

AI Clothes Remover
Online AI tool for removing clothes from photos.

Undress AI Tool
Undress images for free

Clothoff.io
AI clothes remover

Video Face Swap
Swap faces in any video effortlessly with our completely free AI face swap tool!

Hot Article
Hot Tools

Atom editor mac version download
The most popular open source editor

VSCode Windows 64-bit Download
A free and powerful IDE editor launched by Microsoft

Zend Studio 13.0.1
Powerful PHP integrated development environment

SublimeText3 English version
Recommended: Win version, supports code prompts!

Notepad++7.3.1
Easy-to-use and free code editor

