


With the development of technology, computers have become one of the indispensable tools for our daily work and study. In computer office work, Word documents, as one of the most commonly used word processing software, also have many practical functions. Among them, making tables is undoubtedly one of the commonly used functions. This article will introduce you how to easily learn how to create tables in Word documents, so that you can use Word software to work and study more efficiently.
First, open your Word document and select the location where you want to insert the table. In Word's menu bar, navigate to the "Insert" tab and find the "Table" option in the drop-down menu. After clicking the "Table" option, you can choose to insert a table with several rows and columns. Just move the mouse to the box of the table and select the required number of rows and columns to insert the table.
Next, learn to style the table. After inserting the table, you can select the entire table and then find the "Table Tools" tab in the Word menu bar. In the "Table Tools" tab, you can set the table's style, borders, background color, and more. By adjusting these settings, you can make your table look cleaner and more beautiful.
In addition to setting the style of the table, you can also insert rows and columns, merge cells, adjust cell size, etc. Select the row or column in the table that needs to be operated, and then find the corresponding function button in the "Table Tools" tab to perform the operation. These features allow you to flexibly adjust the structure of your table to suit different needs.
In addition, you can also insert formulas, charts and other content into the table to make the table more rich and diverse. In Word, you can use the formula editor to insert various mathematical formulas, as well as Excel tables, charts, and other content. The use of these functions can make your forms more professional and practical.
Finally, learn how to save and share the forms you create. After completing the form creation, remember to save your document in time to avoid data loss. You can choose to save the document on your local computer or in cloud storage for viewing and editing at any time. In addition, you can also choose to export the document to PDF format to share it with others.
In general, it is not difficult to learn how to create tables in Word documents. You only need to follow the above steps and you can easily create beautiful and practical tables. I hope this article can help you become more proficient in using Word software and improve your work and study efficiency. I wish you better success in using Word document tables!
The above is the detailed content of Easily learn how to create Word document tables. For more information, please follow other related articles on the PHP Chinese website!

 How to archive in Outlook automatically or manuallyApr 16, 2025 am 11:48 AM
This comprehensive guide explains how to effectively manage your Outlook email storage by archiving emails, tasks, and other items across various Outlook versions (365, 2021, 2019, 2016, 2013, and earlier). Learn to configure automatic archiving, pe
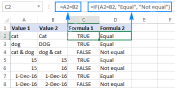 Excel: Compare strings in two cells for matches (case-insensitive or exact)Apr 16, 2025 am 11:26 AM
The tutorial shows how to compare text strings in Excel for case-insensitive and exact match. You will learn a number of formulas to compare two cells by their values, string length, or the number of occurrences of a specific character, a
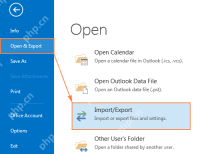 How to back up Outlook emails automatically or manuallyApr 16, 2025 am 11:17 AM
This comprehensive guide ensures your Outlook data remains safe and accessible. Learn how to back up Outlook emails, contacts, calendar entries, and tasks—both automatically and manually—across all Outlook 365 and 2010 versions. The importance of re
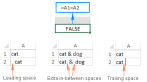
 Excel TRIM function - quick way to remove extra spacesApr 16, 2025 am 10:16 AM
This tutorial shows you quick and easy ways to remove extra spaces in Excel. Learn how to eliminate leading, trailing, and excess spaces between words, troubleshoot the TRIM function, and discover alternative solutions. Facing duplicate detection fa
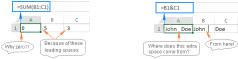
 How to remove blank spaces in Excel - leading, trailing, non-breakingApr 16, 2025 am 09:05 AM
This tutorial shows you how to eliminate unwanted spaces in Excel using formulas and the handy Text Toolkit. Learn to remove leading and trailing spaces, extra spaces between words, non-breaking spaces, and other non-printing characters. The biggest
 5 Open-Source Alternatives to Microsoft ExcelApr 16, 2025 am 12:56 AM
Excel remains popular in the business world, thanks to its familiar interfaces, data tools and a wide range of feature sets. Open source alternatives such as LibreOffice Calc and Gnumeric are compatible with Excel files. OnlyOffice and Grist provide cloud-based spreadsheet editors with collaboration capabilities. Looking for open source alternatives to Microsoft Excel depends on what you want to achieve: Are you tracking your monthly grocery list, or are you looking for tools that can support your business processes? Here are some spreadsheet editors for a variety of use cases. Excel remains a giant in the business world Microsoft Ex
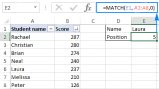 Excel MATCH function with formula examplesApr 15, 2025 am 11:21 AM
This tutorial explains how to use MATCH function in Excel with formula examples. It also shows how to improve your lookup formulas by a making dynamic formula with VLOOKUP and MATCH. In Microsoft Excel, there are many different lookup/ref
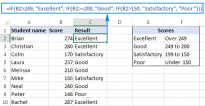 Nested IF in Excel – formula with multiple conditionsApr 15, 2025 am 11:13 AM
This tutorial demonstrates how to effectively use multiple IF functions in Microsoft Excel, showcasing nested IF formulas for various tasks. The core concept is using nested IF statements to evaluate multiple conditions and return different results


Hot AI Tools

Undresser.AI Undress
AI-powered app for creating realistic nude photos

AI Clothes Remover
Online AI tool for removing clothes from photos.

Undress AI Tool
Undress images for free

Clothoff.io
AI clothes remover

AI Hentai Generator
Generate AI Hentai for free.

Hot Article
Hot Tools

Atom editor mac version download
The most popular open source editor

MinGW - Minimalist GNU for Windows
This project is in the process of being migrated to osdn.net/projects/mingw, you can continue to follow us there. MinGW: A native Windows port of the GNU Compiler Collection (GCC), freely distributable import libraries and header files for building native Windows applications; includes extensions to the MSVC runtime to support C99 functionality. All MinGW software can run on 64-bit Windows platforms.

EditPlus Chinese cracked version
Small size, syntax highlighting, does not support code prompt function

Dreamweaver Mac version
Visual web development tools

Notepad++7.3.1
Easy-to-use and free code editor

