


This comprehensive guide explains how to effectively manage your Outlook email storage by archiving emails, tasks, and other items across various Outlook versions (365, 2021, 2019, 2016, 2013, and earlier). Learn to configure automatic archiving, perform manual archiving, and troubleshoot common issues.
Maintaining a streamlined Outlook inbox is crucial for efficiency. Archiving older items reduces mailbox size and improves performance. This tutorial covers both automated and manual archiving methods.
- Automating Email Archiving
- Manual Archiving (Individual or All Folders)
- Locating Archived Files
- Advanced Archiving Techniques
- Relocating Archived Files
- Auto-Deleting from Deleted Items and Junk
- Archiving by Received Date
- Troubleshooting Archiving Problems
What is Outlook Archiving?
Outlook archiving (and AutoArchive) transfers older emails, tasks, and calendar entries to a separate archive folder on your hard drive. This process moves items from your primary .pst file to a dedicated archive.pst file, accessible within Outlook. This frees up space on your C:\ drive (unless you specify a different location).
Archiving offers two key functions:
- Moving items: Transfers items to the archive folder.
- Permanent deletion: Deletes items after a specified time.
Key Facts About Outlook Archiving
To avoid common archiving questions, remember these points:
- Outlook primarily uses .pst files (Outlook Data Files) to store emails, contacts, appointments, tasks, and notes. Only .pst files can be archived. Archived items reside in the Outlook Archive folder and are no longer in their original location.
- Archiving differs from exporting. Exporting creates a copy; archiving moves or deletes the original.
- Archived files are not backups. Create separate backups of your archive.pst file for data security.
- Contacts are not auto-archived. Manual archiving is required for contacts.
- Exchange accounts with online archives disable Outlook's built-in archiving.
Tip: Merge duplicate contacts before archiving.
Automating Email Archiving in Outlook
Outlook's AutoArchive feature automatically moves or deletes old items at set intervals. The steps vary slightly depending on your Outlook version.
Auto-Archiving in Outlook 365 - 2010
AutoArchive isn't enabled by default in Outlook 2010 and later. You might receive prompts to enable it. Click "Yes" to proceed immediately, or "AutoArchive Settings…" to customize options. Alternatively, manually configure it:
- Open Outlook, then navigate to File > Options > Advanced > AutoArchive Settings…
- Check "Run AutoArchive every N days" to activate. Configure other settings and click OK.
The following image shows default settings; detailed explanations for each option are available elsewhere. The archive progress displays in the status bar. The "Archives" folder appears automatically if "Show archive folder in the folder list" is selected. See instructions on displaying the archive folder if needed.

Auto-Archiving in Outlook 2007
Outlook 2007 auto-archives Calendar, Tasks, and Journal items (older than 6 months), along with Sent Items and Deleted Items (older than 2 months) by default. Enable it for other folders:
- Open Outlook and click Tools > Options.
- Go to the Other tab and click AutoArchive….
Configure the settings as described below.
Understanding Outlook AutoArchive Settings
(Outlook 2010 and later: File > Options > Advanced > AutoArchive Settings…)
- Run AutoArchive every N days: Sets the frequency. Frequent archiving of large volumes of data may impact performance.
- Prompt before AutoArchive runs: Provides a confirmation prompt before archiving.
- Delete expired items (e-mail folders only): Deletes messages with individual expiration dates (set in Options > Tracking > Expires after). This is often checked by default, so uncheck if necessary.
- Archive or delete old items: Allows custom AutoArchive settings (unchecked uses defaults).
- Show archive folder in folder list: Displays the "Archives" folder in the Navigation Pane.
- Clean out items older than: Sets the age threshold for archiving.
- Move old items to: Moves items to the archive.pst file. Click Browse to change the location.
- Permanently delete items: Deletes items without archiving.
- Apply these settings to all folders now: Applies settings to all folders.
Default Aging Periods
Default aging periods (changeable per folder):
- Inbox, Drafts, Calendar, Tasks, Notes, Journal: 6 months
- Outbox: 3 months
- Sent Items, Deleted Items: 2 months
- Contacts: Not auto-archived
Excluding Folders or Applying Different Settings
To exclude a folder or customize its settings:
- Right-click the folder and select Properties….
- Choose either "Do not archive items in this folder" or "Archive this folder using these settings" and configure accordingly.
Creating the Archive Folder
If "Show archive folder in folder list" is selected, the "Archives" folder appears automatically. Otherwise:
- Click File > Open & Export > Open Outlook Data File.
- Select the archive.pst file and click OK.
Manual Archiving in Outlook
For more control, manually archive items:
- In Outlook 2016, go to the File tab, and click Tools > Clean up old items. In Outlook 2010 and 2013, click File > Cleanup Tool > Archive…
- Select the folder(s) to archive and set the age threshold. Click Browse to change the archive file location. Check "Include items with 'Do not AutoArchive' checked" to include excluded items.
Location of Outlook Archive Files
The archive.pst file is created automatically during the first auto-archive or manual archive. The location depends on your operating system (unless changed during setup).
Outlook 365 - 2010
-
Vista, Windows 7, 8, 10: C:\Users\
\Documents\Outlook Files\archive.pst -
Windows XP: C:\Documents and Settings\
\Local Settings\Application Data\Microsoft\Outlook\archive.pst
Outlook 2007 and earlier
-
Vista and Windows 7: C:\Users\
\AppData\Local\Microsoft\Outlook\archive.pst -
Windows XP: C:\Documents and Settings\
\Local Settings\Application Data\Microsoft\Outlook\archive.pst
(Note: Application Data and AppData are hidden folders.)
Advanced Archiving Techniques
Changing the Archive File Location
To move an existing archive:
- Close the Archive folder in Outlook.
- Move the archive.pst file to the new location.
- Reconnect the moved file in Outlook (File > Open > Outlook Data File…).
- Update your AutoArchive settings to point to the new location.
Auto-Deleting from Deleted Items and Junk Email
Configure AutoArchive to delete old items from Deleted Items and Junk Email folders by setting the "Permanently delete items" option for these folders.
Archiving by Received Date
To archive based on received date (instead of modified date), modify the registry (use caution!). This requires specific hotfixes for Outlook 2007 and 2010. Create the registry value ArchiveIgnoreLastModifiedTime with a value of 1 under HKEY_CURRENT_USER\Software\Microsoft\Office\<office version>\Outlook\Preferences</office>. Restart Outlook.
Troubleshooting Archiving Problems
Archiving Options Unavailable
This usually indicates an Exchange Server mailbox or organizational mail retention policies. Check with your administrator.
AutoArchive Not Running
Ensure "Run AutoArchive every N days" is checked in AutoArchive settings.
Specific Item Not Archived
Check if the item's modified date is recent or if "Do Not AutoArchive this item" is selected.
Missing Archive Folder
Verify that "Show archive folder in folder list" is selected. Open the Outlook Data File manually if necessary.
Damaged Archive.pst File
Use the Inbox Repair Tool (scanpst.exe) to repair the archive.pst file. If unsuccessful, create a new archive.
Maximum Size Reached
Clean up the archive.pst or main .pst file if it's full. The default limit is 20GB (Outlook 2007) or 50GB (later versions).
This guide provides a thorough understanding of Outlook archiving, empowering you to optimize your email management.
The above is the detailed content of How to archive in Outlook automatically or manually. For more information, please follow other related articles on the PHP Chinese website!

 How to add and subtract dates in ExcelMay 08, 2025 am 11:36 AM
In this tutorial, you will find a variety of useful formulas to add and subtract dates in Excel, such as subtracting two dates, adding days, weeks, months and years to a date, and more. If you have been following our tutorials to working
 Excel WORKDAY and NETWORKDAYS functions to calculate working daysMay 08, 2025 am 10:49 AM
This tutorial demonstrates how to use Excel's WORKDAY, WORKDAY.INTL, NETWORKDAYS, and NETWORKDAYS.INTL functions to efficiently calculate weekdays, considering custom weekend settings and holidays. Microsoft Excel offers specialized functions for wor
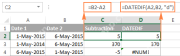
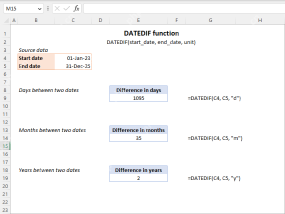 Excel DATEDIF function to get difference between two datesMay 08, 2025 am 10:45 AM
This tutorial provides a concise explanation of Excel's DATEDIF function and offers formula examples for calculating date differences in days, weeks, months, or years. We've previously covered date and time manipulation in Excel, including formattin
 Excel YEAR function - convert date to yearMay 08, 2025 am 09:19 AM
This tutorial explains the syntax and uses of the Excel YEAR function and provides formula examples to extract year from date, convert date to month and year, calculate age from the date of birth and determine leap years. In a few recent
 Time formatting in Excel: 12/24 hour, custom, defaultMay 07, 2025 am 10:42 AM
This tutorial explains the basics and beyond of the Excel time format. Microsoft Excel has a handful of time features and knowing them in depth can save you a lot of time. To leverage powerful time functions, it helps to know how Excel st
 Excel date functions - formula examples of DATE, TODAY, etc.May 07, 2025 am 09:03 AM
This is the final part of our Excel Date Tutorial that offers an overview of all Excel date functions, explains their basic uses and provides lots of formula examples. Microsoft Excel provides a ton of functions to work with dates and ti
 RAND and RANDBETWEEN functions to generate random numbers in ExcelMay 07, 2025 am 09:02 AM
The tutorial explains the specificities of the Excel random number generator algorithm and demonstrates how to use RAND and RANDBETWEEN functions to generate random numbers, dates, passwords and other text strings in Excel. Before we delv
 5 Excel Tips for Power UsersMay 07, 2025 am 12:55 AM
Excel efficiency improvement: Five practical tips to help you process tables quickly Even users who have been using Microsoft Excel for decades can always discover new techniques to improve efficiency. This article shares five practical Excel tips I have accumulated over the years to help you speed up your spreadsheet workflow. 1. No need to freeze the first line: Use Excel tables cleverly When working with Excel tables containing a lot of data, you may get used to freezing the first row through the View tab so that the header is always visible when scrolling. But in fact, if you format the data as an Excel table, you don't need this step. First, make sure that the first row of the data contains the column title. Then, select the data and click "Table" in the "Insert" tab. 2.


Hot AI Tools

Undresser.AI Undress
AI-powered app for creating realistic nude photos

AI Clothes Remover
Online AI tool for removing clothes from photos.

Undress AI Tool
Undress images for free

Clothoff.io
AI clothes remover

Video Face Swap
Swap faces in any video effortlessly with our completely free AI face swap tool!

Hot Article
Hot Tools

SublimeText3 Mac version
God-level code editing software (SublimeText3)

SublimeText3 Linux new version
SublimeText3 Linux latest version

ZendStudio 13.5.1 Mac
Powerful PHP integrated development environment

SublimeText3 English version
Recommended: Win version, supports code prompts!

Safe Exam Browser
Safe Exam Browser is a secure browser environment for taking online exams securely. This software turns any computer into a secure workstation. It controls access to any utility and prevents students from using unauthorized resources.

