


How to make a circular picture in ppt: 1. Use the crop function; 2. Use the shape tool; 3. Use shortcut keys and control points to adjust.

#There are many ways to create a circular picture in PowerPoint. The following are detailed steps and instructions:
Method 1: Use the crop function
1. Open the PPT and insert the picture:
First, start the PowerPoint software and open the presentation you are editing.
Select the "Insert" option in the menu bar, then click "Picture", select the picture you need to make into a circle from the file browser and insert it into the slide.
2. Crop the picture into a circle:
Left click on the inserted picture to jump to in the "Format" menu.
Under the "Format" menu, find and click the "Crop" function.
In the Crop drop-down menu, select "Crop to Shape" and select "Oval" from the pop-up shape list.
At this point, the image will be cropped into an oval shape, but usually what we want is a perfect circle.
3. Adjust to a circle and exit editing:
In the "Crop" drop-down menu, continue to select "Resize shape" or similar option.
Hold down the Ctrl key and drag the edge of the oval with the mouse to make it a circle. Pay attention to the shape of the image as you adjust it, making sure it becomes a perfect circle.
After the adjustment is completed, click on the area of the slide except the picture to exit the picture editing mode.
Method 2: Use the shape tool
1. Insert pictures and shapes:
Similarly, insert the photos that need to be processed into the PPT.
Next, select the circle in the "Shape" of the "Insert" tab.
Drag the circular shape onto the slide and adjust its size and position so that it covers the photo that needs to be processed.
2. Edit the shape outline and fill:
With the circular shape selected, go to " Format" tab.
Select "Shape Outline" or "Shape Fill" and edit as needed. For example, you might want to set the shape outline to no fill so that only part of the image is visible.
By adjusting the transparency of the circular shape and the hierarchical relationship of the image, you can achieve the effect of displaying only the circular area of the image.
Method 3: Use shortcut keys and control points to adjust
1. Insert a picture and use shortcut keys:
Insert a photo that needs to be processed into the PPT.
Hold down the "Shift" key and drag the photo to quickly adjust it into a circle. However, this method may not be accurate enough and needs further adjustment.
2. Finely adjust the circle:
Use the "Control Point Adjustment" tool to finely adjust the circle. . This usually involves rotating and fine-tuning the handles on the edges of the circle to achieve a perfectly round effect.
During the adjustment process, you can use the "Shape Outline" or "Shape Fill" functions in the "Format" tab to further edit and optimize the circle.
Notes and Tips
When cropping or shape overlay, pay attention to maintaining the relative position of the picture and shape and size relationship to ensure that the final effect meets expectations.
If you want to control the size and shape of the circle more precisely, you can use the drawing tools in PPT to draw and adjust manually.
When processing high-resolution images, pay attention to maintaining the clarity and quality of the image and avoiding image distortion or blur caused by cropping or adjustment.
You can also try combining different shapes, lines, and fill effects to create a more creative and personalized circle picture effect.
To sum up, there are many ways to choose from in making circular pictures in PowerPoint. You can choose the appropriate method to operate based on your needs and proficiency. With some trial and error, you can master the art of making circular images and create presentations that look beautiful and professional.
Please note that the above steps and instructions are based on the general operation of PowerPoint. Since different versions of PowerPoint may have differences in interface and functionality, actual operations may vary. It is recommended to consult relevant documents or online tutorials according to the version of PowerPoint you are using for more specific guidance.
The above is the detailed content of How to make a round picture in ppt. For more information, please follow other related articles on the PHP Chinese website!

 How to use SUMIF function in Excel with formula examplesMay 13, 2025 am 10:53 AM
This tutorial explains the Excel SUMIF function in plain English. The main focus is on real-life formula examples with all kinds of criteria including text, numbers, dates, wildcards, blanks and non-blanks. Microsoft Excel has a handful o
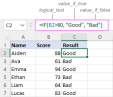 IF function in Excel: formula examples for text, numbers, dates, blanksMay 13, 2025 am 10:50 AM
In this article, you will learn how to build an Excel IF statement for different types of values as well as how to create multiple IF statements. IF is one of the most popular and useful functions in Excel. Generally, you use an IF statem
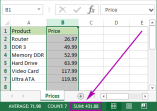 How to sum a column in Excel - 5 easy waysMay 13, 2025 am 09:53 AM
This tutorial shows how to sum a column in Excel 2010 - 2016. Try out 5 different ways to total columns: find the sum of the selected cells on the Status bar, use AutoSum in Excel to sum all or only filtered cells, employ the SUM function
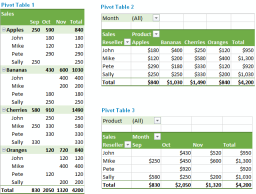 How to make and use Pivot Table in ExcelMay 13, 2025 am 09:36 AM
In this tutorial you will learn what a PivotTable is, find a number of examples showing how to create and use Pivot Tables in all version of Excel 365 through Excel 2007. If you are working with large data sets in Excel, Pivot Table comes
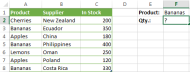
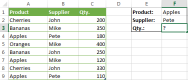 Excel SUMIFS and SUMIF with multiple criteria – formula examplesMay 13, 2025 am 09:05 AM
This tutorial explains the difference between the SUMIF and SUMIFS functions in terms of their syntax and usage, and provides a number of formula examples to sum values with multiple AND / OR criteria in Excel 365, 2021, 2019, 2016, 2013,
 How You Can Use Wildcards in Microsoft Excel to Refine Your SearchMay 13, 2025 am 01:59 AM
Excel wildcards: a powerful tool for efficient search and filtering This article will dive into the power of wildcards in Microsoft Excel, including their application in search, formulas, and filters, and some details to note. Wildcards allow you to perform fuzzy matching, making it more flexible to find and process data. *Wildcards: asterisks () and question marks (?)** Excel mainly uses two wildcards: asterisk (*) and question mark (?). *Asterisk (): Any number of characters** The asterisk represents any number of characters, including zero characters. For example: *OK* Match the cell containing "OK", "OK&q
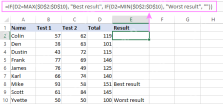 Excel IF function with multiple conditionsMay 12, 2025 am 11:02 AM
The tutorial shows how to create multiple IF statements in Excel with AND as well as OR logic. Also, you will learn how to use IF together with other Excel functions. In the first part of our Excel IF tutorial, we looked at how to constru
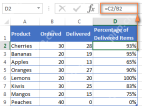 How to calculate percentage in Excel - formula examplesMay 12, 2025 am 10:28 AM
In this tutorial, you will lean a quick way to calculate percentages in Excel, find the basic percentage formula and a few more formulas for calculating percentage increase, percent of total and more. Calculating percentage is useful in m


Hot AI Tools

Undresser.AI Undress
AI-powered app for creating realistic nude photos

AI Clothes Remover
Online AI tool for removing clothes from photos.

Undress AI Tool
Undress images for free

Clothoff.io
AI clothes remover

Video Face Swap
Swap faces in any video effortlessly with our completely free AI face swap tool!

Hot Article
Hot Tools

EditPlus Chinese cracked version
Small size, syntax highlighting, does not support code prompt function

SublimeText3 English version
Recommended: Win version, supports code prompts!

MantisBT
Mantis is an easy-to-deploy web-based defect tracking tool designed to aid in product defect tracking. It requires PHP, MySQL and a web server. Check out our demo and hosting services.

SublimeText3 Linux new version
SublimeText3 Linux latest version

SecLists
SecLists is the ultimate security tester's companion. It is a collection of various types of lists that are frequently used during security assessments, all in one place. SecLists helps make security testing more efficient and productive by conveniently providing all the lists a security tester might need. List types include usernames, passwords, URLs, fuzzing payloads, sensitive data patterns, web shells, and more. The tester can simply pull this repository onto a new test machine and he will have access to every type of list he needs.

