


php editor Apple will introduce you in detail how to set the row height of Excel tables. In Excel, adjusting row height is very important. It can make the table more beautiful and tidy, and also improve the efficiency of data reading. Through this article, you will learn how to quickly and easily set the row height of an Excel table to make your data display clearer.
Today I will share with you the detailed steps on how to set the row height in the Excel table. The specific operations are as follows, let us study carefully together!
1. First of all, the row height usually seen when opening EXCEL is relatively narrow. If we want to set the row height, we must first select the area that needs to be set, which can be one row or multiple rows, or a selected area. It can also be the entire document, (as shown in the figure below).

#2. Then, we select the row height we want to set (as shown by the red arrow in the figure below).

3. Next, after selecting the area that needs to be set, directly click the [right button] of the mouse and select [Row Height] (as shown in the red circle in the figure below) .

#4. Finally, an interface will pop up for you to modify the row height. After successfully setting the size, click [OK] to succeed (circled in red in the picture below) shown in the section).

The above is the detailed content of How to set row height in Excel table. For more information, please follow other related articles on the PHP Chinese website!

 How to make a histogram in ExcelApr 22, 2025 am 10:33 AM
This tutorial explores three distinct methods for creating histograms in Excel: leveraging the Analysis ToolPak's Histogram tool, employing the FREQUENCY or COUNTIFS functions, and utilizing PivotCharts. While creating basic charts in Excel is strai
 Outlook signature: how to make, add and changeApr 22, 2025 am 09:54 AM
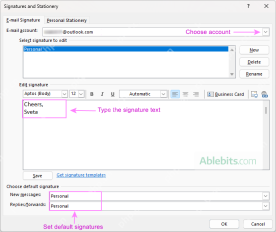
This comprehensive guide provides step-by-step instructions for creating and managing professional email signatures in Microsoft Outlook. Learn how to craft compelling signatures with images, clickable links, and more, across all Outlook versions (i
 Excel SUM formula to total a column, rows or only visible cellsApr 22, 2025 am 09:17 AM
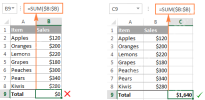
This tutorial demonstrates how to calculate sums in Excel using the AutoSum feature and custom SUM formulas for columns, rows, and selected ranges. It also covers summing only visible cells, calculating running totals, summing across multiple sheets
 How to AutoSum in ExcelApr 22, 2025 am 09:05 AM
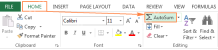
This concise guide explains Excel's AutoSum feature and its efficient uses. Learn to quickly sum columns, rows, or visible cells, and troubleshoot common AutoSum issues. Excel's SUM function is incredibly popular, prompting Microsoft to include a ded
 Excel Switch function – the compact form of nested IF statementApr 22, 2025 am 09:04 AM
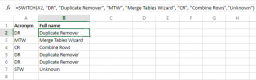
This article introduces the Excel SWITCH function, explaining its syntax and demonstrating its use in simplifying complex nested IF statements. If you've struggled with lengthy nested IF formulas, the SWITCH function offers a significant time-saving
 How to do a running total in Excel (Cumulative Sum formula)Apr 21, 2025 am 11:16 AM
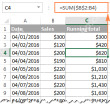
This concise guide demonstrates how to efficiently calculate running totals (cumulative sums) in Excel using a SUM formula with strategically placed absolute and relative cell references. A running total displays the accumulated sum of a dataset as
 Excel LEN function: count characters in cellApr 21, 2025 am 10:10 AM
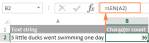
Are you looking for an Excel formula to count characters in a cell? If so, then you have certainly landed up on the right page. This short tutorial will teach you how you can use the LEN function to count characters in Excel, with or with
 How to count words in Excel - formula examplesApr 21, 2025 am 09:59 AM
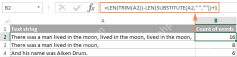
This tutorial demonstrates how to count words in Excel using a combination of the LEN, SUBSTITUTE, and TRIM functions. It offers both case-sensitive and case-insensitive formulas for counting total words or specific words/text within a cell or range


Hot AI Tools

Undresser.AI Undress
AI-powered app for creating realistic nude photos

AI Clothes Remover
Online AI tool for removing clothes from photos.

Undress AI Tool
Undress images for free

Clothoff.io
AI clothes remover

Video Face Swap
Swap faces in any video effortlessly with our completely free AI face swap tool!

Hot Article
Hot Tools

PhpStorm Mac version
The latest (2018.2.1) professional PHP integrated development tool

ZendStudio 13.5.1 Mac
Powerful PHP integrated development environment

WebStorm Mac version
Useful JavaScript development tools

Safe Exam Browser
Safe Exam Browser is a secure browser environment for taking online exams securely. This software turns any computer into a secure workstation. It controls access to any utility and prevents students from using unauthorized resources.

Notepad++7.3.1
Easy-to-use and free code editor

