


DDREASE is a tool for recovering data from file or block devices such as hard drives, SSDs, RAM disks, CDs, DVDs and USB storage devices. It copies data from one block device to another, leaving corrupted data blocks behind and moving only good data blocks. ddreasue is a powerful recovery tool that is fully automated as it does not require any interference during recovery operations. Additionally, thanks to the ddasue map file, it can be stopped and resumed at any time. Other main functions of DDREASE are as follows:
- It will not overwrite the recovered data but will fill in the gaps in case of iterative recovery. However, it can be truncated if the tool is instructed to do so explicitly.
- Recover data from multiple files or blocks to a single file.
- Supports multiple types of device interfaces, such as SATA, ATA, SCSI, MFM drives, floppy disks and SD cards.
In this guide, I will take an in-depth look at this powerful data recovery tool, discussing its installation steps and how to use it to recover block devices or partitions.
- Install ddrescue
- Understand the basics
- Important considerations
- Use DDREASE
- Repair corrupted blocks
- Restore image file to new blocks
- Restore data block to another data block
- Recover specific data from saved image files
- Advanced Features
- How ddrescue works
- in conclusion
Please note: In this guide, I am using a Linux distribution (Ubuntu 22.04). The installation steps for the Ddreasure utility may vary depending on the distribution, but the guidelines are universal for all Linux distributions.
Install ddrescue
To install ddrescue on Linux, especially Ubuntu and its versions or Debian-based distributions, use: Purpose:
sudo apt install gddrescue
To install it on REHL, Fedora and CentOS, first enable ETEL (Extra Packages for Enterprise Linux).
sudo yum install epel—release
The above commands are applicable to newer versions of the respective distributions.
Then execute the following command to install ddreasue:
sudo yum install ddrescue
For Arch-Linux based distributions like Arch-Linux and Manjaro, please install the ddrescue recovery utility using the command given below.
sudo pacman—S ddrescue
Since I am using Ubuntu 22.04, I will use the APT package manager to install it.
Understand the basics
Before using the ddreasue tool to recover data, I recommend that users who are not familiar with the recovery process understand some naming conventions of Linux.
Linux recognizes blocks (devices) as files and places them in the /dev directory. To list the files in the /dev directory, use the ls/dev command.
Hard drives (storage blocks) are represented by sd and the alphabet; in the case of multiple storage devices, the files will be represented as /dev/sda, /dev/sdb, etc.
If the storage device has partitions, they will be represented by numbers with corresponding drive file names, such as /dev/sda1, /dev/sda2, etc.
To list all blocks and other connected devices in the system, use the list block lsblk command:
lsblk

ddrescue command can recover the entire block (including MBR and partition) or partition. On the other hand, if you only need to recover specific files from a specific partition, then it is better to recover the partition rather than the entire block.
Important considerations
Before using the ddue utility, there are some very critical issues that should be considered:
- Do not attempt to recover a mounted data block, which should not even be in read-only mode.
- Do not attempt to repair a data block with an I/O error.
- The system can change input and output device names on reboot. Before starting the copy process, make sure the device name is correct.
- If you use a separate block as the output device, all data on the device will be overwritten.
Use ddrescue
After installing the ddrescue utility and understanding the naming convention, the next step is to identify the failed disk and use the ddrescue tool to recover it.
Repair corrupted blocks
The first example will contain the process of recovering the entire block. First, list the blocks using the lsblk command:
lsblk—o Name, Size, FSTYPE
—The o flag is used to specify what type of information (field) the command should output. I have mentioned name, size and FSTYPE or file system type.

Now you can determine the target block, partition and location to save the rescued image file.
Another important thing to note is that on Linux, block names are dynamically assigned at boot time and after a reboot, the name of the block may change. So, be careful when writing down block names.
Now, use the syntax below to save the chunk as an image file and use the log file in the root directory.
sudo ddrescue—d—rX/dev/[block][path/name]. img [logfile_name]. log
Note: Replace [block], [path/name] and [logfile_name] of the image file with the preferred name accordingly.
In this example, I am recovering /dev/sda in the root directory using the image file name recovery.img. Log files (also called map files) are necessary if recovery is to be resumed at any time.
Sudo dd rescue-d-r2/dev/sda2 restore.img restore.log
Two important flags are used in the above command.
| D | -indirect | Used to tell the tool to access the disk directly and ignore the kernel cache |
| RX | -Retry-Pass | Used to tell the tool to retry bad sectors X times |
When executing the above command, you will notice that two files appear in the file browser, named recovery.img and recovery.log.

Recovery time depends on input block size and corruption. If you want to recover large data blocks, I recommend using log files, as the process can take hours or even days to complete.
The output of the above command is as follows:

In the output image, ipos is the input location of the input file from which copying starts, and opos is the output location of the data written on the output file.
Non-try is the size of the block without waiting for a try. Rescued represents the size of successfully recovered blocks. Rescued pct indicates the percentage of data successfully recovered. The terms, non-pruned, non-scrap, bad sectors and bad areas are self-explanatory. However, read error terms represent failed read attempts numerically.
The running time shows the time it took the tool to complete the process, while the remaining time is the time remaining to complete the recovery process. The above output shows that the remaining time is 0 because the process has completed, please read the output below in the image of the unfinished process.

Let's see what we get in the log file; to open the generated log file, use the vim recovery.log command.

current_status is , indicating the end of the process, and current_pos is the position on the block.
The current status list is shown in the table below:
| ? | copy |
| * | prune |
| / | scrapped |
| – | Retry |
| F | Fill the specified block |
| G | Generate log file |
| The process is completed |
Below this, the log file shows the status of previously rescued chunks in the characters listed below:
| ? | Block Not Tried |
| * | Unpruned faulty block |
| / | Unretired invalid blocks |
| – | Bad sector failed data block |
| Complete Block |
Restore image file to new blocks
Once you have completed the recovery process and have the image file. You may now want to move it from the damaged drive to the new drive. To move an image file to a new block, first, connect the block to the system and then use the lsblk command to identify the block name.
Assuming it is /dev/sdb, use the following command to copy the image to a new block.
sudo ddrescue—f recovery. img/dev/sdb logfile.log
If there is any data, use the -f flag to overwrite the new block. Remember that the log file must have a different name to keep it separate from previously stored log files.
The above operation can also be done using dd, which is another powerful command for copying files.
sudo dd if = recovery. img of =/dev/sdb
Before proceeding with the restore, please remember that the new block must be large enough to preserve the entire recovered block; for example, if the recovery block is 5GB, the new block should be larger than 5GB.
If the recovered image file presents a lot of errors, then they can be repaired to an extent using the fsck command on Linux. On Windows you can use the CHKDSK or SFC command to do this. However, recovery depends on the number of errors generated by the corrupted file.
Now, the recovery process and repair work is complete. Another important thing to note is that instead of creating an image file and then copying it to the new block, you can recover the corrupted block directly on another block. Okay, in the next section I'll go into detail about this process.
Restore data block to another data block
To restore a block directly to a new block, first connect the block to the system and then use the lsblk command again to identify the block name. Wrong block names can disrupt the entire process and you may lose data.
After the source and destination blocks are identified, restore the block using the following command:
sudo ddrescue—d—f—r2/dev/[source]/dev/[destination] backup.log
Assuming /dev/sdb is the target block, so to copy the /dev/sda directory to the new block, use use:
Sudo ddue-d-f-r2/dev/sda/dev/sdb backup.log
Before attempting this procedure, please see the key considerations mentioned in the previous sections.
Recover specific data from saved image files
In many cases, the purpose of data recovery is to find specific files from a damaged drive. To access specific files, you need to mount the image file. On Linux, the recovered image file can be explored using the mount command.
Before mounting the image file, create a folder or directory where the contents of the image file will be extracted.
mkdir Recovery Mount
Next, use the following command to mount the image file:
sudo mount—o loop recovery. img~/Recovery Mount
The—o flag indicates options, and the loop option is used to treat the image file as a block device.
You can now access the contents of the image file, as shown in the screenshot below.

To unmount a block, use the umount command.
SUDO uninstall~/restore load
Advanced Features
To resume from a specific point, use the -i flag or -input-position. It should be in bytes and defaults to 0 bytes. It is important to resume replication from a specific point. For example, if you want to start the copy process from the 10 GB point, use the following command.
sudo ddrescue—i10GiB/dev/sda imagefile. img logfile.log
To define the maximum size of the input device, the -s flag will be used. -s indicates size, which can also be used as -size, in bytes. If the tool does not recognize the size of the input file, use this option to specify it.
Sudo ddreasure-s10GiB/dev/sda Imagefile.imglog file.log
—The ask option is very convenient as it prompts for confirmation of input and output blocks before starting the copy process. As mentioned before, the system dynamically assigns names to blocks and changes the names on reboot. In this case, this option may be useful.
sudo ddrescue——ask/dev/sda imagefile. img logfile.log
Additionally, some other alternatives are listed below:
| —R | —Reverse | Reverse the direction of copy |
| —q | -quite | Cancel all output messages |
| —V | -lengthy | In more detail, all output messages |
| —p | -Preallocation | Pre-allocate storage space for output files |
| —P | -Data preview | The display lines of the latest read data default to 3 lines |
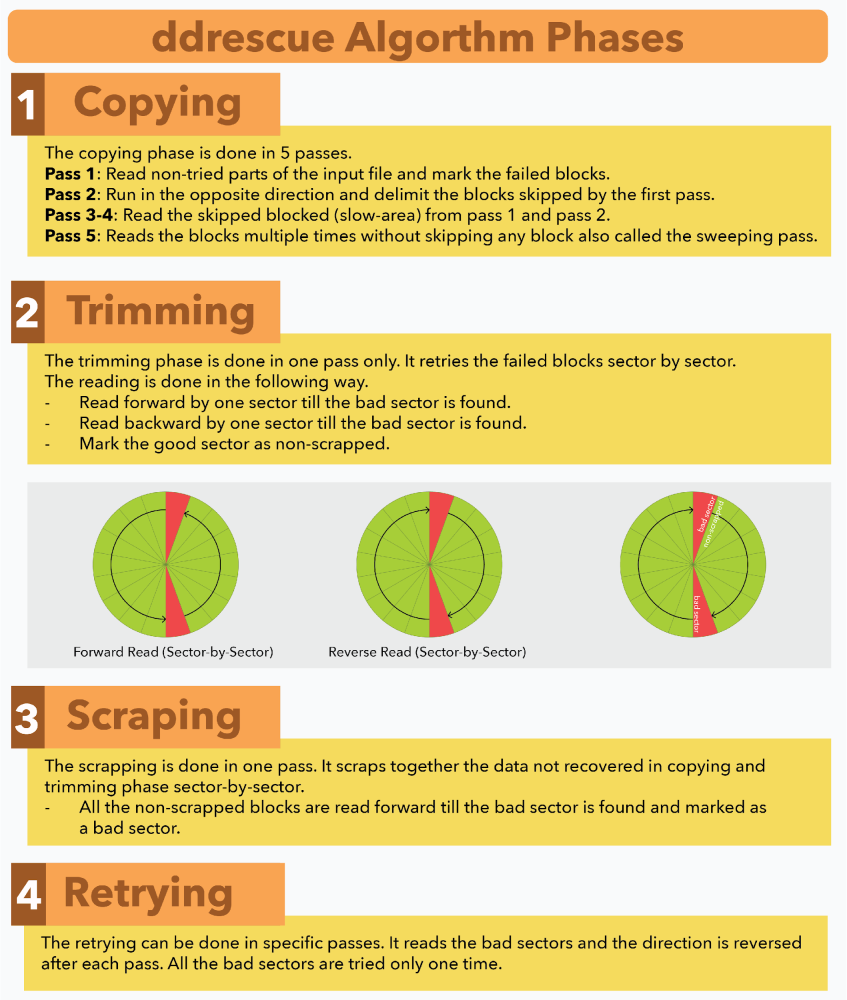
How ddrescue works
DDREASE uses a powerful recovery algorithm, which is divided into four stages:
1.Copy
2.Pruning
3.Scrape
4.Retry
The execution of the ddrescue algorithm is shown in the figure below.
in conclusion
ddrescue is a powerful recovery tool for recovering data from a damaged or faulty drive by copying it to another drive. It can be installed effortlessly on any Linux distribution with the help of the default package manager. Please note important considerations before using this tool mentioned in this guide. The process of copying data is simple, unmount the drive and use ddrescue command with source drive name and destination drive name. Don't forget to use the log file as it becomes very useful during the recovery process.
The above is the detailed content of Use ddrescue to recover data on Linux. For more information, please follow other related articles on the PHP Chinese website!

 Download Hidester VPN/Proxy to Access Your Favorite Content - MiniToolApr 22, 2025 am 12:50 AM
Learn about Hidester VPN and Hidester proxy and download Hidester VPN for Windows, Mac, Android, and iOS to use this VPN service to view websites with no limit. For more useful free computer tools and troubleshooting tips, you may visit php.cn Softwa
![Windows Keyboard Opening Shortcuts Instead of Typing [Fixed]](https://img.php.cn/upload/article/001/242/473/174525409770635.png?x-oss-process=image/resize,p_40) Windows Keyboard Opening Shortcuts Instead of Typing [Fixed]Apr 22, 2025 am 12:48 AM
Windows Keyboard Opening Shortcuts Instead of Typing [Fixed]Apr 22, 2025 am 12:48 AMHave you ever encountered the trouble of “Windows keyboard opening shortcuts instead of typing”? In this post from php.cn, you will learn how to fix this issue.
 Easy Ways to Add the Control Panel Icon to Desktop on Win 10 / 11Apr 22, 2025 am 12:46 AM
In this post, php.cn Software will introduce what Control Panel is and how to add the Control Panel icon to desktop on your Windows 10 or Windows 11 computer. You can also learn some related information about desktop icon settings.
 Granblue Fantasy Relink Save File Location & Backup Save DataApr 22, 2025 am 12:45 AM
If you play Granblue Fantasy: Relink on your PC, you may wonder where you can find its save file. In this post, php.cn introduces everything you want to know - Granblue Fantasy Relink save file location and how to back up the savegame of this game.
 How to Fix Event ID 1104: The Security Log Is Now Full? - MiniToolApr 22, 2025 am 12:44 AM
Event Viewer keeps track of activity for better management. However, if the upper limit of the security log is reached, no more events can be logged. In this post on php.cn Website, we will show you how to deal with Event ID 1104 the security log is
 Watch: How to Enable Secure Boot on Gigabyte Motherboard?Apr 22, 2025 am 12:43 AM
Secure Boot is a security standard that can prevent your computer from booting with untrustworthy software. Enabling it will add an extra layer of security to your device. In this post from php.cn Website, we will show you how to enable Secure Boot o
 Windows 11 23H2 Release Date: September 26, 2023 - MiniToolApr 22, 2025 am 12:42 AM
Coming to a new year, what Windows 11 users are looking forward to are not only the patch updates but also the annual major update for Windows 11. This post will talk about the Windows 11 23H2 release date. In addition, if you want to recover deleted
 How to Turn off Bixby on Samsung Phone? See a Guide! - MiniToolApr 22, 2025 am 12:41 AM
Can you completely disable Bixby? How to turn off Bixby on Samsung phones? It is not hard to disable this voice assistant. In this post from php.cn, we will go to any length to help you find the method. Besides, a way to turn off “Hi, Bixby” is also


Hot AI Tools

Undresser.AI Undress
AI-powered app for creating realistic nude photos

AI Clothes Remover
Online AI tool for removing clothes from photos.

Undress AI Tool
Undress images for free

Clothoff.io
AI clothes remover

Video Face Swap
Swap faces in any video effortlessly with our completely free AI face swap tool!

Hot Article
Hot Tools

SecLists
SecLists is the ultimate security tester's companion. It is a collection of various types of lists that are frequently used during security assessments, all in one place. SecLists helps make security testing more efficient and productive by conveniently providing all the lists a security tester might need. List types include usernames, passwords, URLs, fuzzing payloads, sensitive data patterns, web shells, and more. The tester can simply pull this repository onto a new test machine and he will have access to every type of list he needs.

DVWA
Damn Vulnerable Web App (DVWA) is a PHP/MySQL web application that is very vulnerable. Its main goals are to be an aid for security professionals to test their skills and tools in a legal environment, to help web developers better understand the process of securing web applications, and to help teachers/students teach/learn in a classroom environment Web application security. The goal of DVWA is to practice some of the most common web vulnerabilities through a simple and straightforward interface, with varying degrees of difficulty. Please note that this software

SAP NetWeaver Server Adapter for Eclipse
Integrate Eclipse with SAP NetWeaver application server.

MinGW - Minimalist GNU for Windows
This project is in the process of being migrated to osdn.net/projects/mingw, you can continue to follow us there. MinGW: A native Windows port of the GNU Compiler Collection (GCC), freely distributable import libraries and header files for building native Windows applications; includes extensions to the MSVC runtime to support C99 functionality. All MinGW software can run on 64-bit Windows platforms.

Safe Exam Browser
Safe Exam Browser is a secure browser environment for taking online exams securely. This software turns any computer into a secure workstation. It controls access to any utility and prevents students from using unauthorized resources.

