

How to install img from USB disk

php editor Xinyi teaches you how to use a USB flash drive to install the img system. Installing the img system on a USB flash drive allows you to quickly and easily deploy system images on different devices to improve work efficiency. Follow the editor's steps below to easily install the img system on a USB flash drive, making your work more convenient and faster.
php editor Xinyi teaches you how to use a U disk to install the img system. Installing the img system on a USB flash drive allows you to quickly and easily deploy system images on different devices to improve work efficiency. Follow the editor's steps below to easily install the img system on a USB flash drive, making your work more convenient and faster.
How to install Android system using USB flash drive?Android is a very good system. It is even cooler if you install it on a USB flash drive and carry it with you. It is plug and play.

Required tools: Free installation program: Phoenix Android System
 Write a program to enter the U disk:
 First, we need to install the Android system on the U disk. It is important to prepare a high-speed USB flash drive. It is recommended to use more than 16GB of storage space. Although 8GB can barely cope with it, there may be problems with lag or insufficient space during operation.
After opening the .exe file of Phoenix Android system, three options will appear, namely: "Install to hard disk", "Start Phoenix dual system" and "Exit". Selecting "Install to Hard Drive" means installing the Android system to the computer's hard drive, which will allow the computer to run Windows and Android dual systems at the same time, allowing the two systems to run independently of each other. In this way, users can switch systems at any time as needed and enjoy the convenience and functions brought by different operating systems.

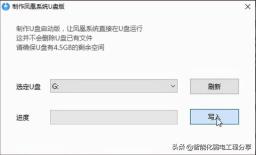
We are making a U disk version here, click "Make U disk version".

Next, we select the U disk and click "Write". At this time, the Android system starts to write the data to the U disk and it takes about 10 minutes to complete.
Restart the settings. After the writing is completed, we need to restart the computer and enter the U disk to boot and set up. How to boot from USB disk?

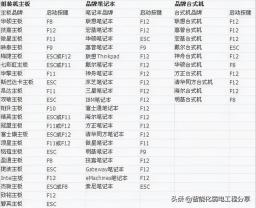
We restart the computer and hold down "F12" on the keyboard from the black screen to enter the BIOS settings (some computer keys are different, you can check the table below for details).
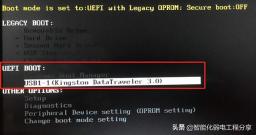
After entering the BIOS system, we can see an interface similar to the one below (different computers have slight differences). We need to select the UEFI U disk to boot and click Enter.
At this time, the waiting interface for Android system initialization will appear, as follows.
 Enter the system
After the system initialization is completed, we can enter the settings of the Phoenix Android system. Does it feel familiar? The operations are very similar to the Android system.

Select the language, connect to Wi-Fi, set the name, etc., and then you can officially enter the Android system.

This Android system looks a lot like Windows. The operations are very familiar to us, and there are no barriers to use.

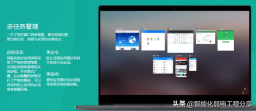
There is also a start menu that is very similar to Windows, and the installed applications are clear at a glance.
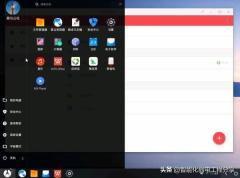
Due to the real background characteristics of Android itself, we can easily open multiple applications at the same time. In the picture below, we have opened three applications: WPS, Wandoujia, and QQ at the same time. QQ Or the one we just installed.

Finally, remember to shut down the computer before pulling out the USB flash drive, and you’re done.
The Phoenix system is divided into two versions according to the CPU architecture: tablet version (ARM version) and personal computer version (X86 version)
Tablet version (ARM version) is currently supported For the following tablets, the official has thoughtfully provided a flashing tutorial for your reference.
(http://www.phoenixos.com/download_arm)

The personal computer version (X86 version) can be installed on the hard disk on Windows, Linux, Mac and other system platforms or U disk installation (after installation, it is independent of the original system and does not affect it). The tools are relatively simple and can basically be done with one click. The official is also very considerate and has prepared installation tutorials for the corresponding platforms.
(http://www.phoenixos.com/help/installation)

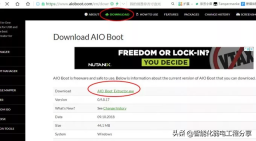
Latest Phoenix system ISO file
(Official download address: http:// www.phoenixos.com/download_x86)

Production tool: AIO Boot
(Official download address: https://www.aioboot.com/en/download/)
AIO Boot is a free self-starting U disk production software. You can use it to make self-starting U disks with multiple systems. It has extremely powerful functions, whether it is a windows system, a linux system, It supports winpe, Android-x86 systems and anti-virus software CDs.
3. A blank U disk with a capacity of at least 8G, preferably supporting USB3.0, so that the reading and writing speed is fast and the system runs smoothly.
Start making
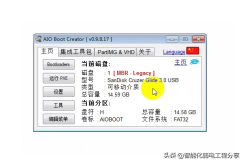
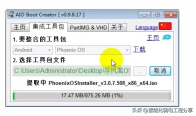
1. First plug the USB flash drive into the computer, and then run AIO Boot Extractor. Just click OK after setting as shown below. The program will automatically format the USB flash drive to Fat32, then install the startup file and wait 2-3 minutes.

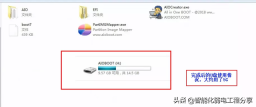
After the installation is completed, the AIO Boot Creator program will automatically start, as shown below, where you can see some basic information about the current U disk
3. Select the second option above Click the tab "Integrated Toolkit", select the corresponding Android - Phoenix OS, then select the prepared Phoenix system ISO file, and click OK.
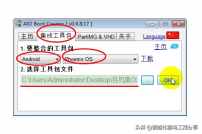
4. At this time, the following dialog box will pop up, asking you for the size of the file you want to create. This file can simply be thought of as the storage space of the Phoenix system in the USB flash drive, which is generally determined based on the size of your USB flash drive and personal use. What I chose here is the largest 4GB (Fat32 format only supports a single file of up to 4GB. Of course, you can customize a larger space. This requires another method, which I will introduce again when I have the opportunity)

Then enter the menu name. This is the name of the Phoenix system after booting from the USB disk. Generally, the default is fine. Click OK

and then wait quietly. First, extract it from the ISO. file, and then generate the data.img file (the storage space file mentioned above), which may take about 10 minutes.

Start the system
1. There is no need to remove the U disk, restart the computer, directly enter the startup item, and select the U disk to boot. (Some computers may need to enter the BIOS to set up a USB drive to boot). Different computer keys may be different, and they can all be found online. For my Asus notebook, F2 enters the BIOS and ESC enters the startup items; for the Lenovo notebook, Fn F2 enters the BIOS and Fn F12 enters the startup items; for Lenovo desktop computers, DEL enters the BIOS and ESC enters the startup items. You can refer to this.
As shown below, for the boot item, select the sandisk U disk option (both are acceptable)


Start entering the Phoenix system and initialize it It will take a few minutes.


Selfless dedication, please remember to follow, forward and collect, we will see you in the next issue!

The above is the detailed content of How to install img from USB disk. For more information, please follow other related articles on the PHP Chinese website!

![[Fixed] You Need to Authenticate Microsoft Services in Minecraft? - MiniTool](https://img.php.cn/upload/article/001/242/473/174568627523426.png?x-oss-process=image/resize,p_40) [Fixed] You Need to Authenticate Microsoft Services in Minecraft? - MiniToolApr 27, 2025 am 12:51 AM
[Fixed] You Need to Authenticate Microsoft Services in Minecraft? - MiniToolApr 27, 2025 am 12:51 AMIn this post, php.cn provides several effective solutions to the “you need to authenticate to Microsoft services” issue in Minecraft on the PC. If you get stuck in this issue, you should pay attention to this post.
 Top 4 Fixes for High Power Usage in Task ManagerApr 27, 2025 am 12:49 AM
In Task Manager, you can view how much power the processes on your computer use. What if you receive high power usage in Task Manager constantly? In this post from php.cn Website, we will explore how to address this issue easily and effectively.
 2 Windows Folders in C Drive: How to Deal with Them?Apr 27, 2025 am 12:48 AM
The Windows folder contains the Windows operating system and is a crucial folder in Windows computers. Sometimes, you may see 2 Windows folders in the C drive. How to delete one of them? This post from php.cn tells you how to do that.
 Top 4 Halo Infinite Trackers to Track KD, Stats, Ranks, and More! - MiniToolApr 27, 2025 am 12:47 AM
Many people are looking for a feasible Halo Infinite tracker. In this post, php.cn introduces several available Halo Infinite trackers to help you track the Halo Infinite KD, ranks, stats, etc. Now, keep on your reading.
 10 Best Google Sheets Add-ons You Must Have - MiniToolApr 27, 2025 am 12:46 AM
Have you ever heard of Google Sheets add-ons? Do you have any idea how to install them in your Google Sheets? Do you want to get the best and the free Google Sheets add-ons? This article on php.cn focuses on these questions and provides you with seve
 Enable/Disable Ctrl Alt Delete Secure Sign-In on Windows 11 - MiniToolApr 27, 2025 am 12:45 AM
Secure Sign-In is a handy way to keep your PC safe, but if you don't want it around, here's how to disable it for Windows 11. This post from php.cn provides 3 ways for you to enable or disable Ctrl Alt Delete secure sign-in on Windows 11.
 How to Fix Word Dictation Not Working Issue in Windows 10 - MiniToolApr 27, 2025 am 12:44 AM
Have you ever heard of Microsoft Word dictation? What if Word dictation not working? This post from php.cn shows you the basic information about Word dictation and some feasible ways to fix the “Word dictation not working” issue.
 What Is Atlas VPN? How to Free Download Atlas VPN for Use? - MiniToolApr 27, 2025 am 12:43 AM
What is Atlas VPN used for? Is Atlas VPN safe? Can you use Atlas VPN for free? How to download Atlas VPN & install it on your device for use? Refer to this post from php.cn and you can find details about this VPN service and Atlas VPN download fo


Hot AI Tools

Undresser.AI Undress
AI-powered app for creating realistic nude photos

AI Clothes Remover
Online AI tool for removing clothes from photos.

Undress AI Tool
Undress images for free

Clothoff.io
AI clothes remover

Video Face Swap
Swap faces in any video effortlessly with our completely free AI face swap tool!

Hot Article
Hot Tools

Atom editor mac version download
The most popular open source editor

SAP NetWeaver Server Adapter for Eclipse
Integrate Eclipse with SAP NetWeaver application server.

Dreamweaver Mac version
Visual web development tools

VSCode Windows 64-bit Download
A free and powerful IDE editor launched by Microsoft

WebStorm Mac version
Useful JavaScript development tools

