


php editor Baicao teaches you how to set an "open password" in PowerPoint to protect your slide content from being viewed by unauthorized people. Setting a password can effectively prevent others from viewing or modifying your presentation without permission, ensuring privacy and content security. Let’s take a look at the specific setup steps.
Setting method one:
After opening the PPT file, click the menu tab [File], then click [Information] → [Protect Presentation] → [Encrypt with Password];

After the [Encrypted Document] interface appears, set the password in the password column, click [OK] and enter it again. The "Open Password" for the PPT file will be set.

Setting method two:
First, click the PPT menu tab [File], and then click [Save As];

After the [Save As] interface appears, click [General Options] in the [Tools] drop-down list;

After the [General Options] interface appears, set the password in the [Open Permission Password] column, click [OK] and enter it again.

Because it is set through "Save As", after setting the password, you will be prompted whether to replace the original PPT. If you select "Yes", the "Open Password" will be set for the original PPT. If you select "No", you need to replace the PPT. Rename it, or change the directory where the file is saved, and save it as a new PPT.

Regardless of the above two methods, when you open the PPT file again, a dialog box will pop up, prompting you to enter a password to open the file.

If there is no need to password protect PPT in the future, how to cancel "Open Password"?
We only need to follow the operation process of setting the password, that is, click the menu tab [File] → [Information] → [Protect Presentation] → [Encrypt with Password]. After the [Encrypted Document] interface pops up, you can When you see a line of password in the password column, this is the originally set password. Delete this line of password and turn it into a blank space. After clicking [OK] and saving the file, the "Open Password" of PPT will be cancelled.

You can also cancel the "Open Password" of PPT through "Save As". Follow the set operation process and call up the [General Options] interface to see the originally set password. You can also delete the password and turn it into a blank space. After saving the file, you can cancel the "open password" of the PPT.

If you forget the "open password" of the PPT file, you cannot use the above method, because you need to open the PPT with the password first before you can perform the "cancel password" operation.
Forgot the "open password" of the PPT file, we can use the help of other tools.
For examplePepsi Niu PPT Password Recovery Tool, the [Retrieve Password] module in the tool can be used to retrieve the "open password" of PPT.

After clicking the [Retrieve Password] module, you can see that there are 4 retrieval methods provided. We only need to import the PPT file into the tool, then select the appropriate method and follow the prompts.

Then wait for the password to be retrieved.

The above is the detailed content of How to set "open password" in PowerPoint?. For more information, please follow other related articles on the PHP Chinese website!

 Time formatting in Excel: 12/24 hour, custom, defaultMay 07, 2025 am 10:42 AM
This tutorial explains the basics and beyond of the Excel time format. Microsoft Excel has a handful of time features and knowing them in depth can save you a lot of time. To leverage powerful time functions, it helps to know how Excel st
 Excel date functions - formula examples of DATE, TODAY, etc.May 07, 2025 am 09:03 AM
This is the final part of our Excel Date Tutorial that offers an overview of all Excel date functions, explains their basic uses and provides lots of formula examples. Microsoft Excel provides a ton of functions to work with dates and ti
 RAND and RANDBETWEEN functions to generate random numbers in ExcelMay 07, 2025 am 09:02 AM
The tutorial explains the specificities of the Excel random number generator algorithm and demonstrates how to use RAND and RANDBETWEEN functions to generate random numbers, dates, passwords and other text strings in Excel. Before we delv
 5 Excel Tips for Power UsersMay 07, 2025 am 12:55 AM
Excel efficiency improvement: Five practical tips to help you process tables quickly Even users who have been using Microsoft Excel for decades can always discover new techniques to improve efficiency. This article shares five practical Excel tips I have accumulated over the years to help you speed up your spreadsheet workflow. 1. No need to freeze the first line: Use Excel tables cleverly When working with Excel tables containing a lot of data, you may get used to freezing the first row through the View tab so that the header is always visible when scrolling. But in fact, if you format the data as an Excel table, you don't need this step. First, make sure that the first row of the data contains the column title. Then, select the data and click "Table" in the "Insert" tab. 2.
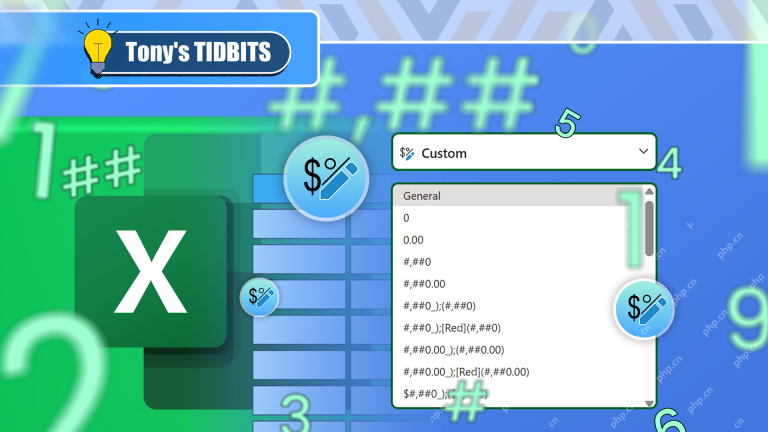 I Use Custom Number Formatting Instead of Conditional Formatting in ExcelMay 06, 2025 am 12:56 AM
Detailed explanation of custom number formats: Quickly create personalized number formats in Excel Excel provides a variety of data formatting tools, but sometimes built-in tools are not able to meet specific needs or are inefficient. At this point, custom digital formats can come in handy to quickly create digital formats that meet your needs. What is a custom number format and how it works? In Excel, each cell has its own number format, which you can view by selecting the cell and in the Number group on the Start tab of the ribbon. Related: Excel's 12 digital format options and their impact on data Adjust the number format of the cell to match its data type. You can click on the "Number Format" dialog launcher and then
 How to Use the CHOOSECOLS and CHOOSEROWS Functions in Excel to Extract DataMay 05, 2025 am 03:02 AM
Excel's CHOOSECOLS and CHOOSEROWS functions simplify extracting specific columns or rows from data, eliminating the need for nested formulas. Their dynamic nature ensures they adapt to dataset changes. CHOOSECOLS and CHOOSEROWS Syntax: These functio
 How to Use AI Function in Google SheetsMay 03, 2025 am 06:01 AM
Google Sheets' AI Function: A Powerful New Tool for Data Analysis Google Sheets now boasts a built-in AI function, powered by Gemini, eliminating the need for add-ons to leverage the power of language models directly within your spreadsheets. This f
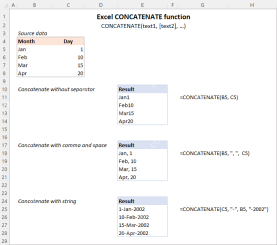 Excel CONCATENATE function to combine strings, cells, columnsApr 30, 2025 am 10:23 AM
This article explores various methods for combining text strings, numbers, and dates in Excel using the CONCATENATE function and the "&" operator. We'll cover formulas for joining individual cells, columns, and ranges, offering solutio


Hot AI Tools

Undresser.AI Undress
AI-powered app for creating realistic nude photos

AI Clothes Remover
Online AI tool for removing clothes from photos.

Undress AI Tool
Undress images for free

Clothoff.io
AI clothes remover

Video Face Swap
Swap faces in any video effortlessly with our completely free AI face swap tool!

Hot Article
Hot Tools

SublimeText3 English version
Recommended: Win version, supports code prompts!

EditPlus Chinese cracked version
Small size, syntax highlighting, does not support code prompt function

Safe Exam Browser
Safe Exam Browser is a secure browser environment for taking online exams securely. This software turns any computer into a secure workstation. It controls access to any utility and prevents students from using unauthorized resources.

MantisBT
Mantis is an easy-to-deploy web-based defect tracking tool designed to aid in product defect tracking. It requires PHP, MySQL and a web server. Check out our demo and hosting services.

Zend Studio 13.0.1
Powerful PHP integrated development environment

