


php editor Xiaoxin introduces to you how to create the virtual focus effect in PS. The defocus effect is a commonly used photo editing technique that can make photos more artistic and focused. In Photoshop, you can easily achieve a defocused effect by using features like filters and layer masks. Through the guidance of this article, you can learn how to create a defocused effect in PS to add more visual appeal to your photos.
PS method of adding a virtual focus effect to charactersRendering picture: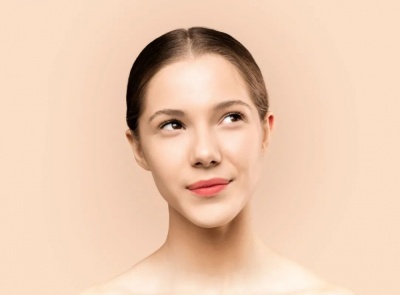
Type 1: Smart Object Gaussian Blur
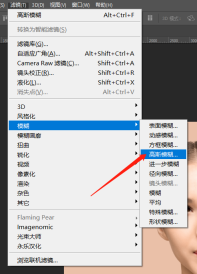
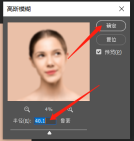
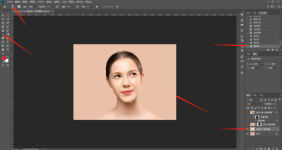
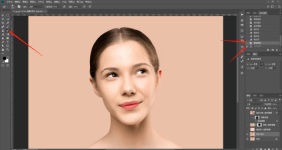
Step 1: Open the photo, press Ctal J to copy a layer, then right-click the copied layer and select "Convert to Smart Object". Execute Filter - Blur - Gaussian Blur, see if you need to set the pixels, here set 40 pixels, click OK.

Step 2: Select the gradient tool, double-click the gradient color, and the gradient editor panel will pop up , select the black and white gradient, and click OK. Then select the white frame in front of the smart filter, which is the Gaussian blur mask, use the gradient tool, select the radial gradient, press the , if the gradient is not in place at one time, you can use a brush with a soft edge (hardness of 0), set the foreground color to black, change the opacity and flow appropriately, select the Gaussian blur mask, and then apply on it until you feel that the effect is achieved. .


Type 2: Mask Gaussian Blur
Step 1: Still open the photo, copy one layer, and then Directly execute Filter-Blur-Gaussian Blur, here still set 40 pixels, click OK. Then use a brush with a soft edge (hardness 0), set the foreground color to black, change the opacity and flow to 50%, click the camera icon below on the layers panel, add a mask, and then paint with the set brush. Just smear it out if it doesn't need to be out of focus.


Type 3: Eraser Gaussian Blur
Step 1: Still the same as the second method, open Take the photo, copy a layer, perform Gaussian blur, 40 pixels, then use an eraser, set the hardness to 0, change the opacity and flow appropriately, and apply directly on the layer. If you make a mistake, just go back in the history.
Type 4: Selection Gaussian Blur
Step 1: Open the photo, copy a layer, select the Polygonal Lasso Tool, feather fill 50 pixels, and then Trace out the subject that needs to be highlighted (you can also use the Pen Tool, Quick Selection Tool, or Magic Wand Tool), and press Shift Ctrl i to invert the selection. Execute Filter - Blur - Gaussian Blur, fill in 40 pixels, click OK, and then press Ctrl D to cancel the selection. In this way, the effect of virtual focus comes out,


 ##Type 6: Lens blur
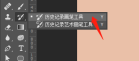
Step 1: Open the photo, copy a layer, then click the camera icon below the layers panel to add a mask, then use the gradient tool, select the radial gradient, select the gradient color from black to white, and then add a mask on the Pull the gradient, and the parts you want to highlight will be black. If the gradient cannot be drawn in some places, you can use a brush to paint them.

Step 2: Select the copied layer, execute Filter - Blur - Lens Blur, select the layer mask at the source of the lens blur interface, and blur the focus with 50, select six deformations for the shape, select 100 for the radius, click OK, and that's it.


Type 7: Fantasy Soft Focus - Color Filter Gaussian Blur Mask
Step 1: Copy 2 Layer the background photo, change the layer style of the top layer to Screen, then right-click the layer and select Merge Down to brighten the photo.

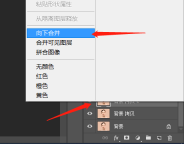
Step 2: Press Ctrl J to copy the layer merged in step 1, and change the layer style to Multiply. Then right-click on the layer and select Merge Down.


Step 3: Click the camera icon below on the layers panel, add a mask, then use a soft edge brush, and the foreground color is Black, appropriately reduce the opacity and flow. Where the smear needs to be highlighted, the opacity of the mask can also be adjusted according to the effect needs.

Complete:
PS There are many ways to achieve an effect. From the above 7 methods, To achieve virtual focus, you can consider three aspects: Gaussian blur, lens blur, and layer style combined with Gaussian blur. Interested students can practice it.
The editor brings you the tutorial content information on how to add a defocus effect to characters in PS. If your brothers and sisters want to know more about this game, please bookmark it and follow itthis siteMobile Game Internet Cafe!The above is the detailed content of How to create virtual focus effect in PS. For more information, please follow other related articles on the PHP Chinese website!

 Instagram Just Launched Its Version of CapCutApr 30, 2025 am 10:25 AM
Instagram officially launched the Edits video editing app to seize the mobile video editing market. The release has been three months since Instagram first announced the app, and two months after the original release date of Edits in February. Instagram challenges TikTok Instagram’s self-built video editor is of great significance. Instagram is no longer just an app to view photos and videos posted by individuals and companies: Instagram Reels is now its core feature. Short videos are popular all over the world (even LinkedIn has launched short video features), and Instagram is no exception
 Chess Lessons Are Coming to DuolingoApr 24, 2025 am 10:41 AM
Duolingo, renowned for its language-learning platform, is expanding its offerings! Later this month, iOS users will gain access to new chess lessons integrated seamlessly into the familiar Duolingo interface. The lessons, designed for beginners, wi
 Blue Check Verification Is Coming to BlueskyApr 24, 2025 am 10:17 AM
Bluesky Echoes Twitter's Past: Introducing Official Verification Bluesky, the decentralized social media platform, is mirroring Twitter's past by introducing an official verification process. This will supplement the existing self-verification optio
 Google Photos Now Lets You Convert Standard Photos to Ultra HDRApr 24, 2025 am 10:15 AM
Ultra HDR: Google Photos' New Image Enhancement Ultra HDR is a cutting-edge image format offering superior visual quality. Like standard HDR, it packs more data, resulting in brighter highlights, deeper shadows, and richer colors. The key differenc
 You Should Try Instagram's New 'Blend' Feature for a Custom Reels FeedApr 23, 2025 am 11:35 AM
Instagram and Spotify now offer personalized "Blend" features to enhance social sharing. Instagram's Blend, accessible only through the mobile app, creates custom daily Reels feeds for individual or group chats. Spotify's Blend mirrors th
 Instagram Is Using AI to Automatically Enroll Minors Into 'Teen Accounts'Apr 23, 2025 am 10:00 AM
Meta is cracking down on underage Instagram users. Following the introduction of "Teen Accounts" last year, featuring restrictions for users under 18, Meta has expanded these restrictions to Facebook and Messenger, and is now enhancing its
 Should I Use an Agent for Taobao?Apr 22, 2025 pm 12:04 PM
Navigating Taobao: Why a Taobao Agent Like BuckyDrop Is Essential for Global Shoppers The popularity of Taobao, a massive Chinese e-commerce platform, presents a challenge for non-Chinese speakers or those outside China. Language barriers, payment c
 How Can I Avoid Buying Fake Products On Taobao?Apr 22, 2025 pm 12:03 PM
Navigating the vast marketplace of Taobao requires vigilance against counterfeit goods. This article provides practical tips to help you identify and avoid fake products, ensuring a safe and satisfying shopping experience. Scrutinize Seller Feedbac


Hot AI Tools

Undresser.AI Undress
AI-powered app for creating realistic nude photos

AI Clothes Remover
Online AI tool for removing clothes from photos.

Undress AI Tool
Undress images for free

Clothoff.io
AI clothes remover

Video Face Swap
Swap faces in any video effortlessly with our completely free AI face swap tool!

Hot Article
Hot Tools

MantisBT
Mantis is an easy-to-deploy web-based defect tracking tool designed to aid in product defect tracking. It requires PHP, MySQL and a web server. Check out our demo and hosting services.

EditPlus Chinese cracked version
Small size, syntax highlighting, does not support code prompt function

SublimeText3 English version
Recommended: Win version, supports code prompts!

SublimeText3 Linux new version
SublimeText3 Linux latest version

Notepad++7.3.1
Easy-to-use and free code editor

