


How to wrap lines in Excel cells
In Excel, we often need to enter long text content in cells. If the text content is too long and exceeds the width of the cell, it will cause Text display is incomplete. In order to avoid this problem, we can manually wrap the text in the Excel cell so that the text displays on multiple lines. Below we will introduce several methods to achieve line wrapping in Excel cells.
Method 1: Use the ALT Enter key to wrap the line
At the position where you want to wrap the line, hold down the ALT key and press the Enter key at the same time. This will insert a newline character at that position and the text will start on the next line. This method is suitable for situations where the cell content is relatively simple. If there is a lot of content in the cell, you may need to frequently use the ALT Enter key to add multiple line breaks.
Method 2: Use the automatic word wrap function
In the Excel toolbar, you can find a button with an icon similar to a text box. This button is the "Line Wrap" button. Select the cell that needs to be wrapped and click this button to enable the automatic word wrapping function in the cell. When automatic word wrapping is enabled, the text will be automatically wrapped and displayed within the cell, and there is no need to manually add line breaks.
Method 3: Use functions to wrap lines
In addition to manually entering line breaks or enabling the automatic line wrap function, we can also use functions to wrap lines within cells. At the position where a line break is required, enter the function CHAR(10). The CHAR function is a character function used to convert numbers into corresponding characters, and the character corresponding to the number 10 is a newline character.
For example, assume that in cell A1, we need to enter text that wraps. You can enter the following content in cell A1:
"First row" & CHAR(10) & "Second row"
In this way, the text will be in the two rows of cell A1 show. Simply replace the corresponding text content and cell position to achieve line wrapping in other cells.
It should be noted that when using this function for line wrapping, you need to ensure that the row height of the cell is high enough to fully display the text content after line wrapping.
To sum up, the above are several ways to wrap lines in Excel cells. By using the ALT Enter key, enabling the automatic line wrapping function, or using functions to wrap lines, we can easily adjust the text display format according to actual needs to make the text content clearer and easier to read.
The above is the detailed content of How to wrap text within cells in Excel. For more information, please follow other related articles on the PHP Chinese website!

 How to use SUMIF function in Excel with formula examplesMay 13, 2025 am 10:53 AM
This tutorial explains the Excel SUMIF function in plain English. The main focus is on real-life formula examples with all kinds of criteria including text, numbers, dates, wildcards, blanks and non-blanks. Microsoft Excel has a handful o
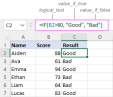 IF function in Excel: formula examples for text, numbers, dates, blanksMay 13, 2025 am 10:50 AM
In this article, you will learn how to build an Excel IF statement for different types of values as well as how to create multiple IF statements. IF is one of the most popular and useful functions in Excel. Generally, you use an IF statem
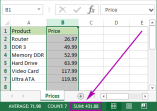 How to sum a column in Excel - 5 easy waysMay 13, 2025 am 09:53 AM
This tutorial shows how to sum a column in Excel 2010 - 2016. Try out 5 different ways to total columns: find the sum of the selected cells on the Status bar, use AutoSum in Excel to sum all or only filtered cells, employ the SUM function
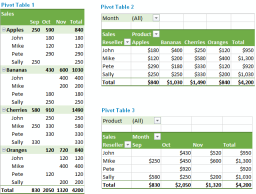 How to make and use Pivot Table in ExcelMay 13, 2025 am 09:36 AM
In this tutorial you will learn what a PivotTable is, find a number of examples showing how to create and use Pivot Tables in all version of Excel 365 through Excel 2007. If you are working with large data sets in Excel, Pivot Table comes
 Excel SUMIFS and SUMIF with multiple criteria – formula examplesMay 13, 2025 am 09:05 AM
This tutorial explains the difference between the SUMIF and SUMIFS functions in terms of their syntax and usage, and provides a number of formula examples to sum values with multiple AND / OR criteria in Excel 365, 2021, 2019, 2016, 2013,
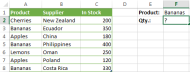
 How You Can Use Wildcards in Microsoft Excel to Refine Your SearchMay 13, 2025 am 01:59 AM
Excel wildcards: a powerful tool for efficient search and filtering This article will dive into the power of wildcards in Microsoft Excel, including their application in search, formulas, and filters, and some details to note. Wildcards allow you to perform fuzzy matching, making it more flexible to find and process data. *Wildcards: asterisks () and question marks (?)** Excel mainly uses two wildcards: asterisk (*) and question mark (?). *Asterisk (): Any number of characters** The asterisk represents any number of characters, including zero characters. For example: *OK* Match the cell containing "OK", "OK&q
 Excel IF function with multiple conditionsMay 12, 2025 am 11:02 AM
The tutorial shows how to create multiple IF statements in Excel with AND as well as OR logic. Also, you will learn how to use IF together with other Excel functions. In the first part of our Excel IF tutorial, we looked at how to constru
 How to calculate percentage in Excel - formula examplesMay 12, 2025 am 10:28 AM
In this tutorial, you will lean a quick way to calculate percentages in Excel, find the basic percentage formula and a few more formulas for calculating percentage increase, percent of total and more. Calculating percentage is useful in m


Hot AI Tools

Undresser.AI Undress
AI-powered app for creating realistic nude photos

AI Clothes Remover
Online AI tool for removing clothes from photos.

Undress AI Tool
Undress images for free

Clothoff.io
AI clothes remover

Video Face Swap
Swap faces in any video effortlessly with our completely free AI face swap tool!

Hot Article
Hot Tools

SAP NetWeaver Server Adapter for Eclipse
Integrate Eclipse with SAP NetWeaver application server.

MinGW - Minimalist GNU for Windows
This project is in the process of being migrated to osdn.net/projects/mingw, you can continue to follow us there. MinGW: A native Windows port of the GNU Compiler Collection (GCC), freely distributable import libraries and header files for building native Windows applications; includes extensions to the MSVC runtime to support C99 functionality. All MinGW software can run on 64-bit Windows platforms.

Zend Studio 13.0.1
Powerful PHP integrated development environment

ZendStudio 13.5.1 Mac
Powerful PHP integrated development environment

mPDF
mPDF is a PHP library that can generate PDF files from UTF-8 encoded HTML. The original author, Ian Back, wrote mPDF to output PDF files "on the fly" from his website and handle different languages. It is slower than original scripts like HTML2FPDF and produces larger files when using Unicode fonts, but supports CSS styles etc. and has a lot of enhancements. Supports almost all languages, including RTL (Arabic and Hebrew) and CJK (Chinese, Japanese and Korean). Supports nested block-level elements (such as P, DIV),

